You can purchase several versions of similar books on the maintenance and repair of Lada Granta. Each of the three books covers 8- and 16-valve engines, with different transmissions: manual transmission, automatic transmission and robotic manual transmission. Both sedan (2190) and liftback (2191). The books are quite voluminous! The books present in detail various malfunctions and methods for eliminating them, namely step-by-step repairs.
The first option is from the publishing house "World of Autobooks", the series "I repair it myself." Book on operation, maintenance and repair of Lada Granta. 2015 edition. Pages: 240. Paper: newsprint. Printing: offset. Apparently, due to the mediocre quality of the paper, all electrical circuits, photographs and drawings do not have very good clarity and sharpness.
The second option is from the publishing house “Third Rome”, series “Repair without problems”. Book on maintenance and repair of Lada Grants, 2016 edition. Pages: 328. Paper: offset. Printing: offset.
Due to the high quality of the paper, the pages are denser, glossy to the touch, and all images are perfectly readable. There is also an abundance of explanatory miniature photographs illustrating each step.
The third option - the same as the first - is from the publishing house "World of Autobooks", the series "I repair it myself." Also - Book on operation, maintenance and repair of Lada Granta. 2016 edition. Pages: 336. Paper: newsprint. Printing: offset. The quality of the accompanying photographs and drawings is not excellent, but everything is visible, distinguishable and understandable. It is important. But the main thing that distinguishes this particular book from the first two options is the presence in it of a catalog of parts with original VAZ numbers, on 94 pages, at the end.
List of works in maintenance
The number and list of maintenance work for this model depends on the type of maintenance and mileage. In this case, the following operations are mandatory:
- Replacing engine oil and oil filter;
- Replacement of technical fluids and consumables;
- Checking the tightness of bolts and fasteners;
- Diagnostics of electrical equipment;
- Suspension check;
- Troubleshooting or servicing the brake system;
- Fuel system diagnostics;
- Inspection of the condition of the body and paintwork;
- Checking or servicing the gearbox and other work.
The number of works may depend on the technical condition of the car and the characteristics of its operation. The need for additional procedures is identified during diagnostics during maintenance or based on owner complaints. In order to identify and eliminate all problems in a timely manner, it is recommended to carry out scheduled maintenance of the Lada Grant only at an authorized dealer.
Body and interior
- Body and interior (vehicle controls)
- Removing the instrument panel
- Removing the central dashboard trim
- Removing the headliner
- Removing the inner door handle
- Removing the outside door handle
- Removing the door trim
- Removing the trunk lid
- Removing the switch with the trunk lock cylinder
- Removing the lock from the trunk lid
- Removing the trim above the hood, in front of the windshield
- Removing and installing the hood
- Front and rear bumper, removal and installation
- Removing and installing the radiator grille
- Removing, installing, adjusting the hood lock
- Side and rear view mirrors
- Car keys (for various trim levels)
- Control unit for mirrors and door locking on the driver's door
- Doors and controls on them
- Front and rear seats, adjustment and description
- Removing mudguards and arch protection of the Lada Granta
- Removing and installing the front fender
DIY common rail injector repair
Why undergo MOT?
Scheduled maintenance of the LADA Granta should be carried out regularly, not only while the car is new and under warranty due to the risk of loss. It is necessary for long-term maintenance of the car in working condition and ensuring safety on the road.
Compliance with the deadlines for routine maintenance and performing them to the recommended extent can prevent many malfunctions and avoid costly repairs. It is advisable to undergo maintenance only at official service stations, since they have all the necessary diagnostic and other equipment certified by the manufacturer. And dealership specialists are familiar with all the features of the model and its operation.
Passing periods
The frequency of regular maintenance is prescribed by the manufacturer in the vehicle operating instructions. It is not recommended to deviate from these deadlines in order to avoid unexpected malfunctions and other problems. According to AvtoVAZ recommendations, the maintenance schedules are as follows:
- TO-0 (for modifications with an 8-valve engine) – 2000-3000 kilometers;
- TO-1 - at a mileage of 14,500-15,000 km or after one year of operation, if the car is rarely used;
- TO-2 – mileage 29,500-30,500 kilometers or after 2 years;
- TO-3 - performed at a mileage of 44,500-45,500 km or three years after the sale of a new car;
- TO-4 - done at a mileage of 59,500-60,500 kilometers or after four years of use;
- TO-5 – mileage 74500-75500 km or after 5 years;
- TO-6 - at a mileage of 89,500-90,500 kilometers or after 6 years of operation;
- TO-7 must be carried out at a mileage of 104,500-105,500 km or after 7 years.
After the end of the warranty period, it is advisable to perform maintenance every 15,000 kilometers. During the warranty period, it is recommended to undergo maintenance at dealer service centers to avoid its loss. In addition, this will allow you to diagnose and eliminate many faults in a timely manner.
Features of Lada Granta maintenance
The official regulations for Lada Granta maintenance are similar to the recommendations for scheduled maintenance of most modern car models. It was developed by AvtoVAZ specialists. Compliance with it is a guarantee of long-term and trouble-free operation of the car.
Zero maintenance is mandatory for modifications equipped with an 8-valve engine. For cars with a 16-valve engine since 2013, this type of maintenance is recommended. Therefore, it can be completed at the request of the car owner and at his expense at dealership car centers.
The price of regular maintenance depends on the type of maintenance and mileage of the car, as well as its technical condition and the need for additional operations. The cost of spare parts may change annually. The price of parts and labor is affected by the service region and the type of service station (dealer or not).
Dashboard lighting for VAZ 2107: what lamps are needed and how to replace them
In order to replace the lamps in the lighting fixtures of your car, it is not at all necessary to go to a service station and pay a highly qualified specialist. All operations can be done independently with minimal effort and money. Today we will talk about replacing light bulbs in the dashboard (DP) of a VAZ 2107 car.
Location of lamps on the instrument panel of the VAZ 2107
Before we start replacing the light bulbs, let’s see where they are located on the PCB board and what the VAZ 2107 is responsible for illuminating or indicating.
- Fuel level.
- Instrument lighting.
- The direction indicators are on.
- Engine control controller malfunction.
- Exterior lighting is on.
- Emergency oil pressure.
- The parking (hand) brake is on.
- High beam headlights are on.
- Battery charge indicator lamp.
Removing the instrument panel and preparing for replacement
To change the lamps in the instrument panel, the latter will have to be removed. It cannot be said that the PP can be removed with one movement of the hand: the designers of the VAZ 2107 made dismantling a little more difficult than on other cars of the VAZ family. Nevertheless, dismantling the PP is quite feasible in a garage or even a parking lot. In this case, the operation does not require any special knowledge. The tools we will need are:
- small flat screwdriver or knife;
- crosshead screwdriver.
I think all this will be found in the trunk of any VAZ 2107, and we can get started. First of all, we remove the plastic handles from the heating control knobs by prying them off with a flat screwdriver.
Removing the handles from the interior heating system of the seven. We unscrew the nut securing the daily counter reset button (marked with a red arrow), and push the button itself inside the shield.
Now you need to unscrew the screw that is located under the plug and secures the decorative trim. Remove the plug using a flat-head screwdriver and unscrew the Phillips screw.
After this operation, the right side of the panel will move away so that you can get to the flexible speedometer control shaft.
The shaft is removed with bare hands: simply unscrew the nut securing it.
Now remove the instrument panel from the clamp that secures its left side and pull it out slightly to get to the vacuum hose connected to the econometer. It can also be removed with bare hands, but be careful not to tear it.
It remains to disconnect the three power connectors of the instrument panel and the three wires on the VAZ 2107 heater switch. Before disconnecting, it is advisable to mark them so as not to confuse them when assembling the panel.
We remove the decorative trim along with the PP and unscrew the four self-tapping screws securing the shelves (two on each, I marked them with red arrows) to the decorative trim, and the instrument panel can be removed.
What kind of lamps are needed?
Before disassembling your VAZ, it makes sense to drive it to the nearest auto store and stock up on new light bulbs. But which ones to buy? Judging by the first photo, the backlight and indication lamps have different sizes. The choice is simple: if the backlight bulbs have burned out (position 2 in the same photo), then you will need AMN 12-3-1 (T3W) bulbs. If they are indicator ones, then A 12-1.2 (Wl.2).
You can purchase backlight lamps for VAZ either together with sockets or separately. In the second case, the burnt out light bulb must be removed from the socket and a new one installed in its place.
Dashboard illumination lamp VAZ 2107 with and without socket included
LED light bulbs
If you are tired of changing light bulbs in the power supply of your VAZ or are just a fan of modern tuning, then you can install LED light bulbs instead of incandescent ones, since the industry also produces those that have the same standard size, base, socket and operating voltage.
LED lights for the dashboard illumination (left) and indication for the VAZ 2107 car
Important! The battery charge indicator lamp cannot be changed to LED - the battery will not be charged properly
Replacing warning lamps and backlight bulbs
We lay the VAZ 2103 dashboard on a smooth soft surface face down and see the backlight and indication lights (see the very first photo).
I hope that before removing the dashboard, you found out which bulbs burned out and, using the recommendations above, purchased new ones of the right type.
As I already indicated above, backlight lamps can be sold both with sockets, ready for installation, and without them.
What is 0 TO?
Zero maintenance is only required for vehicles with an 8-valve powertrain. For cars with a 16-valve engine, this can only be done at the request of the owner. But many car enthusiasts, especially those with experience in using old models of domestic cars, still go through it for their own peace of mind. TO-0 is carried out at a mileage of 2000-3000 km and usually includes:
- Changing the engine oil and installing a new oil filter;
- Pulling bolts and fasteners;
- Adjusting engine valves and some other work if necessary.
This maintenance is carried out with a note in the service book only for those cars for which it is mandatory. For everyone else, such an entry is not made. Therefore, owners of cars with a 16-valve power plant may not perform TO-0 at all or do it themselves. In other cases, it is advisable to contact the service of an official dealer of the brand.
Priora: how to remove the panel?
1) On the back of the dashboard, unscrew the 4 screws (asterisk). 2) Remove the glass from the instrument panel.
3) Place molar tape on the pad and mark the position of the arrows with marks. All instrument panels are calibrated, this procedure will help us accurately set the position of the needles during assembly.
4) Remove the arrows. The arrows must be pulled perpendicularly upward, while simultaneously scrolling them against the direction of travel.5) Remove the standard lens
6) Remove the metal screen holder. On the back of the instrument panel, we unsnap the metal latches of the screen.
We separate the white plastic from the green base and get the following.
9) In order for our scale to glow with the color we need, it is necessary to erase the green filter from it; this is done using cotton swabs, solvent or alcohol (do not use acetone). If desired, the red divisions can be left. After this procedure we get a clean pad.
10) A similar procedure must be done with the screen diffuser.
11) It is necessary to enlarge (drill out) the holes in the plastic light diffuser and paint their inner edges black (a black marker is suitable for this), this is necessary in order to install wells for illuminating the arrows. The light of the arrows will thus not illuminate the main scale.
Wells are made from any plastic tube (syringe), adjusted in diameter as shown in the photo, or thick paper folded in several layers and wrapped in black tape.
13) We begin to install the boards themselves, to do this we solder the wires according to the following diagram: a) In the version without soft ignition, you need to solder 2 wires: GND from the backlight board to 19 (ground) contact of the instrument panel, IG from the backlight board to 18 (light control ) instrument panel contact.
b) In the version with soft ignition, it is necessary to solder 3 wires: GND from the backlight board to 19 (ground) contact of the instrument panel, IG from the backlight board to 21 (ignition) contact of the instrument panel and ILL from the backlight board to 7 (dimensions) contact of the instrument panel .
If you installed a version without soft ignition, then there is always the opportunity to modify the board by installing a soft ignition unit on it.
When the negative wire is connected to the -CH1 pad, the screen will light up simultaneously with the arrows; when the negative wire is connected to the -CH2 pad, the screen will light up along with the scales (applies to boards with a soft ignition unit installed).
On the reverse side we glue the adjustment buttons of the smooth ignition unit onto double-sided tape.
14) We install our wells, fixing them if necessary with a drop of glue, and install the standard light diffuser in place.
If you want to install sound insulation in your Lada Priora or tune the interior, to do this you will first have to dismantle its dashboard.
You can do this yourself if you follow our instructions.
What problems does Lada Granta have?
The Lada Granta car is recognized as reliable, unpretentious and perfectly adapted to Russian operating conditions. But, despite this, some of its owners encounter certain problems even during the period of the factory warranty. Typically, these include the following problems:
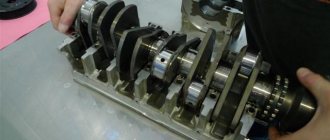
- Broken timing belt at low mileage;
- Failure of the ignition coil;
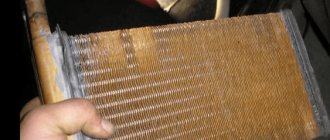
- Thermostat failure;
- Manual transmission howl;
- Oil leakage through gearbox seals;
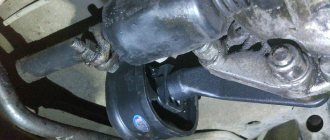
- Damage to shock absorbers;
- Malfunctions of ball joints;
- Unreliable wheel bearings;
- Formation of scratches on glass;
- Low generator bearing life;
- Chips and scratches on the paintwork.
Many of these deficiencies can often be corrected by the dealer under warranty if it is determined that they were not the owner's fault. In all other cases, repairs are possible only at your own expense. To prevent such problems, experts advise following the car manufacturer’s recommendations for car maintenance and operation, performing scheduled maintenance in a timely manner and contacting dealer service stations at the slightest sign of breakdown. This will help avoid problems during short mileage and costly major repairs in the future.
The official dealer of the brand in Moscow, the TECHINKOM car dealership, offers regular maintenance and repairs of any complexity for the Lada Granta at prices and technologies recommended by the manufacturers. You can make an appointment with us for diagnostics and maintenance or find out the cost of the work by calling the phone number indicated on the website. You can also leave a request for a call back on the website. Our employees will contact you as soon as possible!
Correct diagnosis of the problem
First you need to conduct a high-quality diagnosis of vehicle malfunctions. However, it is unlikely that a club of simple “fret workers” has expensive equipment for this in the garage. To buy such a diagnostic device, you will have to spend a lot of money. And is it worth it? Most motorists draw conclusions based on their own feelings and observations of their car. Of course, such a superficial analysis cannot give the most accurate verdict, but by consulting a repair book, you can quite accurately determine the type of the majority without resorting to the expensive services of a service station.
For example, in this book you will find signs of engine malfunctions and other elements of the power system. If you notice a strong noise when the starter is operating, popping noises in the intake pipe, shots in the muffler, strong engine vibration or increased oil consumption, then the above book will indicate the first causes of these problems, as well as provide tips that will help correct these breakdowns.
In this unique guide you will find answers and tips to many questions. For example, the crankshaft does not turn with the starter, the engine is running unstably, the unit is overheating - all these and many other problems will be indicated in the reference book.
You will find descriptions and solutions to problems related to the vehicle's chassis, transmission, steering and braking system. The clutch slips, knocks when the suspension operates, noise when changing gears, vibrations when the car is moving, oil leaks - this is a short list of the problems that are described in the book.