How to remove the steering wheel from LADA Kalina
When the steering wheel on a Kalina sticks, you need to disconnect the negative terminal of the battery and wait approximately 10 minutes for the airbag activation capacitor to discharge. The two latches and cushion latches should be released.
There are holes on the sides of the steering wheel. If the steering wheel was not removed, they are sealed. After removing the seal, use a flat tool to find a stop with a spring in the vacated gap. Squeeze the latch with one hand and pull the pillow toward you with the other until it clicks. If the pillow does not return to its place, the latch has become loose. Do the same on the other side.
The released cushion should move slightly. A pair of audio signal wires are disconnected, using a flat object, maybe a knife, and prying a small yellowish latch from the orange connector of the pillow. It is moved forward, the connector is removed, the pillow is released and set aside.
Then you need to find the small arrow on the shaft and make a mark opposite it for the correct orientation of the steering wheel. Loosen the steering wheel nut, but do not twist it all the way, throw approximately two turns. Using the method of swinging towards yourself, tighten the steering wheel until it stops against the nut. Align the wheels of the machine and achieve straight installation of the steering wheel. Pull out the pin, connect the marks and stick it into the switch block under the steering wheel.
Under no circumstances should you allow the steering wheel to move; otherwise, you can break it together with the base of the block and unscrew the nut. Pull out the wires through the outlet and remove the steering wheel on Kalina.
It’s now clear how to remove the steering wheel. During assembly, all actions are performed in reverse order. We should not forget about the little things that are so important for proper installation of the steering wheel.
How to remove the steering wheel on a Priora and Kalina with an airbag
Removing the steering wheel of Grants, Kalinas 2
I decided to share with you detailed instructions for this procedure. It seems like there is nothing complicated here, but there are several points that I came across after reading various manuals on the Internet. As a result, the mistakes I made hit me pretty hard. Namely, I had to change the block of steering column switches. And it costs not much, not little: 1100 - 1300 rubles.
So let's get started. We carry out everything strictly point by point:
1. Disconnect the negative terminal of the battery. After this, you must wait at least 10 minutes. in order for the airbag activator capacitor to discharge. Remove the terminal and wait 10 minutes. !MANDATORY!, if you don’t want to have the consequences of a deployed airbag.
2. You need to release two airbag latches. They are held in place by two spring clips.
In order to compress them, there are two holes on the steering wheel. They are located on the sides of the steering wheel. If the steering wheel has not been removed before, these holes will be sealed (something like a seal).
These “seals” need to be pierced. You can do this carefully with a Phillips screwdriver. Next, take a flat-head screwdriver. We push it into the hole and feel for the spring-loaded stop.
With one hand we squeeze the latch, with the other hand we pull the pillow towards us from the side until it clicks. If, after releasing the screwdriver, the pillow itself does not sit in place, then the latch has been successfully released. The same thing needs to be repeated on the other side, while simultaneously supporting the first side, because it may snap again. 3. After this, you need to remove the lower additional mountings of the pillow. (shown in the photo of the airbag above) The fastenings in the fit are quite tight. You can pull them out only by firmly pulling the pillow towards you from below.
Pay attention here! ATTENTION ! to the following: Without calculating, I pulled the pillow towards me and it abruptly jumped out of the additional fastenings. The wire from the airbag is short, and the L-shaped connector of the airbag shattered due to a strong jerk and tension. It is of such a shape and material that it shatters into pieces from any unnecessary effort. Inside it are not just terminals, but also some kind of inductor (like a coil). This piece of wiring with connectors is not sold separately. Only together with the steering column switch block. So take all of the above into account and don’t repeat the mistakes of others. Do everything carefully and slowly. 4. Having freed the Pillow from all fastenings, carefully move it away from the steering wheel.
Disconnect the two horn wires. Then take a thin flathead screwdriver or knife. Pry the small yellow clip on the orange connector of the pillow. He should move forward a little. Next, remove the connector and set the pillow aside. This will open up:
5. For the correct orientation of the steering wheel, during its subsequent installation, it is necessary to make a mark. Take a core with a hammer or a marker. We make a mark on the shaft exactly opposite the arrow.
Perform further actions in strict sequence so as not to break the latch of the steering column switch block, and the block itself.
6. Use a 24mm socket wrench to loosen the steering wheel nut. Do not unscrew it all the way. Leave it twisted a couple of turns. 7. By rocking the steering wheel to the sides and pulling towards you, pull it out of the seat. It will rest against the nut. 8. Align the car wheels and set the steering wheel straight. 9. Remove the latch from the pocket. Aligning the marks, insert the lock into the block of steering column switches, as shown in the photo.
10. Without any movement of the steering wheel, unscrew the nut completely. ! IMPORTANT! If you move the steering wheel with the red lock, it will break it with the roots of the steering column switch block.
We take out the steering wheel, passing the wiring through the hole.
We perform the assembly in the reverse order, paying attention to the important nuances that I indicated earlier.
Causes of knocking and creaking steering wheel
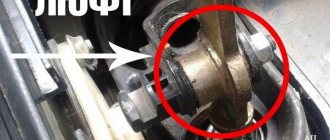
The first reason may be a worn ball joint. It should be replaced. A rupture of the support will result in the impossibility of the upcoming movement due to the wheel being twisted inward or outward. A tow truck will be needed.
The lemon valve may also be faulty. The load is applied to the right grenade when the steering wheel is turned to the left, and vice versa.
The control rack is faulty. There is kickback and the steering wheel bites. It is necessary to carry out diagnostics at 100, tighten the rack fastenings or replace it.
If the Kalina are very worn, you should use silicone for lubrication, then the noise will disappear.
If the crankcase guard mounting bolts are loose, they must be tightened. If the thread breaks, the bolt should be replaced.
The knocking noise may appear after changing a wheel. If the bolts are loose, they need to be tightened with a certain amount of force. If this is not done, vibration will be added to the knocking.
If the spring has burst or cracked, it will need to be replaced.
The springs are leaking or worn out, they cannot support the load when turning the steering wheel to the right or to the left, they sag with a crash under the weight of the car - carry out diagnostics or replace spare parts.
How to remove the steering wheel on Kalina without a cushion
Very often, when turning the steering wheel on a LADA Kalina , you hear a knock, creaking or the steering wheel bites. The driver hears the sounds all the time or they appear after the car has been parked for a long time.
Extraneous noise may appear even if the driver constantly looks after his vehicle and promptly replaces outdated parts with new ones. Such phenomena should be taken especially seriously and an attempt should be made to identify their cause, since they may indicate severe defects in the machine mechanism. Working parts of cars often need repairs because they become unusable and must be replaced with new ones.
What kind of gearbox cushions are there on Kalina?
These parts are different, and we are not talking about airbags. The first thing that comes to mind is the gearbox support cushion. They are hydraulic and rubber-metal.
Kalina has a large number of such parts installed. These are engine mount cushions that reduce vibration from the power unit. There is a rubber suspension cushion for the muffler resonator. It serves to get rid of extraneous knocks from the exhaust system.
Kalina gearbox cushion
The Kalina is equipped with rubber-metal gearbox support cushions. This is a simple design consisting of two plates (metal), with rubber located between them. Classic rubber is fading into the background, so more wear-resistant polyurethane is actively used. It’s easy to guess why most car enthusiasts install this type of support.
The supports serve to reduce vibration that occurs as a result of the operation of the power unit and suppress extraneous noise, as well as to secure the gearbox to the body.
Replacing the ball joint
- wrenches 17, 19;
- hammer;
- mount;
- puller;
- head for 12.
The car is put on the handbrake, the bolts of the wheel from which the ball joint will be removed are loosened. Using a jack, the front part of the LADA Kalina is raised, the bolts and wheel are removed. Use a 19 wrench to unscrew the ball pin nut. Insert the puller and twist to release the support pin.
The support fastening bolts are removed using a 12mm socket. The lever is pressed, the support is released and removed. There is also another method for dismantling the ball joint: the brake disc is placed on a rigged brick, the jack is lowered slightly to unload the lever. At this moment the stand rises up, the ball is released.
A new support requires a huge amount of lubricant. The pin is put in place, the nut is tightened with a torque of 66-82 Nm. If the holes of the steering knuckle and the support coincide, the bolts are tightened. The procedure requires patience and great effort.
Removing the steering rack from the car
The rear wheels are fixed by rolling back, the front wheels are lifted with a jack. Inside the car, on the driver's seat side, unscrew the bolt of the splined connection of the column. The difficulty in disconnecting is that it is located where the pedals are grouped.
After removing the front wheels, the cam nuts are removed and the space under the hood is prepared. The terminals from the battery and the battery itself, together with the mounting plane and the thermal reflector, are removed. The body mount of the rack is removed with a nut, it is released and placed on a flat surface for future work with it.
Diagnostics for the presence of free play is carried out as follows: the rack casing is clamped in a vice and swung with force from side to side. There is a feeling of free movement - you need to try to tighten the spring nut by less than 10 degrees. Check the free play again, and so on until the problem is eliminated. Tightening is prohibited, because the steering wheel will become very difficult to rotate, even if an electronic amplifier is installed.
Some drivers have learned to make adjustments without removing the rack. This method helps save time and effort. To perform this type of work, the car is placed in a pit and the location of the part is determined in the front part. The spare part is pulled clockwise if you can only get to it from below. If you can feel it from above, then the tightening goes counterclockwise. Actions are carried out in the sequence described a little higher.
It is necessary to keep in mind that replacement does not always solve the problem; the rack continues to make noise and squeak when turning the steering wheel. In order to double the service life of the control rack of a machine with hydraulic booster, constant oil monitoring, checking the technical condition of the control rod boots and their timely replacement are important.
READ Replacing the ZMZ 409 generator belt
The control rack does not like movement without braking in the deepest holes. The steering wheel does not need to be turned all the way so as not to create excessive pressure in the hydraulic booster, otherwise the seals will quickly wear out.
Troubleshooting tips for Kalina
From time to time, applying lubricant to the shock absorber bushings does not bring positive results; a squeaking noise accompanies the driver when driving on uneven roads. The reason is improper installation of the part, wear of rubber bushings, cushions, and oil leakage.
In such dilemmas, the shock absorber will be in free movement. Worn bushings must be replaced, installation errors can be corrected by tightening the fastening bolts and nuts. When oil leaks out, stains mixed with dirt appear on the shock absorber. It is necessary to simultaneously replace parts on the left and right.
From time to time it is necessary to remove the engine crankcase protection to replace the gasket and tighten the bolts. To do this, you need to dismantle the engine splash guard, drain the residual oil, unscrew three bolts, remove the lower clutch housing cover and the engine sump. Then you should replace the gasket and bolts, while tightening them from the middle to the edges.
To eliminate the damage, the steering wheel is completely disassembled
How to remove the steering wheel from a Kalina (any VAZ model)
In order to prevent noise from disturbing the driver, it is necessary to know the correct tightening pattern for the wheel bolts. To ensure even tightening, so as not to hit the figure eight, the bolts are tightened clockwise in the following order:
- 4 bolts - “hourglass”, pattern: 1-3-4-2;
- 5 bolts - “pioneer star”, scheme: 1-4-2-5-3;
- 6 bolts - “radiation”, scheme: 1-4-5-2-3-6.
You need to tighten the bolts by hand, first using a can with a small lever, later with a long one.
A dull knock when turning the steering wheel may come from the front wheels. It is best to change springs and springs in pairs. If the driver wants to change the springs because of their age, this is not always appropriate. Grinded old springs make the suspension soft, and they should be changed in this case if the car enthusiast is not satisfied with the ground clearance, which is measured at the front of the car.
When replacing the spring, problems may arise.
- The brand new part will burst.
- A creaking and crunching sound will appear in the CV joint.
- You will have to do destruction a couple of times.
If the cause of the knocking is the sluggish metal of the spring, it needs to be replaced. Otherwise, the racks will quickly break, the supports and balls will fail, the Kalina will bend sideways and will not allow the installation of other racks.
It is better to replace it if the stand begins to hit the rubber bumper very hard.
Repair of electric power steering on Kalina. Signs of breakdown and repair »
Electric power steering is a problem area for the Lada Kalina. Surely this is due to the fact that the domestic auto industry has only recently become acquainted with the ESD. Avtovaz has not yet learned how to make good steering systems. Therefore, repairing electric power steering on Kalina remains a common practice.
. But it is best done by specialists. Amateurism will be inappropriate here - it can only aggravate the situation. The steering system is an important component, the serviceability of which determines the efficiency of driving and, of course, safety.
Repairing the electric power steering on Kalina is a responsible job that requires certain knowledge in the field of power steering. And since a minimum number of car enthusiasts have such knowledge, mostly when problems arise, drivers go to a service station, which is fundamentally correct. How to determine the malfunction?
Despite the fact that repairing the electric power steering requires contacting a car service,
you can detect the first symptoms of a malfunction yourself
. Viburnums on the front panel have a special yellow indicator, which, in the event of a breakdown of the electric booster, lights up and reports an error in the system. If it lights up, it means you have another reason to visit the nearest auto repair shop. But it’s immediately worth noting that the yellow indicator does not indicate a critical malfunction, but only signals the occurrence of a problem that allows you to drive the car, but without the participation of the ESD.
If the electric power steering has completely failed, it is better to stop immediately and pull out its fuses.
. In Kalina they are located on the left side of the steering wheel. Theoretically, in case of malfunctions, the EUR should turn off on its own. However, it doesn’t happen once at a time. Therefore, to be sure, it is still worth taking care of the fuses.
Possible malfunctions and their causes
The main problem that causes breakdown of the electric power steering is.
The EUR installed on Kalina does not work with a constant force applied to the steering rack. The amplifier begins to operate at full strength only when the car is moving at low speed or is at rest. When accelerating, the power steering forces on the steering rack decrease. That is, the lower the speed, the more the power steering starts to work.
The naturally described malfunction can only be detected when the car is standing still or moving at low speed
This failure can only be corrected by completely replacing the speed sensor. Moreover, here it is not necessary to go to the service. You can replace everything yourself.
The second malfunction may be hidden in the EUR itself. Basically, it consists of self-disabling the electric power steering due to the fact that it has not passed self-test. That is, the device turns off automatically so as not to interfere with the driver when driving the car.
This kind of malfunction guarantees a trip to the service station and will require you to spend a lot of money.
Additional reasons
Troubles in the operation of the electric power steering can be caused by:
- voltage drop due to possible circuit breaks due to wiring faults;
- exceeding the internal combustion engine speed;
- lack of speed sensor information.
Grenade change
Limonka, or CV joint, is one of the main parts of the car's chassis. It ensures safe traffic on the roads. The lemon is located in the drive of the drive wheels, which allow the steering wheel to move. Occasionally you can see this hinge on a rear-wheel drive car. The CV joint can be internal or external.
The lemon valve is out of order and requires replacement if the car starts to click and squeak when moving back and forth, and you can hear a creaking sound when you turn the steering wheel.
The car is raised with a jack, the wheel is removed, and you must try to knock out the control rod with a hammer. Unscrew the lower ball nuts and use a crowbar to push the steering knuckle away. The bolts are unscrewed and the control rod is removed. The old retaining ring is thrown away, since it is included in the kit of the new CV joint. Lubricate the spare part with a special granite-based lubricant and put on the boot. Assembly is carried out in reverse order.
Steering rack tightening and repair
When driving the car, you may hear a knocking noise when turning the steering wheel, especially on rough roads. The LADA Kalina control rack is no different in its structure from parts of other VAZ car models. Disassembly and installation have some differences.
- from the steering wheel through the control column, rotating movements are directed to the drive gear;
- the gear gives energy and sets the rack in motion, they cooperate with each other;
- the end rods are attached to the steering rack and turn the wheels.
The structure of the rack is very simple, so you don’t need to waste a lot of time to adjust or replace it. But there is a detail that causes concern, since it is difficult to see and get. The pressure spring regulates the contact force between the device and the gear. During operation, the elasticity of the part decreases, as a result of which the functionality is also reduced. To restore force, the spring often needs tightening. It can only be seen in the inspection hole; adjustment will be difficult; this will require dismantling the rack.
What does the Kalina steering system consist of?
The control wheel is one of the main parts of the entire mechanism. It is placed on the splines of the control shaft and secured there with a locking nut. Thanks to this, the greatest reliability of the wheel fit is achieved and the likelihood of damage is reduced.
With all this, the control shaft itself is not an integral element, but consists of several parts - the upper and intermediate parts. Its rotation is carried out thanks to two bearings installed inside the control column tube, on which the ignition switch with an anti-theft system is located. The control column is assembled with a motor gearbox and an electronic amplifier control unit.
Protection from dust and dirt is provided by the decorative casing of the control column, installed on the front of the panel. Its dismantling is done using a Phillips screwdriver. The normal operation of the amplifier depends on the speed of the vehicle.
One of the parts of the column is the steering shaft driveshaft. Finding it is quite easy; to do this you will need to remove the casing. The steering shaft cardan softens vibration and makes steering safe.
Brackets are attached to the steering column tube using hinges, and their lower part is attached to the body with studs and special nuts. The top bracket has a mechanism that allows you to fix the column in different positions. When the lever is moved to the lower position, the angle of inclination of the column changes, and when it is moved up, it is fixed.
The rack and pinion steering mechanism consists of a housing, a rack and a drive gear. It is secured to the engine compartment crossbar using two steel brackets on rubber supports. The steering rod is attached to the racks, part of which are the steering ends, as well as adjusting bushings.
LADA Kalina steering tips are designed to ensure the mobility of the mechanism and allow you to easily change the lower angle of rotation of the wheels. The adjusting bushings are installed on the inside of the rod, and on their outer part there are ball pins that connect the rod to the rotating arms of the front suspension struts. When the slats are shifted, the position of the racks changes.
READ How to remove the Ford Focus 2 heater pipe
How to remove the steering wheel on a Lada Kalina yourself
Removing the steering wheel on a LADA Kalina car is not at all difficult, and also does not take much time, so there is no need to contact a car service center to resolve this issue. It is enough to have the tools, desire and necessary knowledge.
So, in order to carry out this procedure, you must have the following tools:
- head 24;
- knob with extension;
- ratchet handle.
Once all the tools are at hand, you can proceed to removing the steering wheel.
Video review on how to remove the instrument cluster on Kalina with your own hands
This video was prepared by me personally using the Priora car as an example, but there is practically no difference, moreover, on Kalina everything is made even simpler.
If even after watching you still have any questions, please ask below in the comments to the article or the video itself.
Owners of a Lada Kalina car sometimes think about how to remove the dashboard in order to remove unnecessary noise or replace the heater radiator. Today I want to show you detailed photographs of the process of removing the panel with my own hands.
I would like to immediately clarify that I will remove the torpedo without draining the antifreeze (without removing the stove).
How to remove a torpedo on a Lada Kalina with your own hands:
1. Bend the front door seal. We pull carefully.
2. Remove the decor (plastic casing) from the front roof pillar. It is held on by 3 clips. In the photo I have already pasted over the lid.
Removing a steering wheel equipped with an airbag
To complete the job, you will need a special airbag remover and a new steering wheel nut.
If you don’t have a puller, you can make one from an old slotted screwdriver with a blade width of 5-6 mm. To do this, you need to make a small groove in the middle of the blade.
Remove the “—” terminal of the battery (you need to wait at least 5 minutes before continuing work).
Set the front wheels of the car to the straight-ahead position.
Through the holes in the steering wheel upholstery with a homemade puller, first on one side and then on the other, squeezing the outer antennae of the spring clips
(for clarity, the airbag has been removed) release the two airbag module holders
Moving the airbag module away from the steering wheel, disconnect the ends of the two wires.
Use a slotted screwdriver with a thin blade to release the wire block retainer.
Disconnect the wire connector from the airbag module
To avoid injury in the event of inadvertent deployment of the airbag, place the removed module away from the workplace with the decorative trim facing up.
If it is necessary to install the steering wheel in the previous position, use any available method (marker, felt-tip pen, thin chisel) to make installation marks on the shaft and steering wheel.
When removing the steering wheel, the moving part of the contact wheel is not automatically locked from rotation.
As a result, the central position of the moving part of the ring may be disrupted during assembly.
In this case, there is a high probability of damage to the contact ring when turning the steering wheel to one of the extreme positions; to fix the ring, the steering wheel is equipped with a special stopper.
And on the slip ring there is a special hole.
By inserting a stopper into this hole, you can fix the moving part of the slip ring in a certain position.
When disassembling, it is necessary to lock the slip ring and do not remove the lock until the steering wheel is installed on the steering shaft.
We insert the stopper into a special hole to fix the slip ring
Using a 24mm socket wrench with an extension, unscrew the steering wheel mounting nut and leave the nut on several threads of the shaft thread.
By successively striking the rim of the steering wheel on the right and left sides with your palms, we knock it off the shaft splines.
After unscrewing the nut, remove the steering wheel from the shaft, while pulling out the slip ring wires along with the pads from the hole in the steering wheel hub
We install the steering wheel in the reverse order, aligning the previously made marks and installing a new self-locking nut.
Steering wheel mounting nut with a torque of 32–51 Nm (3.2–5.2 kgf.m).
If it is necessary to install the steering wheel in a new position (for example, if the spokes are inclined when the car is moving in a straight line), put the wheel on the shaft and secure it with a nut without tightening it completely.
After driving straight a few meters, make sure it is in the correct position. If necessary, move the steering wheel to the required number of splines and tighten the nut.
Features of dismantling the steering wheel of a Lada Kalina car
Disconnect the ground wire from the battery.
Using your fingers, press the horn switch trim.
Remove the trim from the steering wheel.
Disconnect the wire ends from the horn switch.
We use a marker to mark the position of the steering wheel relative to the shaft.
Use a 24mm socket to unscrew the steering wheel fastening nut not completely (to avoid injury when removing the steering wheel).
Completely unscrew the steering wheel nut.
While rocking, pull the steering wheel towards you and remove it from the shaft splines
Removing the steering wheel
We install the steering wheel in the reverse order, following the marks made during removal.
How to remove the steering wheel on Kalina
The work is shown on a car equipped with an airbag. The operation on a car without an airbag is performed in the same way.
We prepare the car for work. remove the terminal from the negative terminal of the battery.
On a vehicle equipped with an airbag, to prevent the airbag from deploying after disconnecting the battery, wait at least five minutes before continuing operation. Place the removed airbag module with the actuator down and away from the workplace.
Set the front wheels of the car to the straight-ahead position.
Using a 5 mm hex wrench, remove one bolt securing the airbag module on both sides of the steering wheel.
Using a thin slotted screwdriver, release the module from engagement with any of the loosened bolts (the bolts do not fall out of the hole and prevent the module from being removed from the steering wheel).
Moving the airbag module away from the steering wheel, use the blade of a slotted screwdriver to release the wire block retainer.
Disconnect the wire connector from the airbag module and remove the trim assembly.
If it is necessary to install the steering wheel in its previous position, use any available method (marker, felt-tip pen, thin chisel) to make installation marks on the shaft and steering wheel.
Using a 24 mm socket wrench with an extension, unscrew the steering wheel mounting nut and leave the nut on several turns of the shaft thread.
By successively striking the rim of the steering wheel on the right and left sides with your palms, we knock it off the shaft splines.
If to remove the steering wheel using the method shown, loosen its fastening on the shaft splines. To do this, screw the nut flush with the shaft and apply several blows with a hammer to the end of the shaft through a soft metal drift, while simultaneously supporting the steering wheel with your knees.
Disconnect the horn switch wire connectors and unscrew the steering wheel mounting nut.
We remove the steering wheel from the shaft, while pulling out the slip ring wires along with the pads from the hole in the steering wheel hub.
When removing the steering wheel, the moving part of the slip ring is secured with a locking mechanism, which prevents it from rotating. Do not press the locking ring or rotate the moving part of the contact ring. As a result, the central position of the moving part of the ring may be disrupted during assembly. In this case, there is a high probability of damage to the contact ring when turning the steering wheel to one of the extreme positions.
We install the steering wheel in the reverse order, aligning the previously made marks and installing a new self-locking nut.
If it is necessary to install the steering wheel in a new position (for example, when the car is moving in a straight line, the steering wheel spokes are inclined), put the wheel on the shaft and secure it with a nut without tightening it. After driving straight a few meters, make sure it is in the correct position. If necessary, move the steering wheel to the required number of splines and tighten the nut. Tighten the steering wheel mounting nut to a torque of 31.4-51 Nm (3.2-5.2 kgcm).
The instructions are as follows
- The first step is to dismantle the airbag, and for this you need:
- disconnect both clamps from the battery;
- Wait at least ten minutes until the airbag activator is completely discharged.
- Next, you should find the holes located on both sides of the steering wheel on the inside, and unscrew the screws in them that secure the airbag.
- Afterwards, you can carefully and slowly remove the airbag upwards.
- Now, having unfolded the module, on the reverse side you can see a block with a wire that should be disconnected. But before that, you need to pry the green fastener and pull it up.
- Then you can disconnect the power plug from the airbag.
- Next, you need to unscrew the nut that secures the steering wheel to the shaft a little, and then, grasping the steering wheel on both sides, remove it from the shaft splines.
- After this, the nut is completely unscrewed, which makes it possible to dismantle the steering accessory. In the process of removing it, it is necessary to very carefully thread the power wires through a specially designed gap.
Airbag installation
Installation is carried out in reverse order. While working, stay outside the pillow deployment area. When you first turn on the ignition, stand outside the vehicle and turn on the ignition with your hand under the steering column.
Have you experienced a knocking sound in your steering? Let's solve this problem together.
Keywords: safety LADA Granta | LADA Granta steering wheel | safety LADA Kalina | steering wheel LADA Kalina | safety LADA Priora | LADA Priora steering wheel
The most common body type of Lada Granta FL has been determined
Reasons why turn signals do not work on LADA Priora
How the front and rear seats fold out on a LADA Vesta
Lada Vesta SW appeared in the Za Rulem editorial park
Removing the Kalina electric power steering column
- Medium Phillips screwdriver
- Large flat screwdriver
- Marker
- Open-end wrench 10 mm
- Open-end wrench 13 mm
- Driver for socket attachment
- High nozzle on the wrench 13 mm
- Knob attachment 13 mm
- Knob attachment 24 mm
We set the wheels to the position of straight-line movement of the car.
Disconnect the wire terminal from the negative terminal of the battery.
Remove the steering wheel as described here. We remove the steering column switches as described here. Disconnect the ignition switch wire connectors from the instrument panel wiring harness connectors. If necessary, remove the ignition switch from the steering column.
Using a Phillips screwdriver, unscrew the three screws.
Then remove the lower cross member of the instrument panel.
By pressing the clamps, disconnect the two wiring harness blocks from the power steering control unit. Disconnect the wiring harness connector from the steering column switch connector as described here.
Using a high “13” head, unscrew the four nuts securing the bracket (the fourth nut is not visible in the photo).
Lower the steering column to the floor.
If necessary, remove the connector for the steering column switches, as described here. Using a 13mm socket, unscrew the nut of the bolt securing the lower cardan joint to the steering gear shaft. If the bolt turns, hold it with a 13mm wrench.
Using a powerful slotted screwdriver, release the terminal connection of the hinge.
Remove the intermediate driveshaft from the steering gear shaft.
Before disconnecting the intermediate propeller shaft from the steering shaft, use a marker to mark the relative position of the upper joint of the propeller shaft relative to the steering shaft. Using a 13mm wrench, unscrew the nut of the hinge coupling bolt. If the bolt turns, hold it with a 13mm wrench. We take out the bolt.
Use a screwdriver to loosen the terminal connection of the hinge.
Remove the intermediate driveshaft from the steering shaft.
Install the intermediate driveshaft in reverse order. When connecting the upper joint of the intermediate propeller shaft to the steering shaft, it is necessary to align the previously made marks. Install the steering column in the reverse order. Installation this way is best done with an assistant.
However, it is more convenient to install the column when the lower hinge of the intermediate propeller shaft is installed on the steering gear shaft in advance. To do this, after connecting the intermediate propeller shaft to the steering shaft, use a 13mm wrench to unscrew the nut of the intermediate shaft coupling bolt.
We take out the intermediate shaft bolt and disconnect the lower universal joint from the upper one.
We install the lower hinge on the steering gear shaft (the bolt securing the hinge to the gear shaft should be located vertically on the right side). We turn the steering shaft so that the hole in the upper hinge for the intermediate shaft pinch bolt is located horizontally at the bottom of the shaft. We connect the upper and lower hinges of the intermediate shaft, insert the coupling bolt and tighten the nut. We carry out further installation in reverse order.
- Photo of the instrument
- High-quality photos of repairs
We repair it ourselves: we remove the steering wheel on Kalina
If you own a Lada Kalina car, then most likely during your ownership you will have to remove the steering wheel from this car more than once. Why might this be needed? Yes, here are some good reasons:
- replacing the electric booster, which happens quite often on this car
- replacing the ignition switch, although you don’t have to remove it, it’s more convenient
- replacing the steering column unit
- repair or replacement of the steering column
As you can see, there is quite a large list of procedures that require removing the steering wheel from your car, so I think it is necessary to devote a few minutes to this moment.
DIY replacement process
So, the first step is to remove the key from the ignition and lock the steering wheel so that it does not rotate during removal. Then carefully pull off the top cover - the horn button, since it is secured with latches.
You should not tear it off abruptly, as there are wires inside, so as not to damage them, you need to act carefully.
We disconnect each of the plugs and remove the cover, as is clearly demonstrated in the photo below.
It is worth keeping in mind that in this article we are considering the option in the normal and standard configurations without an airbag, since with an AirBag everything will be a little different.
So, next you need to make a mark with a marker on the shaft and on the inside of the steering wheel housing, so that later during installation everything will be aligned evenly, without distortions.
It is most convenient to unscrew the nut using a socket and a ratchet handle with an extension.
Important: do not unscrew it all the way, leave a couple of turns on the thread so that when you pull the steering wheel off the shaft, it does not hit you on the head or other part of the body.
Having applied a certain force, pulling the steering wheel as if towards yourself and trying to swing it from side to side, it can be removed without any problems. When it is torn off the shaft, unscrew the nut completely and remove the steering wheel.
If my review was useful to you, do not be lazy to subscribe to the channel and like each new entry. It’s not difficult for you, but it’s nice for me. Thank you for your attention and see you again on the channel.
How to remove a steering wheel with an airbag on a Kalina
Removing the steering wheel on a LADA Kalina car is not at all difficult, and also does not take much time, so there is no need to contact a car service center to resolve this issue. It is enough to have the tools, desire and necessary knowledge.
So, in order to carry out this procedure, you must have the following tools:
- head 24;
- knob with extension;
- ratchet handle.
Once all the tools are at hand, you can proceed to removing the steering wheel.
Replacing the steering wheel
The standard Priora steering wheel can be replaced with a new model from the Priora 2 SE luxury. The differences in feel are quite significant. The updated model is much more convenient to use, so it’s worth considering such a purchase if you have an old, battered steering wheel installed.
We will now figure out how to remove the steering wheel. To replace you will need the following set of tools:
- Phillips and flat screwdriver;
- hex key five;
- replaceable head for 24 and 8;
- ratchet.
Here's the procedure:
- Disconnect the device from the battery by removing the terminal. We are waiting for the capacitor of the protective system to discharge.
- We fix the steering wheel in the position for driving in a straight line.
- Using a Phillips screwdriver, unscrew the fastenings of the steering wheel casing (7 pcs.), then remove it.
- Next, you will need a hex wrench to unscrew the next 2 steering wheel airbag mounts.
- Now we pull the pillow towards us, use a flat screwdriver to pry the device from the bottom on the other side and disconnect it.
- Using a 24mm replaceable socket, loosen the fastening of the steering wheel to the shaft. The nut is strong, so you may have to work hard. Unscrew and remove the steering wheel.
- The 8 socket is useful for removing the steering column cable and switches.
Steering problems
Mostly, problems manifest themselves in the form of looseness of the steering wheel itself, which leads to various inconveniences while driving a vehicle.
This is especially felt when driving on an uneven highway or dirt road, since the car itself in such a situation becomes unstable, and the steering loses its effectiveness. Kalina was no exception .
There is nothing difficult in eliminating this defect. The main thing here is to understand the structure of the steering mechanism and try to understand what is located where. Having done this, you can remove the steering wheel on Kalina yourself, without resorting to the expensive services of service stations.
All parts installed in all series of these cars are characterized by increased resistance to damage, which makes them more reliable. In addition, depending on the year of manufacture of the car, additional devices may be installed in it to improve safety while driving.
Such devices include electric power steering, steering column and airbag . Their main task is to increase vehicle stability on the road and reduce the likelihood of injury in emergency situations.
Dismantling algorithm
Note. Depending on what year Kalina was released, the steering wheel mounts may differ. An may or may not be present . If there is one, then you need to use a Phillips screwdriver to unscrew the bolts that secure it.
- It is worth noting that the bolts are fastened quite firmly, so you need to remove them with the utmost care so as not to damage the buttons and contacts.
- Afterwards the cover can be completely detached.
- The next step is to use a socket with a wrench to unscrew the nut that secures the steering wheel to the shaft. The steering wheel must be locked.
- In a situation where the nut is difficult to rotate, you can use a ratchet, with which this can be done faster and easier. There is no need to unscrew the nut completely; it is better to leave it in place, otherwise you might get hit in the forehead when removing the steering wheel.
- The position of the handlebar should be marked with a marker or pencil so that when mounting it back, it should be set straight. Marks can be made either on the steering wheel itself or on the casing.
- Now you need to take the steering wheel with both hands and pull it towards you, removing it from the shaft splines. If he doesn’t give in the first time, you can hit him with his hands from below, alternately left and right.
- After the steering wheel has been removed, you need to unscrew the nut completely and remove the wheel.
Sources:
https://olden-avto.ru/remont/kak-snyat-rul-na-kaline.html https://mobile-DVR.ru/ekspluatatsiya/kak-snyat-rul-s-podushkoi-bezopasnosti-na-kaline .html
Photo report on removing the steering wheel yourself
First of all, read the material on removing the driver's airbag on a Priora. Then, when you have dealt with this, you can proceed further. Disconnect the power wires to the sound signal.
Then we put the head on 24 and rip off the nut, but don’t unscrew it completely yet. Before you start knocking it off the shaft, you need to mark the position of the steering wheel relative to the shaft - you can make marks on the steering wheel and casing.
When the nut is loosened, leave it on the shaft for now. Then we take and knock down the steering wheel from the reverse side, tapping it with medium force - on both sides.