Despite the simple design of the VAZ 2105 generator, the uninterrupted functioning of all electrical equipment of the car while driving directly depends on it. Sometimes problems arise with the generator, which you can identify and fix on your own, without visiting a car service center.
- Technical characteristics of the VAZ 2105 generator
Table: parameters of the generator 37.3701 (G-222)
- Rotor
- The battery discharge light is on or flashing
Video: generator noise on a “classic”
- Diagnostics with a multimeter
Video: diagnosing a generator with a light bulb and a multimeter
- How to remove the generator
Video: generator repair on a “classic”
- How to tension the alternator belt
Video: tensioning the alternator belt on a “classic”
Technical characteristics of the VAZ 2105 generator
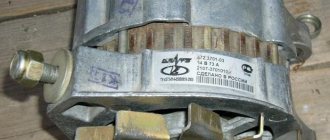
Starting in 1986, 37.3701 generators began to be installed on “fives”. Before this, the car was equipped with the G-222 device. The latter had different stator and rotor coil data, as well as a different brush assembly, voltage regulator and rectifier. The generator set is a three-phase mechanism with excitation from magnets and a built-in rectifier in the form of a diode bridge. In 1985, the relay responsible for indicating the warning light was removed from the generator. The on-board network voltage was monitored only using a voltmeter. Since 1996, the 37.3701 generator has received a modified design of the brush holder and voltage regulator.
Until 1986, G-222 generators were installed on VAZ 2105, and after that they began installing model 37.3701
Table: parameters of generator 37.3701 (G-222)
| Maximum output current (at a voltage of 13 V and a rotor speed of 5 thousand min-1), A | 55(45) |
| Operating voltage, V | 13,6–14,6 |
| Engine-generator gear ratio | 2,04 |
| Direction of rotation (drive side) | right |
| Generator weight without pulley, kg | 4,2 |
| Power, W | 700 (750) |
Let's start the replacement process
We are gradually approaching how to carry out the replacement. The procedure is much more complicated than, say, replacing a windshield, so you initially need to protect yourself from possible electric shock. To do this, you need to disconnect the ground terminal on the battery. Despite the fact that the voltage in the electrical circuit of a car is not as high as, for example, in an electric train, even one random spark that hits you can become quite noticeable.
The location of the generator on the VAZ-2107 model and its other “colleagues” (2110 and 2114) is almost the same - it is installed in the right half of the engine compartment. In other words, it is located next to the main light on the passenger side. Moreover, there is absolutely no difference whether the car has front-wheel drive or rear-wheel drive - the developers of the Zhiguli do not change their style, adhering to their own traditions. The metal body is attached to the engine with several fastening nuts. You can recognize the generator by the flywheel and the drive belt stretched over it.
Now you need to decide on the choice of replacement procedure. For those who are not in the know, replacing generator brushes can be done in two ways:
- with removal of the generator;
- without removal.
The main difference between these methods is that after replacement you will need to adjust the tension of the drive belt. But if for the VAZ-2110 and 2114 the adjustment will not be any difficulty, then the owners of the VAZ-2107 will encounter difficulties due to the poor layout of the mechanisms. Choose the method that suits you best.
Next you need to adhere to a certain order.
Step 1. Remove the protective cover installed on the generator housing.
Step 2: Remove the power terminal from the female connector.
Step 3. In order to remove the parts of interest in this case, you need to unscrew the 2 fastening bolts. Then remove the brush holder with holder.
Step 4. Conduct a visual assessment of the condition of the brushes: the protrusion from its socket should be no more than 5 millimeters. After this, make a replacement.
Step 5: Reassemble.
Representatives of the automotive industry have long decided to meet drivers halfway by creating a special holder, which includes brushes and a voltage regulator. Its cost is about 150-200 rubles higher than the cost of the kit. Of course, everyone tries to save money whenever possible, but before making a purchase, think about how much you can save this way? In addition, you will not carry out such a replacement very often (in some cases, brushes are replaced only a few times during the entire period of use of the car).
The voltage regulator may also be the cause of the malfunction. Before installing the unit into the generator, connect the battery cable (positive) to the plug connector of the unit, and the negative lead to the housing. After connecting the wires, you need to connect a rheostat and a 3-volt light bulb to the brushes. If connected correctly, the light should light up. Change the voltage little by little, moving its indicator from 12 to 16 V. After you reach 16 V, the connected light bulb should go out. If the light is still on, the voltage regulator is most likely faulty.
What generators can be installed on a VAZ 2105
The question of choosing a generator for a VAZ 2105 arises when the standard device is not capable of providing current to the consumers installed on the car. Today, many car owners equip their cars with powerful headlights, modern music and other devices that consume high current.
The use of an insufficiently powerful generator leads to undercharging of the battery, which subsequently negatively affects engine starting, especially in the cold season.
To equip your car with a more powerful source of electricity, you can install one of the following options:
- G-2107–3701010. The unit produces a current of 80 A and is quite capable of providing additional consumers with electricity;
- generator from VAZ 21214 with catalog number 9412.3701–03. The current produced by the device is 110 A. For installation, you will need to purchase additional fasteners (bracket, strip, bolts), as well as make minimal changes to the electrical part;
- product from VAZ 2110 for 80 A or higher current. For installation, a suitable mount is purchased.
One of the powerful options for generator sets that can be equipped with a VAZ 2105 is a device from a VAZ 2110
Our advantages
The Dvizhkom online store offers:
- a constantly updated catalog with automotive products for domestic and foreign brands;
- only original products from leading manufacturers in Russia and the world;
- official warranty for spare parts and components;
- affordable prices for car starters, the possibility of wholesale purchases at a favorable price;
- fast delivery to any region of the Russian Federation, availability of pickup or courier delivery in St. Petersburg.
In our catalog you can buy a car starter at a price from the manufacturer. You can place an order by filling out an application on the website and providing contact information. Our managers will call you back as soon as possible and advise on payment issues and delivery times.
Connection diagram for the “five” generator
Like any other electrical device in a car, the generator has its own connection diagram. If the electrical installation is incorrect, the power source will not only not provide the on-board network with current, but may also fail. Connecting the unit according to the electrical diagram will not be difficult.
Generator circuit G-222: 1 - generator; 2 - negative diode; 3 - positive diode; 4 - stator winding; 5 - voltage regulator; 6 — rotor winding; 7 - capacitor for suppressing radio interference; 8 - battery; 9 — battery charge warning lamp relay; 10 — mounting block; 11 — battery charge indicator lamp in the instrument cluster; 12 - voltmeter; 13 — ignition relay; 14 - ignition switch
More information about the VAZ 2105 ignition system: https://bumper.guru/klassicheskie-modeli-vaz/elektrooborudovanie/zazhiganie/kak-vystavit-zazhiganie-na-vaz-2105.html
Color-coded electrical wires are connected to the VAZ 2105 generator as follows:
- the yellow one from connector “85” of the relay is connected to terminal “1” of the generator;
- orange is connected to terminal “2”;
- two pink ones to terminal “3”.
On-board network elements
The generator is an important part of the electrical system. This is the main voltage source of the vehicle
The generator converts the mechanical energy of the engine into electrical potential.
The stability of the on-board network voltage guarantees trouble-free operation of all consumers. The normal voltage level depends on the following elements:
- Generator.
- Battery.
- Relay-voltage regulator.
The electrical circuit is one whole. Failure of wiring or a short circuit can lead to failure of the entire system. The generator does not work - the battery charging current disappears. The battery is dead - you can't start the car.
The serviceability test can be carried out independently and at home. Typically, such a procedure does not involve dismantling devices on a Zhiguli-2105, 2107 car. It is necessary to have a tester that measures voltage, winding resistance, and the serviceability of diodes.
There are mechanical and electrical components of the unit
It doesn’t matter whether there is a carburetor or an injection system, the generator is checked in two directions. The following mechanical parts are subject to assessment:
- body elements;
- V-belt;
- pulley;
- bearing units;
- brush block;
- mounting bolts.
Generator device
The main structural elements of a car generator are:
- rotor;
- stator;
- frame;
- bearings;
- pulley;
- brushes;
- voltage regulator.
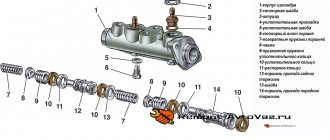
Design of the VAZ 2105 generator: a - voltage regulator and brush assembly for generators manufactured since 1996; 1 — generator cover from the slip ring side; 2 — bolt for fastening the rectifier unit; 3 - slip rings; 4 — ball bearing of the rotor shaft on the side of the slip rings; 5 - capacitor 2.2 μF ± 20% to suppress radio interference; 6 — rotor shaft; 7 - common terminal wire for additional diodes; 8 — terminal “30” of the generator for connecting consumers; 9 — plug “61” of the generator (common output of additional diodes); 10 — output wire “B” of the voltage regulator; 11 - brush connected to terminal “B” of the voltage regulator; 12 — voltage regulator VAZ 2105; 13 - brush connected to terminal “Ш” of the voltage regulator; 14 — pin for attaching the generator to the tensioner; 15 — generator cover from the drive side; 16 — fan impeller with generator drive pulley; 17-pole rotor tip; 18 — bearing mounting washers; 19 — spacer ring; 20 — ball bearing of the rotor shaft on the drive side; 21 — steel bushing; 22 — rotor winding (excitation winding); 23 - stator core; 24 - stator winding; 25 - rectifier block; 26 — generator coupling bolt; 27 — buffer sleeve; 28 — bushing; 29 — clamping sleeve; 30 - negative diode; 31 — insulating plate; 32 - phase output of the stator winding; 33 - positive diode; 34 - additional diode; 35 — positive diode holder; 36 — insulating bushings; 37 — holder of negative diodes; 38 — terminal “B” of the voltage regulator; 39 — brush holder
To know how the generator functions, you need to understand the purpose of each element in more detail.
On the VAZ 2105, the generator is installed in the engine compartment and is driven by a belt from the engine crankshaft.
Rotor
The rotor, also known as the armature, is designed to create a magnetic field. On the shaft of this part there is an excitation winding and copper contact rings, to which the coil leads are soldered. The bearing unit, installed in the generator housing and through which the armature rotates, is made of two ball bearings. An impeller and a pulley are also attached to the rotor axis, through which the mechanism is driven by a belt drive.
The generator rotor is designed to create a magnetic field and consists of rotating coils
Stator
The stator windings create an alternating electric current and are combined through a metal core made in the form of plates. To avoid overheating and short circuits between the turns of the coils, the wires are coated with several layers of special varnish.
Using the stator windings, an alternating current is created, which is supplied to the rectifier block
Frame
The generator housing consists of two parts and is made of duralumin, which is made to facilitate the design. To ensure better heat dissipation, holes are provided in the housing. By means of an impeller, warm air is expelled from the device to the outside.
Generator brushes
The operation of a generator set is impossible without elements such as brushes. With their help, voltage is supplied to the rotor slip rings. The embers are enclosed in a special plastic brush holder and installed in the corresponding hole in the generator.
Voltage regulator
The relay-regulator controls the voltage at the output of the unit in question, preventing it from rising above 14.2–14.6 V. The VAZ 2105 generator uses a voltage regulator combined with brushes and fixed with screws on the back of the power source housing.
The voltage regulator is a single element with brushes
Diode bridge
The purpose of the diode bridge is quite simple - to convert (rectify) alternating current into direct current. The part is made in the shape of a horseshoe, consists of six silicon diodes and is attached to the back of the case. If at least one of the diodes fails, the normal functioning of the power source becomes impossible.
The diode bridge is designed to rectify alternating current into direct current from the stator windings for the on-board network
Required Tools
To replace and repair the VAZ 2101 generator, tools are required, the list of which is given below.
Table - List of necessary tools for replacing the generator
| Name | Note |
| Socket wrench | "at 17", "at 19" |
| Kardanchik | For easier access to generator mounts |
| Vorotok | With ratchet and extension |
| open-end wrench | "on 10" |
| Spanner | "by 10", "by 15" |
| Head | "at 17", "at 19" |
| Multimeter | To test the chain |
| Soldering iron | To connect winding terminals |
| Penetrating lubricant | For detaching stuck and rusty threaded connections |
| Wire brush and rags | For cleaning fixtures and work surfaces |
Some of the work on replacing the generator requires access from the bottom of the VAZ 2101. Therefore, it is advisable to have an inspection hole or overpass available.
Operating principle of the generator set
The “five” generator functions as follows:
- When the ignition is turned on, power from the battery is supplied to terminal “30” of the generator set, then to the rotor winding and through the voltage regulator to ground.
- The plus from the ignition switch, through the fuse-link “10” in the mounting block, is connected to contacts “86” and “87” of the charge warning lamp relay, after which it is supplied through the contacts of the switching device to the light bulb and then to the minus of the battery. The light is on.
- As the rotor rotates, a voltage appears at the output of the stator coils, which begins to power the excitation winding, consumers and charge the battery.
- When the upper limit of the voltage in the on-board network is reached, the relay regulator increases the resistance along the excitation circuit of the generator set and keeps it within 13–14.2 V. Then a certain voltage is supplied to the winding of the relay responsible for the charge lamp, as a result of which the contacts open and the light goes out. This indicates that all consumers are powered by the generator.
Checking the brushes
To check for brush malfunctions, you will need a 12 V light bulb.
We put a plus on the terminal, and a minus on the ground terminal. The light comes on, let's check further. We add voltage to 16 V, if the light continues to light, this is the main sign of a malfunction of the brushes.
Checking the serviceability of the brushes
In this case, before installing new brushes, it is worth checking the protrusion of the graphite contacts. A normal protrusion is considered to be a protrusion of at least 0.5 centimeters, after which new brushes are installed, and everything is installed back, based on the above steps.
It happens that repairing a generator does not end with just replacing the brushes. If brush wear is not detected in time, then the remaining parts of the generator also wear out, since all elements of the generator are interconnected. That is why, after replacing the brushes alone, the malfunction in the generator will not completely disappear, but the signs of breakdown will disappear for a while.
When replacing brushes, it is best to remove the generator and examine it, trying to identify what other faults may be in it.
Generator faults
The Zhiguli generator is a fairly reliable unit, but its elements wear out over time, which leads to problems. Malfunctions can be of various types, as evidenced by characteristic signs. Therefore, it is worth dwelling on them, as well as on possible problems, in more detail.
The battery discharge light is on or flashing
If you observe that the battery charge light on a running engine is constantly on or flashing, then there may be several reasons for this behavior:
- insufficient tension of the generator belt drive;
- open circuit between the lamp and the generator;
- damage to the rotor winding power supply circuit;
- problems with the relay regulator;
- brush wear;
- damage to diodes;
- break or short circuit in the stator coils.
The driver will immediately notice a signal of lack of battery charge, as the lamp begins to glow bright red on the instrument panel
More about the VAZ 2105 instrument panel: https://bumper.guru/klassicheskie-modeli-vaz/elektrooborudovanie/panel-priborov/panel-priborov-vaz-2105.html
No battery charge
Even when the generator is working, the battery may not be charged. This may be due to the following reasons:
- the generator belt is loose;
- unreliable fixation of the wiring to the generator or oxidation of the terminal on the battery;
- battery problems;
- problems with the voltage regulator.
If the battery does not receive a charge, it means that the generator or voltage regulator is faulty
The battery is boiling over
There are not many reasons why a battery may boil over, and they are usually associated with excess voltage supplied to it:
- unreliable connection between ground and the body of the relay regulator;
- the voltage regulator is faulty;
- battery is faulty.
Once I encountered such a problem when the relay regulator failed, which manifested itself in the form of a lack of battery charge. At first glance, there is nothing difficult about replacing this element: unscrew two screws, take out the old device and install the new one. However, after purchasing and installing a new regulator, another problem arose - battery overcharging. Now the battery received a voltage of more than 15 V, which led to the boiling of the liquid in it. It is impossible to drive for a long time with such a malfunction and I began to figure out what led to its occurrence. As it turned out, the reason came down to the new regulator, which simply did not work correctly. I had to buy another relay regulator, after which the charge returned to normal values. Today, many people install three-level voltage regulators, but I have not tried it yet, since there have been no problems with charging for several years.
Generator wire melts
Quite rarely, but it still happens that the wire running from the generator to the battery can melt. This is only possible in the event of a short circuit, which can occur in the generator itself or when the wire comes into contact with ground. Therefore, you need to carefully inspect the power cable, and if everything is in order with it, you should look for the problem in the power source.
The generator is noisy
During operation, although the generator makes some noise, it is not so loud that you think about possible problems. However, if the noise level is quite strong, then the following problems may occur with the device:
- bearing failure;
- The generator pulley nut has come loose;
- short circuit between the turns of the stator coils;
- noise from brushes.
Video: generator noise on a “classic”
The battery drains quickly.
If the battery is good and fully charged, then the car, left for several months, will start normally.
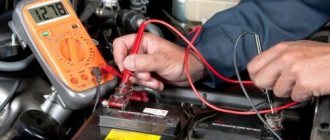
With the engine running, you need to check the voltage on the battery, it should be 13.8-14.2 Volts. Turn on the headlights and heater, the voltage should remain at 13.5 Volts. If it drops to 12 volts, the alternator is faulty and cannot keep the battery charged.
If the generator is working normally, then rapid discharge of the battery indicates that it has lost capacity, perhaps it is very old
The low battery light is blinking
The brushes and, possibly, the slip rings themselves on the rotor are worn out. In the first case, the brushes must be replaced (the generator will have to be removed). In the second case, it is better to replace the generator.
The generator is noisy.
Noisy generator operation. This is almost always bearing wear. It is necessary to remove the generator and change the bearings. If the generator is very old, then the right thing to do is change the generator.
Generator belt
The flexible drive is designed to rotate the pulley of an electricity source, ensuring the functioning of the latter. Insufficient tension or a broken belt leads to a lack of battery charge. Therefore, despite the fact that the belt life is about 80 thousand km, its condition must be periodically monitored. If damage is detected, such as delamination, protruding threads or tears, it is better to replace it with a new product.
The alternator belt has a long service life, but if there is visible damage, the product needs to be replaced
Many years ago, when I first purchased a car, I encountered an unpleasant situation - the alternator belt broke. Fortunately, this happened near my house and not in the middle of the road. I had to go to the store to buy a new part. After this incident, I always carry an alternator belt in stock, because it does not take up much space. In addition, when I carry out any repair work under the hood, I always check the condition of the flexible drive and its tension.
The VAZ Five uses an alternator belt 10 mm wide and 944 mm long. The element is made in the shape of a wedge, which allows it to more easily engage with the generator pulley, pump and crankshaft.
How to tension the alternator belt
To tension the belt you will need the following tools:
- mount;
- head for 17 and knob.
The procedure consists of the following steps:
- Check the tension level of the drive. Normal values are those at which the belt between the pump pulley and the crankshaft pulley bends by 12–17 mm or by 10–17 mm between the pump pulley and the generator pulley. When taking measurements, the pressure should not be more than 10 kgf in the location indicated in the image. To do this, press with the thumb of your right hand with moderate force.
The belt tension can be checked in two places by pressing on it with the finger of your right hand. - If there is excessive tension or loosening, make adjustments.
- Loosen the upper fastener of the generator with a 17mm head.
- We insert a pry bar between the pump and the generator housing and tension the belt to the required values. To loosen the tension, you can rest a wooden block against the upper mount and lightly tap it with a hammer.
- We tighten the nut securing the generator set without removing the pry bar.
- After tightening the nut, check the tension of the flexible drive again.
External inspection
External inspection reveals obvious damage. If necessary, spare parts are cleaned of dirt, oil and moisture. Solid sand particles contribute to the wear of bearings and brushes
It is important to know that water entering the housing can damage the varnish coating of the windings. Insulation breakdown threatens turn-to-turn short circuit of the stator coils
Also, a layer of dirt can short circuit pin 30 to ground. A short circuit will damage the semiconductor rectifiers.
Particular attention is paid to the condition of the belt drive on the “Seven” and VAZ-2105. The belt is classified as a fast-wearing spare part.
Visually determine the absence of cuts, worn out teeth, or frayed edges.
It is useful to observe the operation of the flexible transmission with the hood open. The approach of a critical state can be heard by sound. Belt slipping is one of these problems. As a result of its friction against the pulley, a characteristic whistle occurs.
Excessive wear will indicate that the damaged belt needs to be replaced. Otherwise, slipping will lead to loss of battery charging and damage to the coolant pump. The battery will run out and the motor will overheat.
The generators on the VAZ-2107 car (injector or carburetor type) have the same drive. But there is one difference - the crankshaft position sensor is not installed on the carburetor.
The degree of production increases if the tension is incorrectly adjusted. The situation is corrected by moving the body along the adjustment bar, having first loosened the fastening. Installation of the generator in place is fixed with a 17 nut and a 19 lower bolt.
The measurement is carried out by pressing on the belt. Pressure is applied with a mounting blade in the middle of the segment. The deflection between the generator and the water pump will be 12-17 mm. The right wing (directed towards the crankshaft) will bend by 10-15 mm.