What is DPKV
As mentioned above, DPKV stands for crankshaft position sensor. It determines the position of the crankshaft at each moment in time, thereby monitoring its rotation frequency, and ensures the correct functioning of the ignition system.
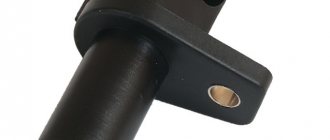
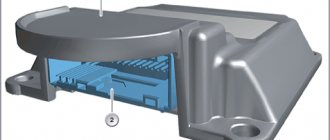
General view of the DPKV
DPKV transmits the following indicators to the control unit:
- the moment the pistons reach TDC and BDC in the first and last cylinders;
- crankshaft position and speed.
Based on this data, the vehicle's ECU can regulate the following processes:
- ignition timing for each cylinder;
- control of fuel injection through injectors, the required amount of fuel;
- camshaft rotation angle (variation of valve timing);
- operation of the fuel vapor recovery system (control of the canister purge valve).
Not a single injection engine with an electronic control unit can operate without DPKV. There is no need for it in carburetor engines, since a saturated air-fuel mixture enters the engine in equal quantities, regardless of needs. The injector allows you to regulate the fuel supply and save fuel consumption. And it is on the basis of data from the DPKV that the system regulates its work.
Many drivers confuse the DPKV with the camshaft position sensor (CPS). Although their structure and purpose are largely similar, there are differences. DPRV determines the angular position of the camshaft and is responsible for fuel injection into the cylinders and ignition at the right time. The DPRV uses a permanent magnet and its operation is based on the Hall effect. We can say that DPKV and DPRV work in tandem with each other, but the first is more important for engine operation.
Causes of crankshaft sensor malfunction
There are a number of typical malfunctions due to which the crankshaft position sensor stops working correctly. Among the main breakdowns:
- between the synchronization disk and the sensor core is broken Typically the corresponding value is in the range from 0.5 to 1.5 millimeters. It is adjusted using installed shims. The distance may be violated when replacing the sensor with a new one, mechanical displacement of the washer or sensor as a result of repair work or an accident. Also, the cause of such a breakdown may be dirt or dust getting into the gap between the sensor and the synchronization disk.
- Broken wire or poor contact . For example, the sensor's power supply may be poorly connected as a result of damage to its retainer. Less often, the wire insulation is damaged (reduced insulation value, broken wire), due to which the electrical signal passes not to the ECU, but to the car body or other elements of the engine compartment.
- Winding damage . In rare cases, the winding inside the sensor is damaged, causing it to work incorrectly or not work at all. The reasons why the winding fails can be different - destruction due to vibration, oxidation, poor-quality (thin) wire, damage to the core, and so on.
- Damage to the sync disk . For example, some disk teeth may be damaged as a result of repair work or an accident. If the disc is constantly dirty, then the teeth can naturally wear out and grind down. On those cars where there is a rubber damper, if it breaks, the tracking mark goes away.
- Damage to the LED or light absorption element . This option is suitable for older cars that have an optical crankshaft position sensor installed on the engine.
Usually, if the sensor fails partially or completely, it cannot be repaired, since its housing is sealed and non-removable. Accordingly, it is almost impossible to replace the wire (winding) and/or the magnetized core in it. For this reason, the unusable sensor is disposed of, and a new one is purchased and installed instead, since its price is low, and stores offer a variety of models for different cars.
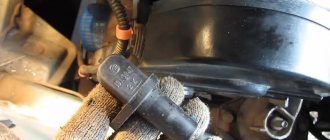
The device and where the crankshaft position sensor is located
The sensor has a simple design. Inside there is a magnetized steel rod with a copper wire winding. The rod and winding are placed in a plastic case and filled with compound resin to insulate the wires. From it comes a standard electrical connector that connects to the car's electrical system. The DPKV is fixed on the cylinder block or gearbox housing. It can also be mounted on a bracket near the drive pulley.
Inductive sensor device
The sensor is located opposite the teeth of the drive disk. Sometimes it can be called synchronizing or reference. It is a disk with teeth along the outer circle. Can be mounted on a crankshaft pulley or flywheel and rotate with it at the same frequency.
How to determine a faulty crankshaft sensor
There is a simple way to find out if a sensor is faulty, and anyone can do this with just one multimeter. Most modern cars are equipped with inductive crankshaft position sensors, so let’s briefly look at checking devices of this type.
So, DPKV can be checked in three ways - using an ohmmeter, checking the inductance value of the coil, and also using an oscilloscope. In addition, an important element of checking what signs of a malfunction of the crankshaft sensor have appeared is to set the correct gap between the sensitive element of the sensor, as well as the synchronization disk (the distance must be clarified in the documentation, it is in the range of 0.5...1.5 mm).
How to check the crankshaft sensor?
There are three ways to check the DPKV - with a multimeter (checking the winding resistance), a tester (checking the insulation resistance and inductance) and an oscilloscope. More details
The simplest and most accessible method to almost any car owner is to check the internal resistance of the sensor. To do this, it is enough to use an electronic multimeter switched to the mode for measuring the resistance of an electrical circuit. For most modern sensors, the electrical resistance value of the internal coil is about 500...700 Ohms (in some cases this value may differ, so it is advisable to familiarize yourself with the technical parameters of the sensor separately). It is also advisable to check the insulation value of the wires. It should not be less than 0.5 MOhm.
To measure inductance, the car owner will need a multimeter (megaohmmeter), a network transformer, an inductance meter, and a voltmeter. Omitting the verification algorithm, it is worth immediately noting that the inductance value of the internal coil of a working sensor should be in the range of about 200...400 mH (may differ for different sensors, but not significantly). If the inductance is significantly lower (less often higher), then the sensor is most likely faulty, and additional checks must be performed, including measuring the coil resistance and insulation.
The most complex, but the most informative and reliable method of checking the crankshaft position sensor is using an oscilloscope, usually electronic (software emulator). To do this, connect an oscilloscope to the sensor terminals while the car engine is running and set up a program for taking an oscillogram. Its drawing will give a clear understanding of whether the sensor is in working condition and whether there are any gaps in its operation. In addition, you can remove the sensor from its mounting location, connect an oscilloscope to it and simply move some metal object (for example, a screwdriver) near its sensitive element. If it records movement and an oscillogram is formed on the screen, the sensor is most likely working.
During the verification process, it will not be superfluous to scan errors from the ECU memory using special scanners. This will help both in determining the error of the DPKV and other engine elements.
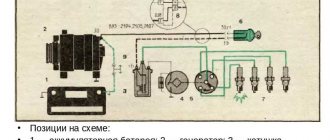
Principle of operation
The operating principle of the DPKV will depend on its type. The most common are inductive or magnetic. Let's look at their work step by step:
- There are a total of 60 teeth on the master (reference) disk, but two teeth are missing in one place (58 in total). The gap ensures synchronization of the sensor and is the beginning of the crankshaft rotation count.
- The sensor creates a magnetic field. As the drive disk rotates, its teeth pass through a magnetic field, creating pulses.
- When a section with missing teeth passes through the magnetic field, the device records the initial position of the crankshaft. All data is transmitted to the control unit.
- Based on the pulse frequency data, the control unit determines the crankshaft position and the number of revolutions.
- In accordance with this, the operation of the ignition system and the engine as a whole is adjusted.
There are also drive discs with two skipping teeth at an angle of 180°, type 60-2-2, which are used on some types of diesel engines.
Important! An inductive sensor does not use a supply voltage, and the electrical signal is generated by a magnetic field passing through the winding.
Stalls, doesn't drive, detonates: what is a crankshaft position sensor and how to check it?
That's right!
What is the crankshaft position sensor used for?
The answer lies in its name: determine the position of the crankshaft. It's that simple, yes. But besides this, the same sensor determines another important detail - the moment the pistons pass the top and bottom dead centers. Of course, he doesn’t do this himself - the computer does everything. But without it, it is simply impossible to obtain this data. Just in case, let's say a few words about why the control unit needs this data and how it uses it. Despite the apparent paucity of information transmitted by the DPKV, it is extremely necessary for the unit to adjust several parameters at once. Firstly, this is, of course, the fuel supply time. By the way, here it is precisely important to determine the moment of passing the dead spots. Secondly, this is the ignition timing. Thirdly, the amount of fuel supplied is determined not without the participation of the DPKV. And finally, this sensor is needed to synchronize the operation of the crankshaft and camshafts and for the normal functioning of the adsorber (to be more precise, its valve). If we add everything up, the crankshaft position sensor is one of the main sensors, the signal from which is required by the ECU for correct ignition control. Of course, the matter is not limited to it alone; without it, the engine cannot work normally either. And sometimes - just work in general, at least somehow. After all, if the ECU doesn’t know at what point it should apply voltage to the spark plugs or tell the injectors to inject the next dose of fuel, where should the engine go? Just stall.
Actually, this is usually what happens. The matter is complicated by the fact that DPKV practically cannot “glitch” due to its simplicity. So if he dies, he does it completely. One of the least severe consequences is an emerging phase error (for example, P0016). Of course, with this error, the first thing that arises is the desire to check the gas distribution mechanism (maybe the chain has stretched, the timing belt has jumped, or there is something wrong with the chain tensioner or damper or with the crankshaft pulley damper). But this error may well be caused by DPKV.
At one point, the ECU sees that the signal from the camshaft position sensor does not coincide with the signal from the crankshaft position sensor. During normal operation, the peaks on the oscillogram should coincide every other time, since in two revolutions of the crankshaft the camshaft will make only one revolution. If, when two signals are superimposed, desynchronization is noticed, a phase error appears. Thus, the ECU not only controls the ignition and injection, but also conducts a kind of self-diagnosis, checking the phase synchronization. And DPKV is one of the elements that undergoes constant testing during this self-diagnosis. This sensor cannot somehow distort or transfer the signal in time, and its only malfunction is the complete absence of a signal.
Light, Magnet and Hall
There are three types of DPKV: optical, induction (magnetic) and a sensor based on the Hall effect (sometimes called a Hall sensor). To operate, each sensor needs one more part - a master (or reference) disk, which stands either on the crankshaft pulley or directly on its toe. The purpose of the reference disk is to rotate at the same speed as the crankshaft and send signals to the sensor about each revolution.
The optical sensor is used less frequently than others. It consists of two parts: a light source and its receiver. Typically this is an LED and a photodiode respectively. When rotating, the master disk at a certain moment covers the LED, and the photodiode records the change in the signal. The disadvantage of this type of sensor is obvious: if it becomes covered with dust or dirt, it will not work. An induction sensor works much simpler and more reliably.
It's just a coil with a magnetic core and winding. At the moment the mark of the reference disk passes near the sensor, near the core, the magnetic field changes, and a current appears in the winding. Well, the current is the signal that the ECU is waiting for. Induction sensors are the most popular. They are reliable, simple, inexpensive and almost fail-safe.
Hall sensor - this is a Hall sensor. There are microcircuits in a housing with magnetic circuits, and the reference disk for such a sensor has magnetized teeth. Then everything is clear: a magnetized tooth passes near the sensor, a current arises, and the ECU receives a signal. In theory, this is the most advanced sensor, although more complex. At least for one reason: it needs power, which means there are more wires going to it. But it is very accurate.
I think we need to say a few words about the master disks. It is usually a simple toothed disc with a couple of teeth missing. Typically, the total number of teeth is 60. Thus, each tooth measures 6 degrees of rotation (6x60=360, a full revolution). Such discs are called discs type 60-2 (without two teeth). But sometimes there are discs that do not have two more teeth on the opposite side (180 degrees apart). They are called type 60-2-2.
If you usually don’t bother with the material for optical and induction sensors (they are often cast from steel along with the crankshaft pulley), then the disks for the Hall sensor are a little more complicated due to the need to put magnets in the teeth. That's why they are usually plastic.
Jerks, won't go, won't start
Just in case, we will describe the symptoms of DPKV failure. As I already said, the car will not drive normally or it may be impossible to start the engine at all. In addition, this is a rare case when the engine may stall while driving for no apparent reason.
Since an inoperative DPKV makes changes to the operation of the ignition system, detonation is possible (especially under load). At idle, the engine may operate unstably and the speed may fluctuate. In a word, the bouquet of consequences is large and unpleasant. And it is unlikely that you will be able to sort out this entire set without diagnostics. But DPKV has one nice feature: it can often be very easily removed and a new one installed in its place. Most often, you don’t even have to erase errors or perform other actions with the scanner: if the motor starts working, the problem is in this sensor. This is, of course, good, but it’s unlikely that anyone has a supply of DPKV at home. Maybe there is a way to check it without replacing it? And even without a scanner? Yes, there is such a way.
Little blood
Of course, you can’t check the DPKV with your finger; you’ll at least need a multimeter. And only the most common induction sensor can be checked this way. The method is very simple: set the multimeter to ohmmeter mode and check the coil resistance. It varies among sensors, but the approximate value of the coil resistance is from 500 Ohms to 1 kOhm. Of course, before taking measurements, it is advisable to find the exact value of the sensor that is installed on a particular car. But in general, you can focus on these values - 0.5-1 kOhm.
Unfortunately, this method does not give a 100% result. That is, the absence of resistance is a guarantee of failure of the sensor, but its presence is not a guarantee of its normal operation. And in normal services, DPKV is checked in two more ways. But for the first you need at least an inductance meter, for the second - an oscilloscope. Neither one nor the other is simply kept at home, so I will not describe these methods.
It’s sad, but it’s generally impossible to check the Hall sensor with a conventional multimeter, so this will require either expensive equipment or (which is much simpler and more efficient) a new sensor. In general, replacing a suspicious sensor with a known good one is the best diagnostic method.
Fortunately, the DPKV itself breaks down extremely rarely. Nothing moves or wears out inside it, so it cannot wear out mechanically. It is usually damaged during clumsy repairs, so if there is a suspicion that the DPKV began to act foolishly after visiting “Uncle Vasya,” this suspicion may be well founded.
Before looking for the ohmmeter mode on the multimeter and thinking about where to put the two probes of the device into the sensor, you need to inspect it from the outside. No matter how simple he may be, if he is accidentally hit with a hammer, he may die. More often it dies from dirt getting between it and the drive disk. The distance between them is small (on average 0.5-1.5 mm), so even a small pebble that unsuccessfully sticks to the dirt can cause a lot of grief.
In addition, like any electrical part, the sensor may refuse to work due to faulty or oxidized wiring. Therefore, you need to check its connectors, and if they are dirty or oxidized, clean them. It may turn out that the problem is in them, and not in the sensor.
And lastly: a shaking and stalling engine along with a burning Check Engine and errors P0016 (as well as P0335 or P0336) do not always clearly indicate a malfunction of the DPKV. Yes, there are errors that more or less accurately indicate the absence of a signal from the sensor, and a good diagnostician will see this immediately. It is best not to self-medicate and turn to a professional.
Survey
Has your DPKV ever broken down?
Your voice
Total votes:
Types of sensors
There are three types of DPKV, which differ in their principle of action.
- Inductive (magnetic) . We have already discussed its principle of operation above. It is based on electromagnetic induction. This type of sensor is most widely used due to its efficiency and reliability. It is worth noting that for its operation and the formation of a stable signal, high speeds of the master disk and the absence of obstacles between it and the sensor (contaminants) are required.
- Hall Sensor . This type of DPKV works based on the Hall effect. When the disc teeth pass through the sensor, it produces a small signal voltage. The data is recorded and transmitted to the control unit in the form of a discrete signal. Such sensors use a reference voltage and are highly accurate, but are rarely used as DPKV.
- Optical . The operation is based on a light source and receiver (LED and photodiode). The teeth of the disk pass between them in the gap. At different rotation speeds, the teeth of the disk obscure the LED, as a result, pulse signals are formed on the photodiode, which are fed to the control unit. Due to their impracticality, such sensors are now almost never found in cars.
Symptoms of a problem
The following signs may indicate a breakdown of the crankshaft position sensor:
- loss of engine power;
- the engine operates unstably at different speeds and modes, including at idle;
- fuel consumption has increased;
- at high speeds, detonation is observed in the engine;
- misfiring;
- error P0336;
- If the sensor completely fails or is missing, it is impossible to start the engine.
However, it is worth keeping in mind that these signs are the most common and may indicate a breakdown of other vehicle sensors, which it is also advisable to check. Therefore, it will not be superfluous to carry out comprehensive diagnostics using a car scanner. For example, Rokodil ScanX Pro is suitable for most domestic and imported cars.
Rokodil ScanX Pro
These signs may indicate other malfunctions, but in any case it is necessary to carry out diagnostics and identify the cause. The sensor itself rarely breaks down, and if it does, it is simply replaced with a new one.
Trouble-shooting
The check may show the inability of the electric sensor to detect the condition of the crankshaft. In this case, if the failure of the DPKV is confirmed, it will need to be replaced with a new one. But if the breakdown happened on the road and the nearest car shop or service station is far away, you can try to find and fix the problem yourself. Sometimes the problem lies not in the coil of the induction device, but in the contacts.
Cleaning from dirt
For example, a common problem is contamination of the working part with grease from the flywheel. The latter flies onto the sensor and covers it with a thick layer of dirt. Dust and sand, as well as metal shavings, stick to the top. All this creates interference with the operation of the element. In this case, you will need to unscrew one or two holding bolts, remove the DPKV out and thoroughly wipe its body protruding after the stop. Then return the device back and try to start the engine again.
Dirty PCV sensor
Broken contact
Another common problem is a broken wire. It often happens before the contact chip. At this point the wires bend, which leads to gradual refraction. Visually, a violation of the integrity of the conductor may not be noticeable, since the outer insulation remains intact.
To resolve the problem, remove the connector and pull the contact pins lightly towards you. The tattered one will come out and remain in your hands.
Repairs will require stripping the insulation and tying off the exposed ends. Then the area is insulated (you can use cambric or electrical tape). But this measure is temporary and will require subsequent soldering.
Contact contamination
Although the connector is protected by a rubber seal, it gradually loses elasticity and tightness. Because of this, moisture and dust penetrate inside. The corrosion process begins. The contacts oxidize and the circuit is interrupted. As a result, a serviceable DPKV ceases to detect the condition of the crankshaft and the engine stalls.
Dirt on DPKV contacts
To solve the problem, try cleaning the contact pins. They are located in the recesses and can be reached with a thin file or sandpaper rolled into a tube. Blow out any dust that has accumulated inside, restore the connection and try to start the engine.
Related Issues
If the DPKV “rings” and there is no violation in the integrity of the contacts, the breakdown may be associated with missing teeth on the flywheel. The electric sensor simply “confuses” the ECU, responding to additional “tags” formed. Only a mechanic at a service station can determine this. To repair, you will need to replace the flywheel crown.
The MAF (determines the mass air flow) also affects the operation of the DPKV and causes deviations in the readings. The problem is diagnosed in the service.
A figure-eight bend of the flywheel can mislead the crankshaft electric sensor, and this will require removing the box and replacing the deformed part.