Payment for goods and downloading of the book in electronic form (PDF format) is made on the website.
To do this, you need to find the book you are interested in and click on the “Buy” button. The price of the book is indicated on the button.
For convenience, the price on the website for residents of Russia, Belarus and Kazakhstan is presented in rubles.
For residents of Ukraine in hryvnias, and for all other countries - dollars.
After clicking on the “BUY” button, a payment window will open where you can select a payment system with which you can pay for the selected book using any bank card (Visa, MasterCard, MIR, etc.)
When you click on the “Pay by bank card” button, the Portmone payment system will open, which is the easiest way to make a payment.
In addition, the website offers four payment systems for payment:
- Yandex (payment from any bank cards, Yandex Money account, QIWI Wallet, terminals, etc.);
- Portmone (payment from any bank cards, Portmone account);
- PayPal (payment from any bank cards, PayPal account);
- WebMoney (payment from any bank cards, payment from WebMoney wallets).
Payment via Yandex Cashier
After selecting payment via Yandex, the Yandex Cashier payment system will launch, where you need to select a convenient payment method (bank card, QIWI, Yandex Money account, etc.)
After specifying payment details and confirming payment, payment for the goods will occur.
If you have a bank card in a currency other than the ruble, then the money will be debited from the card at the rate of the Central Bank of Russia at the time of the purchase.
This payment method is optimal for residents of Russia, Kazakhstan and Belarus.
Official website of the Yandex Kassa payment system https://kassa.yandex.ru
➤ How to remove the rear and front bumper of a grant liftback
Long-term operation of the vehicle over rough terrain, extreme temperature conditions, and aggressive driving style contribute to premature wear of the paintwork and peeling.
Ultimately, cosmetic repairs and a number of restorative procedures are required. Obviously, we are not talking about deformation, damage after an accident, collision, or traffic accident. In practice, based on the results of an inspection by a service station technician, a decision is made to replace the plastic “protection.” The cost of purchasing a new one is approximately comparable to partial repairs.
Characteristic differences between sedan and liftback bumpers
The front/rear “plastic” of both modifications is completely identical in terms of the mounting method. The main difference is in the exterior, color, and shape of the radiator grille. You can visually distinguish the first generation from the second by the color of the front grille of the cooling system.
In the first generation, she is in her original color - the natural color of plastic. In the second - to match the main color of the car. This rule also applies to the Grant liftback model, the so-called “bolt on” landing. This is such slang among motorists.
Typical bumper mounting locations:
- front: four bolts in the upper perimeter, two in the middle, four at the bottom, on each side;
- rear: two side fasteners, four upper and the same number of lower.
What is needed for a successful renovation
To remove the Grant liftback bumper you will need: a set of automotive tools, a Phillips-head screwdriver, rags, rust remover WD-40, restoration components.
The decision on the type of repair is made by the workshop specialist based on the results of a comprehensive diagnostic. If the impact occurred “head-on” at a speed of over 60 km/h, then replacement with a new one is guaranteed. When the scale of the damage is not large, the structure of the plastic fasteners is not damaged - restoration of the standard element is allowed.
Do-it-yourself front bumper removal
- We install the car on a flat platform, an inspection channel. In this case, it is not at all necessary to use an electric lifting mechanism;
- open the hood;
Unscrew the top row of mounting bolts (4 in total), two in the middle, four at the bottom.
First turn the steering wheel to the side for ease of work. We remove the front bumper of the Grant liftback, the dismantling process is completed. Subsequently, the master (car owner) carries out preventive maintenance, replaces the plastic product, and installs additional equipment as necessary.
Algorithm for step-by-step installation of the front bumper
- after diagnostics, prevention of fastening points, we install a new “plastic”, it must be painted in the original color of the car;
- we hang the upper perimeter, then the lower one, followed by snapping the plastic clips;
- Having made sure that the fit is tight, we proceed to fastening it with bolts.
DIY installation is complete.
Payment via Portmone
After selecting payment through Portmone, the payment system will launch, where you need to select the payment method: bank card or Portmone account.
The price in the Portmone payment system is converted into dollars at the exchange rate of the Central Bank of the country where you are located.
If you have a bank card in a currency other than the dollar, then the money will be debited from the card at the rate of the Central Bank of your country at the time of the purchase.
After specifying payment details and confirming payment, payment for the goods will occur.
Official website of the Portmone payment system https://www.portmone.com
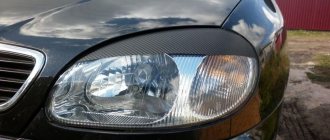
Replacing standard lighting
In order to replace headlights or carry out repairs, you need to prepare accordingly. The vehicle owner will only need 8 mm and 10 mm socket wrenches. The process of removing the headlight is as follows:
- Initially, you should disconnect the negative terminal from the battery.
- In order to gain access to the lower mounting of optical instruments, you need to remove the lower bumper.
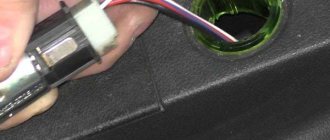
- It is necessary to disconnect the turn signal lamp clips. You also need to remove the running lights of the Lada Grant.
- The main light cover should be removed by turning it counterclockwise. After this, you can gain access to the inner surface of the headlight.
- Remove the wire retainer from both the low beam and high beam lamps.
- The headlight hydraulic corrector must be removed counterclockwise.
- Using a wrench, unscrew the 4 mounting bolts.
- After completing all of the above steps, you can remove the burnt out lamp by replacing it with a new one.
While disconnecting optical devices, they must be held. This should be done to prevent them from falling and being damaged.
The rear lamps can be removed and replaced much more easily than the front lamps. This is due to the fact that they are accessed through the trunk of the car. As a result, there is no need to remove the bumper. Removing and replacing lamps in the rear headlights is as follows:
- The luggage compartment trim needs to be removed. The bases of the instrument lamps will become visible under it.
- To unscrew you will need an 8 mm wrench.
- Another fastener needs to be pressed out without using tools. This can be done by hand.
- The taillight connector can also be removed without the use of keys.
- Having pryed the headlight, it should be bent. After this, you can completely remove the device.
- To replace the lamp you need to unscrew the base.
After all these steps, the work must be done in the reverse order to install the headlight unit in its original place.
Payment via PayPal
After selecting payment via PayPal, the PayPal payment system will launch, where you need to select the payment method: bank card or PayPal account.
If you already have a PayPal account, then you need to log into it and make a payment.
If you do not have a PayPal account and you want to pay using a bank card via PayPal, you need to click on the “Create an Account” button - shown with an arrow in the picture.
PayPal will then prompt you to select your country and provide your credit card information.
After specifying the information required to make the payment, you must click on the “Pay Now” button.
Official website of the PayPal payment system https://www.paypal.com
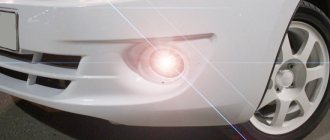
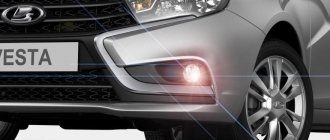
Step-by-step instructions for installing a rear fog light
Many Lada Granta Liftback car owners are surprised to hear about this, but it is a fact. Of course, we are not talking about PTF in its classic form, but about a laser brake light. It is installed in the rear of the car and informs the driver behind about the vehicle. Since there is no strictly defined installation location, it is customary to fix it in the area of the license plate, under the lower contour of the bumper, in the spoiler. There are known cases of embedding an accessory inside.
A bright red light beam informs drivers behind, preventing accidents. The brake light is also used when it is necessary to notify the driver of the need to switch the high beam headlights. An alternative way to use lighting when backing up or parking in conditions of limited visibility. The maximum effective beam length is 25.0 meters. Exceeding the length does not guarantee the quality of lighting.
The voltage is supplied from the left/right brake light. Activation is possible either by pressing the brake pedal or by a separate button. The owner makes the decision based on personal beliefs. In practice, activation occurs with an autonomous button, since when driving backwards it is not always advisable to use the standard brake pedal. It is strictly forbidden to point the laser beam at the windshield area behind the driving driver.
Payment via WebMoney
After selecting payment via WebMoney, the payment system will launch, where you need to select the payment method: bank card or WebMoney wallet.
If you already have a WebMoney wallet, then you need to log into it and make a payment.
If you do not have a WebMoney wallet and you want to pay in another way, you need to select any of the methods that WebMoney offers and make the payment
After specifying payment details and confirming payment, payment for the goods will occur.
Official website of the WebMoney payment system https://www.webmoney.ru/
Gearboxes
This is a sore subject, as for a long time there were a huge number of complaints about noise from the gearbox. The howl was really pronounced and annoying. The main responsibility for gearbox noise lies with the final drive. It works constantly, and the largest gear is in its mesh.
The new Lada Granta has a main gear with a gear ratio of 3.9; the old model had 3.7. This made it possible to improve the dynamics of the car to some extent and reduce noise from the gearbox. Now there are significantly fewer complaints from car owners about noise from the gearbox.
What gearbox defects have been eliminated?
At one time there was a common defect - a crunching sound when shifting gears from 1 to 2. The culprits were the synchronizer rings, namely their coating, which burned out. When AvtoVAZ released a new cable-driven gearbox, things weren’t going smoothly with it at first either.
There were frequent complaints about strong vibrations transmitted to the shift lever when driving in 3-4 gears. This problem has been dealt with for a long time; there have been a number of ineffective methods for eliminating the defect.
As a result, the situation was resolved by installing three modernized components:
- Gear shift cables.
- Switching mechanism.
- Brackets for fastening cables.
A separate story was with the bearings of the primary and secondary shafts of the gearbox. They hummed and made a small knock when the transmission was operating. At that time, domestic bearings were installed, which did not have a long service life. The percentage of defects for them was high. As in the case of oil seals, the situation changed dramatically for the better when we switched from domestic bearings to imported SKF ones.
Downloading a book
After successfully completing the payment (by any method) and returning to the KrutilVertel store from the payment system website, you will be taken to the successful payment page:
On this page you need to indicate your e-mail, where access to download the book will be sent.
If you are already registered on our website, then simply follow the link to your personal account.
The book you purchased will be in your personal account, from where you can always download it.
Please note that after making the payment, you need to return back from the payment system website to the KrutilVertel website.
If for some reason you did not return back to the site and closed the payment system tab with a message about the successful completion of the payment, please let us know - we will send you a letter indicating access to download the book.
How to adjust headlights on Lada Granta
After replacement, it is necessary to install the headlight bulbs and make adjustments so as not to dazzle oncoming drivers. To adjust the light, you must use a special stand that simulates special lines of the light-shadow boundary and allows you to control its direction. The sequence is as follows:
- Set the hydraulic corrector to position 0.
- Insert the hex key into the corresponding hole and turn the adjusting bolt until the STG lines up with the lines on the stand.
Adjusting the light using the wall gives only an approximate result. Precise settings are only possible when using special equipment.
Problems when paying with bank cards
Sometimes difficulties may arise when paying with Visa/MasterCard bank cards. The most common of them:
- There is a restriction on the card for paying for online purchases
- A plastic card is not intended for making payments online.
- The plastic card is not activated for making payments online.
- There are not enough funds on the plastic card.
In order to solve these problems, you need to call or write to the technical support of the bank where you are served. Bank specialists will help you resolve them and make payments.
That's basically it. The entire process of paying for a book in PDF format on car repair on our website takes 1-2 minutes.
If you still have any questions, you can ask them using the feedback form, or write us an email at [email protected] .
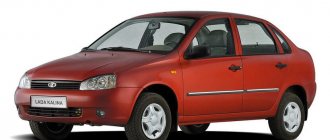
Selection of headlights for Lada Granta
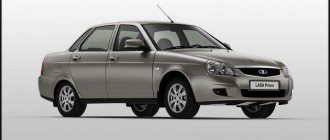
First of all, you need to decide on the generation of the car. And there are currently two of them:
- From 2011 to 2022, the very first version of Grant was produced.
- Since 2022, an update has been released - Granta FL.
The main difference between them is the front optics and design. Just look at the photo below:
Purchasing a new part may be necessary if the old one was damaged in an accident or the car owner wants to improve the quality of the head optics.
It should be borne in mind that there are many companies that produce head optics for different cars, and accordingly, their quality differs. Therefore, you need to be able to distinguish between an original and a fake.
TOP 4 headlight manufacturers for Grants:
- Kirzhach - delivered as original to the conveyor. The cost of the set is 10,000 rubles.
- KT Garage is a tuned version with an additional curved strip of LED running lights. Its price is 4500 rubles. The quality is low.
- OSVAR is also sometimes supplied to the conveyor belt. Price may vary.
- Lensed products – 12,000 rubles per set. The quality is average, may require improvements. The light is good only with LED lamps.
Article number of the original headlight (until 2022):
- 21900371101000 – right;
- 21900371101100 – left.
Article number of the original part (after 2022):
- 8450100856 – right;
- 8450100857 – left.
Tuned versions often have only one advantage - an attractive appearance, the rest are disadvantages. After all, the quality of light leaves much to be desired, and the original headlight has many advantages:
- good, proven light;
- no problems with the traffic police;
- In the event of an accident, you do not need to buy the entire kit.
Therefore, the car owner’s priority should be the original.
What does the market offer?
Below are some options for halogen lamps of different price categories that can be installed on the Grant:
And these are just a few types of halogen lamps. In general, the range of such lighting equipment is very extensive and allows any car owner to find a suitable option both in terms of price and quality of work.
conclusions
As you can see, the technological process of removing a Lada Granta headlight is quite simple and almost every motorist who does not have experience and skills can dismantle this element with his own hands and without unnecessary labor.
Granta and Kalina headlights are considered non-separable. If a crack appears on the glass, the headlight unit is replaced as an assembly. However, with a strong desire, it is still possible to disassemble it. Let's look at how to remove the glass and headlight mask with your own hands. The process is shown using the example of a Lada Granta headlight. On the Lada Kalina 2 headlight, all actions are performed in the same way.
Required
: remove the headlight, prepare a Dremel (disc diameter 20 mm), sharp knife.
Headlight glass mounting diagram:
The sealant that holds the original headlight glass in place is heat resistant. That is, you won’t be able to loosen its “grip” by heating it with a hairdryer or in the oven. In addition, there are four fastening brackets on the edge:
How to replace headlight glass
:
- Seal the glass with masking tape to prevent damage during work.
- We cut off about 7 mm of the U-shaped fastening (using a Dremel), and then remove the remaining sealant (photo No. 1).
- We cut off about 2 mm of the sealant between the glass and the plastic using a Dremel (photo No. 2, color green).
- We remove the remaining sealant using an L-shaped blade (you can bend an ordinary knife after heating), photo No. 3.
When reassembling, we use a transparent glass sealant (for example, ABRO).
What it looks like in practice:
The process is also shown in the video:
How to remove a mask from a headlight
:
- The inner mask is attached using a spring mechanism, which is connected to a hydraulic corrector.
- The outer mask is held in place by 4 Torx screws.
Now it becomes possible to install powerful LED or flexible DRLs. Have you ever had to disassemble the headlights on a Grant or Kalina yourself? How did you manage to do this?