Why are there bevels on brake pads?
Applied to both the front and rear of the part, the bevels ensure stable contact between the planes both when the vehicle moves forward and in reverse. In addition, this technology allows you to optimize the grinding of the pad to the disc, optimizing friction and increasing component life.
Interesting materials:
Where are the brains on the VAZ 21099? Where is the United Arab Emirates? Where are the Olympic venues in Sochi? Where are the shipping bolts located on a Candy washing machine? Where are all the masks in Skyrim? Where are all the horseshoes in GTA SA? Where was New Carthage located? Where to find the Sea of Azov? Where is the photo archive on Instagram? Where is the Bering Strait located?
How to press in the caliper piston
When repairing calipers or replacing brake pads on a car, you must press the piston into the caliper to install it in place.
The fact is that when you press the brake pedal under the influence of brake fluid pressure, the piston comes out of the caliper body, presses on the pad, causing the car to brake. So, when the caliper is removed from the brake disc, it remains in the pressed-out position, and it will not be possible to install it back on the disc after replacing the pads, since the piston is in the way. The part must be pressed back, only then the structure will fall into place. Most car enthusiasts press the piston in all sorts of ways: some with a bench vice, some with a gas wrench, in general, whatever is necessary. But few people know that you can quickly make a tool with your own hands, with the help of which the piston is pressed into the caliper in a few seconds. This tool is made simply, from improvised material, the only condition is that you will need electric welding.
It happens like this. We will need an arbitrary metal plate, 3 cm wide, 10 cm long, 3 mm thick, so that it does not bend under load. We also use one bolt with a diameter of 10 mm and a length of 10 cm, two oversized washers and two nuts. A hole must be drilled in the center of the plate so that the bolt shaft can fit through it.
First, using electric welding, weld the nut to the enlarged washer. This must be done carefully so as not to spoil the thread. We will do the same with the other nut and washer.
Then we weld one nut with a washer to the plate so that the holes on the plate and on the nut coincide with each other. In our case, we found a plate with a drilled hole. Since the diameter of this hole was larger than the diameter of the nut, we used an oversized washer to weld the nut to the plate. If you drill a hole in the plate yourself, you won't need a second washer.
Now we take the bolt, screw the structure with the plate onto it to the middle, and screw the nut and washer onto the end of the bolt so that the washer is the last one. The tool for pressing in the caliper piston is ready.
It works like this: we install the device in such a way that its enlarged washer rests against the piston, and the plate rests against the caliper body. We tighten the bolt with a wrench, it is screwed into the nut with the plate, it rests on the caliper body, the washer on the piston - and presses it. You just need to be careful not to tear the boot. In this simple way you can quickly install the caliper piston in place. If you liked the article, share it on social networks.
VIDEO
Brake caliper piston and other system elements
If we consider the brake caliper design as a whole, we should remember that this is a unit that, with the help of pistons, ensures uniform pressing of the pads. The very design of disc brakes requires them to operate in critical temperature conditions. Between the pad and the disc, as a result of friction, the surfaces of the parts are heated to a temperature of 500-600 degrees Celsius.
Heat is dissipated and removed on other parts of the caliper, due to which the temperature is much lower, but its value is kept at a minimum level of 150 degrees. In such conditions, brake caliper lubrication is critical. In addition, the components and parts of the caliper are constantly exposed to water and salts that appear on the road surface.
Therefore, the lubricant used must have high temperature resistance, be resistant to the chemical effects of brake fluid, and it must not melt or dissolve in water.
Considering the design of a disc brake with a floating caliper, one should note its characteristic features. Its movement relative to the disk during braking occurs in such a way that it can quite easily provoke various malfunctions in the form of critical accumulations of dirt, corrosion, and jamming. In such situations, the pads wear out quickly and fuel consumption increases. A more reliable design is considered to be a fixed version of the caliper, where there is no movement of it relative to the disc.
Is it difficult to replace a brake caliper?
Replacing a brake caliper on most car models is a fairly simple repair. You can do this project at home using some common tools. However, especially if your car is equipped with ABS, you should take certain precautions. But don't worry. This guide will tell you how to approach this project at home and, if your car has a regular or ABS system, the steps that are important to a quality car repair.
What is the mileage before replacement on a Toyota Corolla?
The pads should be changed if the diagnostics showed extreme wear of the friction clutch (less than 2 mm) or you saw an obvious increase in the braking distance. Another sign is a loud squeak when braking. The average service life of front pads on foreign cars is 25–30 thousand km. The rear ones go twice as long. But it is always necessary to look at the actual condition. numbers of original pads: how to press out the brake cylinder when replacing. Average times may vary significantly due to driving style or the properties of the spare part.
Steps to Replace a Brake Caliper
- Find the brake caliper.
- Minimize brake fluid loss.
- Remove the old caliper.
- Install a new caliper.
- How to bleed a brake line.
- Strategies and tips for successful brake caliper replacement.
Each of these steps is described in detail below.
Tools you'll need
- Wrenches
- Screwdrivers
- Hammer
- Brake fluid
- Rags
- Wire.
DIY caliper repair
- Caliper repair
- Rear caliper repair
Repairing a caliper with your own hands is not at all difficult, but it requires the correct selection of lubricants and components. Let's take a closer look at this process with photos and video instructions.
The most common cause of brake caliper failure is its souring and subsequent jamming.
If the caliper is regularly maintained and lubricated, it can last for decades without any repairs. But the main thing is to choose the right lubricants!
How to choose the right lubricant is outlined on the page How to lubricate a caliper
If interested, read about choosing lubricants. In this article we will work with them, but I will not spend letters in this article describing these lubricants.
Caliper repairs can be divided into three categories:
The first two categories can be viewed via the links. And in this article we will look at the third category, when it is too late to drink Borjomi and surgical intervention is necessary.
How to recess the rear caliper piston
Today I lubricated the rear caliper guides, but I couldn’t get the piston to sink no matter how hard I tried, everything came together tightly and now the hub is heating up. How to drown him?
Try it with a pry bar or a small crowbar.
Someone wrote that it seems like you need to twist and press, but with what and how?
Tried it, doesn't work
Someone wrote that it seems like you need to twist and press, but with what and how?
The piston must be twisted. Using sliding pliers.
it needs to be screwed in; a grinder key is great for this.
I'll try it today and post the results
They are usually screwed in clockwise. It is recessed very tightly and in a small turn, in the service standards there is a special gadget. If you use a key for an angle grinder or a bike, loosen the bolt a little so that when pressed, the brake fluid flows out. The piston will go in much easier
. cut the hose it will be even easier
+1000 clockwise, the main thing is not to overdo it and don’t catch the boot - it will tear
Thanks to all! Everything worked out. I lubricated all the guides, as quiet as in . I didn’t even turn on music, I enjoyed the silence.
Damn, I'm also interested in this topic, I tried to change the rear pads over the weekend. So everything seems to be fine, damn it changes, but I couldn’t move the piston. True, the description says that you need to unscrew the hose from the caliper, but to be honest. I was afraid to unscrew it since I was in an area 250 km from Moscow. What are some easy ways to remove a brake piston? Mosh, who has the key, so to speak, for these matters. I agree to rent it if you don’t mind.
In the end, how did I solve this problem? tell the society?
Tags: VAZ, brake repair
Comments 63
I pushed the pistons with a gas wrench: www.drive2.ru/l/4367699/
Well, Idk. A new piston from the store, installed and pumped, is simply pressed in by hand. If you have to use significant force, this means that it is wedged and does not release the brake, or does not release the brake completely.
I press the piston with two spark plug wrenches.
I wasted the grease under the cuff; it’s useless there.
For what! The piston does not rust.
The piston contacts the cylinder up to the main cuff, and there the brake seal. There is no contact above the cuff. The piston should not slide in the cuff. When braking, the piston extends and deforms the cuff, which subsequently returns it back. Whatever rusts, the boot must be intact. And lubricant can only make it worse, dry out due to temperatures or corrode the boot over time.
Learn materiel! The piston is returned not by the cuff, but by the rubber ring in the cylinder. The cuff protects against dirt and corrosion.
Don’t listen to the speaker above, you need to lubricate the piston, the oil seal and fill a lot of good lubricant under the boot, only lubricant that does not dry out, so that the piston does not become covered with corrosion and does not jam.
You can only use lubricant for the calipers there. The rest will dry out or become coked from the heat.
Don’t listen to the speaker above, you need to lubricate the piston, the oil seal and fill a lot of good lubricant under the boot, only lubricant that does not dry out, so that the piston does not become covered with corrosion and does not jam.
repair of brake calipers (lifehack on how to remove and insert brake pistons))
entry for the shared heap. (if you are like me and are going to go through the calipers after watching a bunch of recordings on the drive and realizing that you will have to fuck filling the pistons into the rubber bands according to the instructions from the drive, then read here I will tell you 2 life hacks that I did not find on the Internet) ____________________________________________ the car was given to the service for work : replacement of the ball, replacement of the front stub bones, left wheel bearing, replacement of the steering tips, left drive oil seal, replacement of the handbrake cables, replacement of the rear brake cylinders. bulkhead of the front calipers _____________________________________________ result: no one touched the front calipers, good thing I went to have a look. I had to return the money myself.
I won’t describe too many of these records. We remove the hoses and turn them off for the duration of the work. remove the calipers, pick out all the rubber bands, the hardest thing for me was getting the jammed rusty pistons out of the calipers. break two pages of caliper revision records for emphasis. on the drive there are about 15-20 entries per page, having reviewed about 30 in total and looking at a bunch of videos on YouTube, I realized that they can be pulled out either: 1 by hand. if the pistons move well 2 by pressing the brake pedal (but I remembered this after I removed the hoses and disassembled everything)) 3 with a press 4 with a hammer through the hole where the hose is screwed 5 with a compressor with homemade nozzles through the same hole 6 buy an oiler and screw it into the same hole and stuffed and squeezed out with solid oil, etc.
Well, then put all the glands in citric acid overnight.
after which we clean the remaining corrosion with a brush, sandpaper, etc. My elastic bands were all intact and elastic. I didn't use the repair kit at all. I cleaned the rubber bands and put them back in place. You've all probably read how to put a piston in place while pulling the elastic band back with a wire or your wife's nails in several places - all this is inconveniently long and hemorrhagic. ______________________________________________________________ life hack number two! Lubricate the piston with brake fluid. I didn’t buy or use any lubricants. If you have old wiper blades lying around, take them apart, they always have two metal strips. very tough. or find something similar. Bend half a centimeter at the end with pliers. twice. so that the edge is not sharp and does not tear the rubber. on the other hand, bend it as you like for convenience so as not to hold a thin wire in your hands.
insert the cuff into the caliper. insert the second rubber band into the groove of the caliper. take the slippery piston, pry up the rubber band with your new custom pick and move it in a circle between the rubber band and the piston. exactly 10 seconds for each piston. ready. The pistons move in the caliper with finger pressure. There was a little bit of guide grease left from last time. so I didn't have to buy that either. Next, we paint it to your taste and color with heat-resistant paint and put it back together, after which we pump the front end.
(the most difficult thing in all the instructions is to take out and push back the piston, after reading which you generally think to climb it yourself or give it to them to do it. But no one will do it for you better than yourself, and in the end it turned out to be the easiest thing to take out and push the pistons in. I was more f*cked up with the brush remove rust before painting)
Source
How to bleed the brake system
After replacing your brake caliper, this next procedure will help you remove air from the brake line, even if you are working with the ABS system.
However, if you believe there is air in the brake master cylinder or hydraulic control unit (HCU) and your vehicle has ABS, you may need to take your vehicle to the dealer or workshop and have them bleed the system. If necessary, consult your vehicle's repair manual.
- Without starting the engine, depress the brake pedal approximately five times at normal stopping pressure to remove any residual vacuum from the brake booster.
- Check the master cylinder reservoir. Add new fluid to bring the level to the MAX mark if necessary, and tighten the reservoir cap.
- Place one end of a piece of clear rubber hose onto the drain screw of the new caliper. The hose should fit snugly against the bleeder screw. You can find a clear hose at an auto supply store.
- Insert the other end of the clear hose into a plastic container and add a small amount of brake fluid to the container, large enough to submerge the end of the hose.
- Have a helper press the brake pedal five times and then hold the pedal firmly down.
- Next, loosen the bleeder screw about 1/4 or 1/2 turn, just enough to allow brake fluid to flow through the clear hose for about 2 seconds, and then tighten the bleeder screw again. Watch for air bubbles entering the brake fluid in the reservoir.
- Ask your assistant to release the brake pedal.
- Repeat steps 5 through 7 until you see no air bubbles draining into the brake fluid in the reservoir. When bleeding, be sure to keep the level above the MIN mark on the master cylinder reservoir.
- Correctly tighten the bleeder screw after bleeding the caliper or brake line.
- If necessary, add brake fluid to the master cylinder reservoir.
- Make sure the pedal feels firm and operates properly. Drive at a slow speed to make sure the brakes slow down and stop the car properly.
- Back in the garage, check the brake hose and bleeder screw on the new caliper for leaks. And continue checking for leaks over the next week.
We recommend reading: Pressure meter - tire sensors
You can remove air from your ABS system by bleeding the brake caliper and connecting line. To bleed the master cylinder, refer to your vehicle's repair manual.
Tips and Strategies for a Successful Replacement
Whether this is your first time working on your car's braking system or you're already familiar with it, check out these tips. They will help you make a smoother repair job.
- When cleaning the brake assembly, use a parts cleaner.
- When disassembling the wheel brake assembly, keep the parts in order and use the opposite assembly as a reference if you forget how to put everything together, or better yet, capture everything on camera at the same time.
- Replace the pads and caliper if the thinnest side of the pad is as thick or thin as the backing plate.
- If you haven't replaced your hoses in the last 10 years, consider replacing them now. Old hoses begin to peel off from the inside, blocking proper flow of brake fluid and can cause the caliper to seize.
- Replace brake calipers in pairs (front or rear) if they have more than 200,000 kilometers. This will help maintain the quality of the braking system.
- If possible, install new fastening hardware - heat weakens fastening material after many miles of work and can cause the new caliper and pads to rattle or squeak.
- If your brake system configuration differs slightly from the configuration described here, refer to the repair manual for the specific make and model of your vehicle.
Replacing a brake caliper is not a routine repair unless there is excessive wear, damage to the bore or piston body, the brakes are not seating (in some cases), or there is a brake fluid leak. However, this project is not difficult and is often the best alternative for rebuilding a caliper. If all this seems very complicated to you, it is better to go to a car service station in your city, where auto repair specialists will provide you with a high-quality and quick replacement of calipers.
How do you like the article?
Caliper repair: design nuances and maintenance features
Sooner or later, any mechanism wears out, and brakes are no exception. Items such as brake discs and pads are consumables and are simply replaced with new ones. But brake calipers are an expensive and responsible part. If they break down, they require careful diagnosis and repair.
What does it consist of and what wears out?
Most brakes on cars are single-piston calipers with floating calipers. On powerful machines, mechanisms with two or more cylinders and a fixed caliper are used. The rear brake mechanisms usually also have a parking brake mechanism, which on most modern passenger cars is implemented through service brake pads.
All these mechanisms contain moving parts. At a minimum, this is one hydraulic cylinder per caliper, guides, and the parking brake also has a mechanism for mechanically pressing the pads. In addition, hydraulic shut-off valves are subject to wear, and the surface of the calipers gradually loses paint and oxidizes due to heating and mechanical stress.
The main points of wear are the anthers of the hydraulic cylinders, which are both the “spring” of the cylinder and part of the self-feeding mechanism of the pads, as well as the caliper guides, or, in common parlance, “fingers”. It is because of the wear of these elements that the brakes jam, squeak and overheat.
In addition to the wear and tear of these basic elements, there are also related problems. Thus, due to wear of the hydraulic cylinder boot, the working piston of the hydraulic cylinder and even the working surface of the caliper cylinder are subject to corrosion and abrasive wear. In addition to the wear of the caliper pins, their guides in the caliper may also be worn. And, of course, there is always a chance of a violation of the geometry of the caliper bracket or its other elements, especially if it is light alloy. This happens when there is uneven pressure from hydraulic cylinders on the disk and external mechanical influence, as well as severe overheating.
A separate set of malfunctions occurs in the rear calipers with a built-in parking brake mechanism. The Teves/ATE type brake mechanisms, which appeared back in the 80s, have now almost replaced other types of parking brake mechanisms. For such calipers, in addition to breakdowns of the main working part, the installation parts of the caliper body, corroded rods, studs and other fastening and other elements may require repair.
The service life of calipers is usually more than 7-8 years, even in our climate. However, there are exceptions. Thus, calipers with light-alloy pistons that operate without boots (for example, in Lockheed/AP Racing multi-piston calipers used on many heavy crossovers and SUVs, as well as sports brakes) may require repair much earlier, especially if they still use original aluminum chrome plated pistons.
Also, calipers may require repairs after service errors. This happens especially often with rear brake mechanisms with a handbrake. The main prerequisites for repair are not squeaking or whistling brakes at all - this kind of “trouble” in most cases is associated with an unsuccessful choice of brake pads, their incorrect installation or contamination. Uneven braking, lack of braking force, incomplete release of the brakes or fluid leaks are clear prerequisites for caliper repair.
How are faults resolved?
First of all, the caliper is disassembled and cleaned. Disassembly is not always a simple task, and brakes with integrated parking brakes may require special tools and skill. Cleaning in a specialized workshop is done using shot blasting, but for individual jobs chemical cleaning or mechanical cleaning with brushes/drill attachments can be used.
A separate job is cleaning the hydraulic channels from rust. The shut-off valves are simply replaced, and new fittings must be installed. The external connecting pipes on multi-piston calipers are cleaned, checked and, if necessary, also replaced.
After complete disassembly, a decision is made about the possibility of restoring the caliper. There is no point in repairing violations such as deep corrosion of cylinders or mechanical damage only if the brake mechanisms are unique.
If the decision to restore is positive, the caliper undergoes final cleaning. Sometimes material is welded on to bore new fastening/installation points and, if necessary, painted. New pistons are selected or manufactured. If they are sharpened from steel, they are additionally chrome plated.
If the caliper has anthers, then they are installed on the piston, after which the hydraulics are assembled. Next, the remaining part is assembled, in particular, the parking brake mechanisms. After this, the caliper is checked with a working pressure of 200 kgf/cm2 and monitored for leaks. That's it - the restored brake mechanism is ready for use.
What's the point of repairing if you can buy a new caliper?
Of course, the main reason is financial feasibility. The price of even simple calipers in the original design is at least 15–20 thousand rubles, and multi-piston brake mechanisms can cost as much as 120–170 thousand. And do not forget that these parts need to be replaced in pairs.
But repairs are relatively inexpensive. For common models produced by Bosch, it will be about 1,500–2,000 rubles in a specialized service, rarely for any models - more than 5 thousand rubles. At the same time, all wearing parts will be new, which means that the resource will not be much less than that of a new mechanism.
Repairing the front brake cylinder + a simple way to “drown” the brake piston.
A knocking sound appeared in the area of the front right brake mechanism when driving over uneven surfaces. Because they don’t joke about brakes, I went to the service technicians for service, and they “sentenced” the caliper bracket. But they didn’t have time and spare parts were sent “with God”. As always, I decided to do everything myself.
Options: 1. GTZ does not work. 2. The piston is jammed. 3. Fingers jammed. Well, all possible combinations of these 3 options.
All 3 options were eliminated, but perhaps there was a little bit of each of them. Now you need to push the piston into the cylinder to put everything back together.
I have a simple way to do it correctly without any "gigs".
Before pressing, lubricate the piston.
I'm putting everything back together in reverse order. A test drive showed no knocking and better braking.
Front caliper jammed: reasons
When the driver is used to driving at high speed, a little carelessly, then the front caliper often jams. This type of breakdown is more common in modern vehicles, where this mechanism operates faster in the front part. As a result, a colossal load falls on the caliper.
Most cars have a pressure regulator, which is popularly called a “sorcerer”. If you brake sharply, fluid access to the rear of the car is blocked. The front one continues to function and heat up.
Replacing brake pads — Volkswagen Golf, 1.6 l., 1999 on DRIVE2
I'll tell you an interesting story about replacing brake pads.
Sunday. Sunny and warm day. I take off the rear wheel, unscrew the caliper, and then I go into a stupor. And the brake cylinder came out completely, all rusty, and there were almost no pads...
That's what I thought (about the previous owner).
Because I didn’t know how to compress the cylinder. I came here for help. There was no special tool at hand, I had to put everything back and go to a friend.
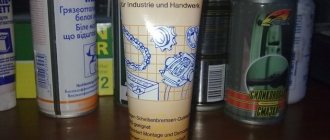
I came and sorted everything out. He gave me something similar to what is indicated in picture No. 1.
Pressing in the cylinder, he began to tighten it with a gas wrench. Pre-spray with WD-40. While I was turning it, I didn’t notice that the brake fluid was leaking from somewhere. I look, and the brake pipe has broken and all the liquid is pouring onto the ground.
I call the store, and they say 1290 rubles... I’m shocked... I go buy food...
I put everything in place, assemble the right side and proceed to the left side.
The left side is even worse. There the cylinder was completely jammed. The pads are eaten down to the metal on the cylinder side. Strange. And the brakes were perfect and there were no extraneous squeaks. In general, we take everything apart, clean it, wash it and put it back together.
Well, there’s nothing to tell about the transfer. They took it off, handed it over, installed the pads and started pumping... The sounds when pumping from the fittings were like an upset stomach)))))
RESULT: Maintenance of the rear cylinders, replacement of pads - excellent ABS operation, no errors and excellent brakes...
Thank you all, good luck to all!
No photo report, sorry.
Price: 3,480 ₽ Mileage: 234,926 km
Disc brakes
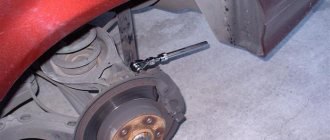
- To access the pads we need to remove the upper part of the caliper. It is held in place by only two bolts on the reverse side.
Hold the caliper and unscrew the mounting bolts
Unscrew them without allowing the guides to turn.
To fix, use the 2nd wrench
Now remove the top part by simply pulling it upward.
Pull up the freed part
Old pads can be removed by hand. As I already wrote, the brake piston pads. Moreover, at. If they don’t “go”, then help yourself with a screwdriver.
Pull out worn out pads
To install new linings, install their special guides and push them deep.
Press the record deep for secure installation
The block with the tin plate should be on the inside. This bar serves as a wear indicator. When the friction material wears away, it rubs against the disc and makes a loud squeak.
The tin plate must be inside the mechanism
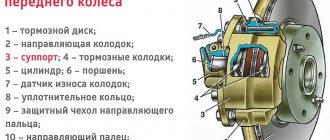
Before reassembling, it is necessary to recess the brake cylinder, since the new linings are thicker. You simply cannot put the caliper back on. If you just push, nothing will happen. It is necessary to screw the cylinder clockwise using pliers.