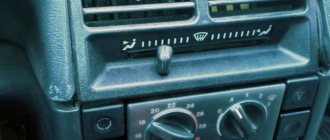
The electric motor of the heater fan (“stove”) on VAZ 2108, 2109, 21099 cars and their modifications is a commutator, DC motor with excitation from permanent magnets. Has three rotation speeds. The speed is selected by a four-position switch on the instrument panel. Below are the electrical diagrams for connecting it.
Wiring diagram for the electric motor fan (“stove”) of VAZ 2108, 2109, 21099 cars with a “low” instrument panel and mounting block 17.3722
Wiring diagram for the electric motor fan (“stove”) of VAZ 2108, 2109, 21099 cars with a “high” instrument panel and mounting block 2114
Notes and additions
— The fan electric motor can be connected to the on-board network either directly (highest speed) or through an additional resistor having two resistance spirals (0.23 Ohm and 0.82 Ohm). If both spirals are included in the chain, the speed is low, if one is 0.23, the speed is average.
More articles on electrical equipment of VAZ 2108, 2109, 21099 cars
The stove on the VAZ 2121, 2131 has a number of advantages and disadvantages. One of them is associated with an electric fan, which not only blows weakly, but also makes a lot of noise and whistles during operation. Replacing it with a new type fan will solve only part of the problems. As practice shows, it is better to install an additional fan from the figure eight “snail” type.
The point of the modernization is to install on the Niva an additional electric fan from the VAZ 2108, which will be located in the engine compartment inside the air intake, where it is normally positioned at figure eight. Let us remind you that the standard Niva 4x4 fan is located inside a plastic box in the cabin.
You will need: a figure-eight stove fan with a casing (catalog number: 2108-8101091).
The fan control can be left as standard, then there will be the least amount of modifications. Or use additional parts from the VAZ 2108:
- an additional heater resistor (article: 2108-8101081), which will need to be placed in the air intake next to the fan;
- fan speed switch (2108-3709608), which is mounted on a panel in the SUV interior.
What is a stove fan
A car heater, which is popularly called a stove, is designed to perform a simple and at the same time important function - heating the interior. In addition, the device helps eliminate fogging of windows in cold and damp weather. During normal operation of the heating system, the temperature in the interior of the “nine” should be maintained at +20 ˚С with the same indicators outside, but only with a minus sign. In the legs, with maximum heating mode, the value should be maintained at +25 ˚С. One of the important components of the stove, in addition to the radiator, is the fan. The purpose of this device, its malfunctions and repairs should be considered in more detail.
Purpose of the device
The purpose of the motor is to increase the efficiency of the heating system and air circulation in the car. Its operation is based on air intake from outside and its subsequent supply into the cabin through the radiator. As a result of the air flow passing through the heat exchanger, the air enters the cabin already warmed up.
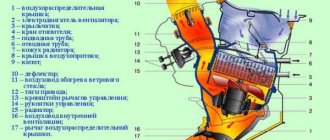
Heater operation diagram: a - VAZ 2108; b - VAZ -2108–01: 1- fan impeller; 2 — air duct for heating the windshield; 3 — windshield heating flap; 4 — damper for heating the driver’s feet; 5 — central nozzle flap; 6 - central nozzle; 7- radiator; 8 — heater control damper; 9 — driver’s foot heating window; 10 - internal ventilation duct
Where is the motor located on the VAZ 2108/09
The heater motor on the VAZ 2108/09 is installed in a niche in the engine compartment in front of the windshield, which is radically different from the design of the heater of classic Zhiguli cars, which have a fan installed in the cabin. The unit is an electric motor with an impeller mounted on it, through which air is pumped into the cabin.
The heater motor on the VAZ 2108/09 is installed in a niche in the engine compartment in front of the windshield
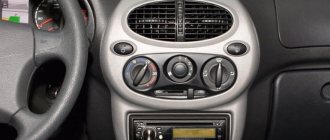
Connection diagram
To make it easier to find possible faults with the fan, an installation diagram may sometimes be required, the main components of which are:
- fuse mounting block;
- egnition lock;
- additional resistor;
- fan motor;
- operating mode switch.
The heater motor connection diagram consists of a fuse mounting block, an ignition switch, an additional resistor, a fan motor, and an operating mode switch
What is the structure of the VAZ-2109 stove with a low and high panel
The interior heating system of the VAZ Nine can be called traditional. Comfortable temperature is ensured by warm air heated by the heater radiator. It is sent to the cabin through an air duct system. Essentially, everything here is quite simple. However, owners of “nines” often experience problems with this component of the car. It is especially unpleasant when they occur during the cold season. Often these problems can be fixed with your own hands. But before you begin repairs, you should know not only the possible causes, but also understand what is located and where.
Heater fan VAZ 2108/2109
Breakdowns of the stove motor, although not so often, still occur. If this unit fails, the quality of heating is significantly reduced. Depending on the nature of the problem, extraneous noise may appear that distracts the driver's attention. In this situation, repair or replacement of the device is required, for which it must be removed from the car.
Reasons for failure
There are several common reasons that lead to fan problems.
Fuse
One of the likely reasons leading to a malfunction of the motor may be a faulty fuse. The element is located in a mounting block installed in the engine compartment in front of the windshield on the left side. It is worth starting troubleshooting by checking this part. The fuse is marked F7 and has a rating of 30 A.
The stove fuse is located in the mounting block marked F7 and has a rating of 30 A
Poor contact
Over time, contacts may oxidize. The check is not difficult; to do this, just move the block with the harnesses. If the fan starts working during the diagnostic process, then the cause has been found. The malfunction can be eliminated by cleaning the problematic contact in the mounting block.
During oxidation, the contact is usually covered with a green or white coating.
Resistor
The operation of the electric motor may be impaired due to problems with the additional resistor. At maximum speeds, the motor is connected to the power circuit directly, and at the first two speeds - through a resistor. If problems arise with this particular element, the electric motor will only operate in maximum mode. To replace the part located on the left side of the stove body, simply unscrew the fasteners and install a new resistor.
Removing and disassembling the heater on a car with a VAZ-21124 engine
| EXECUTION ORDER |
|
|
|
|
We do not disconnect the steam exhaust hose from the heater radiator, since its fastening clamp is difficult to access. It is easier to disconnect this hose from the expansion tank pipe (see Removing the expansion tank) and remove the heater housing along with the hose.
|
|
|
|
|
- Unscrew the nut of the upper fastening of the heat shield of the steering rack cover.
|
|
When dismantling the heater electric motor assembled with the impeller, remove the cover of the air purification filter entering the interior ventilation and heating system.
You can also dismantle the heater motor in a car, but to do this you will have to perform all the operations necessary to remove the heater housing assembly. You can only not remove the body from the engine compartment, but only pull it out to a sufficient distance.
| EXECUTION ORDER | |
|
|
- We take out the screws...
|
- To remove the heater core...
|
|
|
- We take out the screws and remove the lock washers located under them.
|
The heater components are not subject to further disassembly. If they fail, it is better to replace them with new ones. There is no point in separating the body parts, since they usually do not fail until the end of the vehicle's service life.
We install the removed components and parts in the reverse order.
When installing the heater housing assembly on a vehicle, you should be prepared for the fact that the heater housing is difficult to fit into place. The installation of the housing should begin from the middle of the engine shield, directing the right (along the direction of the car) part of the housing, first towards the starboard side and down, and then up. It is better to carry out the installation with an assistant.
| previous page20.2.7. Car bodies with VAZ-21114 and VAZ-21124 engines | next page 21. Applications |
Internal structure and principle of operation
The heating system installed on the VAZ-2109 has its own differences and features compared to other cars in the AvtoVAZ line.
The heater consists of a pair of plastic casings (on the right and on the left), which are connected to each other along the entire perimeter with clamping brackets. A special flagellum is placed in the grooves of the casings to seal it well. The fan supplies air flow to the interior of the machine. The VAZ-2109 stove is designed so that the fan can be easily removed independently from the engine compartment.
An electric motor of type 45.37230 is attached to the casing, and a fan is located on its shaft. To obtain its desired rotation speed, additional resistance was provided. It was attached to the left side of the hole in the heater casing using a screw.
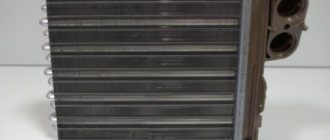
Heating system radiator
A radiator is built into the stove body to heat the air flows, which then blow into the cabin. Using three screws, this element of the system is screwed to the right casing and sealed with a polyurethane foam gasket.
The radiator design is a combination of:
- 2 rows of tubes.
- 2 rows of cooling plates.
- 2 plastic tanks.
It has two pairs of pipes, it is connected to the cooling system by rubber pipes, where coolant circulation is ensured using a pump. In the valve casing, on the axis of the supply line, there is a plate valve, which has a hole; it allows the coolant to pass through. The valve lever is connected by a rod to the handle lever, which also controls the process of heating the air flow. If you turn this lever, the hole in the valve will open the line for coolant to enter the radiator.
To ensure uniform heating of the car interior, the stove has two central nozzles, as well as left and right, to which air ducts are connected.
Exhaust ventilation
The car is equipped with exhaust ventilation, which circulates air from the interior to the street. It is located behind the body openings for the side windows.
Air also passes out through the deflectors when the car moves. The ventilation process is carried out due to the vacuum that occurs at the deflectors during movement. Air is sucked out from the rear of the cabin under the deflector trim; for this purpose, the rubber valves are pressed out and the air flow goes out through the deflector hole to the street.
Rubber valves are needed to prevent outside air from entering the car interior.
The VAZ 2110 stove does not heat well - reasons
So, if the stove blows cold air on a VAZ 2110, the reasons may be different. In practice, the problem most often appears when the car has been standing for a long time. At the same time, you need to know that, in a simplified way, the VAZ-2110 heater consists of:
- stove radiator;
- air distribution systems;
The VAZ 2110 heater radiator is located in the engine compartment of the car. In fact, this solution “cooks” the warm air before it is supplied to the cabin. The distribution system controls the intensity of air supply, temperature, etc. The supply and distribution system is located in the cabin, installed on the instrument panel.
As for malfunctions, the stove may not heat up if the stove radiator is not sealed or an antifreeze leak appears. In practice, the stove in the car often does not blow warm air if it is not possible to change the temperature regime. The gear motor may also fail or the damper may be faulty.
Even on the VAZ 2110, malfunctions occur in the operation of the automatic control system. This is the block that controls the heater. The list of common malfunctions is completed by a temperature sensor located in the ceiling lining in the car's interior. Now let's figure it out.
Electrical component of the stove
Below is an electrical diagram for turning on the fan. For it to work, you need a temperature sensor, which is located in the radiator. When the coolant reaches a certain temperature, the sensor gives a signal and the fan turns on automatically.
- Mounting block.
- Ignition.
- Additional resistance (resistor).
- Motor.
- Button that controls the motor.
A – to the terminal with a plus sign “30” of the generator.
Some cars still have an old mounting block installed, in which case the fan is turned on via a relay.
Heating system elements
The stove diagram clearly shows the location of its main functional elements. It should be noted that the design of the stove on the VAZ-2108, 2109 and 21099 models is the same. Many car owners know that the heater in these models is not fully developed. As a result, the interior is not heated properly, so a decision is made to modify the stove with your own hands. Just in this case, it is important to know the design of the heater so as not to confuse anything.
The design of the stove of the VAZ-2109 car, whether it is a high panel or a low one, is absolutely identical. Therefore, the information presented will be useful to owners of this model with any instrument console.
Knowing the main points and what is located where, you can already try to independently deal with the problems that arise and fix the malfunctions that appear, while saving money and time on trips to the service station.
The VAZ 2108 stove fan, like other important parts, is the key to the car’s heating system. Like any other system, this one has its own nuances and can suddenly break down. The solution to some popular problems, even those related to replacing the product, can be found below in the article.
Repair
As we have already noted, the design of stoves on dozens with carburetor and injection engines has practically no differences. Therefore, the repair instructions below are suitable for owners of a VAZ 2110 with both types of power units.
If you are planning to overhaul your old-style stove, we recommend starting with the purchase of a radiator. Use copper as it is more efficient and helps the heater work better.
To carry out repairs correctly, strictly follow the points presented in our instructions and rely on video materials.
There is a plug on the engine block through which coolant is drained into any container. If you plan to use the same antifreeze or antifreeze again, choose clean containers. Next you need to move the frill forward. This process will take quite a long time, so be patient. Next, you need to remove the windshield wipers and get rid of as much as possible of everything that could interfere with the repair process. Remove your stove body
It is divided into two parts, which is important to know in advance. The front part of the stove body is removed directly along with the fan. After this, the stage of dismantling the cabin filter begins.
Check its current status. If the filter is dirty, this is an excellent reason to replace it. The next stage involves removing the second part of the housing. Loosen the clamps used on the hoses a little. This will allow you to easily remove the hoses. Having applied some effort, you can now finally remove the radiator from its seat.
Reassembly
In fact, reassembling the unit only involves following the opposite sequence of operations. By disassembling the stove, you have the opportunity to simultaneously inspect other elements of your car to make sure they are working.
Get used to the fact that during complex repairs you need to check components along the way that are not related to the current problem you are solving. Even if the part is suitable for use, but has already worn out enough, it is easier to change it now than to carry out heavy dismantling work again in a couple of months.
The only nuance that you should pay attention to when reassembling is the type of stove
If you have an old-style heater, in this case it is important to pay attention to a couple of issues
- When the plastic housing is mounted in place, make sure that the pedal fits neatly into the groove intended for it.
- Check how tightly all the nodes fit into their seats. Otherwise, unpleasant consequences may arise that will force you to dismantle the entire assembly again. And this, as you already understand, is not an easy process.
That's it, now all that remains is to return the coolant back into the system and tighten the plug securely. Test your vehicle in a garage before driving it on public roads.
Operating principle of the stove
- The liquid is heated to a certain temperature and enters the radiator of the VAZ 2108 stove.
- To ensure constant circulation, rubber tubes are installed between it and the liquid cooling system, fixed for better fastening with clamps.
- Warm air enters the car interior through several openings. The heater motor with its own fan is designed to distribute air evenly.
- The air flows directly to the feet of the driver and passengers, and also exits to the panel. The heat flow is then delayed by the dampers, and therefore the air is cooled. Thus, cool air is supplied to the windshield.
If the operation of the furnace is not satisfactory, it can be modernized. This is done by installing fiberglass.
The action goes like this:
- It is necessary to disassemble the stove, wash all parts and begin assembly. This action can also be used to visually inspect parts for damage. For example, the casing ear often breaks.
- After this, you need to glue all the flaps and fill the seams with sealant. Glue the casing and wait a while until the sealant is stable.
- Assemble the “insides” of the heating system and cover it with fiberglass. Thanks to this, the temperature will increase to 10 degrees.
The VAZ 2110 stove does not work, diagnostics and repairs
Having decided on the main reasons, it is necessary to begin diagnostics. First of all, problems with temperature regulation may be associated with a breakdown of the control unit or damper.
First, you should check the temperature sensor on the ceiling, which is located near the interior lamp. Simply put, malfunctions in its operation lead to the fact that the required command does not reach the damper and the stove does not heat.
Checking the sensor is easy. To do this, you need to move the control knob first to one extreme position, and then to the other. At the same time, you should check whether there is a change in the temperature of the incoming air.
The temperature may not change completely, or the air becomes warmer only when the handle is in the extreme maximum position. If the temperature does not change, then the problem is not in the sensor. In the second case, the culprit may well be the controller, which is replaced with a working device.
A breakdown of the gear motor often results in the heater blowing cold air into the cabin after turning on the heating. This is a common problem. As a rule, replacing the heater gear motor allows you to normalize the operation of the system.
To change this element, you need to remove the windshield wipers, dismantle the frill by unscrewing the screws. Then you need to disconnect the wiring from the gearmotor, remove the faulty device and install a working one.
If there is a suspicion that the heater of the VAZ 2110 stove has failed, you will need to remove the main deflector for inspection. To do this, you need to straighten the fasteners and move the damper. By the way, you can get to the damper from the engine compartment.
The inspection allows you to determine whether there is a need to replace the radiator. If this is the case, you need to disassemble the stove. You can read below about how to remove the radiator of a VAZ 2110 stove with your own hands.
If the air is warm, but not warmed up enough or supplied poorly, it is recommended to change the damper. Instead of a standard plastic solution, it is better to buy an aluminum heater damper from a VAZ.
This eliminates possible deformation of the damper during switching, as well as improves heat retention. As a result, the heating system works more efficiently, the air is supplied hotter, which allows you to warm up the interior more efficiently and quickly.
Typical faults
As with any mechanism, problems can occur in the heating system (video author - Andrey Kuzemsky).
If the VAZ 2108 heater motor is broken, you can understand this by comparing some symptoms:
- If the motor does not work when switching operating modes, the cause of the breakdown may be hidden in the resistor. When repairing, you need to replace the resistor with a new one, because it cannot be repaired.
- If the fuse is blown, you need to check the insulation of the armature located on ground. There may be a short circuit.
- If, when switching modes, the VAZ 2108 heater fan rotates at the same speed, this may be a consequence of contamination or oxidation of the collector. In case of repair, it is worth cleaning the collector and, if nothing has changed and the fan continues to act up, you can replace the bearings.
If the VAZ 2108 stove motor does not even show signs of life, then the reason is not in its design, but in a broken circuit. To find out if this is true, you can use a voltmeter.
DIY repair
To carry out repairs yourself, you need to use the following tools:
- a Phillips head screwdriver;
- 10mm wrench.
When dismantling, you need to remove the plastic trim, which is located on the outside of the windshield. To remove it, you need to open the hood and remove the 5 bolts that secure the trim to the body. Remove the rubber seal from the engine compartment and pry the casing with a screwdriver to get to the motor and oven fan. Now you can remove the motor. It is attached to the body of the VAZ 2108 with two bolts.
When the clamps are disconnected, you can turn off the power and disconnect the positive wire of the furnace under the dashboard. The negative one is attached over a special thread and pressed down with a special nut. You need to unscrew the nut by touch and fold back the negative wire. By disconnecting the wires, you can remove the motor and install a new fan. The entire structure is assembled in reverse order.
It is important to note that breakdowns associated with the stove also depend on which panel is installed on the VAZ - low or high. Both have their downsides. For example, on a high one the central flap does not open completely. It is she who is responsible for supplying cold and hot air to the car interior. To solve this, you need to adjust the damper. And to get to it you need to disassemble the dashboard.
If we talk about the low panel, this is where the thermostat often breaks. Of course, if it wears out, the oven will not work. It is recommended to change it every two or three years. And if replacement does not solve the problems, it is worth replacing the hoses that connect the stove and radiator.
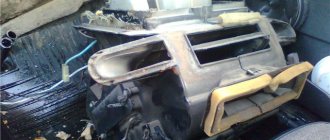
Photo gallery “Stove removal and repairs”
In the photos provided below you can see in more detail how the furnace repair scheme occurs.