Overheating of the engine leads to serious problems: the pistons may jam, the cylinder block gasket may break, which leads to the need to overhaul the engine. To protect the power unit from overheating, it is important to maintain stable operation of the cooling fan. In this article we will discuss the operating principle of the device, its connection diagram, independent diagnostics and repair, as well as modernization of the control circuit. The instructions are fully suitable for VAZ 2115 and VAZ 2113 cars.
Operating principle
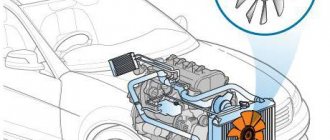
A fan is a device that allows you to increase the efficiency of a cooling radiator. The radiator takes heat from the engine and releases it into the air. This process is accelerated by blowing through the blades of an electric fan.
The coolant flows through a closed, sealed system. Its task is to remove excess heat from overheated engine parts. Hot antifreeze flows into the radiator, is cooled here and returns back. While in the radiator, the coolant passes through a system of thin tubes. The incoming air flow while the car is moving helps to quickly remove excess heat from the engine compartment.
But when the car is stuck in traffic or idling, the air flow stops cooling it. In this case, the cooling system may not cope with its task. An electric radiator fan is designed to create air flow artificially. The temperature for turning on the fan on a VAZ 2114 is 85 degrees Celsius.
Having received a signal that the permissible temperature value has been exceeded, the sensor starts the device’s operating mechanism. An artificial air flow is created that removes heat from the radiator. The mechanism operates until the temperature level drops to an optimal state.
The thermal switch then receives a signal that the normal temperature has been reached and turns off the fan.
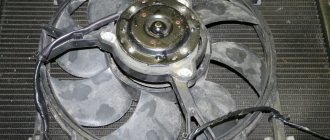
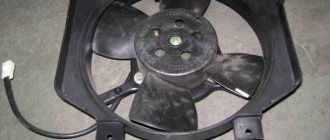
The device consists of four plastic blades that are mounted on the EDF shaft. A special controller regulates the automatic operating mode. The thermostat is equipped with a solid filler that is sensitive to temperature changes.
There are main and additional valves. When the temperature reaches 85 degrees Celsius, the main valve opens.
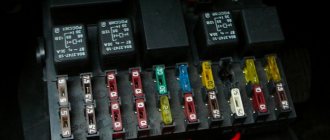
We gain access to the fuse box in the cabin
In the Lada Granta, the fuse box, or as it is also popularly called, the mounting block, is located to the left of the driver. To gain access to it, you need to lower the protective decorative plug down.
Removing the decorative plug
Location of the latches of the decorative plug of the mounting block
Removed from one mount
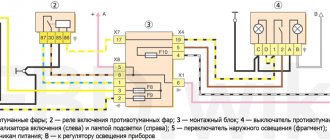
Where is the fan relay located?
It is located in an additional block.
4 – electric fan relay;
5 – electric fuel pump;
6 – ignition relay.
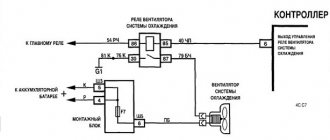
Relays and fuses may have a different order. Therefore, you need to focus on the color of the wires. The main relay is always located at the bottom. Find the relay that has a thin pink wire with a black stripe coming from it. It comes from the main relay through pin 85. Be careful! Do not confuse this with the red thin wire, which also has a black stripe and extends from the controller. And find a thick white wire with a black stripe (pin 87). This is where the cooling fan relay is located. There is always a fuse next to it. It is an element of the chain.
Relay block Lada Granta
The relays are located in the same fuse and relay box, which is located to the left of the steering column under the cover.
K1 - heater fan relay
K2 - power window relay . If they do not work, also check fuse F2; if this does not help, then the problem may be in the control unit.
K3 - starter relay . If it does not work (does not turn) and this relay is working, check the battery charge level. It could also be a problem with the retractor or the ignition switch and its contacts.
K4 - ignition switch terminal 15 relay
K5 - turn signal and hazard warning relay . If the turn signals come on and do not turn off, this relay may be shorted. Also check fuse F3 (emergency mode).
K6 - windshield wiper relay . Check also fuse F4.
K7 - high beam relay . Also check fuses F14 and F15 and the lamps themselves.
K8 - horn relay . Also check fuse F20, signal switch contacts on the steering wheel.
K9 - low beam relay . Also check fuses F12 and F13 and the lamps themselves.
K10 - rear window heating relay . If the heating does not work, the problem may be in fuse F8.
K11 - engine control unit relay . Also check fuse F1.
K12 - electric fuel pump relay . Also check fuse F21.
Cooling fan diagnostics
If signals appear on the dashboard indicating that the permissible temperature level in the cooling system has been exceeded, this may indicate that the fan on the VAZ 2114 is not working. The main symptom of the malfunction is that the mechanism does not start even with a significant increase in temperature. It is urgent to turn off the engine to prevent its elements from overheating.
The engine should not be operated with a faulty electric cooling fan. This may damage the cylinder head.
If the cooling fan on a VAZ 2114 does not work, the following malfunctions may be the cause of the breakdown:
- The fan switch sensor on a VAZ 2114 has failed.
- Lack of contact at the sensor connector.
- The wiring has broken.
- Electric fan relay faulty.
- The fuse has blown.
- Damage to the device's electric motor drive.
Unplug the device. Connect it to the battery terminal. Maintaining polarity. If a direct connection to an energy source starts the electric motor, then the drive is working. There may be problems with the wiring, the fuse, or the temperature sensor.
Now it’s time to diagnose the fuse. You don't even have to open the plastic box to do this. If the relay malfunctions, the horn stops working at the same time as the fan. Therefore, if you notice the loss of the sound signal, it means that the fuse has definitely blown. You can find it in the engine compartment in a small plastic box. We release the cover, pressed by two latches, take out the burnt fuse with tweezers and replace it with a new one.
But diagnosing a relay is quite difficult. Especially for those who are exclusively “you” with auto electrics. To check functionality, the easiest way is to find a working relay and temporarily install it. If, after installing a new device, the fan begins to work properly, then it is time to replace the old one.
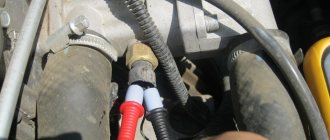
To diagnose the temperature sensor that supplies a signal to the radiator, you need to disconnect the connector from the sensor and start the ignition. The emergency mode will start, in which the electric fan will start blowing. If the fan starts late when the connector is disconnected, the sensor is most likely faulty. Replacing it will take no more than five minutes. You just need to unscrew two bolts using a Phillips screwdriver and install a new device in its place.
Even if a malfunction has occurred in the VAZ 2114 fan itself, this does not mean that it is time to change it. Sometimes you can simply replace a damaged bearing or brushes. But if the electric motor is faulty, it is much easier to purchase a new mechanism.
Fuses and relays in Lada Granta, electrical diagrams
If you bought a Granta and started having electrical problems, you may be faced with a manufacturing defect. But don’t be alarmed ahead of time, the first thing you need to do is check the fuses and relays in the Lada Granta and find out the cause of the malfunction. If you're lucky, you'll get away with simply replacing the fuse.
If not, you may have to go to a car service center or troubleshoot the electronics yourself. Remember - the main thing in such cases is to fully understand the problem, do not waste time on this, because any car owner should know as much as possible about his car (especially a domestic one).
How to make a replacement
If you are convinced that the cause of the malfunction lies in the fan motor, then the easiest way to carry out repairs is to completely replace the device. In this case, there is no point in spending money on a new casing. It will be cheaper to just buy a new electric motor.
Necessary tool
No special tool is needed. The work is carried out simply using 8 and 10 socket wrenches and a Phillips screwdriver.
Step-by-step algorithm of work
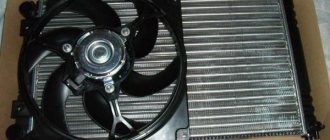
You can replace the cooling fan motor without removing the radiator.
- Disconnect the connector and device wiring harness from the casing.
- Unscrew the mounting bolts using a 10mm wrench.
- Unscrew the lower fastening nut.
- Using a 10 mm socket wrench, unscrew the mounting nut from the radiator.
- Using a size 8 socket wrench, unscrew the two pressure plate nuts.
- Remove the plate.
- Remove the electric fan along with the casing.
- Let's start dismantling the electric motor. Using a 10 mm wrench, unscrew the three mounting nuts and remove the engine along with the blades.
- Using a screwdriver, pry up the lock washer.
- And take it off.
- Remove the impeller.
- Put the impeller on the new motor. Make sure that the shaft pin fits into the impeller groove.
- Reassemble in reverse order.
Replacing fuses on a VAZ 2115
Preparatory stage:
- Driver, head at “10”;
- Flat head screwdriver;
- A set of new modules;
- Plastic pliers for removing the relay block;
- Rags, additional lighting as needed.
Sequencing:
- We turn off the engine, open the hood, remove the terminals from the battery;
- On the left side, closer to the windshield, there is a mounting block. Unscrew the two bolts around the perimeter;
- We disconnect two blocks with wires, remove the power supply assembly;
- We carry out troubleshooting and check the serviceability of all modules.
You can do this in two ways:
- Visually: checking each module for the integrity of the melting element;
- Using a multimeter: measuring the resistance at the end switches of the module without dismantling it.
Each method is applicable and effective.
After replacing the faulty fuses, we assemble the structure in the reverse order.
Some motorists practice the second method: without dismantling the mounting block. We remove the fuses one by one, check them for integrity, and replace them with new ones as necessary.
If you notice that a unit in your car has suddenly stopped working, do not rush to dismantle it and replace it with a new one. First of all, inspect the mounting block, check the modules for integrity. Most likely some kind of fuse has blown.
Only after replacing the module does not help eliminate the problem, proceed to diagnosing the equipment and checking the integrity of the electrical supply circuit.
How to replace a temperature sensor
Before starting work, you need to partially drain the coolant from the cylinder block.
- Remove the wire.
- Using a 21 wrench, unscrew the temperature sensor.
- Take it off.
- Install the new one in reverse order.
Power fuses
The power fuse box is located under the hood and is located between the battery, strut support and coolant reservoir. Looks like a vertically mounted box. By removing the top cover, access to the power fuses appears.
F1 (50 A) - electric power steering . If the steering wheel turns hard, also check fuse F32.
F2 (30 A) - heater fan
F3 (60 A) - generator . If the battery discharges quickly or the discharge lamp is on, check this fuse, as well as the operation of the generator itself and its brush.
F4 (60 A) - generator
F5 (30 A) - low beam headlights . Also check relay K9 and fuses F12, F13.
When troubleshooting any electrical problems, use caution. Replace fuses and relays only with the engine off and the ignition off.
If your fleet contains not only Grants, you can also read about Kalina fuses and relays.
Most electrical circuits in modern cars are protected by fuses. Firstly, this protects the electrical device itself from damage, and secondly, it prevents the threat of fire due to overheating or short circuit.
Scheme options
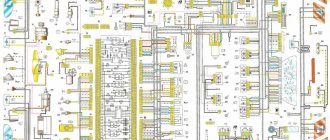
Schematic diagram of VSO connection on VAZ 2108, 2109, 21099 (until 1998).
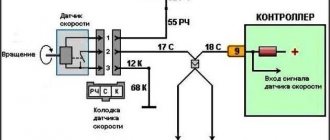
As we can see, the sensor controls the fan relay, which is located in the fuse box. When a certain temperature is reached, the contacts of the temperature switch close, which leads to the flow of current in the electric motor circuit.
Above is a diagram for VAZ 2108, 2109, 21099 cars, but after 1998. As we can see, the power sensor now functions as a relay.
Let's consider a circuit using a resistor to implement two propeller rotation speeds using the VW Passat as an example. The two-position fan power sensor S23, depending on the coolant temperature, closes the contacts directly or through an additional resistance.
DIY connection
Some drivers, warning the engine against overheating due to improper operation of the radiator fan power supply thermal relay, make an external button to force the electric motor to turn on. To do this, it is enough to connect a fixed button in parallel to the control output of the relay coming from the sensor, which, when pressed, will close the contact to ground, thereby provoking the operation of the relay. If the car's design does not provide a fan relay, you will have to install it yourself to force cool the radiator.
Under no circumstances should you connect the electric motor directly through the button in the cabin! We also do not recommend connecting the circuit so that after turning on the ignition the electric fan constantly rotates, as this significantly reduces its service life.
To connect, you only need to understand the operating principle of a 4-pin relay and minimal knowledge in installing additional equipment. Be sure to include a fuse of the correct rating in the power circuit and place it as close to the power source as possible (read more about how to choose the correct fuse rating).
If desired, you can replace the single-position sensor with a two-position one, which, paired with a selected resistor, will allow you to realize a low speed of operation of the VSO. If you have a sufficient level of knowledge in electrical engineering, then you can build a PWM controller to adjust the speed of rotation of the propeller. Controlling the electric fan using a PWM signal will allow you to smoothly regulate and arbitrarily select the rotation speed depending on the temperature load on the engine. There is enough material on the Internet on how to make a PWM controller with your own hands.
Fuse box under the hood of a car
In the Lada Granta car there is another block of “powerful” fuses under the hood of the car. The fuse rating is from 30A to 60A, which is why this unit is called a power unit.
The fuse box is indicated by an arrow
To access the fuses, pull the protective cover upward. It can be easily removed. After finishing work, do not forget to return the cover to its place.
Block diagram in configurations: Standard, Norma
| Fuse no. | Denomination, A | Description |
| F1 | 30 | Low beam headlights or main relay, circuits protected by fuses F1 and F21 of the mounting block in the passenger compartment |
| F2 | 60 | Generator |
| F3 | 60 | Generator |
| F4 | 30 | Heater fan (heater fuse grants) |
| F5 | 50 | Electric power steering |
Block diagram in the Lux configuration
| Fuse no. | Denomination | Description |
| F1 | 50A | Heated windshield |
| F2 | 60A | Generator |
| F3 | 60A | Generator |
| F4 | 40A (in the configuration without air conditioning - 30A) | Electric radiator cooling fans |
| F5 | 50A | Electromechanical power steering |
| F6 | 40A | Anti-lock brake system (ABS) control unit |