Lada Vesta, like any other modern car, is “stuffed” with electronics. The OBD diagnostic connector is needed to check all these systems. Almost any Lada Vesta component has either an electronic control or a drive. Especially important are the connections between the electronic control unit and the internal combustion engine sensors. The problem in these connections, as well as the incorrect operation of the circuit components, can rarely be detected with the naked eye, mechanically. To do this, you need special devices that connect to the Vesta diagnostic connector. They quickly and specifically recognize the error. Electronics in a car is progress, but it is also a bait for thieves - protection against theft of the connector will not be an unnecessary plus for the car. Read the article and find out about the OBD connectors: where they are located and what to do with them!
Diagnostic adapters
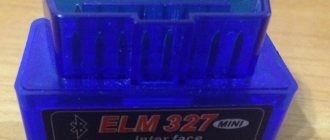
Recently, diagnostic adapters that transmit information via Bluetooth to the phone have become widespread among car owners, as well as professionals. It can be used to read and erase error codes. The OBD-II V1.5 adapter is suitable for the Lada Vesta (the first part of the name is the type, the second is the version). The advantage of such a scanner is its low price, the disadvantage is that it is only suitable for a specific brand of car. However, for the owners of the Lada Vesta, the minus does not matter, but the pluses make you think - maybe they can buy it after all.
Software
To diagnose Lada Vesta via ELM327, there are several programs compatible with OBD2. The most popular, error-free and crash-free software for Vesta is OpenDiag. Also used:
- TorgiePro – application for use on Android;
- AutoEnginuti – program for IOS and Windows;
- PCMScan – for laptop computers.
Most software and drivers for adapters are available for download on specialized websites and online stores. It is recommended to use certified software.
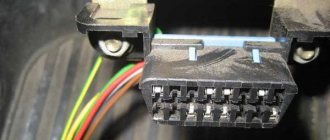
What is a diagnostic connector?
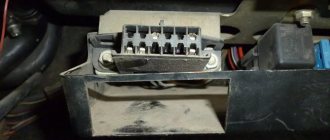
This is a plastic 16-pin trapezoidal OBD-II type input. Below is a diagram for its sixteen pins:
2 - J1850 (Bus+); 4 - Body grounding; 5 - Alarm grounding; 6 - J-2284 (CAN-High Line); 7 - ISO 9141-2 and ISO/DIS 14230-4 (“K” diagnostic line); 9 - SCS (Output of self-diagnosis codes); 12 - Program output; 13 — Input/output for controlling VTM-4 and immobilizer; 14 - J-2284 (CAN-Low Line); 15 - ISO 9141-2 and ISO/DIS 14230-4 (“L” diagnostic line); 16 - 12 volt power supply from battery.
Vesta error codes - decoding and designation
To properly understand the essence of the problem, you need to know how the serial error number is deciphered. The screen of a third-party device usually displays a five-digit code, where the first part is:
- B – body systems are damaged;
- C – interruptions in the stability of the suspension and chassis;
- P – incorrect functioning of the electronics of the power unit or gearbox;
- U – the data exchange bus is out of order.
Next comes the first digit:
- 0 – SAE catalog number;
- 1-2 – standard serial number;
- 3 – reserve.
- 1-2 – air or fuel supply devices;
- 3 – ignition;
- 4 – catalyst problems;
- 5 – incorrect idle speed;
- 6 – problems with the computer;
- 7-8 – gearboxes for automatic or manual.
The last element of the code indicates the serial number of the error.
Protection of the Lada Vesta engine control unit
Despite the alarm system and central locking, the vehicle is stolen. It is enough to hack the hood locking device and replace the Lada's electronic engine control unit with the attackers' ECU, which operates from a different immobilizer.
You can protect your car from theft. It is necessary to block access to the ECU, to make sure that the unit is not easy to remove. There are manufacturers who develop protection for engine control units, and it is also possible for a turner to make the protection individually.
Protection for the Lada Vesta ECU looks like a metal case 3 mm thick. The assembly is placed in such a container made of cold sheet steel, and is attached to the body with studs and shear nuts. The advantages of the modification are that hijackers will have to cut the metal to remove the device (they are unlikely to do this). Cons: if you install it yourself, there is a risk of breaking the studs; to repair the “brains”, you will have to go to the protection installers.
LADA VESTA. DIAGNOSTIC OXYGEN SENSOR (DOC) OF ENGINE 21129 WITH M86 EURO-5 CONTROLLER
content .. 120 121 122 123 124 125 126 127 128 129 ..
LADA VESTA. DIAGNOSTIC OXYGEN SENSOR (DOC) OF ENGINE 21129 WITH M86 EURO-5 CONTROLLER
To reduce the content of hydrocarbons, carbon monoxide and nitrogen oxides in the exhaust gases, a catalytic converter is used (see section 1.9).
The neutralizer oxidizes hydrocarbons and carbon monoxide, causing them to be converted into water vapor and carbon dioxide. The neutralizer also reduces nitrogen from nitrogen oxides.
The controller monitors the redox properties of the converter by analyzing the signal from the diagnostic oxygen sensor installed after the converter (Fig. 1.1-06). DDC works on the same principle as UDC. The UDC generates a signal indicating the presence of oxygen in the exhaust gases at the inlet of the converter.
The signal generated by the DDC indicates the presence of oxygen in the exhaust gases after the converter. If the neutralizer is operating normally, the DDC readings will differ significantly from the UDC readings.
The output signal of a warmed-up diagnostic oxygen sensor when operating in feedback mode, with a working converter in steady state, should be in the range from 590 to 750 mV and should not repeat the UDC signal. If a malfunction occurs in the circuits or the diagnostic oxygen sensor itself, the controller stores its code in its memory and turns on the alarm, signaling the presence of a problem.
The maintenance requirements for the DDC do not differ from those described above for the UDC.
LADA VESTA. CRANKSHAFT POSITION SENSOR (CPKV) OF ENGINE 21129 WITH M86 EURO-5 CONTROLLER
The crankshaft position sensor is installed on the oil pump cover (Fig. 1.1-07) at a distance of 0.9±0.5 mm from the top of the tooth of the drive disk mounted on the engine crankshaft.
The drive disk is combined with the generator drive pulley and is a gear with 58 teeth spaced at 6° pitches and a “long” synchronization cavity formed by two missing teeth.
When the middle of the first tooth of the toothed sector of the disk after the “long” cavity is aligned with the DPKV axis, the engine crankshaft is in position 114° (19 teeth) to the top dead center of the 1st and 4th cylinders.
- 1 - crankshaft position sensor
- When the drive disk rotates, the magnetic flux in the sensor's magnetic circuit changes, inducing alternating current voltage pulses in its winding. The controller determines the position and speed of the crankshaft by the number and frequency of repetitions
of these pulses and calculates the phase and duration of the pulses to control the injectors and ignition coil. The DPKV wires are protected from interference by a screen shorted to ground.
- If a malfunction occurs in the crankshaft position sensor circuit, the engine stops working, the controller stores a fault code in its memory and turns on the warning light.
- LADA VESTA. PHASE SENSOR (DF) OF ENGINE 21129 WITH CONTROLLER M86 EURO-5
Protection of the obd vesta diagnostic connector from theft
Criminals can use the diagnostic connector to steal Vesta. They break into the driver's door, connect to the OBD input, remove the vehicle's security, and start the engine without having the ignition key. To protect the car, you can block access to the 16-pin window (as you remember, it is not covered by anything).
Protection for contact with the “brains” from the interior looks like a small metal box with holes for bolts. The cover consists of two parts, one of which is removable (so that you can use the contact at any time). The protection is attached with a bracket to the internal pillars of the dashboard, and its two parts are connected to each other with turnkey bolts in the form of “secrets”. Every year, manufacturers come up with a new type of secret key to make their product even more secure.
Blocking the diagnostic connector
You can mislead hijackers in other ways. Here are some examples of blocking access to a contact:
- reworking the input from a sixteen-pin one to another (minus - it will complicate the work of service engineers);
- removal of OBD - input to another place (questions regarding warranty service may arise);
- installing a blocking relay on the path from the connector to the control unit (self-installation may lead to a short circuit).
All these modifications create difficulties - maybe you can park your car in a guarded parking lot and not have to worry?
The diagnostic connector is a necessary, useful device, without which a modern car cannot be imagined. On the other hand, this is a vulnerable spot, a “tidbit” for car thieves. There are solutions to this problem. Use one of them and sleep peacefully.
General questions about OBD2 on Grant
Let's look at questions about OBD2 on Grant - a diagram of what it is needed for.
How to use the connector
The main options for using OBD2 in Grant:
- Connecting a scanner to check the car and work with errors;
- Installation and connection of an on-board computer of the State or Multitronics type.
It will be useful to connect the on-board computer - this is how you can:
- control engine temperature;
- receive error codes immediately when they occur;
- force the cooling fan to turn on.
Diagnostic block diagram
The contact diagram of the block is shown in the picture:
The pinout of the block can be useful in the manufacture of adapters for OBD2.
Why do you need an ecu unit?
The electronic control unit is the electronic brain of any car. The ECU unit receives and analyzes information from all sensors available in the car: indicators of engine temperature in operating condition, air temperature, travel speed sensor, brake system activity sensor, steering. In essence, the ECU unit organizes and monitors the operation of all vehicle systems. Using the device, the process of air exchange in the car is regulated, maintaining a certain temperature regime, the process of fuel supply/consumption, the content of exhaust gases, and the functioning of the transmission. Having gained access to it, car thieves easily start the engine and steal the car. This method of theft is common. That is why take care of the safety of your car. It won't require a lot of money. If the owner does not have the skills to work with the computer, it would be advisable to contact a service center to ensure protection.
The Russian car Lada Vesta does not lag behind its foreign analogues, and is fully equipped with electronics. To monitor the operation of many vehicle systems, you can use the diagnostic connector. Its name is “OBD”; almost any unit is controlled by an electronic unit - the brain of the car.
The connection between sensors, engine and electronic unit is important. It is difficult to see the problem in such connections and circuit elements without the use of instruments and special devices. For this purpose, devices are used that are connected to the diagnostic connector. After this, the error is quickly found.
Electronics in a car are great progress, but also a bait for car thieves. Therefore, the diagnostic site must be protected. In the review, we will analyze the OBD in detail, where this convenient and useful plug is located, and what it is used for.
Options
The electronic engine control device for the Lada Vesta is Itelma M86. All other nodes are controlled by CBKE. Communication with vehicle systems is carried out via the CAN data bus. In addition to the standard installed components, the ECU interacts with the following devices:
- alarm;
- GPS tracker.
Itelma block. Photo source: drive2.ru
The main requirement for connection is the ability to work using a protocol compatible with the engine ECU.
Through the TsBKE block it is possible to diagnose the main components of the car:
- automatic transmission;
- anti-lock braking system ABS;
- dashboard;
- electric power steering.
The condition of electrical accessories and airbags is monitored. The developers have provided more than 50 parameters by which you can control the operation of the devices. The owner's manual lists about a hundred common error codes that the engine ECU can report. There are a total of 3,000 faults that can be identified by diagnostics.
Electronic control systems are monitored and adjusted using the values approved in the manual. Based on the data received from the scanner, the following is determined:
- precise engine speed at idle and under load;
- coolant temperature;
- fuel consumption;
- on-board electrical network parameters.
The exact total mileage of the car is determined by the trip computer. The data received from the scanner may differ from the instrument readings. During diagnostics, you can clearly assess the technical condition of the car and receive graphic reports.
Diagnostic adapter
Today, diagnostic adapters that send information about the vehicle’s operation to the phone wirelessly have become popular. With such an adapter you can view errors and erase them from memory. The OBD-II V1.5 adapter is suitable for Lada Vesta. When purchasing it, please note that the version must be 1.5, not 2.0.
The advantage of this adapter is its low price. But it may not work with all brands of cars. But for Lada Vesta owners, this minus does not matter, and the advantages attract them to purchase.
Methods for diagnosing ECUs and errors on Lada Vesta via OBD2
Let's look at examples of analyzing machine systems in different ways.
Check Engine light on Vesta?
Detailed article on the causes of Check Engine and how to clear the Check. If your Check Engine light comes on, read this article immediately. The material explains what a Check Engine is, what to do if it appears, and how to remove this error yourself.
Is the Check Engine light on?
TOP 15 reasons why the Check Engine light comes on and ways to solve the problem. Read the article to solve the Check Engine problem.
To enter the BC diagnostic mode, hold down the top key and turn on the ignition.
Reviews of diagnostic scanners for LADA VESTA
Read detailed articles on the review of car scanners, including those compatible with LADA VESTA.
Reviews of OBD2 diagnostic car scanners
This section provides descriptions of diagnostic scanners and adapters. Before purchasing a scanner for your car, it is recommended that you read reviews of the most popular equipment models.
New software is written using programmers. There are open and closed ECUs.
- In a diagnostic way. Without removing the ECU from the vehicle via the diagnostic connector using flash loaders and a program such as Combiloader.
- Work via BSL mode of the ECU processor. With this method, programming the ECU is carried out by removing the latter from the car using bootloaders that work with the ECU processor via BSL mode.
Location
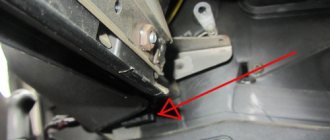
To carry out diagnostics on a computer, you must first find where the diagnostic connector is located. It serves to connect control devices and is connected to the electronic unit. The ECU diagnostic socket is located on the edge of the plastic panel under the mounting block and steering column. It is not closed and is easily accessible for use. But this only plays into the hands of the hijackers.
Diagnostic procedure
If an icon is detected indicating an error in one of the vehicle systems, the driver is recommended to diagnose the malfunction using a portable device. If the owner decides to check the errors himself for the first time, he needs to follow the procedure:
- Determine the location of the diagnostic connector.
- Select a car scanner to identify faults and errors in electronic control systems.
- Select an adapter for connecting equipment that is compatible with the connector.
- Download diagnostic software to a portable electronic device, install and configure. For scanners equipped with a display, software is not needed.
- Connect the auto scanner to the OBD2 connector via the connector.
- Start the car engine.
- Following the instructions, make a diagnosis, get an error log, determine the codes, decipher them using the table.
- Based on the data received, troubleshoot problems.
- Delete errors in the memory of the engine ECU, CBKE and other units.
- After repair, check the system again and make sure that no errors occur.
In addition to identifying errors in the operation of systems, the scanner is used to check the operation of the sensors of all electronic components.
Owners of Vesta who are diagnosing a car for the first time will receive help on auto-related websites. Photo and video materials are posted on the forums for self-checking using a scanner. Articles are also published that teach how to connect to an ECU, CBKE, other units, and use the equipment.
Device and pinout
This is a regular plastic plug consisting of 16 pins, which mean the following:
1 – unused output;
If you use the plug in question for the adapter, then there is no need to remember the name of these contacts. You just need to insert the adapter and carry out diagnostics.
ECU protection
The Lada Vesta car has an alarm system and central locking. However, car thieves continue to steal it. They break the hood lock, replace the electronic unit with their own, which operates from a third-party immobilizer.
After protection, removing the ECU is not so easy. There are manufacturers in Russia who offer to install protection for such units. In addition, it can be ordered individually from private craftsmen.
The car can be protected from theft by blocking access to the electronic unit.
The Lada Vesta ECU protection is made in the form of a metal protective box made of 3 mm thick steel. The block is located in this container and is fixed to the car body using studs equipped with shear nuts. If the thief decides to pull out the block, then he must cut the steel cover. Therefore, hijackers will not do this.
A disadvantage of the electronic unit protection design is the risk of the pins breaking off when installing it yourself. After this, you will have to contact a car service to repair the unit.
Why is the check engine light on, what should I do next?
In a situation where the check light is on or flashing, the driver must listen to the operation of the mechanisms. If there are no failures or noticeable changes in the operation of the engine, there may be an error or failure of the Lada automatic system. Turn off the engine and start it again. If the check engine lights up again, some problems have arisen, and it’s not on for nothing.
Try to cope with the situation
Please note if there are any changes in the vehicle's performance. If the engine is operating in normal mode and the Vesta is driving normally, it does not twitch, there are no knocks, squeaks or noises, check the fuel tank cap
If it is not tightly screwed, or the integrity of the tank itself is compromised, the check may also catch fire.
Other problems are also possible - a malfunction of the oxygen sensor, low-quality fuel, a broken gas pedal, etc.
Plug protection
Thieves can use the diagnostic connector to steal a car. They open the driver's door, connect their devices to the OBD, disable the protection, and start the engine without the ignition key. To protect the connector, you can block access to it.
The protection for the plug is like a steel box with holes for screws. It is made of two halves. One of them is removed to use the diagnostic connector. The protection is fixed through a bracket to the torpedo struts. The halves are fastened together with screws with heads for a secret key. Every year, experts develop new types of secret keys. This allows you to secure the product.
What can be connected to the connector
This connector is mainly used for connecting diagnostic devices, as its name suggests. In particular, the well-known Chinese OBD adapters ELM-327 are connected to it. There are other homemade devices that can also be connected to the diagnostic connector.
For example, Lada Kalina has the same connector. A separate button with a glowing indicator is connected to it. It shows the engine temperature, since standard instruments do not have such an indicator. In addition, even an entire diagnostic computer is built into such buttons, with many capabilities and functions. But the Lada Vesta has a coolant temperature indicator. And you can’t compare Vesta with Kalina!
The connector can be used to connect diagnostic equipment connected to a laptop. Car service centers use such equipment when problems arise in the operation of the engine and other systems. We will consider connecting other interesting devices to the diagnostic connector of the Lada Vesta on our portal. Therefore, look at new publications, do not forget to bookmark our site.
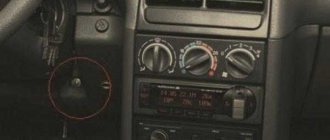
When is diagnostics needed?
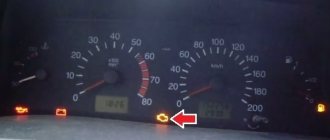
While the car is moving, when the driver does not notice any malfunctions, the icon (chek), schematically depicting the engine, may light up on the tachometer dial. This means that one of the systems has failed.
Check icon. Photo source: drive2.ru
In such a situation, there is no need to panic; perhaps this is a short-term equipment failure, then the chek lights up for a few seconds and does not appear again. If the error indicator blinks or is constantly lit, you must contact a service or dealer center for diagnostics. If you have the skill and necessary equipment, you can check it yourself.