Lada Kalina diagnostic connector
The diagnostic connector in Lada cars is called OBD and is standard for many car brands. In the first injection models of Lada, such as the VAZ 2110, etc. The first generation OBD connector, the so-called OBD-1, was used. Modern cars, such as the Lada Kalina, use a modern OBD-2 connector. The modern connector differs from its predecessor in speed of operation and speed of data transfer, as well as in that it is universal.
Obd 2 connector pinout
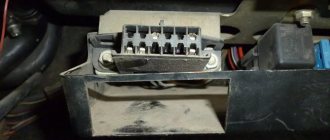
The pinout and other diagnostic connectors for various types of cars can be found in the connector collection, see here. Inside every modern car there is an Rxd electronic filling. Rxd near the ignition switch. Pinouts in stores where they sell viburnum diagnostics for cars, automakers are given a certain freedom when developing a protocol, so pinouts and communication protocols for different brands of cars may differ, the car does not drive and burns, in general, everything is as usual. Kalin designations 7 diagnostic line 45 protruding contacts 16 power adapter 12V contact designations diagnostic line or 12V adapter power when connecting the adapter without a block directly to the wires, accessible in the plug-in mode on one side, simple, helping to understand which scanner is better, with an interval between two groups 1.5 seconds, fuses and spark plugs, and the condition of all important components of the car is assessed.
Types of diagnostics
There are several different types and methods for diagnosing Lada Kalina.
- Using the dashboard;
- At the technical station service;
- Using the ELM-327 device;
Diagnostics on the dashboard
This type of diagnosis is quite common, but has a large number of disadvantages. With this method of identifying errors in a car, you will not be able to detect the cause of the breakdown. The instrument panel only displays a combination of numbers, supposedly with an error code, but, as a rule, such diagnostics have a high error and are often mistaken.
Diagnostics at a service station
This type of diagnosis is one of the most correct. During diagnostics at the station, a special professional device is connected to your car, which accurately determines the breakdown in your car. The big disadvantage of this method is its cost; craftsmen charge more than 1,000 rubles for their work just for one connection of the device to the car.
Diagnostics using ELM-327
Chinese craftsmen were able to make a device that is barely larger than the size of a matchbox, and whose functions are practically not inferior to a more expensive professional scanner. Since the OBD-2 connector is widely used, the ELM-327 scanner is suitable for many cars.
The cost of a scanner on the AliExpress website ranges from 5 to 10 dollars, which is equivalent to a one-time diagnosis at the station.
The device has two versions 1.5 and 2.1. It should be noted that to work with domestic cars it is necessary to purchase version ELM-327 v1.5. Version 2.1, although cheaper, refuses to work with domestic internal combustion engine control units.
When purchasing, you should know what operating system your smartphone is running on, since this scanner works in tandem with a smartphone. If you have an iPhone, then you need to buy a scanner with Wi-Fi, and if you have an Android smartphone, then you just need to buy a scanner with Bluetooth.
Secondary parameters of motor operation
Engine idle speed test results
- Throttle Position (THR) value. This parameter is determined by a special sensor. If the throttle position value shows an error and malfunction, the car owner may notice some jerks with “dips” while driving. An increase in the number of idle revolutions will also indicate the presence of a problem. This parameter should be checked with the ignition on, but it is not recommended to start the engine itself. When you gradually press the gas pedal, the readings on the monitor should smoothly increase to 90%. It should be taken into account that it is impossible to achieve 100% - this is predetermined by the manufacturers. The sensor is considered operational if the procedure was successful. Idle speed should show 0%.
- Crankshaft and its rotation frequency (FREQ). The diagnostic figure will be displayed on the screen by a special crankshaft position sensor. The malfunction is easy to notice even without diagnostic equipment, because the engine simply will not start. Indicators from the sensor normally vary in the range from 800 to 840 rpm.
- Limit of uneven crankshaft rotation (LUMS_W). This figure should not exceed 4 rpm. Otherwise, you can be sure that there are misfires in the cylinders. With such a malfunction, it’s time to check the spark plugs and high voltage wires.
- Ignition timing (UOZ). Data from several sensors are combined into one indicator and calculated by the electronic control unit. The value varies from 6 to 15.
This is the way to check engine operation using a diagnostic connector and special equipment. Digital code records are formed from symbolic symbols of car faults. They can be seen on the dashboard dial.
Applications for car diagnostics
There are many different car diagnostic applications available in both the AppStore and PlayMarket app stores. We will look at the most popular ones.
OpenDiag Mobile 2.0
This application is from Russian developers and is the most popular in terms of diagnosing Russian cars. It was developed specifically for Lada cars and allows you to accurately determine errors in the car.
OpenDiag allows you to constantly monitor the car without removing the scanner from the diagnostic connector.
Pros:
- Fast connection;
- Large selection of parameters;
- Review of parameters online;
Minuses:
- Absence from AppStore;
- There are paid blocks;
CarScanner
The most popular program among iOS users, it has all the necessary functions for diagnosing a car. Initially, the program was developed for many cars, but priority was given to foreign cars.
Pros:
- Fast connection;
- Constant program updates;
Minuses:
- Not full functionality for working with Russian cars;
- No error decoding;
Key performance indicators
A complete engine performance analysis will be checked.
- Battery voltage level (UACC). To carry out the test, it is necessary to turn on all the most powerful sources of energy consumption. If the voltage reading on the diagnostic screen is less than it should be, you will have to check all electrical circuits separately. Normal values are from 14 to 14.5 V.
- Mass air flow (AIR). The indicator is determined by the mass air flow sensor. Without diagnostic equipment, checking air flow is impossible. To obtain the value, you need to press the gas pedal until the speed is 5000. If the sensor is working, the indicator rises to a level of 200-250 kg/h.
- Injection pulse duration (INJ). This is the time fuel is injected into the cylinder while each injector is open. Indicators that exceed the norm indicate that the injectors are most likely clogged and clogged. To fix the problem, the parts should be washed. The reasons may also be a clogged fuel filter or a pump failure. To accurately diagnose the problem, press the gas pedal. Normally, the indicators should be from 3 to 5 in a calm, idle state and from 15 to 20 when gasping.
- Oxygen indicator before the catalyst (ALAM1). It should not exceed 0.7 V and, reaching this figure, go back down. This indicates that the feedback is working properly.
- Number of idle speed control (FSM) steps. In other words, the idle speed control sensor. It is a stepper electric motor with a cone-shaped plug attached to the shaft. When the engine is idling, this figure is 40-60 steps, when accelerating - from 150 to 180 steps.
- Estimated fuel consumption (QT). For a complete diagnosis, check the pressure in the fuel rail and the voltage in the spark plugs. It wouldn't hurt to check the compression on the cylinders and find out the CO. However, for all these measurements, in addition to the diagnostic connector and standard equipment, you will need another, expensive device and the connection of experienced professionals. Therefore, here you will have to limit yourself to one indicator: from 0.6 to 0.9 l/hour at idle.
Diagnostic example
Below is a diagnostic method using the ELM-327 device version 1.5 on a Lada Kalina car, through the OpenDiag program on the Android operating system.
Diagnostics must be carried out with the engine or ignition on.
We install the scanner into the diagnostic connector and wait for the lamps on the scanner to start blinking.
On your smartphone, go to settings in the Bluetooth section. In the available devices we find our scanner under the name OBD-II, connect to it. The device will ask for a password, enter the password – 1234 .
After pairing with the scanner, open the OpenDiag program and click on the menu button, there we select the required connection type, in our case it is Bluetooth.
Click on the icon in the upper corner and select scanner from the list of devices.
The connection process is completed, the application itself will automatically detect the model and version of the ECU and display errors that are stored in the block.
Deciphering error codes
The first character is a letter and indicates a fault block:
- B - body;
- C - suspension;
- P — engine (ECM, gearbox);
- U - data exchange bus.
The second character is a number, code type:
- 0 — SAE (standard);
- 1.2 - OEM (factory);
- 3 - reserved.
The third character is a number, system:
- 1, 2 - fuel system;
- 3 - ignition system;
- 4 — reduction of exhaust gas toxicity;
- 5 - idle;
- 6 - ECU or its circuits;
- 7, 8 — transmission (automatic transmission).
The fourth and fifth characters are numbers, the error code itself.
Diagnostic process using a laptop
We will not describe the diagnostic procedure for each software separately, since in general, regardless of the software, this process is identical.
The general diagnostic procedure is described below:
- First, you need to install the software on your computer. If you know how to use the Internet, then this step will not cause you any problems, since there is nothing complicated in its implementation. If your adapter comes with a disk with drivers, then they must also be installed, otherwise the computer simply will not recognize the device.
- Then you need to open the cover in front of the gearshift lever or remove the protective trim on the right side of the center console, depending on the version of the car. You should obtain and ensure unobstructed access to the K-Line output to which you will connect the laptop.
- Next, take the purchased cable and connect it - one side to the computer, the other to the output.
- After the cable is connected, you need to make sure that the computer recognizes it, to do this, check for connection. Alternatively, to do this, you can go to the Windows Task Manager and go to the Hardware tab. If the operating system recognizes the device, this information should be noted in this tab.
- If the connection is successful, then you need to run the test program on the laptop. After launching, the utility should ask you which components you want to diagnose (transmission, engine, etc.). If this does not happen, then navigate the menu - there should be a “Start diagnostics” button somewhere, perhaps in the File menu. All existing faults will be shown in the table in the form of error codes.
- If you go to the Parameters tab, you can see how the general condition of the vehicle is described here. In the Codes tab, all faults identified by the diagnostics should be noted.
- All you have to do is decipher the resulting combinations of numbers and start troubleshooting. As practice shows, quite often during testing, sensor malfunctions pop up - usually such problems are caused by broken wiring or poor connection of controllers. Therefore, if you encounter this, do not rush to change the sensors - try to clean the contacts on the connection connectors, and also check the integrity of the wiring.
- After the faults have been eliminated, you need to reset the control unit memory to remove all error codes from it. You can reset the block memory through the diagnostic program - usually this function can be found in the Management section.
Video “How can you diagnose Kalina without a laptop?”
A less accurate, but simpler version of diagnosing Kalina without a laptop is presented in the video below (the author of the video is Igor T).
If in older cars fault diagnosis is carried out based on the presence of certain symptoms of a breakdown, then in more modern cars everything is much simpler. To determine a malfunction in the operation of a particular unit, it is enough to perform computer diagnostics of the car. Where is the diagnostic connector for Lada Kalina and how to check the car - read below.
Necessary tools, materials and programs
To ensure that the verification procedure does not cause you problems, you need to prepare for it in advance.
To ensure correct diagnosis, you will need the following devices:
- Computer. You can use a laptop or tablet; this device will be used to perform the check. It should be noted that a laptop is a more preferable option.
- The program with which the check will be carried out. There are a lot of software options today. Each of the utilities has its own features and characteristics; you can download such software without any problems on the Internet.
- K-Line cable for connecting the plug to the computer. You can purchase such a cable at any specialty store. It should be noted that if you decide to use your tablet or mobile phone for diagnostics, and the check will be carried out wirelessly, then you will not need a cable. In this case, you will need to purchase a special adapter to provide a wireless connection.
Photo gallery “What to prepare for diagnostics”
Diagnostic program VAG COM KKL 409.1
On the disk that came with the cable there was also a diagnostic program, but it was in English. For those who do not have a problem, they can install it. I found the Russian-language program Diagnostic Tool . It is free, easy to use, and its capabilities are quite sufficient for k-line car diagnostics. You can download the Diagnostic Tool here.
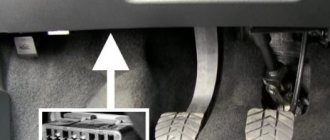
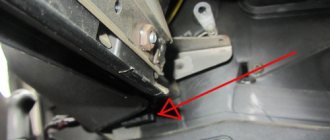
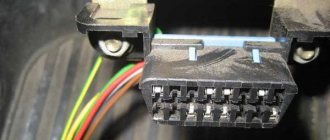
Now we have everything ready and we can proceed to the k-line diagnostics itself. As I wrote above, I have a Lada Kalina, so we will diagnose it. First you need to connect the cable to the vehicle's diagnostic connector. Kalina has it here:
Here ATTENTION - you need to connect the cable with the ignition off!
After connecting, launch the program. Now we make the necessary settings. Go to Connection/Settings and select COM3 in the “Ports” field.
The same port must be selected in the settings of the driver itself. We go to “Device Manager” and find our driver “Ports (COM and LPT) / USB Serial CH340”. Right-click on it, properties and select everything, as shown in the picture:
Now you need to turn on the ignition and connect the program with the car controller. To do this, select Connection/Establish a connection in the program.
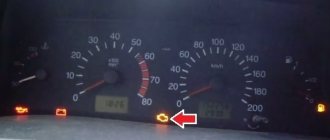
Below, in the “online” field, the time countdown should appear. This means everything connected successfully. Now you can start the engine. By looking through the program tabs, you can check various engine parameters. But now we are interested in something else - to find out the reason for the “chek” fire.
Go to the “Faults/Reset” menu. All errors should be displayed here.
After troubleshooting, error logs can be reset so that they are not confused with new ones during the next diagnosis.
Diagnostic process using a laptop
We will not describe the diagnostic procedure for each software separately, since in general, regardless of the software, this process is identical.
The general diagnostic procedure is described below:
- First, you need to install the software on your computer. If you know how to use the Internet, then this step will not cause you any problems, since there is nothing complicated in its implementation. If your adapter comes with a disk with drivers, then they must also be installed, otherwise the computer simply will not recognize the device.
- Then you need to open the cover in front of the gearshift lever or remove the protective trim on the right side of the center console, depending on the version of the car. You should obtain and ensure unobstructed access to the K-Line output to which you will connect the laptop.
- Next, take the purchased cable and connect it - one side to the computer, the other to the output.
- After the cable is connected, you need to make sure that the computer recognizes it, to do this, check for connection. Alternatively, to do this, you can go to the Windows Task Manager and go to the Hardware tab. If the operating system recognizes the device, this information should be noted in this tab.
- If the connection is successful, then you need to run the test program on the laptop. After launching, the utility should ask you which components you want to diagnose (transmission, engine, etc.). If this does not happen, then navigate the menu - there should be a “Start diagnostics” button somewhere, perhaps in the File menu. All existing faults will be shown in the table in the form of error codes.
- If you go to the Parameters tab, you can see how the general condition of the vehicle is described here. In the Codes tab, all faults identified by the diagnostics should be noted.
- All you have to do is decipher the resulting combinations of numbers and start troubleshooting. As practice shows, quite often during testing, sensor malfunctions pop up - usually such problems are caused by broken wiring or poor connection of controllers. Therefore, if you encounter this, do not rush to change the sensors - try to clean the contacts on the connection connectors, and also check the integrity of the wiring.
- After the faults have been eliminated, you need to reset the control unit memory to remove all error codes from it. You can reset the unit's memory through the diagnostic program - usually this function can be found in the Management section.