Print this article Font size 16
Every driver knows that engine overheating is very bad. It can't lead to anything good. To protect the engine from overheating, cars are equipped with radiator cooling fans. And sometimes he is far from alone.
Today we’ll talk about a very important cooling element - the fan sensor. It is responsible for turning on this cooling device in a timely manner, preventing unwanted overheating.
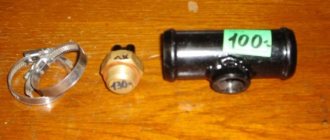
Appearance of the device and location
At what temperature does the VAZ-2114 fan trigger and turn on?
Many motorists during the operation of the VAZ-2114 have encountered the fact that the engine cooling fan turns on. But not everyone knows at what temperature it should operate. This indicator is inextricably linked by the design of the cooling system and the embedded ECU program.
The design of the cooling system and the principle of turning on the fan
Engine temperature indicator
Before we begin to directly consider the temperature at which the cooling fan turns on, it is worth understanding the operating principle itself. So, coolant circulates through the system and removes heat from the engine to the radiator. This element, in turn, conducts natural cooling of the liquid with a counter flow of air.
If natural cooling is not enough, the fan turns on. This happens under certain conditions.
Before considering all the factors and the temperature at which the fan turns on, it is worth understanding the design of the cooling system and the circulation of coolant:
Engine device
1 – element in the form of a plug for the expansion tank; 2 – expansion tank; 3 – hose for draining liquid from the pipe; 4 – hose passing between the radiator and the expansion tank; 5 – hose leading from the radiator; 6 – tank to the left of the radiator; 7 – aluminum tube; 8 – plug systems; 9 – tank to the right of the radiator; 10 – drain plug; 11 – middle of the radiator; 12 – casing for electric fan; 13 – plastic wings of the electric fan; 14 – electric motor; 15 – toothed pump pulley; 16 – pump impeller; 17 – camshaft drive belt; 18 – engine block; 19 – pump pipe; 20 – radiator hose with supply function; 21 – heater radiator hose with drain function; 22 – hose supplying coolant to the throttle pipe; 23 – exhaust pipe; 24 – hose for refilling; 25 – heater radiator hose with supply function; 26 – thermostat; 27 – coolant temperature sensor; 28 – coolant level indicator sensor.
What should the engine temperature be?
According to the international automobile convention of December 1, 1992, where 92 representatives of the auto industry gathered, it was decided to establish a single standard for engine operating temperature.
This indicator is 90 degrees Celsius with a maximum permissible deviation of no more than 3 degrees Celsius.
Cooling fan connection diagram
But, given the region of operation and the ambient temperature, this temperature tends to rise. It is for this purpose that automakers came up with a cooling system fan, which provides additional cooling of the fluid in the system. It is driven by a temperature sensor, which detects it in the engine and is located directly on the power unit.
When the fan on the VAZ-2114 turns on
According to the decision of the convention and internal regulatory documents of the AvtoVAZ plant, the limit values for the coolant temperature are 85-105 degrees.
Thus, for normal engine operation, the system temperature should not rise above 105 degrees. This indicator is the starting point for turning on the cooling system fan. This data is stored in an electronic control unit, which regulates the operation of the fan.
The fan switching circuit looks something like this: the engine temperature reaches 105 degrees Celsius, then the sensor sends a signal to the ECU, which turns on the fan and stops it when the temperature in the system reaches 93-99 degrees Celsius.
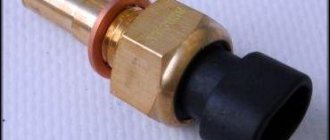
Cooling temperature sensor
In summer and winter, as practice shows, the fan turns on at different temperatures and for different periods. In summer, forced cooling will turn on more often as the radiator is cooled by the hot air flow. In winter, the fan almost does not turn on or its operation is limited to a short period, since natural cooling is quite sufficient. Therefore, the main radiator breakdowns occur in the warm season.
The only nuance when cooling will often turn on in winter is if the thermostat is faulty (see “replacing the thermostat on a VAZ-2114”).
conclusions
It was determined that the normal operating temperature of the VAZ-2114 coolant is 85-105 degrees Celsius.
In this case, the temperature at which the cooling fan turns on will be 105 degrees Celsius.
A little theory
| Characteristic | Explanation |
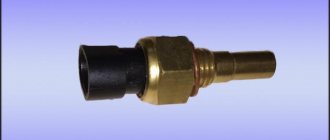
| Location | The sensor is located in the heater radiator. It is not difficult to determine that this is the one in front of you, since in the radiator it is the only element to which the wires are connected. And if you take a 30 key, then only the sensor has the appropriate fastener size. |
| Response temperature | Sensors may have different temperature limits. But for the VAZ 2114, switching on occurs at 102-105 degrees Celsius, and switching off occurs at 85-87 degrees. When choosing a new meter, focus on the one that has failed, or purchase one with an on and off indicator of 102 and 87 degrees, respectively |
| Operating principle | There is a special contact group inside the sensor. When the coolant in the radiator heats up, this group heats up and expands. When the expansion reaches a certain limit, the contacts close, they transmit a signal to the wiring and the fan turns on |
Where is the VAZ 2115 cooling fan sensor located?
Hyundai Accent silver Logbook Replacing the heater fan
Dear visitors of the “Cars” website! We will be very grateful for your comments on the video clip “Where is the VAZ 2115 cooling fan sensor located?” registration is not required for this. We also ask you to let us know if you have any problems playing the video.
Why does the rad fuse blow when the fan is turned on?
Why does the rad fuse blow when the fan is turned on?
can you tell me why I shouldn't bother the first transmission of the ventilator, but should I bother my friend?
I did this the first time it doesn't work. but I found an interesting thing in this wiring idiot, there are two wires on the power supply and the chip is divided into three, there should be a poop switch because I don’t have a yoyo?
try to supply power to the motor with other wires, and it will be clear whether there is a problem with the motor or not
Hello, please tell me why the expansion tank with antifreeze is mixed with oil from where it gets into the expander of a Volkswagen Passat V4 rev. 2. 0 1995 in and the temperature heats up to 110 degrees, the fan does not turn on
Hello, I want to know how to turn on the fan without a chip on a Volkswagen Passad.
Where is the Chevrolet Niva fan sensor located?
If without a plug how to determine the connection between the plus and minus of the thermal sensor, something often breaks down, maybe I’m not connecting the plus minus correctly
Hello, you checked the circuit, and the video is called how to check the sensor, so how do you check the sensor?
The problem is the following: the sensor is new, you jump the motor directly and it doesn’t work. but the radiator is heating up even as much as there is a whistle coming from under the tank cap, and the fan is not working
Good evening, I have the following question: the fan turned on and does not turn off, it works constantly, the upper hose is hot and the lower one is cold, could there be a problem with the sensor?
Hello, I have a lot of questions. 1, the engine overheats at low speeds and the light comes on, I don’t know the reason. 2, the fan speed is low, but if you turn it on directly from the battery, it’s as high as expected. 3, the pressure in the cooling system is high, the rubber tubes become hard. 4, in reverse gear the gearbox lever pops out. Thanks in advance.
Please tell me at DTOZh which wires are responsible for what? and then at 105 on the tidy the fan turns on, cools to 100 and again stays at 100-105
thanks for the video, I was looking for this sensor for a week and wanted to connect it directly, but for the future, write down the year of the car because I don’t have a sensor there for a Daewoo Lanos 1997 car, and thanks for the video
Hello Dima, my Lanus Daewoo right-hand automatic grenade flew off, but there is no other car in the city that can carry a grenade, if you know, I would be grateful
Fuel system
If it is below -20 degrees outside the window, it is possible that condensation has formed in the tank. The presence of water in gasoline is a bad sign. Moreover, it is not necessary that it be “diluted” at the gas stations themselves. Due to the temperature difference, condensation forms on the walls of the tank. At low temperatures it freezes. As a result, the VAZ-2115 (injector, 8 valves) does not start. Frozen water can be both in the fuel lines and in the filter itself. There is no point in trying to turn the starter with the hope that the car is about to start. You'll just drain the battery. The only solution to the problem is to warm up the car. It's better if it's in a garage with this problem. By installing an oil or induction heater there, you will quickly warm up the air temperature in the room. And the car will start successfully.
Step-by-step instructions for replacing the VAZ-2114 heater motor
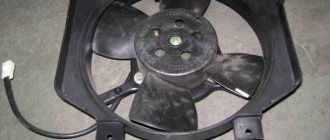
Cooling fan does not work
To force the air flow in the interior heating system, a fan driven by an electric motor is used. Thanks to this fan, the heater's operating efficiency increases.
Of the entire stove design, the fan is the most complex element, since it uses an electric motor. The electric motor itself is a direct current motor with excitation from permanent magnets. Despite its structural simplicity, the motor gradually wears out and stops working or functions incorrectly, which affects the performance of the interior heater.
Causes of malfunction
Note that the reason that the fan does not turn on is problems with the power circuit. Oxidation of wiring contacts, blown fuse, faulty resistor - all this leads to the cessation of operation of the electric motor. Therefore, if it does not turn on, first of all you should check the components of the power circuit. Common problems with the fan motor are the occurrence of extraneous sounds during operation - squeals, rattling, interruptions in operation - spontaneous stopping, difficult starting, etc.
The reason for the appearance of third-party sounds:
- Deterioration in the landing bushings into which the electric motor rotor is installed, lack of lubrication in them. Because of this, the rotor becomes loose during operation, which creates increased vibrations and rattling, and “dry” friction is accompanied by squealing.
- Interruptions in operation are caused by critical wear of the graphite brushes and contact plates of the rotor. Because of this, the brushes and plates cannot make normal contact with each other, which leads to problems in the operation of the fan motor - it does not spin up when turned on and may stop spontaneously.
Troubleshooting the electric motor of the stove is a problematic process and not always advisable; it is easier to purchase a new fan and replace it.
Video: Repairing the VAZ 2114 stove motor
How to replace a heater motor
Due to the fact that the fan is fixed on the heater housing and is accessible from the engine compartment, replacing the VAZ-2114 heater motor is a simple process and does not require disassembling the interior heating system and draining the coolant. Therefore, you can replace the fan yourself, without seeking help from a service station.
To replace the motor, you will need screwdrivers and a 8-10 wrench from the tools. The algorithm for dismantling the heater fan on a VAZ-2114 is as follows: 1. We turn off the power to the on-board network by removing the “positive” terminal from the battery.2. In the passenger compartment, on the driver's side, behind the pedal unit, we find the fan power wires - black (“ground”, pressed with a nut to one of the bolts) and blue (“plus”).
3. Unscrew the ground nut, find the blue wire connector and disconnect it.4. Open the hood.5. Remove the fan casing with the filter installed in it. To do this, unscrew the 4 fastening screws.
6. Unscrew the fastening screws of the air intake grille installed near the glass. Remove the grille.7. Unscrew the 2 bolts securing the fan housing.
8. Using a “pull” motion, remove the body from the support.9. Rotate the body 90 degrees. and remove it from the niche.
Further actions depend on what exactly was purchased for replacement - the assembly with the housing or just the electric motor with the impeller. If a fully assembled structure is available, we install a new element using the reverse technology to that described above.
Fan disassembly
In the case where there is a motor with an impeller, we disassemble the fan housing. To do this, remove the foam seal from the outlet socket, then remove the housing clamps, after which it will split into two halves.
We extract the email. motor, for which we unfasten the spring clamps of the motor cover, remove this cover and remove the electric motor. the engine together with the impeller from half the housing. The electric motor is replaced only assembled with the impeller, and it is not recommended to disconnect them so as not to disturb the alignment. When assembling, be sure to stick a foam rubber seal around the perimeter of the outlet socket, otherwise the air flow will dissipate due to the cracks, which will reduce efficiency of the stove. If the electric motor of the stove made a strong squeal during operation, you don’t have to change the electric motor, just disassemble the fan and put grease in the bushings. But these measures will help eliminate the squealing for a short period of time and ultimately the stove motor will have to be replaced.
MODE SWITCH PANEL
Sometimes the stove cannot be turned on because the switches on the control panel fail. You can also fix this problem yourself. You must first remove the handles and remove the stove mode switching unit. When removing the panel body, pay attention to the latches. They need to be pressed with a thin screwdriver, and at the same time pulled out. When the latches are removed, the switch housing housing slides out of its socket easily. Here you can already see what kind of breakdown occurred and what parts can be replaced.
A car's heater, at first glance, is a simple unit in a car, but it is closely connected with the entire structure of the car, and primarily with the cooling system. Using the heat generated by the engine, the car heater does not require additional electricity and fuel. But often it is the failure of the interior heating system that can be the first signal of more serious defects.
VAZ-2114 cooling fan does not work, injector does not turn on
Replacing the radiator of the VAZ 2114 stove
All cars with an injection engine have an electric fan, not a mechanical one. With mechanics, everything was simpler... The fan motor is connected to the network through a relay, and the signal to this relay is supplied by the ECU. Additionally, there is a fuse in the motor circuit, and the antifreeze temperature sensor (ATS) is connected directly to the ECU. If the cooling fan does not work, you can do one trick on the VAZ-2114: turn off the DTOZh sensor and start the engine. And if the fan starts spinning, the problem must be looked for in the sensor.
To avoid having to examine the wiring inside and out, just watch one video. Everything here has already been done.
Cooling fan diagnostics - trying to find the problem
There will be two temperature sensors: one, which is on the thermostat, is connected to the ECU. It is necessary to turn it off - leave the second one as it is.
DTOZH on engine 11183
We disconnect the connector, but do not remove the sensor itself. Then we turn the key to position 1, and so on.
Electrically, things look complicated: the fan relay is in one box, and the fuse is in another. We need fuse F5 (20A). By the way, both a fan and a horn are connected to it.
Mounting block 2114-3722010-60 and 2114-3722010-10
The main mounting block is installed under the hood, and the additional one is located at the left foot of the front passenger.
Additional mounting block (option 1)
In the additional block we see three relays. The "main relay" is located at the bottom. And then there are possible options:
- The fan relay is mounted in the middle;
- This relay can also be installed at the top.
The second option is shown below.
Additional mounting block (option 2)
By the way, there is always a fuse located near the relay we need. It is part of the fan circuit.
ECU outputs
For the BOSCH M7.9.7 ECU, the output to the fan relay is terminal 68. The “on” command corresponds to the “0 Volt” level. On MP7.0 units, everything does not look simpler - terminal 46 is connected to the relay, and the zero potential is also removed from it.
If the main relay is turned off, the fan relay will not be able to operate.
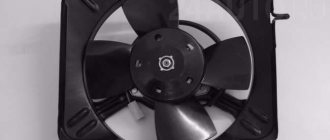
The fan does not work - we change it ourselves
Try to do this: you need to remove the negative terminal from the battery (the key is “10”), and then disconnect the motor connector.
Fan power connector
If you now connect the battery again, you can call “+12” on one of the two terminals. Now you can go all-in: the negative cord from the fan is connected to ground using a T-connector. Often on the VAZ-2114 hatchback the fan does not work because it is not the wiring that is faulty, but the motor. And then they perform the replacement.
Dismantling, all steps
Once again, make sure that you have disconnected the battery. Disconnect the connector as discussed above. Next, use a socket wrench to unscrew the two nuts holding the “stopper” (see photo).
Retaining bracket above the casing
There are four nuts at the corners of the plastic frame. They need to be unscrewed with a 10mm key.
One of four nuts
The mounting frame together with the fan is removed in the “up” direction. As you can see, everything is simple.
Installation of the unit is carried out in the reverse order. It will be possible to replace both the motor and the casing frame.
Articles
- 2108-1309010 – casing;
- 2109-1308008 (-01, -02) – motor assembly with impeller;
- 2103-1308010-10 – impeller;
- 12605571 – lock washer;
- 16102311 – M8 nut.
Conclusions: what exactly should be done if the fan does not work (action algorithm)
First, check whether the “plus” is connected to one of the terminals in the connector. Then connect the connector from ground to check the serviceability of the electric motor. In some cases, you can observe this:
- Both fuse F5 and the additional fuse are working;
- The fan relay operates as expected;
- The DTOZh sensor is working;
- The motor can only be turned on by applying a potential of “0 Volt”.
There will be only one conclusion: the ground contact has come loose, which ends the entire power line. This means you will need to contact an auto electrician. All other faults can be overcome by yourself.
Element F5 may burn out as a result of the horn closing. But then “+12” is not called up on the connector, which should immediately alert you.
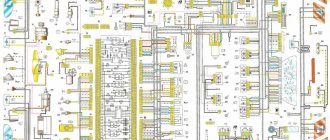
Connection diagram
Knowing the electrical diagram for turning on the radiator fan, it will be easier to find problems in its electrical circuit.
The cooling fan has 2 inputs: the first input leads to the generator through fuse F5 and the connection busbars in the mounting block (2). The harness block (3), nicknamed the chip by drivers, connects the electric fan via a relay to the injection controller connected to the ignition relay. From the wire coming from the controller, a branch leads to an auxiliary relay with a fuse.
Finding possible causes of fan malfunction
The search for possible reasons why the fan on the VAZ-2114 does not work must first begin with the fan itself. To do this, disconnect the fan connector and connect it directly to the battery terminals, while maintaining the polarity. If the fan starts working, it means that it is fully operational and the reason lies in something else.
Where is the fan relay for the VAZ 2114 injector.
But if the fan still does not turn on after the above manipulations, you should check the condition of the sensor contacts and whether the wiring is intact. If in this case everything turned out to be fine, it’s time to check the fan relay and fuse. Both of these parts are located under the hood of the car, closer to the driver's side in a special mounting block.
fan wiring repair
systems
VAZ 2114
.
It should be noted that fuses 20A and F4, responsible for the fan and sound signal, are double on the VAZ-2114. Therefore, if the reason for the fan not working lies precisely in the fuse, then the sound signal will not work. You can check the functionality of the fuse using the most common automotive tester.
But, unfortunately, you will have to tinker with the relay.
In order to confirm or rule out the relay problem, you should acquire a similar device that has been tested for performance. You need to temporarily install it in place of the old one and check whether the fan starts working. If in this case a miracle did not happen, we move on to inspecting the sensor.
After de-energizing the sensor, the fan should start in emergency mode and provide constant airflow. To do this, disconnect the sensor from the connector and turn on the car ignition. If the fan
finally started working, this indicates a sensor malfunction. The latter, by the way, cannot be repaired, which means it can only be replaced.
Where is the VAZ 2114 cooling fan relay?
Tips for motorists
The electric fan of the VAZ-2114 engine cooling system is activated only by a signal from the coolant temperature sensor. But the connection does not occur directly, but through a relay. Two fuses protect this electrical circuit. If the temperature gauge needle creeps into the red zone of the scale, then let off the gas, turn on the interior heater fan at full power and look for a place to stop .
The serviceability of one of the fuses, located in the mounting block and protecting the electrical circuit of the fan, can be checked by simply pressing the horn button. If the signal works, then everything is in order with the fuse, since it also protects the electrical circuit of the sound signal. If it malfunctions, we open the mounting block and look for a 20-amp fuse F5, but before replacing it, you need to find the reason for its failure, otherwise the newly installed one will burn out in the same way.
To check the second fuse, you will have to remove the console trim on the passenger side. There you will see three relays and next to each of them there is a fuse. You will need to pull out the middle one to check. And again, if it burns out, you need to look for the cause of this phenomenon. If the fuse is working, we check the middle relay, since the fan motor is turned on through it. Having pulled it out of its socket, inspect its contacts for oxidation. You can check it with an ohmmeter; if you don’t have one or don’t know how to use it, you’ll have to try to replace it with a working one.
Next, open the hood, disconnect the block with wires from the fan motor and, if there are a pair of wires, connect it directly to the battery. If the fan starts working, then the cause of the malfunction will have to be looked for in the temperature sensor, or a relay and another fuse located next to this relay. Well, if the fan does not work when connected directly, then you will have to look for the fault in it yourself.
The fan may not work due to a failure of the temperature sensor for turning on the fan. It is located on the cylinder head, above the thermostat. If there is no ohmmeter, we check by replacing it. Only the fan switch sensor should not be confused with the sensor that works with the coolant temperature gauge.
Another malfunction may be that the fan does not turn off after the coolant temperature drops below the one at which it should have turned off. In this case, the sensor and fan switch relay must be checked. By using the method of replacing suspected faulty devices, the driver will be able to find the reason why the engine cooling fan is not working.
Many motorists during the operation of the VAZ-2114 have encountered the fact that the engine cooling fan turns on. But not everyone knows at what temperature it should operate. This indicator is inextricably linked by the design of the cooling system and the embedded ECU program.
When do you need to change the fan on a VAZ-2114
If the reason for the non-working fan lies in the fan itself, you can still try to repair this part. As a rule, the problem lies in the bearings. But sometimes it also happens that due to a break in the windings or a short circuit, the fan motor itself fails. If this happens, then it is better not to try to repair anything, but to replace this part.
By the way, driving a car with a non-working fan is strictly prohibited. As a result of this action, the coolant can warm up significantly, which will lead to complete destruction of the pipes and rubber hoses. Driving a short distance with the fan not working can also cause the cylinder head and valve cover gaskets to fail. But that's not all. Overheating of the engine can also destroy some elements of the piston group.
In other words, the fan
(its cost, by the way, is not that great) can cause much more serious problems, the elimination of which will entail significant material costs. On average, the cost of a new fan for a VAZ-2114 varies from 1.5 to 2 thousand rubles. Replacing it at a service center will cost another 500 rubles. But replacing all the above parts and gaskets can cost more than tens of thousands.
Clogged filters
This problem can occur in both summer and winter. And this applies not only to the fuel filter, but also to the air filter. The latter is in a special plastic case. On VAZ 15th model cars it looks like this.
After moving the latches, lift the air filter housing cover and remove the cleaning element itself. If it is dirty, the part needs to be replaced. Filters are consumables and cannot be restored at home. Moreover, they cost pennies. As for the fuel filter, it is located under the bottom of the car. The element looks like in the photo below.
If the car has driven more than 30 thousand kilometers, the filter should be replaced. You will not be able to visually determine the degree of contamination as you can in the air. The part is located in a closed, non-separable case. It has porous paper inside. It is capable of passing particles smaller than 10 microns. Over time, the pores of the paper become clogged, and the filter is not able to pass the required amount of fuel through itself. So that the problem does not take you by surprise, change this part in advance.
A characteristic sign of failure is jerking when moving (as if the fuel supply to the cylinders had stopped for some time). This means that the submersible pump is not able to supply the required amount of fuel through the paper pores. As for the air filter, it is changed every 6 months or every 10 thousand kilometers. By following the regulations, you will protect yourself from such problems.
Replacement
On an injection engine, which is literally filled with all kinds of sensors, sometimes you need to pay attention to the fan control. If the check shows that the device is faulty, there is nothing left but to carry out the replacement procedure
https://youtube.com/watch?v=IWO7xJG5zGY
The work requires only a few tools and materials:
- 30 mm socket wrench;
- Container for draining the cooling liquid;
- Dry rags.
Having prepared everything you need, you can start replacing.
The first priority is to let the engine cool. Working on a cold engine is more convenient and safer. If hot coolant comes into contact with your skin, burns will occur.
Dismantling process
To replace, you do not need an inspection hole or overpass. For such work, these elements are not needed. A simple garage will do. Disconnect the negative terminal from the battery. Drain all coolant from the radiator. Do not drain the coolant from the cylinder block; this is not necessary. Remove the plug from the expansion tank of the cooling system of your injection engine. To drain antifreeze or antifreeze, unscrew the drain plug on the radiator. You will find it at the bottom of the radiator, and no tools are required for dismantling. The plug is easily unscrewed by hand. Place a pre-prepared container under the drain hole where the coolant will drain. Wait until the fluid flow stops completely. If you want to refill the same antifreeze, take a clean container
If the coolant is old enough and needs to be replaced, then the cleanliness of the container does not matter. Screw the plug back in. Disconnect the contacts from the fan sensor. Using a 30 mm wrench, the regulator is unscrewed. Twist carefully so as not to damage the plastic radiator container. Screw the new regulator in place of the old one. Be sure to insert a copper spacer under the new device.
Copper gasket in place
- Reinstall the fan control wiring.
- Fill the expansion tank with pre-drained antifreeze or antifreeze.
- Purge the system to avoid the formation of air pockets inside the system.
- Replace the negative battery terminal.
- Turn on the power unit and warm it up for a while to make sure the new sensor is working.
- If, when heated to the desired temperature, the sensor does not work again, you should check other elements that may be causing this behavior of the cooling system.
Replacement without draining coolant
If you do not want to spend a lot of time replacing the sensor on your VAZ 2114, you can do without the procedure of draining the coolant.
Replacing the fan control switch without the coolant drain stage requires experience and certain skills. Therefore, it is not recommended for a beginner to use this repair method.
- Using a 30mm wrench, start unscrewing the old sensor, but not all the way.
- Prepare a new sensor.
- Unscrew the old regulator completely with one hand, and quickly insert the new one with the other.
- In this case, a certain part of the antifreeze will leak out, but this is not scary.
- After replacement, be sure to thoroughly wipe all areas around the regulator with a dry cloth.
- Make sure there are no leaks after installing a new device.
It is especially important here to work on a cold engine, since when heated and under pressure after removing the sensor, coolant can get on you. The consequences of skin contact with hot liquid are hardly worth describing.
When finished, dry the vehicle thoroughly to ensure no coolant remains on the engine or its components. This is especially true for rubber and plastic elements.
How to check the sensor yourself?
Checking the fan switch sensor is not difficult.
- If there is a need to diagnose it, you must first find out its functions and operating principle.
- After this, you can test the system by heating the most vulnerable part of the sensor housing. To do this, you need to remove it from the radiator, carefully inspect it, check the contact pads, inspect the wires, and, if necessary, clean it.
- Next, you will need a tool that you can make yourself from a regular light bulb and battery, or use a special tester.
- Bring water to a boil, then connect the tester and sensor contacts and lower its vulnerable side into the water.
- After this, a short circuit should occur. This action will cause the lamp to ignite, or the characteristic sound signal of the tester to appear. If the device shows that the contacts closed before colliding with boiling water, then the sensor is undoubtedly faulty. The author of the video, Mechanical Technician, will tell you how to check the fan switch sensor.