The Priora central lock does not have a separate block like on other VAZs. The role of the Priora central locking unit is performed by the electrical package controller. In addition, the central locking is included in the standard security system installed by the factory, the APS-6 immobilizer. This system allows you to avoid installing an additional security alarm. The car comes complete with three keys, the main, spare and training keys with a red insert, in which chips are installed to identify the keys by the security system.
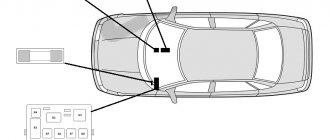
Lada Priora alarm connection points.
| Chain | Wire color | Polarity | Location |
| Weight | M6 nut near the mounting block | — | |
| Food +12 | Brown | + | Ignition switch |
| Ignition | Blue with black | + | |
| Starter | Red | + | |
| Nutrition +12 (second option) | Red | + | BUS, connector X1 |
| Turns | Blue | + | |
| Turns | Blue with black stripe | + | |
| Ignition (second option) | Orange | + | BUS, connector X2 |
| Hood switch | White with black stripe | — | |
| Driver's door - limit switch | Blue with black stripe | — | BUS, connector X3 |
| Passenger door - limit switch | Brown | — | |
| Rear door - limit switch | Gray with orange stripe | — | |
| All doors (with interior lighting delay) | White with black stripe | — | |
| Trunk - trailer | Yellow with red stripe | — | |
| Opening the trunk | Blue with red stripe | — | |
| Ts.Z. (open) | According to the diagram below | ||
| Ts.Z. (close) | |||
| Handbrake (via diode) | Brown with blue stripe | — | Dashboard |
| Generator | Brown with white stripe | + | |
| Tachometer | Brown with red stripe | + | |
| Can tire High (since 2013) | Yellow-red | Diagnostic connector | |
| Can tire low (since 2013) | Grey | ||
| LIN bus (since 2013) | Blue-white | Driver's door harness |
Actuators
If only one of the doors does not open or malfunctions regularly occur, the culprit is most likely a malfunction of the activator. The thing is that it works in tandem with a motor. The latter sometimes has windings that burn or the gears that cause the lock rod to move become unusable. This unit cannot be repaired - it is simply replaced with a working one.
Also, quite often problems with central locking occur after replacing or disconnecting the battery. In general, the entire locking system is powered by the on-board battery; for this reason, it is undesirable to disconnect it without good reason. De-energization leads to malfunctions of the controller, and sometimes to its breakdown.
Connecting limit switches.
The limit switches are connected via diode isolation, shown in the diagram below.
Diode isolation circuit for limit switches.
Let's look in detail at how to connect an alarm system to the central locking system on a Priora. There are two options: the simple scheme provides that 4 locks are automatically closed, but only one can be opened, but the complex version does not have this drawback. Both connection options are discussed further. Additionally, it will be indicated which parts and components can be purchased to implement any of the schemes.
Programming the standard control unit
The Priora central lock does not have a separate block like on other VAZs. The role of the Priora central locking unit is played by the electrical package controller. In addition, the central locking is included in the standard security system installed by the factory, the APS-6 immobilizer. This system allows you to avoid installing an additional security alarm. The car comes with three keys: a main key, a spare key and a training key with a reddish insert, in which chips are installed to identify the keys by the security system.
To activate the Priora immobilizer, you need to turn on the ignition with a reddish training key and after 6 seconds turn it off and remove the key from the lock. In this case, the immobilizer indicator will start blinking at a frequency of 5 times per second. This periodicity of flickering should last the entire activation time. Change means stopping the process due to incorrect actions.
While the indicator is flashing, you need to plug it into the lock and turn on the ignition with the main key. If the action is correct, three beeps will sound from the buzzer. Do not turn off the ignition until two more beeps sound. After which the ignition can be turned off and the key removed from the lock.
Two schemes (simple and complex)
First of all, before connecting the alarm, you need to study the instructions included with it. The main unit always has relays installed: one of them closes when the locks are locked, the second acts on opening. The connector to which the relay contacts are connected usually has 6 pins. There is nothing complicated here.
In the first case, we will use only this connector. The second circuit uses another contact, called “signal output for 2-step lock opening”. Find it on the main unit.
We connect the alarm in a simple way
A push-button module is installed in the driver's door of the Lada Priora. The door trim must be removed and the connector for this module must be found:
We will need a brown cord from the connector. It is a signal, and the alarm relay is connected to its break:
Peculiarities
Unlike other models coming off the assembly line of the Volzhsky Automobile Plant, the Priora does not have a separate control unit on the central lock. Its functions are performed by a single electrical package controller. In addition to this unit, the vehicle protection system installed at production also includes an APS-6 type immobilizer. Thanks to this, the car owner does not need to install an additional security system on his car.
In reality, there are quite a lot of reasons for the central locking malfunction. Problems often arise due to:
- controller;
- keys;
- immobilizer;
- driver's door lock;
- broken wiring;
- shorting it to the ground of the car, etc.
If this or that problem occurs, you should pay attention to the window regulators, as well as the adjustment of the mirrors. If they do not function, then, most likely, the failure occurred due to a malfunction of the signal wiring coming from the 5th pin of the driver's door module or from the 5th pin of the HZ terminal, which supplies the controller itself.
Notes on implementation of schemes
Let us immediately note: if there are no window lifters, the second diagram will not contain parts K2/K3. Then you only need to cut one wire. Sometimes only the rear windows are missing. This means that relay K3 is excluded. And the diodes connected in parallel with the winding can be absolutely anything.
Now we list the requirements for an element called “relay”:
- Operation voltage – 12 Volts;
- Switching current – 10 A or higher;
- The current consumed by all relay windings should not exceed the value specified in the instructions for the signaling. Usually it is 200-300 mA.
It is the last requirement that is often violated.
In order for “scheme 2” to work, it is necessary not only to assemble it, but also to program the main unit: you need to enable the “2-step unlocking” option. And be that as it may, control impulses cannot be made too long. Use values of 0.7-1.1 seconds.
Power cables (cord X1-6) can only be connected using twists.
The cross-sectional area of the wire must be sufficient to withstand a current of “10 Amps” (this does not apply to signal circuits). A fuse protecting the power circuits must be installed. And of course, before installation, remove the negative terminal of the battery.
Why is everything so difficult?
It would seem that we only need to manage the locks. Why then connect to the window lift motors?
All relays operate simultaneously
The opening of the passenger doors is carried out by the second impulse (relay K1 is activated). And elements K2 and K3 at this moment block the power windows. If they are not blocked, the windows in the doors will lower during the entire control pulse. And even in 0.8 seconds they will open noticeably.
Of course, connecting the signaling system in a Priora is more difficult than in many domestic cars. At the same time, the “Grant” in the “Norma” configuration uses a similar scheme. Be that as it may, the Lada Priora is the flagship of VAZ. And probably, difficulties with the electrical part should not confuse a competent car owner. It is also known that the standard control unit can be reprogrammed, and then unlocking occurs in one step. In this case, the connection is made according to “Scheme 1”.
Wiring
In general, the wires remain a weak point in Priora, and so far the manufacturer has been unable to do anything. For this reason, it is extremely important to regularly check their integrity. This is a labor-intensive task, but very necessary.
They start testing them from the doors - it is at the points of their entry that the insulating layer is most often damaged, which, in turn, provokes a short circuit. The procedure looks like this:
- the wires are disconnected from the activator;
- use a key fob to close the lock;
- the power wire must be live;
- If you open the door, the electricity will flow through another vein.
Problem with closing the lock
Recently, a problem with closing the driver's lock has begun to appear frequently. The point is that when closing with the key fob, the driver's door closed, but not completely, and a nasty signal occurred notifying about this. Every day it got worse and worse, I'm already tired of this Beep!
Lubricating the internal mechanism with silicone solved the problem for a couple of days, then the same thing happened again. From time to time the disease gave complications - the lock either did not open or did not close. It was very difficult to manually move the flag from the interior.
In general, I tried to figure it out... but that was not the case. One of the lock bolts had become so sour that it would not move at all. The bolt is a Torx T40 bit (but the metal is very soft). There were 2 bits (cheap China and one of lesser quality). I tried to spin it with a cheap bat and it spun very nicely. I tried to twist it with a good bat - I twisted the splines on the bolt. I spent 1.5 hours with this bolt. I had already driven in a screwdriver, but when I tried to turn it, the edges of the screwdriver twisted.
I gave up on everything, took the grinder, went to the garage (at the same time I stopped at the store and picked up new bolts, but for a Phillips-head screwdriver they cost 10 rubles each). In the garage, I quickly cut a slot on the bolt for the largest flat-head screwdriver. Somehow the bolt came loose.
I tried to open/close the already removed lock, the gearmotor works fine.
I removed the mechanism, and everything there was dirty and rusty. And the lock itself is very dirty (in particular the springs). PS If I buy another car, I will never buy one with external locks! Not only do the Priora have external locks, but they also have rubber bands, so they quickly become clogged with dust.
I cleaned all the mechanisms with carburetor cleaning fluid, then VDshkoy, and finally lubricated everything with grease (alas, there was nothing else). I took the springs out of the lock and cleaned out all the debris there. By the way, this is not the first time I have heard that it is better not to remove the springs because they cannot be inserted later or it is very problematic. Strange, but 5 minutes were enough to put both springs in place.
I put everything back together... but wow! At the same time, now it has stopped opening by the handle, literally a millimeter is missing.
I took it all apart again. I noticed that there is wear on the inside of the lock, which is why after cleaning there just wasn’t enough pressure.
And then I decided to completely remove the gear motor and check it separately. It seems to work, but I tried to lightly hold the rod with my fingers and glitches immediately began. The rod began to twitch, and sometimes it extended itself and immediately moved back.
I disassembled the gear motor, and there was a piece of the plate broken off. As a result, the rod either extended normally or warped inside due to the load.
I quickly assembled the lock without a gear motor and a miracle happened. The handle opens everything perfectly, both from the street and from the interior. That's why I went and bought only a gear motor. I took this one:
After the replacement everything started working perfectly. The doors open easily. They close and open perfectly. Now you can press the flag from the interior to lock all the doors. It seems that this lock closes even more quietly than the original one. And the original one was marked 2108*****, most likely due to the fact that the car was built in 2007.
Source
What is an immobilizer for?
In addition to protecting the car from theft, the immobilizer performs a number of additional functions:
- the ability to control the delay for turning off the interior lighting;
- control of the rear fog lamp;
- checking the presence of the key in the ignition when opening the doors and giving a warning signal to the driver (one buzzer flashes in the instrument cluster);
- signaling that the external lighting is not turned off when the ignition is turned off (double buzzer signal).
Positive sides
The positive characteristics of using a standard immobilizer include:
- inability to start the car engine by turning the ignition lock cylinder or using a key without a chip;
- the ability to control the central locking using the standard key;
- when using a standard alarm system, it works in conjunction with the immobilizer, which provides additional protection;
- implementation of additional comfort functions;
- possibility of diagnosing the unit using a scanner.
Negative sides
The disadvantages of an immobilizer usually include the following points:
- The main disadvantage of the device is its unreliability. Quite often there are key failures, as a result of which the unit does not see the chip. This drawback forces owners to carry with them a second key from the set (with a red mark).
- The complexity of the training scheme and the risk of errors in the process.
- It is impossible to ensure automatic engine start without installing a bypass device or completely disabling the immobilizer.
- If the standard control unit is faulty, it is impossible to disable it yourself.
What is a car alarm
The possibility of increased control and warning range, as well as reliable operation in extreme urban radio interference, is ensured by the use of a 128-channel patented transceiver with FM modulation and a narrow bandwidth.
Remote starting and control of the operation of various types of engines is provided by a specialized processor. The existing key fobs implement an intuitive control principle. The pictograms on the keychain are presented in Russian.
The StarLine A91 Dialog car alarm can be installed on various cars with gasoline, diesel or turbocharged engines, with an automatic or manual transmission.
Thanks to more than 60 standard, programmable functions, not only reliable protection is provided, but also comfort when using a car alarm such as StarLine A91 Dialog.
how to connect central locking on Priora 2010
Central locking diagram for VAZ 2114: we understand the intricacies,
tell me how to implement the central locking function on a 2010 Prior using D94?
Answers 21
Take the relay. and that's all.
do you need 2 five-pin relays?
If you connect to the brown one in the door
but you won’t give me a diagram
in words - when closing we break it, when opening - we give a minus
but you won’t give me a diagram
What model of alarm are you installing? In your profile, you have a completely different car, which means it’s not a fact that the alarm system is the same as for it.
How to connect a VAZ PRIORE with full central locking is HERE if you have relay channels for central locking control (A93, E93). If there is no “relay”, but only low-current channels, then look HERE This is a different machine, BUT THE ESSENCE of connections to a SINGLE-WIRE low-current circuit is the same. There is also an option for a car that does not have a full-fledged lock on the driver's door.
Thank you very much everyone for the tips, everything worked out!
What scheme did you use to implement the connection? I've been suffering for 2 weeks! I have StarLine e90 Gsm! How to connect to the central locking system PRIORA 1? I beg you to help. After 2 the relay does not break!
After 2 the relay does not break!
This means you are connecting something wrong. Everything always works out. It’s just that the cars were equipped with different versions of central locking. Which one you have - who knows. But the force connection into the driver's central locking drive almost always works.
Draw how you connected everything. Just draw it yourself, no links to diagrams (working diagrams) from the Internet are needed. PICTURE EXACTLY WHAT YOU DID IN YOUR CAR.
I connected it according to this diagram!! I set different pulse times, but the locks seemed to lack the pulse strength!
If you cut a wire in a car, will the locks lock?
If you connect and apply minus, will they open?
It turns out that the impulse needs to be adjusted? I will try !
I've been suffering for 2 weeks!
I connected it according to this diagram!!
Just draw it yourself, no links to diagrams (working diagrams) from the Internet are needed. PICTURE EXACTLY WHAT YOU DID IN YOUR CAR.
And you give us a SCREEN from one of the online instructions.
And when you start drawing what you have done, you will most likely find out what was done differently from the diagrams from the Internet.
HAVE YOU CAREFULLY LOOKED AT THE NUMBERS near the RELAY feet on their housings?
In fact, the circuit that you dug up has one serious TYPOGRAPHICAL error and if you stupidly twist the wires ACCORDING to the PICTURE, then you have screwed in the WRONG way.
Compare with your diagram, find two differences on each of the relays (total - FOUR).
I personally have doubts about whether you have connected everything CORRECTLY.
Well, or you connected to the WRONG brown one.
I join Romanych48
Have you checked - WHAT HAPPENS on this brown one if you unhook your circuit from it, connect the break of the brown one and place a voltmeter between the brown one and ground and turn the key in the driver's door lock from the outside? There - on the root - either MASS or not mass? And if now (if you see the mass/not the mass) you unhook the brown one and the tail that went into the cabin, and not into the door - put it on the ground, release it from the mass (hanging “in the air”) - does the central locking unlock/lock?
If YES, then the wire is THE one you need. Then all that remains is to CORRECTLY assemble the circuit of two relays and the duration will be enough for 0.7 seconds in the settings of the first function of the AF table.
And by the way, one relay is enough.
But the machine will not unlock the first time after a long period of parking. So that the circuit will ALWAYS unlock the first time
And the wire is yellow-red (additional channel). need to be translated into flexible programming and programmed
Read about flexible programming in the alarm installation instructions, which can be found HERE
An impulse from black and white “wakes up” a sleeping car after a long stop; the second impulse from channel 2 unlocks the central locking system. If the car does not have time to fall asleep, an impulse from black and white will open it. The second impulse from yellow-red will be “idle” and will not affect anything.
Thanks for clarifying! I connected everything according to the numbers, in my diagram I get a view from the reverse side of the relay contacts, I double-checked the connections, and there is only one brown wire, it’s difficult to confuse, I’ll check for ground, not ground, but everything seems to be as you described. I cut out the diodes to eliminate them. I tried this circuit directly to the button, it only works when it is on. ignition, but the immo light came on (turned off by software)!
https://vaz-russia.com/remont-vaz-2170-priora/shema-provodki-na-lada-priora-raspinovki.htmlhttps://autolocked.ru/avtosignalizacii/kak-podklyuchit-k-centralnomu-zamku- na-priorehttps://avtolektron.ru/upravlyaemye-ustrojstva/tsentralnyiy-zamok-priorahttps://avtozam.com/vaz/lada-priora/elektricheskaya-sistema/https://support.starline.ru/communities/10/ topics/23801-kak-podklyuchit-tsz-na-priore-2010-goda
System components
Since central locking is, at its core, a fairly simple system, there are only a few main components. In particular, we are talking about the following elements:
- input sensors of the centralized system;
- electronic control unit;
- auxiliary actuator.
Of course, this system also includes a wiring kit that connects all components into a single network, allowing the driver not to make any effort to unlock all or individual car doors.
Input sensors
In this case, we are talking about limit switches - input sensors that allow you to transmit information, as well as the location of the doors at the current moment in time, and send information to the control unit, as well as microswitches. The latter determine the position of the mechanical components of the central locking at the moment of unlocking or locking during the activation process. It is noteworthy that two microswitches are responsible for fixing the cam mechanism. A separate switch in this case allows you to accurately determine the position of the lever mechanism in the lock drive. All this helps to accurately recognize in what position the doors are located in relation to the body at this moment.
Provided that the door is open, the system closes the contacts on the switches, after which the central locking function cannot operate. Next, the current information is transmitted directly to the control unit. It transmits everything needed to the actuators used to close the doors, as well as the trunk lid and the gas filler flap.
Electronic control unit
Like any other system, the central locking has its own control unit, which is responsible for the operation of the entire circuit. As soon as information from the input sensors arrives at the ECU, analysis occurs here, as well as subsequent distribution to the actuators. It is noteworthy that the electronic control unit also interacts with the alarm system. This in turn opens up the possibility of remote control of the system using an appropriate, programmed key fob.
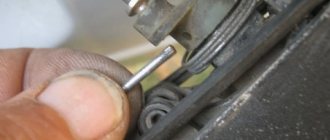
Actuator
Another extremely important element of a centralized locking system or central locking system. In this case, we are talking about an actuator or the final link of the entire circuit, which in turn is directly responsible for blocking the doors. It is noteworthy that the actuator itself is a conventional electric motor operating on the basis of direct current. The device is combined with a simple gearbox and converts the action of a rotating electric motor into reciprocating movements of the lock cylinder. It is noteworthy that in addition to electric motors, some vehicles are equipped with a pneumatic drive. A striking example is the automobile brands Volkswagen and Mercedes-Benz. It is worth recalling that these devices were used previously, but have been abandoned in recent years.