"Samara" (VAZ 2109), in itself, is a durable and reliable car. And if something “flies”, it is usually the result of extreme temperatures, or improper operation. But time spares no one, not even cars. Therefore, one day it may simply not start. And the cause of such a malfunction may not be in the engine or ignition at all. Failure of valves often leads to such breakdowns.
Valve check
Checking the solenoid valve for correct operation can be done in three different modes:
- when the engine is idling;
- when braking the engine;
- after turning off the ignition.
The general serviceability of the valve can be checked after turning on the ignition. To do this, you need to increase the engine idle speed to 2100 RPM. After crossing this mark, a characteristic click should be heard, which means that the valve has closed. After this, you can lower the speed, as soon as its number reaches 1900 RPM, a click should be heard again, meaning that the valve has opened.
Symptoms of a problem
There are several main signs indicating failure of the EPHH:
- The engine regularly stalls at idle;
- Detonation occurs in the engine when the ignition is turned off;
- The engine stalls when coasting braking is performed.
You can check whether the EPHH and its control unit are working correctly with your own hands. To check the valve, you should monitor its activation in various operating modes. Correct operation is determined by ear or using a voltmeter.
Briefly about the main thing
The solenoid valve stops fuel supply when the accelerator pedal is released and the crankshaft speed is more than 2,100 rpm, and resumes fuel supply at a frequency of less than 1,900 rpm under the same conditions. A faulty switch will prevent the engine from starting or will deliberately stop it from running.
There are several ways to check the serviceability of the solenoid valve on the carburetor of a VAZ 2109 car:
- connect standard or bypass power to the element output - a click should sound;
- remove the standard wire from the device with the engine running - the engine will stall;
- dismantle the sensor, connect it to the standard circuit and lean it against the carburetor - the needle will retract with a characteristic click;
- Connect the dismantled sensor to the battery: the needle should retract freely when voltage is applied and extend when there is no voltage.
Application of two-way valves in automotive systems
Since numerous vehicle systems constantly require shutting off, redirecting and mixing various flows of liquids or gases, the use of various bypass devices, such as valves, is required. The principles of their operation are based on different drives: pneumatic,
Setting up the carburetor of a 4-stroke scooter
Tuning the carburetor of a 4-stroke scooter is, of course, not rolling back the injector using broadband lambda, but it also requires a competent approach and knowledge. For stable operation and efficiency, Chinese manufacturers have developed and implemented several design additions. Before you get started
Carburetor DAAZ-4178 - installation and main causes of malfunctions
The Dimitrovgrad Automotive Component Plant produces DAAZ-4178 carburetors for UAZ vehicles, which can be used instead of the standard K-151V. The manufacturer guarantees an increase in dynamics and a reduction in fuel consumption to the level of 11 liters per 100 km in mixed mode, which is comparable to the fuel consumption of a GAZ
Selection of jets on a Solex 21083 carburetor
The Solex 21083 carburetor model with jets that affect the properties of the fuel-air mixture can be modified to suit any engine size. To do this, it is enough to select jets, which is quite possible for an experienced car enthusiast. Solex 21083, subject to proper improvement, is quite
What’s easier: to rack your brains or figure out how the carburetor works in a Lada?
To an uninitiated user, it may seem that the VAZ 2109 carburetor is complicated, so not many people decide to adjust it themselves.
Why did the Solex break down?
A carburetor is the main element of a car's fuel system. It is designed to mix air with fuel in the required proportions and form a fuel mixture supplied to the combustion chambers of the engine.
Source
How to replace the solenoid valve on a VAZ 2108-VAZ 21099?
Removal: 1) At the beginning of the operation, remove the air filter housing from the carburetor cover. (For how to remove the housing, read the article: “Replacing the air filter housing”)
2) Next, disconnect the wire block from the solenoid valve terminal.
3) Next, using a wrench, catching on the edges that are present on the solenoid valve, unscrew it completely. After unscrewing the solenoid valve, remove it from the car engine.
Note! Remove the valve carefully; when removing, do not lose the idle jet, rubber o-ring and cup that are present on this valve!
Installation: 1) Taking the new solenoid valve in your hands, install it in its place and then wrap it around the edges that are present on it.
2) After screwing, connect the wire block to it.
3) Finally, install the air filter housing onto the carburetor cover.
Checking the solenoid valve for functionality:
1) At the beginning of the operation, turn on the ignition of the vehicle.
2) Next, while the valve is still installed in its place, disconnect the wire block from it and then use the tip of this block to touch the output of the solenoid valve several times.
Note! At the moment when the wire block touches the valve terminal, clicks must be heard!
If clicks are present: 1) If clicks are still heard, then remove the solenoid valve from its installation location. (See how to do this in the same article, under the “withdrawal” section)
2) When the solenoid valve is removed, remove the idle jet from its body (Indicated by the red arrow) and then clean it of dirt and various kinds of debris by blowing it with an air pump or compressor. After blowing out the nozzle, check the cleanliness of its hole in the light and then install the nozzle in its place. After that, install the solenoid valve in its place and put the wire block on its output, and then get into the car and start it.
If there are no clicks: 1) In this case, remove the valve from its place and then disconnect the idle jet from it.
2) Next, taking the additional wire in your hands, connect one end of it to the output of the solenoid valve and place the other end on the “positive” terminal of the battery. After this, touch the body with the solenoid valve to the “-” terminal several times.
Note! When you touch the “-” battery terminal with the valve, clicks should occur and pay special attention to the valve shut-off needle (Indicated by the red arrow), when voltage is applied it should retract, and when the voltage is turned off it should return to its original position without jamming!
Device, principle of operation and main types
A thermocouple is a classic thermoelectric converter that is used to measure temperature in various fields of industry, science, medicine, as well as in automatic control and monitoring systems for gas boilers, stoves and water heaters.
It is designed very simply and can easily be made independently. Two conductors made of different materials are connected into a ring. One of the connection points is placed in the measurement area, and the second is connected to the measuring instrument or converter device.
Photo 1: Thermocouple for gas control device
The operating principle of a thermocouple is based on the thermoelectric effect, or as it is also called the Seebeck effect. It lies in the fact that voltage appears at the junction of two conductors made of different metals connected in a ring. If the temperature of the adhesion sites is the same, the potential difference is zero. But as soon as one of the junctions is placed in an area with a higher or lower temperature, a voltage appears that is different from zero and proportional to the temperature difference. The proportionality coefficient is different for different metals and is called the thermo-EMF coefficient.
Photo 2: Design and principle of operation of the thermocouple
The main materials for the manufacture of thermocouples are noble and base metals. Most of their alloys have rather exotic names, which are very popular among the compilers of various crosswords and scanwords. Depending on what metal pairs are used in manufacturing, thermocouples are divided into several types. Below is a table with their main types, designations and characteristics:
| Thermocouple type | Alloy | Russian markings | Temperature range, °C |
| K | chromel-alumel | THA | -200 — 1300 |
| J | iron-constantan | TZHK | -100 — 1200 |
| N | nikhrosil-nisil | TNN | -200 — 1300 |
| R | platinum-rhodium-platinum | Chamber of Commerce and Industry13 | 0 — 1700 |
| S | platinum-rhodium-platinum | TPP10 | 0 — 1700 |
| B | platinumrhodium-platinumrhodium | TPR | 100 — 1800 |
| T | copper-constantan | TMKn | -200 — 400 |
| E | chromel-constantan | THKn | 0 — 600 |
| U | copper-copper-nickel | -200 — 500 | |
| L | chromel-copel | THC | -200 — 850 |
In automatic systems for geysers, stoves and boilers, thermocouples TCA made of chromel-alumel (type K), TCA from chromel-copel (type L), TLC made of iron and constantan (type J) are usually used. Sensors made of noble metal alloy are designed for high temperatures and are mainly used in foundries and other heavy industries.
Photo 3: Sakhalin gas burner for heating boilers and furnaces
Some models operating on solid fuel, for example, such as the solid fuel heating boiler “Lemax” Forward, can be equipped with gas burners, which use thermocouples to protect against gas leaks.
Purpose of the solenoid valve
An electromagnetic valve for irrigation is always needed, even if there is no irrigation system. It is used in conjunction with a timer that turns it on at the right time. It is especially needed to fill the storage tank. When water is supplied according to the schedule, the timer opens the valve and the tank is filled. It is advisable to water the area at the same time. All this is done in the absence of the owner. All he has to do is water hard-to-reach places.
The main purpose of the valve is to supply water to the irrigation system at a given time. A 1-inch device is suitable for this, flowing 50-100 l/min at a pressure of up to 10 atm. It can also be used for short irrigation areas, since the built-in regulator allows you to adjust the required local flow. It is suitable for spray and drip irrigation when the pressure in the system is low.
One or more valves are installed on a drainage pad made of crushed stone and closed with a box. This can be done in any convenient place.
A hot engine stalls while driving or idling
Let's start with the fact that the symptoms and signs of this problem can manifest themselves in different ways. Quite often, the power unit may stall in idle mode, and unstable operation and complete stop of the internal combustion engine often occurs after the engine has warmed up.
First of all, diagnostics should begin with checking the spark plugs and their condition. At the same time, high-voltage armored wires should also be checked. This must be done because there may be weak sparking or no spark at all on the spark plug electrodes. Interruptions in the spark lead to serious malfunctions in the operation of the engine, as a result of which both the cold unit and the engine stalls after warming up. Replacing spark plugs and high-voltage wires often helps solve the problem.
Another common situation is when the engine stalls hot or cold immediately after starting it. In this case, on many modern cars with an injection power system, you should check the idle speed sensor. The failure of this element of the electronic engine control system often leads to the fact that the engine is simply unable to operate at idle speed.
In some cases, cleaning the XX regulator helps, in others the device should be replaced. On cars with a carburetor, the idle jets may become clogged and other carburetor malfunctions may occur. Injection engines also require additional checking of the synchronization sensor (DSPS), and possible problems with the fuel pump should not be ruled out. One way or another, if the engine stalls when hot or this constantly happens with a cold unit, then in-depth diagnostics will be required.
If we talk about why a car stalls at idle when the engine warms up, then the reasons may be similar to those cases when a warmed-up unit stops while moving. This happens as a result of heating of certain engine elements, after which thermal expansion occurs and a failure occurs.
On carburetor cars with a mechanical ignition distributor, a situation arises when the slider stops performing its functions. Quite often, after the engine has warmed up, the central wire on the ignition coil may come off, problems with the ignition unit capacitor, etc. may occur. A known problem with cars with a mechanical fuel pump is that the engine stalls in hot weather. This occurs due to overheating, since the high temperature outside and significant heating of the engine compartment do not allow the pump to cool properly.
At the same time, attention should be paid to the condition of the fuel filters. If the filter element becomes clogged, then as the load increases and the speed increases, the required amount of fuel does not flow into the engine through the dirty filter and the engine stalls. We add that usually before a significant decrease in filter capacity and a complete stop of the motor, the malfunction progresses
At first, the car may not pick up speed, starts poorly, dips appear when you press the gas pedal, the engine is unstable or jerks when you press the accelerator, in transient modes, etc.
We add that usually before a significant decrease in the filter capacity and a complete stop of the motor, the malfunction progresses. At first, the car may not pick up speed, starts poorly, dips appear when you press the gas pedal, the engine is unstable or jerks when you press the accelerator, in transition modes, etc.
Modern cars with an injector have an electronic control unit (ECU). This unit is quite rare, but still fails. In this case, the engine may stall while driving, and the problem itself manifests itself in various situations, including after the internal combustion engine has warmed up. In this case, as well as if it is necessary to check individual ECM sensors, it is necessary to carry out computer diagnostics of the vehicle. The system will display existing errors in the form of codes, after decoding which it is possible to localize the fault. If the problem is “floating”, that is, it occurs periodically, then it is recommended to purchase a compact device that allows you to read information about engine operation via the OBD connector. Thanks to the subsequent display of data on the screen of a smartphone, tablet or laptop with a pre-installed program, this solution will allow you to record failures in real time.
Operation and repair
The VAZ 2109 carburetor, like all other parts, tends to break. Typically, a breakdown involves the failure of any spare part. In such cases, repair usually helps.
The first thing that can break is the accelerator pump. Its purpose is to enrich the fuel mixture, regardless of the air supply, when the throttle valves are opened. If, when you sharply press the gas pedal, the car jerks, it means that there is either not enough fuel, and significant gaps occur in the supply, or, on the contrary, there is too much of it, and it overflows the spark plugs. So, to avoid this problem, an accelerator pump is used. It regulates the exact amount of fuel required for normal engine operation, even when the gas is pressed hard.
The accelerator pump more often becomes clogged with sediment than breaks down, and then repairs are not needed, but simply cleaning is enough. But, if this is not the case, but there is still a breakdown, then the pump needs to be repaired urgently, otherwise operation of the engine of the VAZ 2109 car will be impossible, and you are guaranteed to have pedal failures.
The first symptoms that the pump is faulty is that when you press the pedal, the speed does not increase steadily, but floats. This is due to a shortage, or vice versa, an excess of fuel. The spark plugs do not have time to burn out all the gasoline, and they are simply flooded, so the car jerks while driving. Also, the pedal may fail when pressed.
Correct installation of the EM valve
It would seem, well, what’s so difficult, I screwed the valve into the carburetor and that’s it, but there are some nuances unknown to many, so if you do the installation yourself, without following them, you get new problems. So:
It is extremely important to correctly screw the EMC onto the carburetor. The most popular misconception is that it can only be screwed on by hand. Moreover, this can be heard not only from a beginner, but also from middle-aged and very experienced specialists in reputable car service centers. After such a recommendation, you and other drivers are in the deepest misconception. The point here is The problem is that a valve that is loosely tightened (by hand) begins to dangle in the thread, and a poorly squeezed rubber band adds additional air leaks, which leads to a lean mixture - just one of the common reasons for unstable speed. Also an erroneous technique, proposed in the article with the title “Capricious valve” in a magazine called “Behind the Wheel”: Let the engine idle, while turning off the power supply to the valve. Tighten it little by little until the combustible mixture normalizes and the speed increases; if the engine stalls, this means that the valve is tightened. Then start the engine and check the operation of the valve by disconnecting and connecting the power wiring. The whole point here is that the engine will stall as soon as the end of the nozzle has barely begun to enter its seat, but it has not yet reached the end. This “wisest” recommendation is also supplemented by: “If necessary, you can tighten the EMC about one more turn.” Doing this is just dangerous - if the EMC is pinched, you can ruin the XX jet, or ruin the seat for the jet, which is even worse, and if you break the thread located in the carburetor cover , then the price of repairs will skyrocket
The results obtained in this way:
- The first case - just change the jet
- The second case is replacing the carburetor cap
- The third case is to replace or repair the cover (drill out and insert a threaded bushing)
- For your information, the Repair and Maintenance Manual tells us a tightening torque of 0.4 kilograms per meter (corresponding to 3.68 Newtons per meter)
- For a valve with a body diameter of 20 millimeters, the force required is 40 kilograms, and for a 13 millimeter valve - 61.5 kilograms
- You are unlikely to be able to create such a force with your fingers, but with a key about 15 centimeters long - 2.5 kilograms is normal
- In the book by the author Tyufyakov it is written like this: “The valve must be tightly wrapped in the lid, until the rubber sealing ring is completely pressed into the spacer tube.”
The most sensible recommendation on how to install an idle speed solenoid valve on a VAZ 2109 is as follows:
- It is necessary to remove its rubber seal from the EMC, then screw it in by hand until it stops, while counting the revolutions and also remember in which location you have the contact
- Then we put on the elastic band, and screw it first by hand, and then with the “13” key to its previous position (which we remembered), but no further
- I’ll add on my own that with the VAZ 2109 engine running, the idle speed solenoid valve can be slightly unscrewed (no more than 120 degrees) to achieve maximum speed
Functionality check
Simple instructions will help you check the functionality:
- The functionality of the EMC is first checked with the engine stopped, turn on the ignition, removing and then putting on the wire going to the contact
- There should be a loud click heard when doing this
- Separately, you should check the operation of the limit switch contact located on the carburetor when releasing the gas pedal
- The contact may be oily or clogged with dirt.
- It happens that the “floating” speed of XX occurs due to damage to the rubber seal of the EMC
- This rubber band delaminates due to age, and air leaks begin, and the mixture becomes leaner, so the speed drops
- And sometimes when driving the car there was a slight smell of gasoline, as soon as it appears, you know that it’s time to replace the rubber
- Its “native” seals, which are installed by the factory during assembly, last the longest
- Among those that are now available in stores, it is better to take red ones; they are more resistant to gasoline than black ones
- There have been cases where air was sucked through the valve body, or cracks in the epoxy around the terminal, or simply a lack of seal
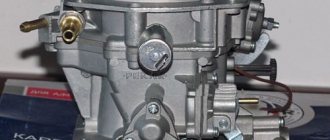
Replacing and checking the solenoid valve on VAZ 2108, VAZ 2109, VAZ 21099
Welcome! From this article today you will learn for yourself how to correctly replace the solenoid valve on cars of the Samara family.
Summary:
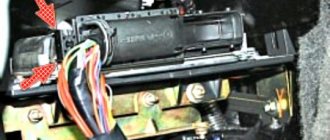
Where is the solenoid valve located? It is wrapped in the carburetor body, and a block of wires is connected to its terminal. At first glance, after opening the hood it is very difficult to notice, and all this is because it is covered by the air filter housing. Therefore, to see this solenoid valve, you will have to bend down and thereby look under the air filter housing. For a more detailed location of this valve, see the photo below:
Note! For clarity, the air filter housing has been removed!
When should the solenoid valve be replaced? Most often, when the solenoid valve fails, the following problems begin to occur with the car engine:
- Firstly, the car’s idle speed becomes uneven, that is, the speed begins to fluctuate and in some cases the car simply stalls constantly.
Note! All this is due either to clogging of the idle jet which is installed on the valve, or to the failure of the solenoid valve itself, or to the lack of power to the same valve!
General information
An electromagnetic solenoid water or gas valve is an electromechanical device designed to control the flow of liquid or gas in devices with power up to v308 (EV220B, Tecofi, Castel, ESM, EVR, GBP, GBV, NBR, PARKER, SCE, SYDZ, automatic transmission, KSVM, ZSK, ISP, Burkert, KSP). This valve is controlled by an electric current passed through a coil. When current is applied, a magnetic field is created and causes the piston inside the coil to move. Depending on the design, the piston will open when electricity is supplied, or the bypass valve will close. When the current stops flowing to the valve coil, it will return to its normal state.
Photo - Danfoss solenoid valve
The mechanisms are:
- direct and indirect type of action;
- vacuum, hydraulic, pneumatic valve;
- 2-, 3-, multi-way.
Direct acting electric valves open and close an opening inside the valve. In experimentally controlled valves (they are also called a shut-off device), a piston opens and closes the hole. High pressure valves (such as flanged valves) use pistons and special seals to control the condition of the orifice.
Video: Danfoss solenoid valves
Operating principle
To determine the cause of the problem and take action to troubleshoot the EPHH, you need to know about the principle of its operation.
- The economizer is equipped with output and input circuits.
- The input circuits are a limit switch and a wire that connects to the switch.
- The throttle (throttle) limit switch tells the economizer whether the gas pedal is depressed or not at that particular moment.
- If the pedal is not depressed, the limit switch closes to ground.
- As soon as the gas pedal is pressed by the driver, the contact is switched off.
- The wire that connects the switch and the economizer reports the number of pulses to the ignition coil. In fact, due to this, the economizer is able to find out about the actual current speed of the power unit.
- The EPHH has only one output circuit - the XX solenoid valve of the carburetor system (XX - idle speed). The economizer can turn this valve on and off.
- Fuel economy is ensured by closing the XX fuel jet at high engine speeds.
- If the gas pedal is not depressed, the throttle limit switch closes to ground, the speed is less than 2.1 thousand per minute, then the economizer opens the XX solenoid valve.
- When the gas pedal is depressed, the limit switch opens, leaving the valve open anyway. The valve closes only when the engine speed exceeds 2.1 thousand per minute.
- The valve is in the closed position until the speed drops below 1.9 thousand per minute.
Article on the topic: Which ball joints are better to choose for the VAZ 2110
If the car is coasting with the gear engaged and the accelerator pedal released, the EPHH will not turn on, even if the revolutions drop below 1900 per minute. The economizer monitors the closed position of the damper. If the engine speed at idle is too high, it is perceived as coasting.
Actually, this is all you need to know about the operation of such an element as EPHH.
Practice and research show that the use of an economizer allows you to save about 5 percent of engine consumption.
Design
EPHH carburetor VAZ 2109 includes the following components:
- Economizer;
- Solenoid valve;
- Throttle valve limit switch.
If at least one component of the EPHH design fails, the entire assembly stops working.
Element location
Valve faults
Like any device, this valve also has its own faults, which periodically appear during its entire service life. As you already understand, the valve’s task is to create a seal between the float chamber and the fuel supply system, so auto mechanics are accustomed to dividing the main malfunctions of the needle valve into two main categories:
- Valve seal failure when closed. This malfunction manifests itself as follows. When closed, fuel still leaks through the valve. This is due to wear on the seat. At the same time, the engine can stably maintain normalized speed, but fuel consumption increases greatly.
- Jamming of the needle component. In this case, the needle opens, but does not close, or does not always close, or even does not close at all. In this case, the chamber is overfilled with fuel or it does not flow there at all. This breakdown is diagnosed quite simply: if the gasoline pump pumps properly, the engine will stall after half a minute of operation, since the remaining fuel in the float chamber will be used up.
Independent examination of the valve condition
A detailed check of the functioning of the needle is possible only after dismantling the element under test. You must first remove the air filter and the filter element housing itself. The switch is unscrewed with a regular open-end wrench 13, carefully removed from its seat, and the analog element that dispenses the amount of fuel is removed.
The range of actions for a full diagnosis is as follows:
- pre-prepared conductors are connected to the battery terminals;
- “plus” is connected to the terminal, and “minus” is connected to the body of the part;
- The device reacts after voltage is applied.
dampers The shut-off needle is unprecedentedly retracted into the device body in the presence of a potential difference and instantly returns to its original position - the device is subject to further operation.
By turning on the ignition and closing the VAZ 2109 solenoid valve to the carburetor (body to body), with a known working EPHH control system, it is easy to assess the suitability of the locking element. As a result of contact with the “ground”, the needle should go inside the body with a characteristic click. Experienced owners test a newly purchased switch in this way.
- before screwing the device back in, the fuel nozzle should be washed/blown out;
- if the precision holes are heavily soiled, it is necessary to clean them with a fishing line or a soft wood needle;
- a loose valve may make it impossible to start the engine when the crankshaft is rotating;
- When tightening the element, you should not apply great forces, leading to deformation of the actuators of the part.
Installing the carburetor solenoid valve
When replacing a solenoid valve, it must be adjusted correctly so that the incoming fuel-air mixture meets the required parameters. The installation is carried out with the engine running, as this will allow you to accurately adjust the valve. In a carburetor, the valve is located under the air filter cover, so to remove a faulty solenoid valve, you must first remove the air filter cover.
First, you need to hand-screw the valve into the carburetor seat and put on the standard wire that connects the valve to the control unit. After this, you need to start the car’s engine, which will stall and possibly try to stall. If the engine still maintains speed, then further tightening of the valve into the carburetor is done using a wrench (13 or 14 depending on the type of valve). Further installation is carried out in the following way:
- the key is turned 1–2 cm clockwise, after which the wire is removed;
- if the car engine does not stall, then the wire is put on again and the procedure is repeated;
- As soon as the engine stalls after removing the wire, the valve is installed correctly in the carburetor.
Installation of the solenoid valve must be carried out carefully so as not to damage the fuel nozzle and seat in the carburetor. During the installation process, the size of the fuel mixture entering the engine is automatically adjusted, after which tripping and detonation stop
For precise adjustment, you can tighten the “quality” and “quantity” screws on the valve.
If, after tightening the valve several times and disconnecting the wire, the engine still does not stall, this means that fuel is entering the engine bypassing the solenoid valve and it is necessary to look for a malfunction in the fuel supply system.
Many owners of cars with carburetor engines, after the solenoid valve fails, simply block its operation or dismantle it, which solves the problem with the engine, which stops stalling at idle. However, such actions are only at first glance the right decision. Blocking the solenoid valve significantly increases fuel consumption (up to 5%), which will cost much more in the future operation of the vehicle.
Parts and consumables:
- Oil filter
- Engine oil
- Rags
- L-shaped socket wrench 14 mm
- Pliers
- Needle for cleaning the jet
- Tester or indicator lamp
- Medium Phillips screwdriver (when replacing the EPHH unit)
Parts and consumables:
- Solenoid valve (2108-1107420) (replacement if necessary)
- EPHH block (5003.3761) (if replacement is necessary)
This manual is suitable for all cars of the Lada Samara family equipped with the same carburetor engine.
VAZ cars with a carburetor have an electromagnetic valve (EMV) with an idle jet in the idle system. This valve is controlled by the electronic forced idle speed unit (EFI). There are three most common reasons for the disappearance of idle speed on VAZ 2108, VAZ 2109, VAZ 21099, VAZ 21093 cars:
- clogging of the idle jet of the solenoid valve;
- solenoid valve burnout;
- lack of power supply to the EMC.
Principle of operation
The operating principle of a pilot (indirect) solenoid valve for water can be understood from the attached diagrams of the device. Regardless of the type of electric valve used (normally closed, normally open or bistable), the operation of an electrically controlled valve will look something like this:
- The solenoid valve is initially closed and no electrical signal has yet been sent to the coil. Water is locked in the inlet part of the valve by a stem with a gasket;
- When an electrical signal enters the coil, an electromagnetic force arises in the solenoid, which draws the rod (plunger) into the inside of the coil, thereby creating space between the rod and the space above the membrane. The pressure under the membrane overcomes the pressure above and a passage opens for fluid to flow through the valve body.
When the tap is open, the same process occurs in the reverse order - the plunger is pushed out of the solenoid body and opens the water pressure above the membrane and, together with the force of the spring, closes the passage of water through the valve body.
The simplest operating diagram of a direct-acting solenoid valve:
- When a signal is applied (the electrical circuit is closed) to the solenoid, the rod is pulled into the inside of the coil and opens the passage of liquid due to the difference in pressure from the inlet to the outlet of the valve;
- when the signal to the solenoid coil stops (the electrical circuit is open), the spring returns the rod to its place and the valve seat blocks the flow of fluid through the valve body.
The solenoid valve can be made in different types of designs:
- saddle type solenoid valve;
- valve using a membrane floating amplifier;
- valve using a diaphragm amplifier with forced lift;
- piston type solenoid valve;
- gate type valve;a
- hinged valves;
- lever valves;
- poppet type solenoid valves;
- spool valves.
Based on the type of current supplied to the induction coils, solenoid valves can be divided into:
- installations with direct current in the network, which is typical for products where there is no high pressure and there is no need to create a large force of electromagnetic radiation;
- Products for networks with high pressures use alternating mains current to create an electromagnetic field of large magnitude on the rod or membrane in order to overcome large resistance loads in the water or gas environment.
Also, electromagnetic valves are divided according to the operating position of the rod into:
- Normally closed;
- Normally open;
- Bistable - with switching the position of the rod depending on the incoming electrical pulse signal.
Normally closed
An electromagnetic normally closed valve for water has a valve closed by a rod when the coil is de-energized, blocking the flow of liquid. When an electrical signal is applied to the solenoid coil, the rod and valve open this passage.
Normally open
Solenoid valves for water are normally open, such as, for example, UNIPUMP BOX series, when the selenoid coil is de-energized, they are in the open position and the liquid has a free flow through the valve body. When an electrical signal is applied, the valve and rod close this passage and the fluid flow stops.
Carburetor solenoid valve - how does it work?
- Carburetor solenoid valve - how does it work?
- 1. What causes excessive consumption of gasoline?
- 2. What does a carburetor solenoid valve do?
- 3. How does the solenoid valve of the VAZ 2107 work?
- 1. What causes excessive consumption of gasoline?
- 2. What does a carburetor solenoid valve do?
- 3. How does the solenoid valve of the VAZ 2107 work?
Regardless of the method of formation of the mixture, as well as the number of strokes into which the working cycle is divided, a carburetor engine has one single operating principle. The directly combustible mixture, which is compressed in the combustion chamber, is ignited by the ignition system at a certain moment, often through an electric spark system. In addition, ignition from a glow tube can be used, which in modern times is found in small-sized internal combustion engines. Currently, plasma and laser ignition are also used, albeit at an experimental level.
Electrical voltage is applied directly to the solenoid coil of the valve, as a result of which the magnetic core begins to be drawn into the solenoid. This procedure will close or open the system valve. The core itself moves inside the solenoid coil tube, which is necessary to increase the sealing component of the solenoid valve. This device is similar to a conventional shut-off valve. The only difference is that in such a device, closing and opening the valve does not use any mechanical force, since it occurs through an electromagnetic coil by applying electrical voltage to it.
What causes excessive consumption of gasoline?
Air enters the carburetor device through the idle valve, as a result of which this element is mixed with gasoline and sent directly to the internal combustion engine. With a system of this kind there will be a continuous supply of fuel. And the need for the fuel itself is always the same, since the vehicle can be operated under different conditions.
So, for example, during moments of engine braking, fuel consumption decreases and rises, and due to the fact that the supply of gasoline itself is not regulated in any way, its overconsumption will occur. The same can be said about when a car is coasting down a hill. In order to save fuel, there is a similar device - an electromagnetic gasoline valve.
What does a carburetor solenoid valve do?
The solenoid valve device is installed in order to reduce the fuel consumption of the vehicle.
How does the solenoid valve of the VAZ 2107 work?
The elementary valve in the “seven” is installed in the carburetor device. The operating mode of this system is controlled by a special forced idle economizer. The blocking of the air channel in such a device is facilitated by the upper working valve part. Due to the opening, the air itself will be directed directly into the chamber where mixing with gasoline occurs. In this case, another channel will be blocked, through the lower working part of the valve, which leads from the chamber, while not allowing the released mixture to enter the engine.
However, there is one small caveat.
The valve stroke itself will provide itself with power supply, which has a voltage of 12V. If the power supply is higher than specified, the air valve will open, which will block the channel for the air-fuel mixture. If the power supplied through the forced idle economizer is not supplied, the valve will close by means of a spring installed at the bottom of the device. Therefore, when the vehicle's ignition is inactive, no fuel will be supplied. Car enthusiasts are advised not to remove the solenoid valve device.
Many car owners who have quite a lot of experience do not know the purpose of installing a solenoid valve in the carburetor. When this device fails, they may make a mistake: instead of buying a new device, they block its operation.
This occurs by breaking off the locking mechanism, leaving it in the open position. As a result, you can get a huge excess fuel consumption.
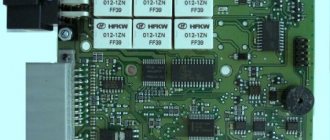
EPHH control unit for Solex carburetor
The Solex carburetor 2108, 21081, 21083 is equipped with an EPHH system (forced idle economizer).
Purpose of the EMK EPHH control unit
The EPHH control unit is designed for timely supply of voltage (switching on) and de-energizing (switching off) the electromagnetic valve (EMV) of the Solex carburetor 2108, 21081, 21083 upon the onset or termination of the forced idling mode of the engine (ISV) - engine braking.
Where is the control unit installed?
The control unit is installed on the engine compartment panel, to the left as the vehicle moves.
The control unit for the forced idle economizer system (ISP) of the Solex carburetor is installed on the engine compartment panel
How does the EMC EPHH control unit work?
To determine the onset of the forced idling mode, the EPHH control unit receives two signals.
— Throttle valves are closed
The signal comes from the screw sensor for adjusting the “amount” of the fuel mixture. Its contact touches the rib of the lever on the throttle valve of the first chamber of the carburetor (“ground”), if it is closed. The contact is fitted with a wire tip that goes to the control unit.
Sensor-screw for adjusting the “amount” of fuel mixture Solex 2108, 21081, 21083
— The crankshaft speed exceeded 2000 rpm
The crankshaft speed signal comes from terminal “K” of the ignition coil (pulses in the ignition system). This is the primary winding of the coil.
Terminal “K” of the ignition coil of the ignition system of VAZ 2108, 2109, 21099 cars
Having received both signals, the control unit de-energizes the carburetor solenoid valve and its needle closes the hole in the CXX fuel nozzle. No fuel flows through the idle system.
Termination of the IAC mode is determined by the block if any of two conditions are not met (either the driver pressed the gas pedal and opened the tip of the screw and the throttle lever, or the engine speed dropped below 1800 rpm). As a result, the control unit resumes the fuel supply through the CXX by applying voltage to the EMC (the EMC pulls the needle inside the housing and opens the CXX fuel nozzle).
Connection diagram for the EPHH Solex control unit
Control unit malfunctions
A faulty EPHH control unit begins to either open or close the valve, regardless of the signals received by it. Jerks and dips appear when the car moves. The engine idling either disappears completely or the engine “troubles”.
To determine the malfunction of the control unit, you can check it (at the same time checking the entire EPH system). You can first check the serviceability of the unit by removing and putting the wire end on the terminal of the carburetor solenoid valve and listening for a click. If there is no click, the EMC does not operate and the unit does not supply voltage to it.
Applicability of the control unit in Solex 2108, 21081, 21083 EPHH systems
Notes and additions
The forced idle mode (FID) of a car engine occurs when driving at speed, with the gas pedal released and the gear engaged - coasting (on a flat road or on a descent). In this mode, when the combustion of the fuel mixture in the cylinders deteriorates (the charge density is low, the amount of residual gases is large), it is necessary to turn off the fuel supply to the engine in order to prevent the release of unburned hydrocarbons into the atmosphere and, at the same time, slightly reduce fuel consumption. This is what the EPHH system does with the control unit.
At forced idle, the car moves in the urban cycle 15-20 percent of the time. If the system that ensures its operation is configured correctly and in good working order, then in addition to reducing exhaust emissions, significant fuel savings are obtained.
Source