The Lada Vesta car of the domestic automaker AvtoVAZ is deservedly and rightly among the most popular Russian cars. The number of sales largely confirms the fairly high level of the model in terms of its quality, reliability at an extremely reasonable cost.
It cannot be said that Vesta reaches the level of world leaders in its class, but domestic consumers enjoy using this car.
The big advantage of Vesta is its price on the new and secondary markets, as well as the ability to carry out independent repair, restoration and maintenance work. One of the simplest tasks is replacing the cabin filter.
If you do not change the consumables in time, problems will arise with the air quality inside the cabin, this will negatively affect the operation of the climate control equipment, and may also affect the health of the driver and his passengers.
Replacement frequency
We must not forget that the cabin filter is a consumable with a limited service life. The operating manual and the Vesta service regulations indicate an interval of 30 thousand kilometers. Allegedly, it is with this frequency that the interior fittings need to be changed.
But the experience of car owners clearly proves that the figure is not even close to reality. Even the highest quality filter cannot withstand 30 thousand kilometers under normal operating conditions. If we add here the constant passage of road dust, smog, exhaust gases, pollen and other pollutants through the air ducts, the interval is reduced by at least 2 times.
Most Lada Vesta owners prefer to change the cabin air filter after a maximum of 15 thousand kilometers. When a car is often forced to drive on dusty roads, the resource of consumables is limited to 7-10 thousand kilometers.
The best thing for a car owner to do is to monitor the condition of the element and replace it if signs of wear appear. Moreover, it is better to do this at the first symptoms, and not wait for development and active manifestation.
The following signs indicate that a mandatory replacement of the Lada Vesta cabin filter is necessary:
- The temperature inside the cabin begins to change. Since the purifier has already completely exhausted its resource, the heating and air conditioning system loses capacity and cannot push air through the clogged filter. Therefore, in the summer when the air conditioner is turned on, it is still hot, and in the winter it is not warm enough.
- There is an excessive amount of dust in the cabin. Yes, it can enter through open windows and doors. But when you turn on the heater or air conditioner, all the air in the cabin penetrates through the air ducts, colliding with the filter. And since the main task of the filter is to protect against dust, when it penetrates inside the car, we can accurately talk about the depletion of the resource. Need a replacement.
- Dirt and dust actively accumulate on the glass from the inside. Another characteristic sign that the cleaner is not doing its job.
- Unpleasant smell. Reminds dampness or mustiness. Almost the most objective factor indicating the need to replace a consumable.
- Rapid fogging of windows. If the windows are all closed, the air conditioner, stove or just ventilation is running, but moisture accumulates on the glass in the form of fogging, it’s definitely time to say goodbye to the filter.
- Weak air flows through the deflectors. It does not matter whether the air is hot or cold when you turn on the air conditioner or stove. It always passes through the filter first and then exits into the cabin. When the fan spins at medium or maximum speed, but the air flow is weak, the filter is probably clogged. It does not allow air flow.
The cabin filter on Vesta is directly connected to the ventilation, air conditioning and heating systems of the cabin. Without changing consumables, you increase the likelihood of failure of components of these systems.
Maintenance of Lada X-RAY > Remont-Avtovaz.ru
Like any car, the new crossover from AvtoVAZ called Lada X-Ray requires periodic maintenance. These measures are aimed at maintaining the car in working condition and eliminating minor faults.
Which AIR FILTER is better to choose for VAZ/LADA VESTA, X RAY. Replacing the Vesta,XRAY air filter
The automaker has drawn up a schedule for maintenance and repair of the Lada X-Ray, which includes all types of work to maintain the car in good condition. The first maintenance of the Lada X-Ray should take place after 15 thousand km, all subsequent ones – after the same mileage.
THAT. What and when to do
The list of maintenance work for the Lada X-Ray is quite extensive. But most of this work can be described as “tug, listen, check.”
That is, such routine maintenance can include such items as checking the level of technical fluids, diagnosing the suspension, checking play, tire pressure, lubrication of hinges and locks, etc.
But in the first maintenance there is also work related to the replacement of some working fluids and consumables. So, during this service the following are subject to replacement:
- Oil and filter element;
- Air filter element of the power plant;
- Cabin filter;
It is also necessary to check the level of other technical fluids (and replenish them if necessary) and the condition of the brake pads.
During TO-2, which is done after 30 thousand km, the service center performs the entire list of TO-1 work, and also replaces the spark plugs. According to the list of works, TO-3 fully corresponds to TO-1, but in addition the brake fluid is replaced.
All maintenance work is repeated up to TO-6. When hitting 90 thousand km. In addition, the accessory drive belt along with the tension roller, as well as the coolant, require replacement.
As for technical fluids, except oil, they should also be changed every 3 years if the car’s mileage has not reached the required level.
Let's summarize. Every one must be replaced:
- 15 thousand km - oil and filter, if necessary - pads;
- 30 thousand km - spark plugs;
- 45 thousand km – brake fluid;
- 90 thousand km – drive belts with tension rollers (timing and attachments);
These are the main types of work, and they must be performed. All other maintenance is mostly carried out during operation.
Nuances and features of maintenance
As you can see, the list of basic types of maintenance is not that significant, so servicing and repairing the Lada X-Ray with your own hands is a completely feasible task, especially since you can save money on it. The official service only charges from 5,000 to 10,000 rubles for services. (depending on the list of works), but you still need to buy replacement materials.
Of course, some of the other maintenance work on the Lada X-Ray cannot be done on your own. This concerns adjustments to the chassis, diagnostics of electronic components, etc. But in this case, it is not necessary to go to an official service center, because any normal service station can also perform the specified work and it will cost less.
Next, we will review what and where to look for when servicing the X-Ray yourself, because the car is relatively new and non-car enthusiasts know the design features of the power plant.
Selecting consumables
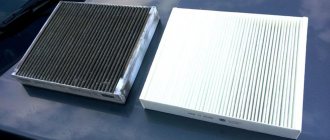
There is an opinion that different modifications of the Lada Vesta, which is equipped with 1.6 and 1.8 liter engines, require different cabin air filters. This is a misconception that does not correspond to reality.
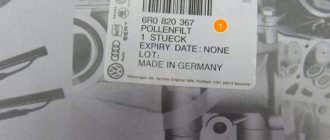
The current original consumable for the Lada Vesta model is a product manufactured by Mann with the index or catalog number CU22011. Such a filter will cost the motorist at least 850 rubles. Moreover, this is exactly what they will ask for for a regular paper filter based on synthetic fibers.
There is another filter, which is also considered the original. It is in many ways similar to the previous one, and the difference between them is minimal. Although the price is almost 2 times less. This is also a consumable from Mann with number 272773016R. It costs from 400 rubles and is suitable for Vesta and the X-Ray model.
But it is not at all necessary to buy the original, as almost every car enthusiast knows very well. Among the cheapest analogues, we can note the salon GB9978 from Big Filter or FAP0443 from the Pilenga brand. Big Filter has a carbon analogue of the named model, where the sign C is added at the end of the index.
Design and principle of operation of the part
Which oil filter is best to choose for your favorite car top 10
Sample engines that are used in modern car models include a lot of mechanisms rubbing against each other. Operating in this extreme mode, the mechanisms require high-quality lubricant as motor oil. For the rational operation of the engine and its components, the use of high-quality oil filters and timely replenishment of the oil reservoir with the missing amount of liquid are required.
In order for the car to remain operational for a long time, it is necessary to monitor the condition of the spare part and the level of engine oil. Manufacturers of car parts for Vesta and other models offer a wide range of filters. They may look different, but the products do the same job, they have a single mechanism of action. The part cleans the lubricant, removes dirt and metal particles from engine parts and prevents them from getting back into the operating mechanism.
The filter component of the Lada Vesta car is visually similar to filters of other brands - it looks like a dark glass with a cleaning device in the middle. Despite its apparent simplicity, the part has a complex design.
Replacement procedure
Motorists themselves, like craftsmen, use 2 main replacement methods when working with Lada Vesta. The only difference between them is the need to remove the glove compartment. That is, one method allows you to do without removal, but then it is not so convenient to work, and the second involves dismantling. The procedure takes a little more time, but removing and inserting a new consumable is much more convenient. The choice is for car owners who decide to take on replacing the cabin filter with their own hands.
The instructions can be combined for 2 methods.
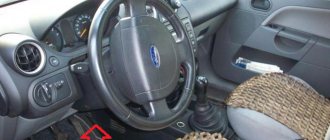
- The first to be removed is the plastic trim on the left leg of the front passenger in the lower side part of the center console. To remove the panel you will need a size 20 Torx wrench. This is a standard star screwdriver that is in the tool kit of almost every motorist.
- Unscrew one single screw, then pry the panel with your hands to remove it from the latches. It's best to use a small spatula or flathead screwdriver. Then the panel is much easier to pry off. Remove it and put it aside for now.
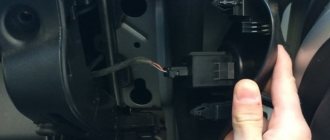
- Next, you can stop at the dismantling work done and begin replacing the filter itself. It is located behind the panel under a plastic cover held in place by clips.
- The latches are pressed out manually. They should be unfastened from the bottom and top of the vertically located cabin filter housing.
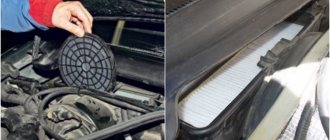
- Having removed the cover, the filter is compressed like an accordion and pulled out. Usually you can get there by hand.
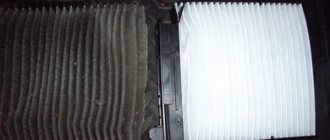
- Next, it is recommended to blow out the socket under the consumable using a compressor with compressed air, or use a vacuum cleaner. Otherwise, the dust accumulated over a long period of operation will immediately settle on the new filter, and its service life will be reduced by at least several thousand kilometers.
- In the same way, the new filter is folded like an accordion and pushed into the seat. This is where some difficulties arise. By squeezing the element too hard, it can be damaged and you will have to buy a new one.
- If you are not in a hurry and want to do everything carefully and correctly, it is better to choose the second option and additionally remove the glove box. He's a glove compartment.
- To remove the glove compartment, you need to unscrew 5 fasteners. A torx screwdriver of the same size 20 (T20) is also used here.
- When unscrewing the fasteners, pay attention to their length and thread. These indicators differ, so it is important to remember the sequence and location of fasteners. Reassembly should be done in exactly the same way when reinstalling.
- You will find 3 screws at the top of the glove compartment, and 2 more at the bottom.
- Using a flathead screwdriver, remove the right side console trim to the side.
- Carefully remove the glove box. Don't forget to disconnect the connector from the backlight. It's on the left side of the box. The latch contracts and disengages.
- Since you have previously removed the side panel along the left leg of the front passenger, and also dismantled the glove compartment, access to the cabin filter housing is open.
- Release the filter cover latches and pull the element to the right. This way the cover is completely removed from its place.
- Carefully use a vacuum cleaner to go over the seat of the cabin filter in your Lada Vesta, and then insert a new consumable.
- It is worth noting that the new filter will literally be 2-3 millimeters larger than the width of the housing opening for the consumables. It is because of this that when using the first method it is not always possible to easily insert a new filter. It's not that easy even with the second method.
- Squeeze the element slightly and insert it into the socket. Already inside it will completely restore its shape and correctly occupy the place intended for it.
- During reassembly, secure the cabin filter cover and return the glove box to its place. Moreover, the backlight is connected first, then the right side trim is moved. If the glove compartment is installed correctly, the trim itself will be exactly in its rightful place.
- Without confusing the location, tighten all 5 screws securing the glove compartment.
- At the final stage, the left trim of the center console is returned to its place.
When the motorist has completed all the procedures, it is worth starting the ventilation system on his Vesta. This will ensure that any problems associated with the worn filter have gone away.
Timely replacement of the cabin air filter provides undeniable benefits to the driver and his passengers in terms of comfort, the functioning of climate control equipment, and also prevents the occurrence of health problems, primarily affecting the respiratory system.
There is nothing difficult about changing standard consumables on a domestic Lada Vesta car. Therefore, even those who have only recently been behind the wheel and do not have extensive experience in independently servicing vehicles can safely take on this task. This is an excellent option for starting to develop the skills and abilities to operate a machine. After all, it's not just the ability to drive.
Instructions for Lada Vesta
- remove the glove compartment cover (you don’t have to remove it if you feel the tunnel lining clamps (from step 2) with your hand, putting your hand behind the shield on the engine side);
- Remove the tunnel lining on the front passenger side by unscrewing the screw and unclipping the fasteners at the top.
Self-replacement of the cabin filter of Lada Largus
Look under the panel. Remove the cabin filter cover (No. 2) by squeezing the clips (No. 3).
To remove the filter element from the heater housing, pull it down by its lower edge (the hole in the housing is smaller than the dimensions of the cabin filter). Clean the seat from dust and debris (for example, dried leaves). Installing the cabin filter is carried out in the reverse order, observing the markings indicating the direction of the air.
The replacement process is also shown in the video:
Where can I buy?
You can buy a cabin filter for Lada Vesta in many brick-and-mortar stores and online. As a rule, the product is always in stock, because it also fits X-Ray and Renault Duster. There are 2 types of elements on sale:
Usually coal is more expensive. The most popular sites are given in the table.
As you can see, the price can vary significantly. As a rule, this depends not only on the type of cabin filter for Lada Vesta, but also on the manufacturer. For example, foreign components produced by Mann and Pilenga brands (Italy) are significantly more expensive than domestic ones and even more expensive than original components.
The process of replacing the cabin filter on a Lada Vesta can be handled by a car enthusiast without special skills and knowledge.
Replacing the cabin filter Lada Vesta
Brief algorithm of actions:
- safely install the machine within the perimeter of the repair area, secure the rear wheels with wheel chocks;
- provide unobstructed access to the dashboard on the right passenger side;
- dismantle the glove box, remove the heater filter, replace it with a new one.
Where is the filter located
On cars of the Lada Vesta family, the cleaning element is located in the center of the dashboard in the lower part. It is a mistaken belief that the filter is installed behind the glove compartment.
Place where the filter is located
To carry out preventive maintenance, temporary dismantling of the storage compartment will be required. However, experienced specialists practice replacing the cleaning element in a different way, which we will consider below.
When to change
In accordance with the manufacturer's recommendations, maintenance of the interior cleaner is carried out every 30,000 km. As applied to the CIS, Russia, among others, the interval is large.
Taking into account climatic conditions, the level of dust and gas contamination of the territory, the purifier needs to be updated every 15,000 km, with the exception of unscheduled maintenance situations.
Signs that replacement is needed
- reducing the force of air flow from the deflectors;
- the appearance of a fetid odor and rot in the cabin, which is dangerous for the human respiratory system;
- Leaves, dust, and dirt fly out of the deflectors when the stove heater is activated;
- the onset of the time interval according to the instruction manual.
Step-by-step process for replacing the cabin filter Lada Vesta 1.6
The algorithm for preventing the stove heater on Lada Vesta 1.8 is identical.
- new cleaner;
- aerosol for cleaning the air conditioner evaporator (if necessary, its prevention);
- screwdriver with a Phillips bit, TORX key set to “20”;
- rags, plastic spatula;
- additional lighting provided that there is not enough daylight for work.
- We place the car within the perimeter of the repair area, provide priority safety measures, and squeeze the parking brake.
- On the passenger right side, open the glove box and remove the contents.
- We unscrew the three fixing screws and lower the glove box housing to the floor. First disconnect the lighting limit switches.
Replacing the cabin filter of a Lada Vesta with air conditioning is carried out according to a similar principle.
Repair sequence
Lada xray and vesta: first kilometers on new AvtoVAZ models
To perform proper vehicle maintenance, you will need to follow a sequence of steps. It is noteworthy that replacing the cabin filter of the Lada Vesta SV Cross is carried out according to a similar scheme, without changes.
Prepare the necessary tools and consumables. Place the machine in a stable position and apply the handbrake. The filter element itself is located under the dashboard on the left side of the glove box. The filter is hidden inside plastic linings and covered with protective inserts that ensure tightness. To remove the filter, you will need to use a T20 Torx wrench and unscrew the fastening screws on the right side of the gearbox lining.
Next, you will need to use a flat screwdriver or a special spatula to pry off the three fastening clips
When dismantling, extreme care must be taken - the plastic latches are very fragile and careless movement can damage them. If the clips break, you will have to buy a new part or “collectively farm” new clips
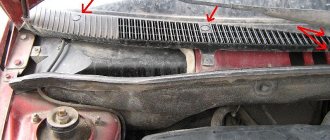
For clarity, the fastening points are indicated in the figure with red arrows.
Similarly, pry up and dismantle the right side of the glove box lining. The screwdriver is driven into the slot and the latches are released using rocking movements.
Next, the glove compartment opens and Torx is taken. In the lower left corner there is the fixing screw itself. It will need to be unscrewed.
It is noteworthy that in different years of production and depending on the assembly, the fixing elements - bolts - can be of different configurations: for Torx, hex, screwdriver or socket wrench.
Consequently, the user may require a much wider range of tools. On numerous videos where the cabin filter of the Lada Vesta is replaced, the video does not talk about this moment.
- Then you need to sequentially unscrew the remaining screws securing the glove box.
- Next, carefully remove the small cargo box.
- After the glove compartment is moved, you will need to disconnect the power terminal for the compartment illumination. After turning off the backlight, you need to disconnect the wiring harness to the dashboard. To do this, the white retainer is disassembled.
- After this, you can completely remove the magazine rack from the machine. Next, it must be carefully placed on a previously prepared rag or special surface. Such actions are justified by the sensitivity of the casing to mechanical damage - the glove compartment is easily scratched.
- Now you have free access to the filter itself. In many videos that show replacing the cabin filter of the Lada Vesta Cross, the video does not convey the details - many elements are not shown. The filter element cover is located right next to the bulkhead between the passenger compartment and the engine compartment.
- To dismantle the element, unclip the plastic clips and remove it strictly to the right. It is not recommended to pull the cover in other directions - the lower part of the part moves along the guide rails.
- The final step is to replace the filter itself. The white insert simply plugs into the socket and is just as easy to remove.
- After the channels have fully opened, experts recommend cleaning the air channels from dirt, leaves and other debris. For cleaning, you can use a compressor or, if you don’t have one, a household vacuum cleaner. The nozzle is inserted into the air intake and debris is blown out of the system. After the procedure, you will need to clean the interior - all the dust will fly onto the panels, windows and dashboard.
- Installing a new filter is done in reverse order. In this case, the insert itself should be removed from the factory package only immediately before installation. If liquid, dirt or foreign debris gets on the paper, this will significantly reduce its service life.
There are also some nuances during installation. There is an arrow on the top of the filter, it should be directed towards the rear of the machine.
The next nuance is installation. When installing, the part needs to be slightly crumpled, the seat is 10mm less in height. In this case, after installation the filter will straighten out and everything will be fine.
Review of Manufacturer Prices
| Name / Catalog article | Price, rub.) |
| Original | |
| Pilenga FA-P0443 from Renault | From 800 |
| High-quality analogues | |
| Nevsky filter NF6433 | From 350 |
| NF6433C (carbon filter) | From 400 |
| TSN Citron | —/— |
| SibTEK | —/— |
| BIG Filter, GB9978 | From 450 |
| Ekofil, EKO0441 | —/— |
| LADA Vesta/X RAY 272773016R (Vesta 1.8) | —/— |
| Mann CU22011 | —/— |
| Patron 5454211 | —/— |
*prices are as of January 30, 2019.
Recommendations for selection
Service center specialists strongly advise purchasing consumables with original factory catalog numbers. However, the high price of the “original” is not affordable for every car enthusiast. Therefore, they are forced to look for cheap but high-quality analogues.
Always check the integrity of the packaging, the presence of protective holograms, and quality certificates. If anything is in doubt, it is better to refuse the purchase.