Front brake mechanism of VAZ 2110 car
For road safety, the serviceability of the front, rear and hand brakes is of great importance. The brake system of the VAZ 2110 car has a diagonal separation of circuits, which increases reliability and safety when driving a car. If one circuit fails, another effectively replaces it.
Rear brake cylinder replacement instructions
Replacing the rear brake cylinder of a VAZ-2110 looks like this:
- Raise the car on the lift.
- To securely secure the VAZ-2110, lock the front wheels.
- Unscrew the fasteners and remove the rear wheels.
- Using a rubber hammer, remove the brake disc.
- Carefully remove the end of the tension spring installed at the top, this spring is located right next to the brake pad.
- Lift the handbrake lever all the way to the top, you will see how the pads have moved apart, now they can be removed without any problems.
- Unscrew the brake pipe from the cylinder.
- Remove the broken cylinder and install a new one in its place.
- Assemble the knot following the reverse order of these instructions (starting from the last point to the first).
- Replacing the rear brake cylinder of a VAZ-2110 involves pumping the brakes at the final stage.
What should you pay attention to during the entire procedure? Maintain a tight fit of the brake system parts; if additional components are found to be faulty, replace them too
Signs of faulty brake calipers
If brake fluid is leaking from the caliper, its level in the system will constantly drop. And when the level in the tank drops below the minimum, the sensor will trigger and the brake system fault light will light up on the dashboard.
If the piston is in good condition, then replacing the seal kit will be enough to eliminate brake fluid leakage from the caliper. Small areas of corrosion on the caliper piston can be removed by grinding its surface. In case of larger damage, you will have to purchase a caliper repair kit along with a new piston.
Diagnostics and repair
From the signs listed above, it is easy to understand that in most cases there is only one source of problems - rubber products that have become unusable. The cuffs crack and swell, as a result they leak liquid and close the discharge holes. Hence the recommendation: all “rubber bands” of the brake system should be changed at intervals of approximately 100 thousand km, without waiting for critical wear.
Before checking the GTZ for operability, make sure there are no other faults:
- Inspect the wheel assemblies from the inside for leakage of brake fluid from the working cylinders.
- Check the integrity of the expansion tank and the fluid level in it.
- Start the engine and at idle speed, press the vacuum take-off pipe to the amplifier. If the engine speed has increased noticeably, there is an air leak and the master cylinder is most likely working.
A clear symptom indicating a breakdown of the main hydraulic cylinder is drops of brake fluid on the body. If you discover a leak, feel free to dismantle the unit and disassemble it to look for the cause. Another common problem - fluid flowing through the seals - is diagnosed as follows:
- Open the cover of the expansion tank and place an assistant in the driver's seat.
- Listening to sounds in the tank, give the command to an assistant to press the pedal.
- If the pedal moves easily and gurgling is heard in the reservoir, liquid is entering there. The reason is that worn cuffs are unable to create pressure in the circuits; liquid seeps through the leaks and enters the container.
Also, problems with the GTZ are indicated by jamming or too little pedal travel. Sit behind the wheel, press it several times, and start the engine while holding the pedal with your foot. If it sinks to the floor or does not budge, disassemble the hydraulic cylinder.
To replace or repair the master brake cylinder, you need to remove the unit from the vehicle. Work is carried out in the following order:
- Suck out the liquid from the tank with a syringe. If the cuffs are leaking, press the pedal several times and suck out the excess fluid.
- Remove the expansion tank.
- It is not necessary to drain all brake circuits. Substituting a small container, unscrew the nut of the first tube and carefully move it to the side, plugging it with a wooden stick.
- Repeat the operation with the second tube, unscrew the fastening of the GTZ flange and remove the unit.
Further actions depend on the design of the master cylinder. If the element is completely disassembled, change the rubber seals. Otherwise, you will have to replace the pistons assemblies.
Pre-wash the body and all openings with alcohol; do not use gasoline. After assembly, add fluid and bleed the brake system to remove air.
Tags: control systems, braking system
There always comes a time when some problems arise in the operation of a part. If the brakes fail during a trip, this means there is a danger for the driver and passengers. The brake wheel cylinder is a very important part of the entire brake system.
It converts the pressure exerted by the fluid into a force that is exerted on the brake pads. Therefore, it is necessary to replace the master cylinder in time if irreparable problems arise with it.
When the driver brakes, he exerts an effect on the brake pedal, and in order for this effect to be realized, there is a part - a rod that acts on the piston of the main cylinder. It affects the brake fluid, which then affects the cylinders. During this process, special pistons press the brake pads against the discs (sometimes drums). The differences arise from different types of braking systems.
Below are instructions for replacing the master cylinder. She will help you make quality repairs with your own hands:
- reasons why the brakes failed;
- the ability to repair the brake master cylinder;
- tools necessary for work;
- replacing the main cylinder;
- its final removal;
- cylinder installation;
- improvement of the main brake cylinder.
VAZ-2110 caliper maintenance and repairs
It is mandatory to service the VAZ caliper after each replacement of brake pads, as well as in the event of a forced inspection due to its malfunction, for which it is first necessary to check the condition of all rubber elements, shock absorbers and anthers. It is also imperative to replace the grease for the caliper guides. You need a good synthetic based silicone lubricant that can withstand high temperatures.
If you had to buy a repair kit, it contains such lubricant, all the necessary gaskets, new guides and a piston. The price of such pleasure will cost you about 500 rubles. Buying a new VAZ-2110 (2112) caliper, depending on the store and region of Russia, will cost from 1000 to 1500 rubles.
To remove the piston from its seat, it is necessary to create the appropriate force using an air compressor (pistons are repaired one at a time, the stroke of the second is blocked, for example, by a wooden block). With the same success, when removing the product from the car, you can press the brake pedal without disconnecting the VAZ 2112 caliper from the brake hose. It is advisable to use a rubber adapter in order to absorb the sharp impact of the freely moving piston and its “shot”.
VAZ 2110 caliper repair
The piston is pushed back using a special clamp. In this case, the boot should be bent to compensate for excess air pressure. The hole for the piston and for the guides are cleaned and washed with carburetor cleaning fluid, all gaskets, boots and seats are also thoroughly lubricated.
The main malfunction of the front wheel brake cylinders on the VAZ 2110-2112 can be considered their jamming, as a result of which, even when the brake pedal is released, the cylinder does not immediately return to its original position. Also, problems with the passage of brake fluid from under the rubber are possible, which is also not normal.
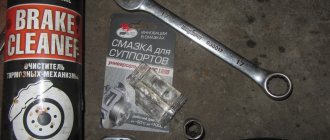
To replace this part yourself, you will need the following tool:
- 13 mm socket head
- Ratchet handle and crank
- Hex bit or similar bit for 10
- Socket wrench 13
- Special split wrench for brake pipes and hoses
Reasons why the brakes might fail
Any problems during the braking process reduce its effectiveness, which can lead to dire consequences for everyone - the driver, passengers, and other road users. Very often, problems arise simply because the driver uses low-quality brake fluid.
If your car suddenly loses brakes, this may be due to several reasons, the main thing is not to blame the master cylinder for all the problems. Below are the reasons why the brakes on a car fail:
- One of the main causes is usually a leaking slave cylinder. Gradually, slowly or quickly, all the contained liquid flows out of it.
- You should also check the level of brake fluid in the reservoir and the condition of the main brake.
- If traces of smudges are noticeable on the main brake, then this is the reason.
- Another possible cause of brake failure could be that the brake line is torn. For example, rubber brake hoses could fray, partially rot in some places, or get punctures.
- The working cylinders may have jammed;
If it is nevertheless noticed that the main brake cylinder is not working:
- it will show where traces of brake fluid leaks appeared;
- it will be impossible to press the brake pedal;
- on the contrary, the brake pedal can move on its own without the driver making any effort to do so.
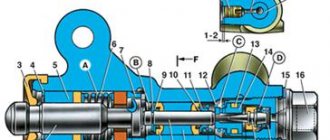
Master brake cylinder with reservoir: 1 — master cylinder body; 2 ~low pressure sealing ring; 3 — drive piston of the “left front-right rear brake” circuit; 4 - spacer ring; 5 - high pressure sealing ring; 6 — pressure spring of the sealing ring; 7 — spring plate; 8 — piston return spring; 9 — washer; 10 — locking screw; 11 — drive piston of the “right front-left rear brake” circuit; 12 — connecting sleeve; 13 - tank; 14 - emergency brake fluid level sensor; A - gap.
Therefore, it is possible to repair the VAZ 2110 brake cylinder, but not always. Most often, if it leaks, a repair kit will help fix the problem and restore the cylinder’s functionality. If the internal mirror in the cylinder is damaged, then, unfortunately, nothing can be corrected, since grinding is prohibited. If everything is not so scary and repairs are possible, you can do it yourself, because the price of the repair kit is quite reasonable, and almost every motorist can afford it.
What tools are required to replace a brake master cylinder?
- key to 17;
- key to 10;
- half-liter bottle of brake fluid;
- syringe;
- brake fluid.
The process of replacing the VAZ-2110 brake cylinder
If the cause of the non-functioning brakes on one of the rear wheels is determined, then you need to begin the replacement process. First you need to dismantle the old part. It happens like this:
- First you need to remove the rear wheel.
- Next, the drum is removed and the pads are taken out.
- The most important task is to disconnect the brake line pipe. During this process, the “brake fluid” will immediately begin to pour out, so it is advisable to close the tube with a fitting cap.
- Before removing the tube, you must unscrew the fitting. It is advisable to use a special key for this.
- After removing the fitting, the tube is unscrewed. Before closing it with the fitting cap, you need to check the condition of this very cap. If it is cracked or damaged, it must be replaced with a new one.
- After plugging the tube, you need to unscrew the two bolts and remove the old rear wheel brake cylinder.
Old brake cylinder.
If the parts are difficult to unscrew, it is better to spray them generously with WD-40. When rotating the nuts, you need to make sure that they rotate without tubes. If the tube turns together with the nut, it means it is rusty and stuck to the nut. This part is not allowed for use and must be replaced.
The process of installing a new cylinder
Before you begin the cylinder installation procedure, it is imperative to clean the entire rear wheel brake mechanism from dirt. If you really had to climb into the drum, then you need to carefully examine its condition, at the same time inspecting the pads. If worn, they must be replaced.
- If there has been a cylinder leak, then before installing it, you need to thoroughly clean the pads from all traces of brake fluid. To do this, you can use a file or sandpaper. Under no circumstances should stripping machines be used, as the pad can be seriously damaged.
- The inside of the rear brake drum also needs to be cleaned of dirt, rust and degreased from traces of brake fluid. If the liquid remains in the drum, the shoe will slide during operation. Only after thorough cleaning of all mechanisms can a new cylinder be installed. The assembly procedure takes place in the reverse order of disassembly.
Leveling up
A mandatory procedure after installing a new cylinder is bleeding the brakes. If this is not done, the car will brake very mediocrely, since air will remain in the system.
Bleed the brakes and add fluid to the expansion tank.
Do-it-yourself dismantling of the caliper on a VAZ-2110
The very simple design of the product and the triviality of the process of dismantling it allow even a novice motorist to carry out repairs and maintenance. If you carefully follow the recommendations below, you are unlikely to encounter difficulties at any stage of the process. You will save a lot of money spent on a trip to a service station, and a considerable amount of time, because the service time is comparable to the time required to travel to the workshop.
The sequence for dismantling the product is as follows:
- The first step is to jack up the car and remove the wheel. To be on the safe side, it can then be placed under the bottom of the car in case the jack fails;
- On a VAZ 2112, the caliper is attached to the bracket using two M17 bolts, which you should unscrew. Penetrating lubricant may be needed to strip the bolts;
- If you need to replace the VAZ caliper or carry out a comprehensive repair, unscrew the product from the brake hose. You seal the hose tip and you can begin further disassembling the product.
Nuances of repair
O-rings require special attention. The time the rings are in isopropyl alcohol should not exceed twenty seconds, after which they should be dried immediately using a compressor.
The surfaces of the mirror, as well as the piston elements, must be completely clean and free of rust. Every disassembly and repair of a faulty brake master cylinder must be accompanied by replacement of the O-rings, even if they are in good condition. The cuffs of the device also require attention; if they are swollen and frayed, they must be replaced.
After all, it is necessary to check the elasticity of the piston springs; this should be done under load. The length of the spring under load should be 39.01–45.9 N (3.8–4.8 kgf) - 41 mm, with another option the following indicators should be 82.01–99.48 N (8.35–10 .15 kgf) – 21 mm. When free, the spring should have a length of 59.8 mm. If the springs do not have such indicators, then they must be replaced.
Vacuum booster
The braking system of a car certainly cannot be called perfect, so it has to be supplemented with devices that help improve efficiency. One of them is a vacuum booster.
Application and purpose
Today, a vacuum amplifier is in great demand because it is highly efficient. Its tasks are extensive, but the amplifier copes with them all perfectly:
- The degree of resistance of the brake pedal increases;
- Reduces the load on the brake system;
- Acts as a highly efficient auxiliary unit;
- Has a positive effect on the service life of the brake system, etc.
This element has the following components:
- Dense body, for the manufacture of which a high-strength polymer is used;
- The diaphragm, which is also called the collecting node;
- Monitoring or control specialized valve;
- Pusher. It allows you to return the engine elements to their original position when there is no power;
- Main piston rod of the brake system cylinder (main);
- Switch return spring.
The body of this spring has two cellular divisions, which are divided into vacuum and atmospheric. Cells are often called chambers.
- The vacuum chamber is a cell directly connected to the brake master cylinder.
- The atmospheric chamber is a cell located opposite the brake pedal. Its open part of the body rests on the brake pedal.
It is also worth noting the diaphragm, which performs two very important tasks:
- Corrects the position of the piston in space;
- Pumps brake fluid to the main brake cylinders.
Installing a vacuum booster involves a serious change in the sensitivity of the pedal, so it is strongly recommended not to apply a large and sudden force to it in the “first couple”. Pressing should be done carefully and smoothly.
Malfunctions and ways to check them
It is possible that you may need to replace the vacuum booster on your VAZ 2110. The cause may be various malfunctions, the characteristic symptoms of which are as follows:
- When you press the brake pedal, a hissing noise occurs, and at the same time, the engine speed often increases;
- The car starts to shake;
- Spark plugs stop working efficiently;
- Fuel consumption increases noticeably.
Before replacing the vacuum booster on a VAZ 2110, it should be checked. This procedure is performed as follows:
- As with normal bleeding of brakes, with the engine not running, press the gas pedal several times;
- After 5 or 6 presses, keep the pedal in the down position, resting it on the floor, and start the engine;
- After starting, the pedal itself will move forward a little.
There is also a high probability of damage to the diaphragm, which forms a hole over time. You can purchase a diaphragm with a repair kit, the cost of which is no more than 500 rubles.
Replacement
To replace an element, you need to understand the main issue - how to remove the vacuum booster from a VAZ 2110. Directly replacing the old element with a new one will not be difficult, just like the reassembly process.
Therefore, we will tell you about the main thing - dismantling the amplifier. Let's start with the fact that the procedure is not complicated, but it requires accuracy and sequence of steps. If you follow the recommendations, the work will take little time and will not take much effort.
- Disconnect the block with wires, which includes brake fluid level sensors in its design.
- Hold the booster check valve with one hand and carefully disconnect the hose with the other. It is advisable to disconnect the hose with a strong hand, since this will require a lot of force.
- Remove the two bolts connecting the booster and master cylinder.
- Carefully remove the cylinder from the amplifier.
- There is no point in disconnecting the brake lines.
- Give access to the dashboard, which will allow you to unscrew the nuts holding the brake pedal bracket. There should be 4 of them.
- It is recommended to dismantle the bracket and amplifier through the engine compartment, since there is enough free space for such manipulations.
- Remove the pin lock plate. To do this, pry the finger with a screwdriver and squeeze it out.
- Now you can easily disable the brake pedal and booster.
- To disconnect the amplifier and bracket, you will have to unscrew the two nuts on the mount.
- A new one is installed in place of the dismantled old vacuum amplifier, and the reassembly procedure is performed in strict sequence of the dismantling process.
Tools that will be needed during the replacement process
To replace the brake cylinder you will need a tool.
Before starting any repair work, you should prepare thoroughly. Replacing the brake master cylinder is no exception. To replace this part you will need:
- Set of keys. Having a variety of sockets and socket wrenches will be a huge advantage.
- Screwdriver Set.
- Round nose pliers will help when changing cuffs.
- Special “brake” wrench for 10.
The process of removing the old part
In order to remove the brake master cylinder, you need to open the hood and do the following:
- To get to the part, you will first have to remove the sound insulation. You should not try to tear it off, as it is secured with bolts. Therefore, you should arm yourself with a screwdriver and unscrew all the fasteners. If the sound insulation is not removed after this, it means that not all fasteners have been unscrewed. If you pull the element, it can be damaged. After this, you can start replacing.
- The chip with the wires, which is located on the lid of the brake fluid reservoir, is disconnected.
- Then all the nuts that hold the brake pipes are loosened. Then these nuts are completely unscrewed.
- After this, the GTZ is removed from the studs. In this case, brake fluid will leak out, so place a collection container under the holes.
- The brake fluid from the reservoir must be drained into the same container.
At this point, the dismantling process can be considered complete.
Installing a new part
If the new gas turbine engine does not have a tank, you need to install the old tank. Before installation, it must be carefully inspected for cracks, chips and damage. If the tank is in poor condition, you will have to buy a new one. It is for this reason that it is recommended to immediately buy and assemble it.
Further work should proceed according to this algorithm:
- The new part is installed in its place under the hood of the car.
- All fastening nuts are tightened.
- For further work, you will need an assistant who will press the brake pedal on command.
- Brake fluid is poured into the reservoir.
- The assistant should slowly press the brake pedal, and at this time you should pinch the holes for connecting the brake pipes with your fingers.
- You need to press the brake until liquid flows out of the holes.
- After this, the front tubes are connected.
- After this, you need to press the brake pedal several more times until brake fluid flows out of the remaining holes.
- After this, the rear tubes are connected.
Next, you need to carefully tighten the fasteners. At this point, the procedure for replacing the GTZ can be considered complete. You will need to add brake fluid to the reservoir, connect the sensor in the plug and install the sound insulation in the old place.
VAZ-2110 caliper maintenance and repairs
It is mandatory to service the VAZ caliper after each replacement of brake pads, as well as in the event of a forced inspection due to its malfunction, for which it is first necessary to check the condition of all rubber elements, shock absorbers and anthers. It is also imperative to replace the grease for the caliper guides. You need a good synthetic based silicone lubricant that can withstand high temperatures.
To remove the piston from its seat, it is necessary to create the appropriate force using an air compressor (pistons are repaired one at a time, the stroke of the second is blocked, for example, by a wooden block). With the same success, when removing the product from the car, you can press the brake pedal without disconnecting the VAZ 2112 caliper from the brake hose. It is advisable to use a rubber adapter in order to absorb the sharp impact of the freely moving piston and its “shot”.
The piston is pushed back using a special clamp. In this case, the boot should be bent to compensate for excess air pressure. The hole for the piston and for the guides are cleaned and washed with carburetor cleaning fluid, all gaskets, boots and seats are also thoroughly lubricated.
Front wheel brake
Rice. 6-20. Pressure regulator performance test diagram: Pi
— pressure at the inlets to chambers A and D (see Fig. 6-18) of the pressure regulator, MPa (kg/cm 2 );
Pr
—pressure at the outlet of chamber B, MPa (kg/cm2);
Re
is the pressure at the outlet of the chamber C, MPa (kg/cm2);
1 - nominal pressure value Pr;
2 - upper limit of pressure
Pr;
3 - lower limit of pressure
Pr;
4 - the pressure
of the Re
manometer Mg) should fit into the shaded area (Fig. 6-20).
The readings of pressure gauges Мз and Мг (see Fig. 6-19) should not differ by more than 0.4 MPa (4 kgf/cm2) in the pressure range from 0 to 10 MPa (from 0 to 100 kgf/cm2) at regulator inputs.
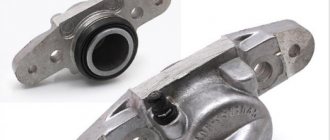
Front wheel brake
Withdrawal. Raise the front of the car, place it on stands and remove the wheel. Unscrew the pipeline fitting and disconnect the flexible hose from the line; Plug the holes in the hose and tube to prevent brake fluid from leaking. Remove the hose from the guide bracket.
After unscrewing the two bolts that secure the shoe guide to the steering knuckle, remove the guide assembly with the caliper and working cylinder.
Installation of the brake mechanism is carried out in the reverse order of removal. After installation, restore the brake fluid level in the reservoir and bleed the hydraulic drive system to remove air.
Rice. 6-21. Unscrewing the cylinder mounting bolt:
1 — cylinder mounting bolts; 2 - cylinder, 3 - bolts holding the cylinder to the caliper
Rice. 6-22. Front wheel brake parts:
1 — wheel cylinder; 2 — fitting for bleeding the brake drive; 3 - sealing ring; 4 - piston; 5 — protective cap; 6 — retaining ring; 7 — caliper; 8 — pad guide; 9 — brake pads; 10 — protective cover; 11 — guide pin; 12 — guide pin fastening bolt; 13 — brake hose; 14 — bolt securing the cylinder to the caliper
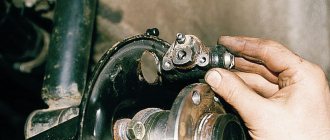
Disassembly and assembly
Disassembly. Disconnect the hose from wheel cylinder 2 (Fig. 6-21). Unlock and unscrew bolts 1 securing the wheel cylinder to the guide pins, holding the guide pin by the edge with a wrench. Remove guide 8 (Fig. 6-22) of the pads and pins. Remove the brake pads 9.
Do not unscrew bolts 3 (see Fig. 6-21) connecting the caliper and cylinder, except when replacing the caliper or cylinder.
Remove the retaining ring 6 (see Fig. 6-22) and the protective cap 5 from the cylinder and piston. Carefully push a stream of compressed air through the fluid inlet to push the piston out of the cylinder. To avoid damaging the piston on the surface of the caliper when pushing it out, install a wooden pad under the piston (Fig. 6-23).
Unscrew the bleeder fitting from the cylinder body and carefully inspect the working surface of the cylinder. There should be no scoring, damage or corrosion.
Assemble the brake mechanism in the reverse order of disassembly. In this case, it is recommended to replace O-ring 3 (see Fig. 6-22) and cap 5 with new ones. Lubricate the cylinder mirror, piston 4 and the sealing ring with brake fluid, and apply graphite grease to the surface of the piston, install the piston in the cylinder and, without removing any remaining lubricant, put on the protective cap 5 so that its edges fit into the groove of the piston and cylinder,
then install retaining ring 6. Lubricate the guide fingers with UNIOL-1 grease (1.5 g for each finger). Tighten the bolts securing the caliper and cylinder to the pins to the torques specified in Appendix 1, then lock them. Before tightening the bolts, apply sealant to them to prevent corrosion of the threaded part of the connection. After assembling and installing the brake mechanism, restore the fluid level in the reservoir and bleed the hydraulic drive system.
Checking the technical condition of parts
Clean all parts and carefully check their condition for signs of wear, damage or corrosion.
Pay special attention to the surface of the piston and cylinder. If they are worn, damaged or severely corroded, replace the cylinder and piston
Remove corrosion from the cylinder body with a wire brush.
Check the guide pins 11 (see Fig. 6-22) and their covers 10. Make sure that the pins are free of corrosion and
Rice. 6-23. Pushing the piston out of the cylinder
Replacement of rear brake cylinders
The best rear brake cylinders on the VAZ 2110 can work for a long time. An example of a defective product would be a brake cylinder in which the pistons extend out of the cylinder only a few millimeters, which is not enough to move the brake pads apart. The quality of the brake fluid also plays a role in the service life of the brake cylinders. The instructions indicate that the rear brake cylinders are removed with the brake drum removed.
Advice: It is advisable that the replacement of the rear brake cylinders of the VAZ 2110 be carried out simultaneously on both brakes. Wear of one of the elements indicates that the second one will soon fail. And the price of the work will be reduced by disassembling the car once.
- The machine is installed on an inspection pit or a lift.
- The front wheels are fixed.
- The rear ones are removed.
- Using a rubber hammer, the brake disc is pulled out of its place.
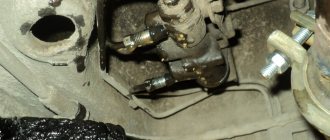
- Carefully remove the end of the upper tension spring, position 7 in the first photo. Previously, it was connected to the brake pad.
- The handbrake handle is raised all the way. In this case, the brake pads move apart and are removed without much effort.
- The brake pipe is unscrewed from the cylinder.
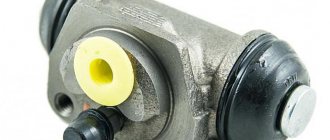
- The rear brake cylinder is removed.
Removing the rear brake cylinder of a VAZ 2110
- If necessary, the rear brake cylinder of the VAZ 2110 is replaced with a new one.
- Assembly of the unit is performed in reverse order.
- The job ends with bleeding the brakes.
Tip: Replacing the brake cylinder on a VAZ 2110 car is carried out in strict sequence - both dismantling and installing spare parts. The main condition is serviceability and tightness in the hydraulic system.
How the rear brake cylinder is replaced on a VAZ 2110 car can be seen in the video.
Repair of rear brake cylinders of VAZ 2110
There are times when, to save money, it is enough to replace worn parts of an assembly. In this case, after removal from the vehicle, the rear brake cylinder is disassembled.
Dismantling the rear brake cylinder of a VAZ 2110
- Remove the protective caps, pos. 10 in the picture above.
- Pistons are pressed out of the cylinder body along with parts to automatically regulate the gap formed between the drum and the brake pads.
- After installing the piston pos. 9, turn it onto a special device and remove the thrust screw, pos. 3.
- Remove the sealing ring pos. 8 and support cup pos. 7 with crackers pos. 5 and spring pos. 6 from the screw.
- The thrust ring pos. is disconnected. 4 and a stop screw.
After disassembling the unit, the parts are checked for faults:
- The working surfaces of the pistons, cylinder and thrust rings must be smooth, without scratches or roughness. Otherwise, fluid leakage and premature wear of pistons and seals may occur.
- Defects on the mirror surface can be eliminated by grinding or lapping.
Tip: Care must be taken not to increase the internal diameter of the cylinder.
- The thrust screw, springs, support cup and crackers are visually checked. If they are damaged, parts are replaced.
- Seals pos. 8 are replaced with new ones.
- If necessary, change the protective caps pos. 10.
The structure is assembled in the reverse order. In this case, you need to take into account:
- All parts are generously lubricated with brake fluid.
- The thrust screws must be tightened to a torque of 3.9 – 6.9 Nm.
- The slot located on the thrust rings is directed vertically upward, the deviation should not be more than 30 degrees. This ensures that all air is removed from the drive mechanism when bleeding the brake.
- Using the device, the pistons are pressed into the cylinder body.
- After assembly, the movement in the housing of each piston is checked, which should be from 1.25 millimeters to 1.65 millimeters.
- Protective caps are installed.
Timely repair or replacement of rear brake cylinders is a guarantee of road safety.
VAZ 2110. Brake system HPB 286×26mm with 6-piston caliper.
Recently, there has been a fashion on VAZ cars - the construction of turbo engines with a power of 250-300 or more hp. With such a herd under the hood, a standard braking system, which was designed for an engine power of 80-100 hp.
not enough at all and it is not able to withstand one braking from 100 km.h. There are different options for upgrading the standard brake system, everyone knows them, using a thin brake disc no more than 22 mm thick and a small brake pad. This braking system cannot show stable braking performance from high speeds; the brake disc is prone to rapid overheating.
HPB offers a ready-made brake system installation kit for the entire family of front-wheel drive VAZ vehicles.
Two-piece brake disc 286x26mm with directional ventilation of internal channels.
4 or 6 piston caliper with large brake pad, similar to Ferodo FRP216. The most common brake pad for AP-Racing calipers.
Reinforced brake hoses, adapters, bolts.
It is also possible to manufacture a brake system for wheels R16 304x26 and R17 330x32, R17 345x32mm using a 6-piston caliper.
This braking system provides high braking efficiency and resistance to overheating, even after several braking sessions from 200 km/h. until it comes to a complete stop.
All sets of brake systems for VAZ vehicles are equipped with SPORT pads; for an additional fee, it is possible to install TRAC brake pads.
Below is a VAZ 2110 car, prepared by FP- Motors.
The engine was converted from a standard carburetor, 8 valve, to an injection 16 valve with a TD04 turbine. Approximate power is about 300 hp.
Disc brakes were installed on the rear axle while retaining the parking brake.
The suspension features front wishbones, a thicker stabilizer bar, sports shock absorbers and lowering springs.
HPB
286x26mm brake system was installed
Standard brake system VAZ
Brake system HPB 286×26mm 6-piston caliper.
The cost of the set is 41,000 rubles.
For questions about tuning a VAZ car, you can contact the Tuning Atelier FP- Motors
.
Tuning VAZ, Turbo VAZ, Tuning Brakes VAZ, Sports brakes for VAZ.
Source of the article: https://hp-brakes.ru/2013/05/vaz-211-tormoznaya-sistema-hpb-c-6ti-porshnevym-supportom/
How to repair a brake cylinder?
If the brake cylinder is intact and only some parts are worn out, then you can try to disassemble and repair the device.
For this:
- Remove the protective caps from the device;
- remove special pistons from the housing along with elements for automatically changing the gap;
- turn and remove the thrust screw;
- remove the support cup and sealing ring. These parts are removed along with the spring and “crackers”;
- separate the thrust screw and the ring.
After disassembly, pay attention to the following points:
Inspect the working parts of the cylinder - they should not show any damage, roughness or scratches.
If there are serious defects, a reliable option is to replace the brake wheel cylinder. Minor damage can be removed by lapping and sanding;
- Check the condition of the “crackers”, support cup, springs and screw. If one of the devices is damaged, the part will need to be replaced;
- replace seals;
- install new caps.
During assembly, lubricate the mechanisms with brake fluid and tighten the thrust screws well with the required torque of 4-7 N*m. Make sure that the slot on the thrust rings is directed vertically.
A slight deviation is acceptable, but no more than thirty degrees. This will allow excess air to freely exit the system.
The pistons are returned to place using a special tool. In this case, the movement of the latter should be in the range from 1.25 to 1.65 millimeters.
Remember the importance of the brake system; if possible, check the functionality of the main components, the absence of leaks and defects. If any, immediately replace the faulty element.
Have a good trip and of course no breakdowns.
Sources
- https://luxvaz.ru/vaz-2110/44-zamena-vakuumnogo-usilitelya-i-glavnogo-tormoznogo-cilindra.html
- https://vaz-russia.ru/remont-vaz-2110/zamena-zadnego-tormoznogo-tsilindra-na-vaz-2110-vaz-2111-vaz-2112.html
- https://remontavtovaz.ru/vaz-2110/osobennosti-zameny-zadnego-tormoznogo-cilindra-vaz-2110.html
Repair
The first rule: if you don’t want further troubles, especially when one of the wheels jams, never repair only one caliper, always both together!
To sort through, repair or replace individual parts, and possibly completely change the unit if it turns out that there is nothing left to repair, you need to follow the following algorithm:
- Remove the ring securing the cover, and then the cover itself;
- To avoid damaging anything, place a piece of wood or a rag between the caliper and the piston, then remove the piston. Also watch your fingers - parts of the mechanism can press them;
- After removal, pay attention to the piston and cylinder. If you find any damage on them, then the entire assembly needs to be replaced;
- If everything is fine, using a wooden or possibly a plastic tool, remove the piston seal from the caliper cylinder;
- If you have a PD51 model, you need to squeeze out the bushing, remove the covers protecting from dust on both sides;
- All elements should be washed with a liquid intended specifically for cleaning brake mechanisms;
- You probably purchased a repair kit. From this, “push” a new seal onto the piston, then place it in the cylinder. This must be done without using brute force, otherwise the brake mechanism may subsequently jam;
- Install the piston dust cover - a new one, from the repair kit;
- The bushings must be lubricated with silicone grease, which is also included in the repair kit, then installed in the corresponding holes;
- Install the dust covers in their proper places;
- Before installing the caliper on the car, replace the copper gaskets on the hose connection.
The front brakes can now be completely reassembled. A prerequisite after repair is to bleed the brakes.
All that remains is to check whether the wheels lock properly when you press the brake pedal, and whether the caliper is sticking. Everything is fine? So, you can hit the road.
Source of the article: https://vazweb.ru/desyatka/tormoza/support.html