Car owners are faced with the problem of how to remove a stuck brake drum? This problem occurs quite often on domestic vehicles, namely Zhiguli cars. But don’t be too upset, because there are three ways to remove it, and one will definitely work in one case or another.
Causes of malfunction
Professionals who have done this many times in a car service center know how to remove a stuck brake drum. But, if a car enthusiast decides to do it with his own hands, then the first thing you need to know is why this happened. Let's consider the main reasons for this phenomenon:
- Heating the brake pads has an expansive effect on the metal from which the drum is made, and therefore the cover sticks to the body;
- Dirt accumulation between the cover and the drum body can also cause sticking.
- Sudden heating of the drum due to braking, and then sudden cooling (for example, in a puddle of water) can cause sticking.
All these reasons create the problem of a boiled-over brake drum, which is quite difficult to dismantle when replacing the pads. Therefore, it is not recommended to use sharp braking in rainy weather.
Three removal methods
In a car service center, removing a stuck brake drum is quite simple, since mechanics often encounter this problem. Using a hammer and a small crowbar or a special puller, the part can be easily dismantled and malfunctions can be eliminated.
Popularly, there are three ways to remove a boiled-over brake drum. In each individual case, you will need different tools, but in all three you cannot do without VD-40, which has become an indispensable tool in car repair. So, let's look at how you can dismantle a boiled-over brake drum.
Method 1 – sledgehammer.
This method involves rigidly fixing the car. It is best to do this on a lift, since the car is quite unstable on a jack. But, if the car enthusiast has an iron goat, which is designed to support the car, then everything will work out. As a last resort, you can use a large tree stump.
Now you can directly consider the process of dismantling the brake drum:
- We remove the wheel.
- Using a metal brush, clean the entire cavity from accumulated dirt and dust.
- Spray everything liberally with WD-40.
- Carefully tap the drum collar from the bottom until it begins to move. Do not hit too hard so as not to damage the elements of the car.
So, the first method showed how to remove the drum. But there is one catch: not everyone knows how to handle such a tool, much less hold a sledgehammer. Therefore, it is worth considering other ways to solve this problem.
Method 2 – extreme.
This method involves completely securing the car. It is recommended to check the indicator several times, because if the car jumps off, the threat to life and health increases to 99%!
So, let's consider the sequence of actions aimed at removing a boiled drum:
- Let's get behind the wheel.
- Turn on the ignition.
- We engage 2-3 gear and release the clutch.
- Turn the engine to medium speed.
- We turn off the engine and remove the drum.
This method implies that the moving part of the axis spins, and accordingly, according to the centrifugal force, the drum rotates, which simply breaks off the scale.
Method 3 – hard, but necessary.
If the first two methods did not help, and even the brake cylinder is jammed, then it is worth moving on to radical measures to resolve the issue. Let's look at how to solve a problem when nothing helps:
- You will need a drill and a 2 or 3 mm drill bit.
- We make several holes where the drum and axle shaft meet.
- Using a syringe, pour brake fluid into it and carefully hit it with a sledgehammer.
- You can also use a 450′ puller, or a homemade one.
Now the stuck brake drum should definitely come out. But, if this does not help, then there is a direct road to a car service, where they will definitely dismantle this part. Of course, you will have to pay for both removal and installation, but it’s better than buying a new hub or steering knuckle.
It is quite difficult to dismantle some parts, so it is necessary to carry out maintenance on the car regularly. As for the brake system, it is recommended to diagnose the condition of the components every 30-40 thousand kilometers. In this case, there may not be a problem with how to remove a stuck brake drum. It is worth remembering that if a car enthusiast undertakes to carry out this operation, then safety is paramount, so it is worth checking the car’s locking several times.
We recommend: Why do the spark plugs on the injector flood and how to deal with it?
Every driver knows how important an element in the design of a car is the brake mechanism. This mechanism is complex and consists of many parts, and one of these parts is the brake drums. They are installed on the rear wheels, but due to their low reliability, the question often arises of how to remove the brake drum on a VAZ 2107 in order to repair or replace the mechanism.
Simple ways to remove a brake drum
Quite often, the seemingly simple procedure of removing the rear brake drum on a Zhiguli (as well as on other cars) turns into real torture. In the VAZ car repair manual, there is only one line on how to remove the brake drum: you just need to unscrew the fastening screws and screw them into the technological holes.
However, it is applicable only for cars that have just come off the assembly line, since during operation, corrosion of the centering belt of the axle shaft occurs, which prevents the free removal of the brake drum.
Disassembly of the rear brakes is rarely required - unless the wheel cylinder leaks or jams or the brake pads wear out. Although the service life of the latter on VAZ cars is quite long (up to 70 thousand kilometers), sooner or later the brake drum will have to be removed.
How to remove a stuck brake drum? 3 ways
With an inevitable replacement, the question of how to remove a stuck brake drum becomes relevant very often.
And don’t blame only the domestic auto industry – drums are welded on foreign cars too. You can, of course, travel like this for a while. At the same time, the car releases the brakes reluctantly, the sounds sometimes appear simply frightening, but one could come to terms with this if it were not for the realization of how dangerous it is to joke with the brakes. Someone corrosive will say, they say, change the pads more often, you won’t remember the drum soon. And he will be right! However, even if later, you will have to remember. And the longer a spare part functions, the more likely it is that it will become permanently attached to the car. So the method described in any manual (screwing bolts into the corresponding holes and using them to push the drum out) is remembered only by hopeless optimists. Perhaps every car owner knows how to remove a stuck brake drum, for example, using a sledgehammer. However, even in such a simple matter there are some nuances that should be taken into account. And in some cases, even this cannot defeat the stubborn drum - you are more likely to bend the bridge than to knock it out. But our people do not give up and come up with methods in such situations.
Sledgehammer and how to work with it
In the vast majority of cases it helps. However, there is a subtlety that some people forget about: fixing the car. Many people simply jack it up and leave it at that. At the same time, not taking into account that a sledgehammer is a heavy thing, and there is no measure of strength. Sometimes this combination works so hard that the jack can't stand it. Therefore, additional support is needed. It is best to use an iron “goat” as it - many people have it hiding somewhere in the corner in the garage.
For lack of anything, he will go and cut down the logs
. Just don’t prop up the car with it, but lower it onto it. To guarantee safety, it would also be a good idea to put stoppers under the wheels: if the car rolls, it certainly won’t run far, but it will provide additional repairs (or even, God forbid, injuries).
Before you pick up a sledgehammer, it's a good idea to go around the hub with a wire brush. The salts and dirt wound around the rim are cemented no worse than concrete mortar. After cleaning, the centering belt is treated with something like WD-40. You shouldn’t hit one place with all your might - firstly, you can warp or bend the drum, and it will be even more difficult to remove it, and secondly, you can damage something that was not intended to be changed. You need to tap firmly but carefully around the circumference, and not hit the metal, but the block, which will act as a gasket.
About grooving brake drums
As mentioned above, some defects that arose during the operation of brake drums can be eliminated using the so-called groove. It should be said right away that it is not possible to sharpen a drum yourself in a garage. Because for this, firstly, you need a lathe, and secondly, you need the skill of working on this machine, and a serious skill at that. A novice driver can hardly boast of having a machine in his garage and the corresponding skills. Therefore, he has only one option left: to seek help from a qualified turner.
For high-quality drum turning, you can’t do without a lathe.
So what is a brake drum groove? It usually consists of three stages:
- preparatory stage. The turner removes about half a millimeter of metal from the inner walls of the drum. After this, the machine is turned off, and the drum is carefully inspected for internal defects. The preparatory stage allows you to determine the general level of wear of the drum and the feasibility of further work. Sometimes, after the preparatory stage, it turns out that the groove is useless due to severe wear, and it is easier to replace the drum than to grind it;
- main stage. If, after preliminary processing, it turns out that the drum is not very worn, then the main stage of turning begins, during which the turner smoothes and grinds all small cracks and grooves. During this work, about 0.3 mm of metal will be removed from the inner walls of the drum;
- The final stage. At this stage, the sanded surface is polished using a special paste. This procedure eliminates even the smallest defects that are not visible to the naked eye, and the surface becomes perfectly smooth.
It should be noted here that the groove will help get rid of internal defects on the drum, but it will be useless if the geometry of the drum is broken. For example, the drum was warped due to an impact or due to severe overheating. If the drum is cast iron, then it will have to be changed, since it is extremely difficult to straighten brittle cast iron using metalworking tools. If the drum on the “seven” is light alloy, then you can try to straighten it. And only after that start grooving.
Extreme way
If you get a very stubborn drum, you will have to resort to radical measures. Considering that they are associated with a high degree of danger, the fixation of the machine must be reliable and checked several times.
The steps are as follows:
- Get behind the wheel, start the car, engage second or third gear and release the clutch. The raised part of the axis will begin to move, and the drum, accordingly, too;
The most severe case
A critical situation arises if not only the drum is stuck, but also the brake cylinder is completely jammed with it. Neither gas and a brake nor a sledgehammer will help here. You will have to take a drill and drill holes (small, 2-3 mm) at the junction of the drum and the axle shaft. Brake fluid pours into them - and again it’s the sledgehammer’s turn.
Those who like to tinker with their iron horse, who know how to remove a stuck brake drum and how problematic it can be, may have homemade pullers in their stash. Craftsmen sculpt them from springs according to the principle of a device used to dismantle axle shafts. If you have such a friend, borrow this device, it greatly simplifies the process.
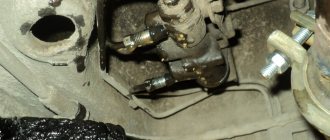
Rear wheel drum brake
Removing and installing brake drums
Note. Replace brake drums on both sides of the vehicle at the same time.
| Rear wheel drum brake mechanism: 1 – - upper tension spring of the shoes; 2 – pressing block 3 – pressing block; 4 – guide spring, 5 – device for automatically adjusting the gap between the shoes and the drum |
| Parts of the rear wheel drum brake mechanism 1 – brake pads; 2 – brake drum; 3 – device for automatically adjusting the gap between the brake pads and the drum; 4 – protective cap; 5 – spring; 6 – wheel cylinder; 7 – fitting for bleeding the system brake drive; 8 – brake mechanism shield; 9 – axis of the pad guide spring |
| Disconnecting the upper tension spring | Removing the brake pad spring guide |
Removal
- Raise the rear of the car, place it on stands and remove the wheels.
- Release the parking brake lever and loosen the tension on the parking brake cables as much as possible.
- Remove the brake drum by unscrewing the mounting bolts.
Installation
- Clean the brake drum and brake pads from dust.
- Reinstall the brake drum.
- Press the brake pedal several times to bring the automatic gap adjustment device between the shoes and the drum into working position.
- Adjust the parking brake system
- Install the wheels and lower the vehicle.
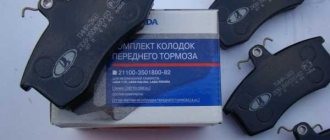
Replacing brake pads
Note. Replace brake pads simultaneously on both sides of the vehicle with new ones of the brand and type recommended by the factory.
Removal
- Raise the rear of the car. Place on stands and remove the wheels.
- Remove the brake drum,
- Disconnect the upper tension spring from the pads using a multi-purpose spring installation pliers.
- Remove the pad guide springs.
- Move the gear lever as far as possible towards the hub axis.
- Move the pads away from the brake shield and install pliers on the wheel cylinder pistons.
- Pull the bar of the automatic adjustment of the gap between the pads and the drum towards you and remove it from the front brake shoe
- Disconnect the parking brake cable from the release lever.
- Turn the ratchet of the automatic adjustment device between the shoes and the drum to the non-working position.
- Turn the front brake pad 90′.
- Remove the brake pads from the lower support pins and remove the pads.
- Inspect the brake drums, check the condition of the brake fluid supply pipes and thoroughly clean the brake parts.
Installation
- Attach the parking brake cable end to the release lever.
- Install the brake pads on the brake shield. turning the front brake pad 90′.
- Move as far towards the axis as possible. hub gear lever and connect the bar of the device for automatically adjusting the gap between the shoes and the drum with the front block
- Install the pad guide springs.
- Attach the upper tension spring to the pads
- Remove the pliers from the wheel cylinder.
- Install the brake drum.
- Press the brake pedal several times to bring the automatic adjustment of the gap between the shoes and the drum into working position.
- Adjust the parking brake system.
- Install the wheels and lower the vehicle.
Removal
- Remove the brake drum.
- Remove the brake pads.
- Disconnect the brake fluid supply pipe from the wheel cylinder, taking measures to prevent fluid leakage.
Installation
The wheel cylinder is installed in the reverse order of removal, observing the tightening torques of the threaded connections. After installation, bleed the hydraulic brake system.
How to remove a brake drum if it is stuck
Despite the fact that today most cars are equipped with a disc brake system, drum-type brake systems do not lose their relevance . They have been used in cars for more than a century and there has never been any doubt about their reliability. But like any brake system, they are subject to wear and tear during constant operation. Which, of course, immediately affects traffic safety. A worn part must be replaced, and in this article we will tell you how to remove the brake drum. We will present several different methods, but first we need to talk about the design of this element, its advantages and disadvantages, as well as possible malfunctions and options for eliminating them.
Brake system diagnostics
Before removing the drum, it makes sense to diagnose brake system faults. This will allow you to purchase everything you need for repairs in advance. This way you will significantly save your time spent on repairs. It would be optimal to visit a service station and check the brakes on a stand, but you can do without it. Let's look at the main points that you should look at when checking:
- Pay attention to the behavior of the brake pedal. It should not be too soft or fall down when pressed;
- Stand on an incline and lift the parking brake lever. If the car starts to roll backwards, you should tighten the brake cable or replace the rear pads. Take precautions when checking. Make sure there is no one further down the slope;
- Check for brake fluid in the reservoir. If it is not enough, check the system for leaks;
- Visually inspect all hoses; they should not have any damage;
- We should also consider diagnosing the condition of the drums. First of all, inspect the part; it should not have cracks or other visible damage. When viewed from the inside, the bead should show even wear. Also measure the inner diameter of the drum; it should not exceed 201.5 mm.
If any of the listed deviations are detected, then it is necessary to replace the damaged parts. Any malfunction of the brake system is deadly. Therefore, always give it due attention.
Element device
The rear brake drum consists of several parts :
- rotating drum;
- brake shoe;
- spring;
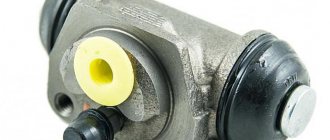
- brake cylinder (one or more).
Removing the drum
When braking, the brake pad rubs against the surface of the hollow drum. To ensure the mobility of the pad, the mechanism contains springs, which, depending on the position of the gas pedal, will be compressed or decompressed. A special cylinder is responsible for the correct operation of the pad and its timely operation, pressing it to the surface of the rotating drum under the pressure of the brake fluid. The entire mechanism is mounted on a shield made by stamping.
But the rear brake drum in some cases has a different device. One of the key elements of the tape structure, as the name implies, is flexible tapes made of metal. During the braking process, the belts are stretched and squeeze the drum tightly. However, this design of the braking system has not been used in cars for a long time.
What types of drums are there?
The brake drum is a critical part, and the demands placed on it are extremely high. Particularly important parameters are the following:
- accuracy of drum geometry;
- internal wall friction coefficient;
- strength.
Another important parameter is the material from which the brake drum is made. This material can be either cast iron or an aluminum-based alloy. On “sevens”, depending on the year of manufacture of the car, you can find both cast iron and aluminum drums.
Cast iron drums for this car are considered optimal (the early versions of the VAZ 2107 had cast iron drums). Cast iron has the best combination of strength, reliability and high coefficient of friction. In addition, cast iron drums are affordable and easy to manufacture. Cast iron has only one drawback: increased fragility, which is very important when driving on our bumpy roads.
To solve this problem, the VAZ 2107 manufacturers took the next step: they began installing drums made of aluminum-based alloys (and specifically alloys - in its pure form, this metal is very soft) on the later “Sevens”. And to maintain a high coefficient of friction of the internal walls, cast iron inserts began to be installed in aluminum drums. However, such a technical solution did not meet with understanding among car enthusiasts. To this day, many owners of “sevens” consider cast iron drums, rather than light alloy ones, to be the best option.
About the advantages and disadvantages
Pros of drum brake
One of the main advantages of this mechanism is its reliable protection from external factors . This type of braking system is ideal for vehicles operating in difficult/extreme environmental conditions. Almost no dust penetrates into the brake pads; they are constantly in conditions of optimal humidity. And this significantly increases the working life of the entire mechanism. In addition, when braking in this design, a smaller amount of thermal energy is released, which allows the use of inexpensive fluids with a low boiling point.
Removing the brake drum
Another advantage of the drum brake system design is the increased braking power due to the diameter or width of the drum. This becomes possible due to the increased contact patch, the contact patch between the drum surface and the block. This is what significantly improves braking performance. At the same time, the rear brake drum, thanks to its design features, is able to increase operating efficiency. When braking, the rotating drum tends to “carry away” the brake pad, turning it.
Disadvantages of a drum brake system
But, despite the obvious advantages , this type of braking system has certain disadvantages:
- lower startup speed compared to disk analogues;
- some difficulties in setting up;
- low stability;
- When the rear brake drum heats up, the pads “stick” and a significant deterioration in braking performance occurs.
In addition, experts do not recommend using the handbrake at subzero temperatures. Cases of pads freezing to the drums often occur. To avoid such situations on modern and expensive cars, this type of braking system is replaced with a disc version. Basically, a brake system with rear drums is found on budget cars and small cars, in which they are placed on the rear wheels. Trucks are also equipped with this braking system.
Removing the brake drum
Production technologies
Nowadays brake drums are manufactured in large quantities on an industrial basis. The most common production technology is metal injection molding using molds. It will be discussed below. Note that stamping technology is also used for drums of tracked vehicles.
Die casting is a method of producing castings in which an alloy under pressure from 7 to 700 MPa quickly fills a steel mold and acquires the required configuration.
Metal stamping is a controlled deformation process in which a workpiece changes its shape under the influence of excess pressure.
Metal injection molding
The development of a mold is accompanied by the creation of technical documentation and the determination of all parameters of the future part: wall thickness, dimensions of technological holes, location and dimensions of stiffeners, etc.
Receiving the workpiece. Aluminum alloy is poured under high pressure into a mold. A cast iron shell is first installed in the mold. After a certain exposure, the casting is removed from the mold and cools in air. Modern automatic machines are capable of providing fairly high accuracy and quality of castings, but after this the workpiece is still sent for further machining.
Mechanical restoration. When manufacturing brake drums, only the working surfaces are machined. These are the inner drum shell, which the brake pads will adhere to, and the outer mounting surfaces, which will come into contact with the hub. Additional processing of the holes used to attach the brake drum is also carried out. Read more about the “pros and cons” of fur. processing - in the footnote below...
Injection molding: advantages and disadvantages
Advantages…
1. The ability to obtain a surface with minimal allowances for machining (in our case, stiffeners, technological holes, mounting surfaces, etc.). 2. Wall thickness of manufactured products is from 0.8 mm and above
This is especially important for saving weight during casting and reducing the weight of the final product. 3. High quality surface of castings (grade 5-6)
This allows you to avoid additional processing of all non-working surfaces of the drum and save time and money. 4. High strength of the workpiece. When casting under pressure, graininess in the structure of the metal is eliminated, which increases strength by 25-40% compared to sand casting. 5. Corrosion resistance and hydraulic tightness. 6. High performance.
Flaws…
1. Duration and high cost of the production process with small batch volumes. Even for a small batch of products, you need to spend time developing a mold. 2. Dependence of product quality on the quality of the mold. Defects in the production of a mold are entirely reflected in the workpieces. 3. A slight decrease in the ductility of the material associated with an increase in strength, which may limit the use of the process for parts operating under significant dynamic loads and vibrations. 4. The possibility of formation of small air inclusions in castings (air porosity), which can reduce the strength and tightness of parts.
Malfunctions: causes and symptoms
Since the participation of the rear wheels in braking is much less than that of the front wheels, the motorist does not immediately notice a decrease in the efficiency of their work. In this case, the process of reducing efficiency can last quite a long time.
Failures in the operation of drum brakes are felt when braking sharply - the car stops much more slowly. On many cars, failure of the drum braking system is especially noticeable when driving in reverse. The front brake system, which has become the rear, does not “want” to work effectively, stopping the car.
A leak of working fluid often leads to the shutdown of one or two circuits of the braking system - this provokes a decrease in its efficiency by up to 60%. Air in the hydraulics creates a soft pedal feel. In this case, the brake can only be applied at the end of the stroke.
If the pads are “skewed” or the spring/strut in the drum breaks, the motorist may hear grinding sounds . This leads to jamming and overheating of the drum. In addition, this leads to a decrease in vehicle acceleration and increased fuel consumption. Among the failures, “ovality” of the drum is often encountered.
Troubleshooting
If there are traces of liquid on the surface of the working cylinder, this indicates that air has entered the system. For an accurate diagnosis, you need to go to a service station, where there is a special stand that allows you to calculate the efficiency of each mechanism.
In order for drum brakes to work properly, they must be serviced on time and their operation checked. To do this, it is enough to stop sharply from a speed of 60-80 km/h. These tests need to be carried out as many times as possible.
Types of breakdowns
Among the most common reasons that involve removing the rear brake drum and replacing it due to loss of efficiency is not only wear on the pads, but also high wear on the drum itself. On its inner working surface the circumference increases. If the pads and working surface wear out immediately, there is a risk of pistons being squeezed out of the cylinder, wheels jamming, or brake fluid leaking.
Brake drum failure
On cars with high mileage, due to corrosion, the spring “sticks”, weakens or breaks . The pressure force may decrease significantly due to the fact that the handbrake cable has become loose. Not often, but it still happens that the friction linings peel off from the pads, then it is necessary to replace the brake pads on the rear drums.
Removing rear brake drums without problems
I encountered this problem when I decided to look at the condition of the rear pads. I read the book by the publishing house “Third Rome”, surfed the forums on the Internet, they advised different things. Some people suggest removing the handbrake cable, some light tapping on the drum through a wooden block, etc. The handbrake lever, of course, needs to be lowered down all the way, but all these tappings go to the “light”, since the brake drum is held by the shoes pushed apart by the lever of the clearance adjustment mechanism (I realized this later). This gap is very small, and since the drum has a groove, the pads are slightly recessed into it and prevent the drum from being removed. I didn’t know all this and started filming, as they say unceremoniously. On the drum itself there are two threaded holes, if I'm not mistaken, for an M8 bolt
So I began to screw them in there little by little. The bolts rest against the hub and tighten the drum, simultaneously breaking the “antennae” of the working brake cylinders, tearing the linings from the pads and deforming them
After all this disgrace, I decided to figure out what the reason was. Having carefully examined the brake mechanism and understood the principle of its operation, everything became clear. Before removing the drums, the pads must be brought together. But how to do that?! After all, this is prevented by the gap adjustment lever. Once again I inspected the brake pad housing and found a small rubber plug.
If you remove it, the hole is located just opposite the hook of the clearance adjustment lever
This is what you need to press with a small screwdriver through the hole in the brake pad housing
The length of the clearance adjustment lever will decrease and it will be possible to compress the pads and remove the brake drum without any problems! Go ahead. The repair book (published by Third Rome) says that the left gap adjustment lever is different from the right. Having carefully examined them, I came to the conclusion that they are exactly the same.
The only difference is that the left lever is installed with the spring down, and the right with the spring up
If my recommendations help anyone, I will be very happy. Hi all!
Source
Troubleshooting methods
Before we talk about ways to remove the rear brake drum if it is stuck, you need to name the reasons why this can happen:
- Heating the brake pad causes the metal that makes up the drum to expand, causing the cover to stick to the body.
- Dirt accumulated between the cover and body.
- Rapid heating of the element during braking, and then sudden cooling (for example, in a puddle of water).
All this leads to sticking of the brake drum. Note that dismantling it is quite difficult. Therefore, experts do not recommend resorting to sharp braking in rainy weather, which is quite difficult to dismantle when replacing the pads. Now let’s talk about the most acceptable ways to remove a stuck drum.
If car service technicians cope with this task almost effortlessly, having sufficient experience and the necessary tools, then an ordinary motorist who decides to do such work on his own needs to stock up on a certain tool. Moreover, for each specific case this tool may be different.
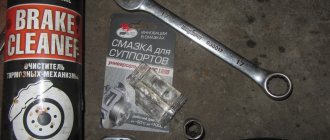
But you will always need WD40, which is used when repairing various vehicles.
Brake drum lubrication
Sledgehammer to help you
Using this method requires reliable fixation of the car. It is better to perform all actions on a lift (a car jack is not able to provide maximum stability to a raised car). In addition, a metal goat designed to support the machine, or an ordinary stump from a large tree, may be suitable for this. Let's move on directly to the sequence of actions when dismantling the brake drum. You will need:
- Remove the wheel.
- Using a wire brush, clean the cavity from any accumulated dirt.
- Spray the surface generously with WD40.
- Gently tap the drum collar at the bottom until it becomes movable. There is no need to strike too hard - this can lead to damage to car parts.
But it is advisable to warn that this method has one significant drawback - not everyone has a sledgehammer and not everyone knows how to handle it. Therefore, it is advisable to consider other options for solving this problem.
Brake drum removed
Extreme way
This method involves absolute fixation of the machine . Before starting work, you should check everything carefully, because if the car comes off, the risk of serious injury increases by almost 100%. Having chosen this option for removing a stuck drum, you will need to perform the following steps:
- Get behind the wheel.
- Turn on the ignition.
- Engage 2nd (3rd) gear and release the clutch.
- Rotate the engine to medium speed.
- Shut down the power unit and remove the drum.
The meaning of this method is to spin the moving part of the axis, and therefore the drum itself, using centrifugal force. In this embodiment, the drum will simply be descaled.
Removing the brake drum
Radical measure
If suddenly the methods described above did not lead to the required result , in addition, the brake system cylinder is jammed, then it is advisable to take radical measures. To complete the work you will need a drill with a drill (diameter size 2-3mm), a medical syringe, and a sledgehammer. Here's what to do if all else fails:
- Make several holes at the junction of the axle shaft and the drum.
- Use a syringe to pour brake fluid into the holes and at the same time gently hit the drum with a sledgehammer.
To simplify operations, use a special removable key (you can buy it or make it yourself). After performing these steps, the stuck drum should come off. But, if you still can’t do this, then you need to visit a car service center. Here the craftsmen will certainly be able to handle the removal of the brake drum. Of course, you will need to pay for the service, but it will be cheaper than buying a new hub or steering knuckle if it breaks.
How to remove a drum on some cars
So, we found out that the drum element must be replaced in case of wear, deformation and sticking . The general procedure for performing actions when removing this element was described. And now we want to tell you how to remove the drum on VAZ models.
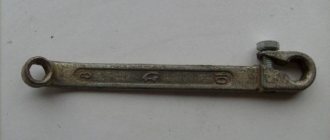
Brake drum removal wrench
VAZ (2101-07)
Replacement of the rear drum element is carried out with the car suspended and the handbrake released. First, remove the wheel on which the element is to be removed. Then, using a wrench/spanner, remove the guide fasteners (pins) that hold the drum and secure the wheels to the hub. After completing these steps, pull out the element body. It should come off fairly easily.
If this does not happen, which happens often, then take a couple of bolts (M8) and screw their holes into which they can easily be screwed. They must be screwed in evenly. As a result, the drum will give in.
Lada (2108-21099)
To remove the rear brake drum elements on these VAZ models, first gear is engaged and stops are installed under the front wheels of the car. The handbrake must be released. Then the wheels are removed, and the brake mechanisms are cleaned of dirt.
After this, the mounting pins are turned out, WD40 is applied to the hub and any traces of dirt/corrosion are removed. Applying light blows with a rubber/polymer hammer, the drum is pulled off the hub. If the element does not give in, then the drums are pressed together using fasteners (M8 pins/bolts).
Lada (2110)
Removing brake drum elements on these models often causes some problems for the car owner. The element is easy to dismantle on a new car, but to remove it on old cars you will need a good-quality hammer, a 7mm deep socket and a ratchet. First, loosen the bolts securing the rear wheel. Then the car is raised using a jack, the fasteners are completely turned out and the wheel is removed.
Brake system repair
Next, the pins are unscrewed from the drum element. But it’s better to do this when the car’s wheels have not yet been removed. The handbrake is applied. Next, on the reverse side, the drum is knocked off the hub with a hammer. If difficulties arise, the studs will help - they are screwed into the corresponding holes, and when they are screwed in evenly, the drum is removed. By the way, the drum is removed in the same way on Korean cars . Sometimes some force will be required, but usually treating the contact area of the drum with WD40 makes it easy to remove. As you can see, dismantling brake drums is not always easy, so the advisability of regular inspection is obvious.
The brake system requires diagnostics after 40,000 km . In this case, there are no problems with removing the drum.
It is important to take into account that if the car owner undertakes to perform the actions described above on his own, then the first place must come first!
Disc and drum brakes, differences
| Automakers are trying to gradually get rid of drum brakes and install more efficient disc brakes instead. Do you know what other differences there are between disc and drum brakes, and why the latter are still relevant and installed on cars produced in 2014? |
The advantage of disc brakes over drum brakes
- The braking distance of a car with disc brakes is 20% shorter. Moreover, the higher the speed, the greater the difference. The main reason is that wear products from the pads remain inside the drum and fall on the friction surfaces and impair grip and contact between the friction surfaces. In addition, the pressure on the pads inside the drum is significantly lower than on disc pads, because Too much pressure in the cylinders can “break” the drum.
- Drum brakes become hotter. This is due to the fact that, unlike disc brakes, the friction surfaces of drum brakes are not blown with air. As a result, the drum expands, the distance to the pads increases and the pedal has to be pressed harder.
- Disc brakes require less time to engage.
- Reduced unsprung masses.
- Disc brakes are easier and cheaper to maintain.
- When using rear disc brakes, there is no need to regularly tighten the handbrake.
- Problems with moisture getting inside the drum in winter.
- If the pads inside the drum are destroyed, there is a high probability of the wheels becoming wedged.
Pros of drum brakes
- Protection from dirt. The pads are in a confined space, so they are not afraid of dirt from the front wheels.
- Long service life. The service life of the pads inside the drums can reach up to 100 thousand, and sometimes more.
- If there is a temperature difference (a hot brake disc gets into water), the brake disc may crack, and its further operation is no longer possible. If you use drum brakes, there will be no damage; you will only have to operate the brake pedal for a while to clean the drum from moisture.
Features of removing the brake drum on a VAZ 2107 and replacing it
Every driver knows how important an element in the design of a car is the brake mechanism. This mechanism is complex and consists of many parts, and one of these parts is the brake drums. They are installed on the rear wheels, but due to their low reliability, the question often arises of how to remove the brake drum on a VAZ 2107 in order to repair or replace the mechanism.
Useful tips
Finally, we will give some tips regarding replacing drums:
- Nowadays this part is often offered, made of aluminum. In fact, there is no practical sense in such a replacement;
- When you have the drum removed, do not press the brake pedal. This will damage the slave cylinder.
As you can see, there are no special rules or difficulties here. Knowing how to remove the brake drum on a VAZ 2107, you can easily complete this job, saving on a trip to a car service center. When performing any repairs, always check the operation of the brakes after completion; this must be done.
How the rear brakes work on the VAZ 2107
The rear brakes on the VAZ 2107 are presented in the form of a special design consisting of a round base and a braking mechanism. You need to know the design of the mechanism in order to understand the principle of operation, and if you know how the wheel locks, then it will not be any problem to repair the brake system. To understand the design, let's look at each element separately.
Brake drum
This is a device that is attached to the rear wheels and rotates with them. When this device is blocked, the rotation of the wheel slows down. Structurally, the device has a simple appearance, and is presented in the form of a massive round metal part with holes for mounting pins.
When considering the brake drum of the seven, it is important to mention the main dimensions of this device:
- The internal diameter of the brake drum is 250 mm. The maximum permissible diameter, taking into account the boring, is 2.2 mm larger.
- The internal height is 57 mm.
- The total height is 69 mm.
- The external size of the brake drum is 305 mm.
- The total number of holes is 8, four of which are needed for the studs that secure the wheel.
The operating principle of this device is quite simple - a locking mechanism (pads) acts on the inside of the part, slowing down the rotation of the device along with the wheel. This is how the car slows down.
Brake mechanism of the rear wheels of VAZ 2107
Knowing the design of the part, you need to find out how the blocking or braking process occurs. This function is realized due to a special design that is securely attached to the wheel hub. This design is based on the following components:
- Brake pads - there are 2 of them, which are shaped like a crescent. The outer part of the shoes is in contact with the inner part of the round base of the drum, reducing its rotation speed.
- Return springs - ensure that the pads return to their original position when the brake pedal is released.
- Rear wheel brake working cylinder.
- A handbrake cable, which secures the wheels (and the car) when the handbrake is engaged.
The principle of operation of the mechanism is simple, and is based on the transmission of force from the pedal to the executive body. The force is transmitted using brake fluid, which acts on the working cylinder of the mechanism, driving the pads. Also, the pads are driven not only through the hydraulic system, but also through the handbrake cable, which is called the parking brake.
Knowing the design and operating principle of the brake drum, you can proceed to the next stage - identifying the need to replace the mechanism.
When replacement is necessary
The drum has a simple and uncomplicated design, which allows you to increase its service life to 150-200 thousand kilometers. However, the service life of this part depends not only on the mileage, but also on the type of driving. The design of the device in question has one, but very big drawback - poor ventilation. Due to this drawback, it is necessary to disassemble the brake mechanism of the rear wheels much earlier - in order to replace the pads or repair a jammed working cylinder.
Replacing rear brake devices is extremely rare. The reasons for the need for replacement are the following factors:
- Deformation of the device - this can be chips, cracks, as well as dents and other types of internal defects, in which the part needs to be replaced with a new one. You cannot operate a car with a deformed drum, as this will sooner or later lead to failure of the brake system.
- Wear of the working surface is above the permissible norm. The working surface is the internal diameter of the device, which is normally 250 mm. When braking, it is abraded by the friction surface of the pads, so the working surface wears out for quite a long time. However, if after dismantling the part and measuring the internal diameter it turns out that its value is higher than 252-254 mm, then this means that the device needs to be replaced.
The unit in question belongs to the non-repairable category, therefore, if defects are detected, the device must be replaced. To identify defects in the brake drum, it is necessary to remove and inspect it, which also makes it possible to assess the need to repair the brake mechanism on the VAZ 2107.
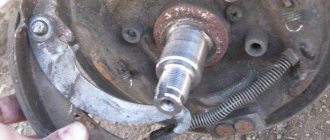
Removing the brake drum of the seven
Every owner of this car knows why it is necessary to remove the brake drums on a VAZ 2107. After dismantling the part, a decision is made on the need for its further operation. Dismantling is carried out according to the following scheme:
- First you need to jack up the rear of the car and then remove the wheel. At the same time, do not forget to install stops under the front wheels, since the handbrake will have to be depressed, otherwise it will not be possible to remove the part from the wheel.
- After removing the wheel, you can begin to unscrew the two studs. To do this, unscrew them using a spanner wrench or socket heads.
- After this, you need to grab the drum with both hands and then pull it towards you. Dismantling must be approached with caution and little effort must be applied. If it is stuck, then when you try to remove it, the car may jump off the jack, so it is first recommended to install safety stops.
The part to be dismantled is secured with guide pins, which are used to press them to the hub.
How to remove a stuck drum
If the part in question has not been disassembled for a long time, then it is not uncommon for the inner surface of the part to become stuck to the hub. It is not recommended to continue trying to pull the stuck part with your hands, since in the best case, if it gets out of engagement with the hub, you may be injured, as you will fall due to inertia.
To prevent this from happening, it is recommended to remove the jammed drum correctly. To do this, there are the following instructions:
- To do this, you will need to take two bolts with metric M8 threads.
- We insert them into the holes on the drum (different ones, not the ones from which the studs were unscrewed), and then we begin to tighten them.
- When the bolts rest against the hub, they will begin to separate the part.
- You need to slowly tighten both bolts.
- We recommend that while tightening, tap the drum with a mallet or hammer through a wooden spacer.
- As a result, the jammed mechanism will be easily removed from the car.
You can also take a wooden block, and resting it against the edge of the protruding side of the drum, strike with a hammer from the opposite side, that is, from the pit. Only blows should be applied lightly so as not to damage the integrity of the device.
This is interesting! If the device cannot be removed from the hub, it is recommended to make sure that the handbrake is not engaged. Many mechanics, out of habit, squeeze the handbrake when removing the wheels, forgetting that it is impossible to remove the drum with the handbrake depressed.
Brake drum installation
If it is determined that the part needs to be replaced, then we take a new device and insert it into the seat. To prevent the inside of the drum from sticking to the hub in the future, it is recommended to treat the joint with graphite lubricant. When installing a new mechanism, a problem may arise such as the inability to seat the part in place, since the pads will interfere. This problem can be easily solved with the help of two mounts. With their help, you need to squeeze the pads towards each other, providing free space for the part to fit into place. You cannot try to insert a new part, as you can damage the outer friction layer on the pads, so they will not work in the end.
Once the drum is in place, it will need to be centered. This is done by aligning the holes on the body with the mounting holes on the flange. When done correctly, the guide pins will screw into the hub rather than rest against it.
At this point, the process of replacing the rear brake drum can be considered complete. As you can see, this process is simple and does not require much time. However, the ease of repair does not mean that the malfunction of this part can be postponed until better times.
Causes and signs of rear brake failure
The rear brake mechanism of the VAZ 2107 has one extremely unpleasant feature: it easily overheats. This is due to the design of this mechanism, which is very poorly ventilated. According to the manufacturers, the rear brakes of the “Seven” can be guaranteed to last 60 thousand km without repair, while the front brakes can only last 30 thousand km. In practice, due to the above overheating, the mileage of the rear brakes is slightly lower, about 50 thousand km. After this, the driver will inevitably have to deal with the following phenomena:
- the pads in the brake mechanism wear out partially or completely, and wear can be observed on one side or on both;
Rear pads are worn down almost to the ground - the seals in the working cylinder crack due to high temperature, as a result of which the tightness of the device is broken, which leads to brake fluid leaks and a sharp drop in braking efficiency;
- the return springs in the brake mechanism rust heavily (in especially severe cases, one of them may break, which can lead to the rear wheel jamming);
- The handbrake cable wears out. When the cable wears out, it stretches and begins to sag a lot. As a result, after putting the car in handbrake, the brake pads put much less pressure on the drum wall, and the rear wheels are fixed very precariously.
Taking into account all these points, it is strongly recommended to check the rear brake mechanism every 20 thousand km and, if necessary, carry out its maintenance. Particular attention should be paid to the rear brakes if the following warning signs appear:
- when braking, a strong vibration of the car appears, which the driver feels literally with his whole body;
- after pressing the brakes, a strong squeaking sound occurs, which over time can turn into a deafening grinding sound;
- when driving there is a strong “beating” of both the steering wheel and the brake pedal;
- braking efficiency has dropped significantly, and the braking distance has become much longer.
All these signs indicate that the brakes need urgent repairs or serious preventive maintenance. It is absolutely forbidden to drive with such brakes.
Brake drum cracks
Cracks are a real scourge of all brake drums, not only on “sevens”, but also on many other cars with drum brakes. The vast majority of the warning signs listed above appear precisely after the drum cracks. This happens especially often with cast iron drums. The fact is that cast iron is an alloy of iron and carbon, which contains more than 2.14% carbon. Carbon gives cast iron incredible hardness, but it also makes cast iron brittle. If the driver does not have a careful driving style and really likes to ride with the breeze over potholes, then cracking of the brake drums is only a matter of time.
Drum crack caused by metal fatigue
Another reason for drum cracking is so-called metal fatigue. If a part is subjected to cyclic alternating loads for a long time, accompanied by an abrupt change in temperature (and the brake drum operates precisely under such conditions), then sooner or later a fatigue microcrack will appear in such a part. It is impossible to see it without an electron microscope. At some point, this crack propagates deep into the part, and the propagation occurs at the speed of sound. As a result, a large crack appears, which is impossible not to notice. A cracked drum cannot be repaired. Firstly, welding cast iron in a garage requires special equipment and skills, and secondly, the strength of such a drum after welding will be significantly reduced. So the car owner has only one option: replace the cracked brake drum with a new one.
Wear of the inner walls of the drum
Wear of the inner walls of the drum is a natural process, the results of which are clearly visible after the car has covered the above-mentioned 60 thousand km. Since the inner walls of the drum are periodically subjected to the frictional force created by the friction linings on the brake pads, the inner diameter of the drum inevitably increases over time. Braking efficiency is reduced because the brake pads are less pressed against the drum. The effects of normal wear are eliminated by regrooving the brake drum and then adjusting the brake mechanism to ensure proper contact of the pads with the inner walls.
Grooves on the inner surface of the drum
The appearance of grooves on the inner surface of the drum is another common problem that owners of “sevens” often encounter. The fact is that the rear brakes on the “seven” are designed in such a way that dirt and small stones sometimes get into the drum, especially if the driver drives mainly on dirt roads. One or more stones may become lodged between the brake pad and the inner wall of the drum. When the block presses the stone against the inner surface of the drum, it is pressed deeply into the friction lining on the brake shoe and remains there (the material of the friction linings is quite soft). With each subsequent braking, stones stuck in the block scratch the inner wall of the drum.
Large scratches are visible on the inner wall of the drum
Over time, a minor scratch turns into a large groove, which will not be so easy to get rid of. The way to solve this problem is determined by the depth of the grooves that appear. If the driver noticed them early and their depth does not exceed one millimeter, then you can try to get rid of them by grooving the drum. And if the depth of the grooves is two millimeters or more, then there is only one way out - replacing the brake drum.
How to remove a brake drum on a VAZ 2110
When the car is new, the driver does not experience any problems with it. But a certain time passes when the car has already traveled a sufficient number of kilometers and something in it begins to work not as it should. For example, when braking, the driver hears a creaking noise. The brake drum of the VAZ 2110 makes itself known. Find out that it needs to be replaced. It is possible not only based on real sensations. Pay attention to actual wear and tear.
To assess the condition of the brake pads, you don’t even have to remove the rear brake drums on the VAZ 2110. You can simply use the inspection window and look into it. After removing the rubber plug with a screwdriver, inspect the lining. Their thickness should not be less than 1.5 mm. During operation, they wear down and can no longer provide a quick stop after pressing the brake pedal.
If the thickness of the linings is smaller, the rod itself also moves incorrectly. This leads to leaks. Fluid is lost and, as a result, pressure changes. And this can already lead to problems with the entire braking system.
What is better for making a brake drum, cast iron or aluminum?
Despite the existence of disc options, rear brake drums are still used on cars. In this regard, some motorists ask the question: which brake drums are better, cast iron or aluminum, for the VAZ 2110? Cast iron is superior to aluminum in strength, but is much heavier. But still, many motorists prefer cast iron products. They are stronger and easier to remove. But still, the disc system is superior to brake pads. It is 15-20% more effective. Therefore, the motorist himself has to decide which brake drums are better for the VAZ 2110.
Disassembly
Of course, before replacing, the question arises: how to remove the brake drum on a VAZ 2110? For this operation, it is better to drive the car onto an overpass. You can, of course, do this on level ground, but first you need to jack up the car.
- It is necessary to remove the wheel and disc.
- Next you need to unscrew the two guide bolts.
- Very often, drivers are interested in how to remove the brake drum on a VAZ 2110 if it is stuck. The problem can be solved by tapping it with a hammer through a board.
- Then, using pliers, the tension spring is removed.
- The retaining guide spring, which holds the block in place, is then removed.
- Then the block itself is removed.
- The upper spring weakens, and the block itself turns to the side.
- Similar actions are carried out with the second block.
- The spacer bar is removed.
- The handbrake rod is disconnected from the cable.
- It is necessary to remove the cotter pin and disconnect the spring. The brake pad can now be removed.
This completes the removal of the VAZ 2110 brake drum. Now all that remains is to replace it with a new product. To do this, assembly should be done in reverse order.
After this, pressure adjustment is required. First of all, you need to adjust the parking brake. After repair work, this device always needs to be adjusted. Then the rear brakes are adjusted.
The adjustment must be made in such a way that the rear wheels lock a little later. Then the car must be tested. To do this, it should be accelerated to 40 km and then braked sharply.
Replacing drum brakes with disc brakes. Correct improvements
Efficiency increases due to more optimal application of braking forces; Brake response time is reduced; The braking distance is reduced; The ventilation of the brake system is improved, this is important for drivers who work the brakes a lot, for example, on mountain roads.
If the brake discs are installed incorrectly, uneven braking may occur, leading to skidding; Problems with setting the hand brake. You will have to either redo the “cable” system, or make a hydraulic handbrake. Both options are quite complex; It is not always possible to pass a technical inspection
Although now they do not inspect the car too meticulously, but pay more attention to the correct operation of the components, difficulties may still arise; Also, such a modification is another reason for the traffic police inspector to quibble. Here the issue comes down to unregistered design changes; In case of an accident, you will become the culprit of the accident, again due to design changes
Find out in advance how your insurance company will react to such tuning.
- The handbrake is released. They jack up the car; for greater convenience, you can lift the entire rear of the car by the beam (bridge). For greater security, you can place a block of wood there. Remove the wheels;
- Next, the drum and parts of the brake mechanism (pads, spacers, springs) are dismantled;
- The plug is removed from the hub or axle shaft. Dismantling the hub (half shaft) fastening is carried out in accordance with the manufacturer's recommendations. Typically, hubs are secured with a nut located on the axle. The axle shaft is most often attached to the drum plate;
- Using a special puller, remove the hub. If you have an axle shaft, then this is even easier; on most models it can be removed quite easily even by hand;
- It is advisable to service the hub at the same time; replace the bearing with a new one. In this case, you will not have to disassemble everything again to replace it soon;
- The drum plate is removed, this mainly applies to models with hubs, otherwise it is removed along with the axle shaft. To remove the drum you will need to unscrew 4-6 bolts. Please note that due to difficult operating conditions they may have become “stuck”, so they may have to be cut off with a grinder. Do not forget to unscrew the brake pipe from it before doing this;
- Install a new brake pipe;
- A new shield is screwed to the axle;
- The handbrake cable is replaced with a new one. It can be borrowed from any model with rear disc brakes;
- The disk is installed, after which the hub or axle shaft is mounted;
- The caliper and brake pads are installed. The caliper is attached to the casing using several bolts;
- We install the handbrake mounting plate and adjust it;
- The brake lines are connected and the brakes are bled to remove any remaining air from the system.
AutoFlit.ru
Removing the brake drum - why master this operation?
As you know, this brake mechanism consists of a stationary part (pads or band) and a movable part (the drum itself), and the braking process occurs through mechanical friction of these parts, thus the speed of rotation of the wheels slows down until it comes to a complete stop. The drum brake has a number of advantages, including low pricing, simplicity and the effect of mechanical self-reinforcement. After all, the lower parts of the pads are rigidly connected to each other, and when friction occurs between the drum and the front pad, additional force is created, which also presses the rear pad against it, which greatly increases the braking effect.
Removing a brake drum is a fairly common procedure, because its condition does not have the most favorable effect on the quality of our road surface. Also, increased air humidity has a negative impact, which contributes to the occurrence of corrosion, an aggressive driving style and sharp braking leads to overheating, not to mention an accident, after which it is quite possible that not only the brake system, but the entire car will need to be changed. So all of the above factors lead to rust, scratches, grooves, and other mechanical damage that can be easily identified by visual inspection.
In addition, the need to remove the drum also arises when it is necessary to assess the condition of the brake pad linings or when the brake cylinder breaks down.
Requirements for materials for the manufacture of brake drums
Requirements
- Thermal cycling resistance. The ability of a metal to withstand a large number of heating and cooling cycles.
- Fatigue strength. The ability to operate for as long as possible without accumulating damage.
- High hardness at normal and elevated temperatures. The metal should not change its properties when heated or cooled.
- High heat capacity (the ability to absorb heat during heating) and thermal conductivity (the ability to conduct energy from hotter parts of the body to cooler parts).
- Corrosion resistance (the drum is subject to constant exposure to water and humid environments) and environmental friendliness.
- Affordable price. Products are produced in large batches. Even a small increase in the price of raw materials can have a big impact on the overall cost.
How to remove a brake drum without assistance?
It may seem that this is easy to do, but, unfortunately, this is not always the case, so let’s look at several ways in which it is possible to solve this problem. First, let's look at the most bloodthirsty method. We jack up the required wheel (from which it is necessary to remove the drum), and install wheel chocks under the others. Next, we dismantle the wheel, and along with it the guide pins. We place a splint under the bridge and then lower the car so that it sits on it as tightly as possible.
Now we get behind the wheel, start the car and engage third gear, as soon as the needle on the tachometer shows 3-4 thousand revolutions, sharply press the brake. Most likely, the drum will be torn off on the first try, but if there is no result, then try again. This method has a number of disadvantages, first of all, it is not safe, and there should be no one in the area, since the drum can break off and fly in any direction , and secondly, it cannot be used if the brake cylinder is not working properly.
"Renault Logan"
If with VAZ cars brute force was used to dismantle the brake elements, then in the case of Logan they use a different method. The first thing you do is engage first gear at the gearbox. Then the wheel chocks are placed under the two front wheels. Next, the decorative caps are dismantled, if they are on the wheels. When the caps are removed, carefully knock the protective cap out of the hub and remove it.
Then loosen the wheel bolts and the hub nut. In this case, the car must be on the ground. Next, lift the rear of the car and remove the wheel. Now you can unscrew the hub nut completely - when installing a new drum, you should also purchase a new nut.
The rear brake drum (Logan Dacia is no exception) is removed from the coupling journal, and along with it the bearing. In these cars, the mechanism is a single unit with the hub.
The second part is removed in the same way. If an old drum is to be installed, it is necessary to grind off the collar on its working surface. It is also necessary to bring the slack adjuster mechanism into working position and bring the brake pads together using mounting blades.
When installing, the Renault Logan rear brake drums must be tightened with a hub nut with a force of 175 Nm. After installation, it is necessary to adjust the gaps; to do this, depress the brake pedal several times. During the process, clicks will be heard - when the gap is adjusted, they will stop.
This allows the drum brake mechanism to be removed for maintenance or replacement. As you can see, you can perform this process yourself, saving money on service stations.
How does a brake drum puller and boiling water make the job easier?
More gentle removal methods will require some equipment or skill. For the second method, we need a brake drum puller. Today it is not difficult to purchase it in a specialized store. But if you want, you can do it yourself. The calculation of the brake drum puller consists of manufacturing the necessary parts, namely: a holder (by the way, it is better to order it from a milling machine so that it is made from a solid blank) and grips that will be secured to the holder with bolts. Drawings or samples can always be found on the Internet, and assembling the structure is no more complicated than a children's construction set.
The third method is suitable when the drum cannot be removed due to corrosion, so to solve the problem it needs to be heated in order to break such a strong bond. This is quite easy to do, just pour boiling water over it, but keep in mind that the heating should be uniform in order to reduce the risk of warping to a minimum. Do not forget to reliably protect the skin of your hands, otherwise burns cannot be avoided. After this expansion, you can freely tear off the bolts securing the brake drum to the axle.
0 0 votes
Article rating