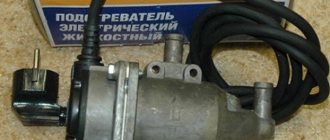
Severs+ engine pre-heaters are built into the vehicle's cooling system. When connected to a 220V network, the heating element in the heater body begins to heat up. At the same time, the circulation pump comes into operation, pumping the heated liquid through the cooling system. Cold coolant enters the lower pipe and exits through the upper.
When the required temperature is reached, the heater thermostat is activated. It turns off both the heating element and the pump. When the temperature of the coolant decreases, the thermostat will turn on heating and circulation again, thus constantly maintaining the temperature of the coolant in the specified range.
After approximately 30 minutes of operation of the Severs+ engine heater, the coolant in the system is warmed up to a temperature of about +70 C, and your car is ready for use.
The engine warm-up time depends on climatic conditions (temperature, wind), as well as on the parking conditions of the car (open parking, garage).
The Severs+ engine pore heater is presented in the following modifications:
- 1.5 and 2 kW, as well as 1.5 and 2 kW with a bumper connector - for passenger cars;
— 3 kW and 3 kW with bumper connector — for medium-duty and trucks.
Severs+ engine heaters are equipped with universal mounting kits. They include all the necessary parts and detailed installation instructions.
ATTENTION! INSTALLED VERTICALLY, ACCORDING TO THE INSTRUCTIONS!
The operating and installation instructions can be downloaded from the link: https://podogrev.com/products/main/severs-new/techdata-1/
If possible, we recommend installing Severs+ engine pre-heaters at a service station. However, following the recommendations and observing the requirements of the instructions, you can install the heater yourself. As practice shows, installation takes approximately 2-4 hours.
Below you can watch a video on how to properly install the Severs Plus engine heater.
Principle of operation
The Severs heater is designed for preliminary preparation for starting a car with a liquid cooling system in the cold season. It can be used in combination with passenger cars running on gasoline fuel and trucks running on diesel fuel.
Device operation diagram
The operating principle of the device is the natural circulation of heated liquid. More precisely, the device works as follows:
- when turned on, the tubular heating element starts;
- at the same time, the circular pump begins to function;
- the liquid is heated from the heating element and driven through the cooling system by a pump;
- when the desired temperature is reached, the thermostat turns on, which stops the operation of the heater and pump;
- when the temperature reaches the lower limit, the thermostat restarts the heating system.
This ensures regular maintenance of the required temperature of the liquid in the required range.
The time required to warm up the car completely depends on weather conditions, the power of the Severs heater and the conditions of the area where the car is parked - an open parking lot or a garage.
VIDEO: On which car can Severs M and Severs + be installed?
Device structure
Thanks to a well-thought-out configuration, the unit is designed in such a way that the owner will not have problems with the circulation of liquid or its contact with the contacts of the device.
- Horizontal design - this aspect completely eliminates the possibility of antifreeze getting on the electronic area of the device. This makes the device safe to use.
- Ball valve - helps direct the circulation of heated fluid through the pre-start unit into the cooling system.
- Thermostat - controls the warming up of the engine and prevents the device from heating the liquid beyond the required level. This provides maximum protection of the device from overheating and allows you to save energy.
- Thermal switch - stops the operation of the entire system in case of malfunctions in the functioning of the thermostat and other parts.
Types of devices
On the official website, the Severs engine preheater is presented in two versions:
The first equipment includes a circulation pump. The products are produced in two classes, differing in power rating.
General characteristics of Severs + modifications:
Options
Index
From a power supply with a voltage of 220 V
Turn-on temperature 80°C
Starting temperature 140°C
The housing of preheaters, regardless of modification, is made of aluminum with an anodized coating. The devices operate from an electrical network with a standard voltage of 220V AC with a frequency of 50 Hz. The price of devices with a power of 2 kW is 3900 rubles, 3 kW - 4800.
Also in the assortment of JSC Leader there are models of the Service-M series. In this case, the cost also depends on the power, which varies between 1-3 kW.
Model name
power, kWt
price, rub.
The “Plus” series modification is capable of heating a car engine in a short period of time. This result is achieved due to the fact that the package includes a circulation pump that helps the heated liquid move through the system. At average winter temperatures, the unit is capable of heating a car within half an hour.
Advantages and differences from other heaters
- Guaranteed engine starting at any temperature.
- The thermostat, complete with an automatic thermal switch, provides double protection against overheating.
- Can be mounted on most engines with a liquid cooling system.
- Easy to install: The device is easy to install with your own hands.
- Tightness: the electrical components of the device are reliably protected from water.
- Quality, good consumer reviews, long warranty period.
Compare with preheater Binar
No. 5 – Start-Turbo (Russia)
A Russian-made product cannot boast of ease of installation, and for high-quality installation, an inexperienced car owner will have to seek help from a special center. However, this drawback is fully compensated by the excellent technical performance of the heater and its reliability. For example, antifreeze is heated up to 49 degrees, after which an emergency shutdown occurs until the temperature drops. The time required for the car to start is significantly reduced, and after it there are no various noises and malfunctions that are familiar to every driver. Even in winter, for the first time after starting, the car will drive at a decent level of traction. The price starts from 1800 rubles.
How to install Severs-M
Installation of Severs-M is carried out in the following order:
1. Cut pipes from a rubber sleeve, put them on the pipes of the device, secure with clamps.
2. Remove the air filter, unscrew the bolt. For VAZ cars, also remove the spark plug tips, disconnect and remove the high-voltage module.
3. Attach the bracket to the heater.
4. Remove the cylinder block plug and drain the fluid.
5. Place the heater fitting in place of the plug (on the sealant).
6. Fix the bracket with the heater.
7. Insert the spring into the sleeve, connect it to the fitting and secure with a clamp.
8. Pour in liquid.
9. Place the second sleeve on the adapter tee and secure with a clamp.
10. Fill the cooling system.
11. Secure the power cord.
12. Check the system for leaks and return the parts removed before installation.
13. Plug in the cord.
Read more about installing a heater on a car
Pay attention during operation!
- Integrity of insulation of electrical parts.
- Connect only to a three-wire single-phase network.
- Monitor the condition of the fluid and maintain the tightness of the system.
- Disconnect from the mains before starting the engine.
Components
A device that allows you to prepare the engine for easy starting and fill the interior with warmth is still considered an element of luxury. But it can really protect the health of both yours and your car.
Cold starting an engine is a difficult test for all its systems, comparable to several tens of kilometers in difficult conditions. The driver and passengers also have a hard time: frozen fingers do not hold the steering wheel well, the cold from the seats reaches almost to the spine, and the steam from the breath tends to freeze on the windows. But how nice it is to sit in a salon where the temperature is almost room temperature, throw off the gloves, hats and scarves that restrict your movements and not have to wait for the frosty windows to thaw...
So those living in cold regions have a reason to spend money not on a leather interior and all sorts of bells and whistles, but on a preheater. Its installation allows not only to extend the life of the engine, but also to save fuel, which a cold engine consumes much more readily.
Installation of the Severs+ engine heater on L200 (photo report)
Hello! I decided to share today’s experience of installing the Severs+ heater. They may ask - what to share? There are two topics https://www.pickupclub.ru/forum/showt. B0%D0%BC%D0%B8 and https://www.pickupclub.ru/forum/showt. A%D0%B8/page28. But the fact is that I took a model with forced circulation of antifreeze, and, as it turned out, this is a slightly different installation principle. Installation in general has become easier because... The heater is placed in the gap in the antifreeze supply hose to the stove. But pitfalls became clear, which are discussed below. So, in order to successfully install this gadget, we will need: 1. A warm garage. No, of course, if you feel strength, dexterity and talent, coupled with experience and a thaw in the yard, then you can do it on the street, but personally for us this process with all the brainstorming and brakes took no less than 4 hours, so I I would have died outside even at minus 5 degrees (and here it was -31 this morning). 2. Neighbor Volodya (optional). Actually, the name of your neighbor is not so important, what is more important is that he repairs cars, and he also had missing parts in his stash. But in the absence of a neighbor, you can do it yourself. 3. My heating kit comes with a universal installation kit. When I hear the word “universal,” I immediately think - in what way will this “generalist” be worse than a “specialist”? Here's what was additionally needed: a) In this case, the main thing is that there was only one hose, sorry sleeve, and 80 cm long, which turned out to be not enough. Neighbor Volodya filled this gap by bringing a sleeve from home. Another hose may come in handy, but more on that later. b) We also didn’t like the studs for fastening the pump itself - we took the existing 6 bolts, approximately 60 mm long, and self-locking nuts. True, I had to drill holes in the mounting plate, but this is a trifle. c) Drill size 10. This will be needed to drill out the mounting plate in order to secure it to the body of our car. d) A knife for cutting the hose, that goes without saying e) It will be convenient to twist the clamps from the kit with a 7-point head - they are very tight, you can’t tighten them with a screwdriver, it’s difficult to get around with a wrench. f) Curved pliers will most likely be useful to you - remove the tight clamp from the pipe. g) Wrenches, screwdrivers and entrenching tools upon request. h) A screwdriver for screwing in the bumper connectors (if you have chosen such a modification). i) If you do not drain the antifreeze completely, then place a basin (preferably two) - when the antifreeze starts to flow, place it under the pan. Wow, so many letters. I’ll go have a smoke, put the battery fasteners back in place (I remembered that it’s my dear, I forgot to put it on) and post some photos with explanations.
Last edited by marino; 12/18/2016 at 21:27 .
So, first of all, we remove the left battery, and remove the terminal from the right one as a precaution. Then we thought for a long time about where to put the boiler. It should stand vertically, with the pump up, and this is a fundamental difference from the Severs-M heater. We found the only place - the space next to the battery platform. And there, right in this area, there is an unused hole where we attach the plate. There is a large hole in the plate for a bolt, but it doesn’t suit us - we would have to lower the boiler too low, and all sorts of things get in the way below, so we apply the plate, see which of the small holes suits us, and drill it out.
Attachment 106308 In the second photo the boiler is already attached. Before screwing the boiler, do not forget to fasten the sleeves on it and tighten the clamps, then it will not be convenient to do this. The protective corrugation that comes with the kit can be put on the upper hose; this is also more convenient to do in advance. The length of the lower hose (entrance to the boiler from the engine) was 50 centimeters, the upper hose (going to the stove) did not measure the length, maybe a little longer. In any case, we cut it in place when the two hoses meet and are ready for joining. Next we work on the pipe going from the engine to the stove. Actually, here he is entering the partition
I decided that I don’t want to cut him, he’s so cute. What if something goes wrong, and I’ll have a whole pipe, that’s the first thing. Secondly, it is small and U-shaped, so I decided that if I cut it, it would be inconvenient to attach thick hoses to them. Moreover, the neighbor brought this:
These were hoses with an internal diameter of 16 mm, like the original ones, and they could easily be turned in the direction we needed. We started removing the pipe from the engine. We struggled with the evil clamp for about 10 minutes - it fits tightly, and my pliers are not very branded. Then they tried to remove the hose from the pipe, but it was stuck, and there was nowhere to turn around. As a result, they turned it with the same pliers and it slowly gave up. Don't forget to put the basin. First, antifreeze leaked from the left side of the pan (i.e., just above the pipe), where I had placed the basin in advance. When the flow seemed to have stopped, I heard it was pouring from the right, so I had to move the basin there. Therefore, if there is, then two basins are better. It was worse with the second end of the pipe. The same struggle with the clamp, then fruitless attempts to pull it off the pipe. Well, it sits tightly! I’m already saying screw it, let’s cut it! And only then did it dawn on me - why remove it? We put the adapter directly into it and connect it to the thick hose going to the boiler. Yes, I say, two geniuses have come together, they have the strength, no need for intelligence, they wasted about twenty minutes! In general, it turned out something like in the last photo. On the left, the clamp on the engine pipe shines, and on the right, the same hose, unrolled, is connected through an adapter to the boiler tube. There is a clamp in the middle - this is the pipe that goes to the stove.
Last edited by marino; 12/19/2016 at 20:39 .
Actually after this the most difficult part is over. All that remains is to lower the wire down and thread it through the grille. It just fits through the grate with tension but without any difficulty. We fasten it with two self-tapping screws from the kit and put on a protective corrugation.
Then I began to study where to attach the ground wires. A round tip is crimped onto the wire; a screw is included, which is recommended to be used to screw the tip to the body. I don’t quite understand why this wire comes not from the body of the boiler itself, but from the socket. I dragged this wiring back into the engine compartment and its length was enough to reach a special ground bolt to which two wirings fit. Ours will be the third.
Then we put the battery back, don’t forget to secure it, and add fluid. To be honest, describing all this I don’t understand why it took us so much time. Somewhere there were distractions, somewhere unproductive body movements. I hope that my description will help reduce your installation time by about half.
Thank you, well described. It’s a little unclear with the hoses, maybe at first glance. As I understand it, this is heating from 220V?
Well, yes, at 220V. Maybe something is not clear (ask), but I simply wrote as if in continuation of those topics about forced circulation boilers, to which I gave a link. And from my bell tower, my story seemed clear to me, and I wanted to talk about the nuances that I encountered regarding this boiler. But then let me expand a little about hoses and connections. There is a Severs-M boiler, where the antifreeze is heated, and due to convection, its movement and heat exchange occur. In this heater, at least in our cars, it is connected according to the following scheme, described by a user with the nickname gefest72. The hose going to the stove is cut, a tee is inserted, the third hose goes to the boiler. The same is done with the hose going to the thermostat (it seems like this from memory). The second link was more difficult for the person to connect, so options are possible. On the Severs+ boiler everything is somewhat simpler because... There is only one insertion point, and in my case I didn’t even cut the hose. Those small bent hoses in the photo, or rather one of them, allowed me to compactly turn the hose almost 180 degrees towards the boiler, because a simple hose can break and narrow the passage hole. The severs comes with two springs included with the hose, which can be respectively inserted inside the two hoses, bent, and they will not become narrow in this place. Well, if you don’t have tricky little bent hoses, then you’ll do it with a spring, it’ll just be a little more compact with these kids, otherwise there’s too much stuff crammed in that corner. Now, if only you could stick the boiler on the other side of the engine, there would be more space there. Every time, even if not often, you have to look under the hood, I think that those people who organize the engine compartment are probably champions in playing Tetris. But those who come up with all sorts of tricky connectors and latches are autists!
To avoid bending the hoses, I bought a corner (metal L-shaped fitting) from a UAZ for 16 rubles. The diameter was perfect.
Instructions for the heater - paragraph 6.3 requires installation of the heater with a pump from below.
Operating a car becomes more difficult with the onset of cold weather. Before setting off on the road, the driver needs to warm up the engine and interior. Special antifreeze preheating devices cope with this task faster, safer for the car and more reliably. One of these is a product from the Severs company - a pre-heater of the same name facilitates the process of starting the engine and reduces the load on it. Let's take a closer look at how the device works, what its advantages and necessity are.