Why do you need to make podiums for speakers in a car with your own hands? There are several answers to this question. A podium for dynamic drivers is needed when the car owner plans to change the configuration of the speaker systems. This may include increasing the number of speakers or installing new, more powerful devices that are too large to fit into the old footprint. In addition, by making a podium for the speakers with your own hands, you can choose any direction of the sound flow of the speaker. It can be aimed forward, upward or towards rear seat passengers.
Installation structures for loudspeakers are divided into internal and external. The internal seat is located on the door, front panel or ceiling of the cabin. External podiums are designed to accommodate high-power speakers and have a heavier construction. Speaker mounting locations must meet certain requirements. Structural elements should not impede the free circulation of air inside the acoustic space, otherwise this will create interference when reproducing low frequencies. There should be no “tunnel” in front of the diffuser, which significantly worsens the sound quality.
How to make podiums for speakers with your own hands
Acoustic structures in the car interior perform several functions at once:
- Change the interior style
- Increases the quality of acoustics
- Allows for placement of non-standard loudspeakers
You can make a podium for a speaker with your own hands using different technologies, using easy-to-process materials. To do this work at home, the easiest way is to use multi-layer plywood or other pressed materials made from wood waste. Simple designs for repeating at home can be made from the following components:
- Multilayer plywood
- Metallic profile
- Nylon fabric
- Epoxy resin
- Decorative leather
- Acoustic fabric or mesh
Types and characteristics of podiums
Depending on the installation location, there are two types of elements: external and internal. Internal ones are installed if you want to preserve the factory appearance of the interior. For example, when replacing a standard speaker with a diffuser of similar diameter.
Internal parts are completely hidden under the door or ceiling trim. And it, in turn, should fit very tightly to the column. Otherwise you will get distorted sound. Internal structures are protected from damage and are easy to manufacture. And also, they do not affect the interior design of the cabin.
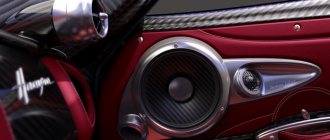
Car door speakers
The external (external) podium makes it possible to install any speakers in size: 20 cm or 16 cm. The head can be placed with inclinations in different directions - towards the listeners or parallel to the door. External installation helps reduce vibration due to its tight fit to the door trim.
DIY podiums for 13 speakers
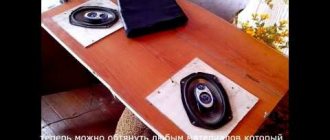
Speakers of this size are usually located in the front of the cabin. The basis of the structure is 10 mm plywood. It’s good if there is impregnated material. Such plywood will not delaminate, and the podium will last a long time. First, installation rings of the appropriate diameter and a base are cut out of multi-layer plywood using a jigsaw. Two rings form a hollow cylinder, which will be the seat for the loudspeaker. The rings and the base are not connected coaxially, but so that the speaker system diffuser is directed in the required direction. This is achieved by shifting the vertical guides to the desired angle.
The guides are cut out of the same plywood and fixed with self-tapping screws. To make the connection more durable, a little epoxy resin is added to the connection point. Then the hollow structure must be filled with polyurethane foam. Thick paper rolled into a tube is placed at the speaker installation location. After the polyurethane foam has completely dried, the paper is removed, and the structure is processed with a sharp knife and sandpaper to give it the desired shape. Leatherette is used as a decorative covering. Its color is chosen taking into account the design of the car's interior. The artificial leather covering is glued with glue 88. This work should be done very carefully, since secondary gluing leads to a deterioration in the appearance of the structure. A loudspeaker of this diameter has low power, so no special fastening is required to secure the podium to the installation site.
What should a podium look like?
As follows from the above, the podium for the midrange or midbass is not a simple decorative element, but a necessary component of the audio system that affects the sound quality. To effectively perform its task—damping unnecessary vibrations—the podium must be heavy. The heavier the better.
In order for a part to be heavy, it must be made of the appropriate material. But in practice, plywood is most often used, since it is easy to process at home.
Did you know that archaeologists discovered the first archaeological artifact made from a material reminiscent of modern plywood in the territory of Ancient Egypt. The plywood casket dates back to the 15th-16th centuries BC. e.
Plywood is a relatively light material. To increase weight, podiums are made as large as possible. Of course, taking into account the features of the car interior.
When determining dimensions, they focus not only on sound quality, but also make sure that the additional element does not interfere with the operation of the main devices. For example, a speaker installed in a door should not interfere with the use of handles.
The speaker podium should not be attached to the casing, only to rigid metal elements. Firstly, a weak base does not help dampen vibrations. Secondly, it will not withstand a heavy podium with a speaker.
Internal podium
There are internal and external podiums. The first ones are installed when they want to maintain the factory appearance without changes. For example, when they change a standard speaker to a diffuser that is similar in diameter.
The internal podium is entirely hidden in the internal cavity of the door or ceiling under the trim, which must fit tightly to the speaker. Otherwise, distortion is possible, as the speaker will “play under the casing.”
The outer casing should fit snugly around the speaker mounted on the inner podium
Table: advantages and disadvantages of internal podiums
| Advantages | Flaws |
|
|
External podium
An external or external podium allows you to install any speaker larger or smaller than stock. In addition, the head can be placed either parallel to the plane of the door or at an angle, directed towards the listener. An additional advantage of the external podium is that it presses the skin tightly, reducing vibration.
Table: advantages and disadvantages of external podiums
| Advantages | Flaws |
|
|
The external podium is not just a stand, but a single structure. Its components must be adjusted and fastened tightly, without gaps or cracks. This ensures maximum structural rigidity and prevents sound from escaping under the skin.
DIY podiums for 16 speakers
16 cm loudspeakers can be included in an acoustic system design consisting of two active elements. Podiums for such acoustics are usually installed on the doors of the car. To make podiums for 16 cm speakers with your own hands, you will need multilayer plywood, fiberglass, polyurethane foam and epoxy resin. The technology itself is quite simple, but it will require time to dry the layers of fabric after impregnation with epoxy resin. First, all the elements of the future acoustic system are cut out of multilayer plywood. These are the base, rings for installing speakers and vertical connections. The structure is then assembled into a single whole. Wooden blocks or metal fastening profiles can be used as vertical elements.
Next, the entire structure is filled with polyurethane foam, with the exception of places for installing loudspeakers. Then everything unnecessary is removed from the podium, and its surface is treated with fine sandpaper. For strength, a thin layer of epoxy resin with a hardener is applied to the surface and rubbed into the pores of the mounting foam. This procedure can be repeated several times. The finished podium is finally sanded over a layer of resin. The finished product is finished using artificial leather.
You can make podiums for speakers in doors yourself using another technology. After the frame for installing the speakers is made, the entire structure is covered with thin fabric, which is impregnated with polyester varnish or resin. After complete drying, a thin layer of epoxy resin and fiberglass is applied to the workpiece.
There should be at least three layers of fiberglass with epoxy resin. After the future podium has completely dried, a layer of fiberglass putty is applied to the structure. All excess is cut off, and the surface is brought to condition using coarse and fine sandpaper. To finish the finished product, you can use leatherette or several layers of enamel, which is matched to the tone of the interior trim. Using this technology, you can make podiums for speakers with your own hands for one, two or three speakers.
Making a platform for a column
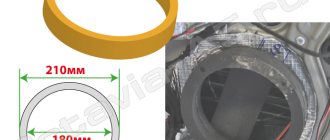
- Measure the size of the speaker for the radio. And also take measurements of the protective mesh.
- Draw a ring on the cardboard, taking into account the fact that the internal diameter corresponds to the diameter of the place where the column will be planted. And the outer diameter of the ring is equal to the diameter of the protective mesh. To get it right, you need to add 6 mm to the annular diameter. For a decorative ring.
- Transfer the cardboard model onto a sheet of plywood and trace it. It is better to take plywood of at least 8 mm.
- Cut out all the details - shapes. It is better to glue the decorative ring to the base and attach it with small nails.
Details for the podium
DIY podiums for speakers under 20
The speakers with a diameter of 20 cm are large in size and have decent power. Such speaker systems are usually installed on the trunk shelf. In order to make podiums for 20 speakers with your own hands, you need to use thick plywood. First, a base is cut out of it according to the size of the seat. The thickness of the material should be as thick as possible, since high-power speakers and the mounting board can resonate at high power. Rings for acoustics and vertical posts are cut out of the same plywood to provide the necessary tilt.
The loudspeaker mounting areas are covered with thin nylon fabric and impregnated with varnish. The top part is cut out and removed. A layer of epoxy resin and fiberglass is applied to the hardened surface. After applying 3-4 layers and completely drying, the surface is cleaned and sanded. You can cover the finished shelf with any decorative material, upholstery fabric or artificial leather. Some car owners install speaker systems on the ceiling of the car interior. It is not difficult to make podiums for ceiling installation according to the described schemes.
Manufacturing and installation process
When starting to make podiums for cars, you need to think through an action plan and divide all the work into several key stages.
Each of the steps can affect the result, so you should approach the work as responsibly as possible, strictly following the instructions and calculating all the details in advance.
Making your own podiums for placing acoustics in the cabin or trunk of a car does not seem so difficult if everything is broken down into clear and consistent steps. The car owner is required to:
- think over the form;
- make a platform;
- assemble a podium;
- fill the structure;
- cover with decorative materials.
Now each step should be considered separately.
Before drawing drawings and cutting out parts, you need to choose the place where the structure will be located in the future.
What you definitely shouldn’t do is assemble a speaker system and only then look for where to mount it. There is a risk of simply not finding a place and not fitting into the dimensions of the interior elements or even the spacious luggage compartment.
Form
To install HF tweeters, that is, high-frequency speakers, powerful speakers, you must first decide on the shape of the future design.
The shape of the podium is selected based on the configuration of the speaker or tweeter itself. It can be a circle, oval, square, etc.
Useful information about speaker spacers
Functions, designs, installation locations of spacer rings
When installing new speakers in the original places of factory equipment, lovers of good acoustics usually choose larger speakers. Budget models cannot accommodate speakers with a diameter of 16 or 20 centimeters. The increased diffuser size requires a larger magnetic head. The distance between the metal frame and the outer door panel (the inner trim of the door card) does not correspond to the installation depth of the new speaker, which rests on the lowered door glass.
Cost of services for manufacturing & installation of rings
Making simple rings 1 hour 600–1600 rub. Production of complex rings 2-3 hours 1600–2600 rub. Making rings for tweeters 1 hour 800–1200 rub. Manufacturing of supporting elements for midrange and tweeter speakers 2–4 h 1000–1500 rub. Making rings for a subwoofer (wood) 1 hour 400–800 rub. Making rings for a subwoofer (metal) 1 hour 800–1200 rub.
Installation of rings on self-tapping screws / bolts 0 / 50–100 rub.
Installation of rings on speakers is free if you order installation of acoustics from us.
Manufacturing of other elements
Features of choosing and installing speakers in Priora
The quality of music in a car is ensured by proper installation and connection of several speakers. The sound volume depends on the size of the tweeters. Many Prior car owners try to install podiums in the front, in the doors. The placement of the speakers is possible both at the top and bottom of the doors.
Leather interior of Priora
There are several important features when choosing tweeters for a Priora:
- First of all, you should decide on their optimal size. It is not recommended to install elements that are too bulky. Since they take up a lot of space in the cabin and interfere with the driver and passengers. And it’s easy to damage strongly protruding parts.
- The system should be conveniently mounted on the side pads. New elements must be placed on the surface of the door with the greatest precision. They must not block the pocket. Special podiums on the Priora, which are mounted on top of the sidewall next to the pillar, add new loud notes to the music. And also, surround sound transmission is added.
- External design is also important. For example, in a black or gray interior it is better to purchase podiums of the same color. If there are two shades in the interior, one is selected: black or gray. Silver details are perfect for such palettes. They will add modernity and uniqueness to the decoration. A car finished in brown or beige colors is well complemented by a coffee shade.
- Any additional installations in the cabin should not only look attractive, but also be of high quality. In addition, do not forget about convenience. No parts should interfere with driving.
- Installation work in the machine must be carried out strictly according to the instructions.
And of course, all elements must be firmly attached so that the system does not fail soon.