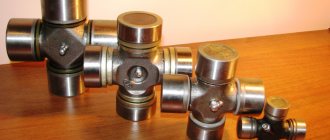
Drivetrain parts
In the VAZ 2105 car, the crosspiece, replacement (10) of which will be considered, is needed in order to make universal joints. Which, together with the front (5) and rear (12) driveshafts, elastic coupling (1), intermediate support (7), flanges, fasteners and protective parts, smoothly transmit torque from the gearbox output shaft to the drive gear flange of the rear axle. Since during movement the bridge constantly moves within the limits allowed by the suspension, it is impossible to use a rigid method of transmitting torque. Splines and hinges allow rotation to be directed to the point of variable position of the bridge without jerking by means of a cardan transmission. Their functionality is designed for high-quality work within 15 degrees of change in the angle of inclination, and shortening or lengthening within 20 millimeters.
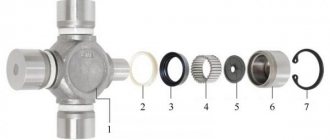
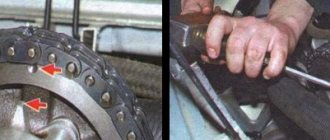
This is what a working crosspiece should look like
Diagnostics
In order to identify faults in the crosspiece, appropriate diagnostics are carried out. To do this, the following type of operations is carried out:
- the car is driven into a viewing hole;
- we grasp the driveshaft with one hand, and with the other we hold the flange of the drive gear, which is located near the gearbox;
- holding the connection tightly, we try to turn or twist the parts in different directions.
Attention: If you can turn it even an iota, then there is play in the connections and, accordingly, the crosspiece has a defect. It is clear that there is no point in delaying repairs and, as happens with a sick person, the car should be urgently put in order.
If you heard the characteristic sounds of a driveshaft malfunction, or sensed something was wrong based on the car’s behavior, you need to quickly understand the situation and determine the reasons. It is not necessary to go to a service station, since diagnosing and replacing the crosspiece on a VAZ 2107 can be done with your own hands.
If you are a beginner, then it is not recommended to do such repairs yourself. If you understand the essence of the car, the work will not take much time and will not be difficult.
To diagnose the problem you need to do the following:
- Drive the car into the pit and go down yourself.
- Pressing the flange leading to the gearbox with one hand, grab the shaft with the other;
- Make turns in different directions and listen to the sounds that appear. If you notice play in the connection, it means that the surfaces are seriously worn.
- Perform the work of replacing the crosspiece.
- In some cases, the play may go unnoticed. This happens if one bearing fails.
- Under such circumstances, trust your eyes by visually examining the mechanism.
- Arm yourself with a 13mm wrench and unscrew the driveshaft from the flange. Look at the condition of the entire unit.
- Do not forget to apply the installation marks during disassembly, which will allow you to reassemble the system in the correct sequence and according to the placed marks without any problems.
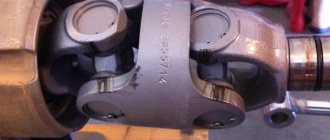
VAZ 2107 driveshaft device
Driveshaft VAZ 2107
- intermediate support
- front driveshaft
- elastic coupling
- balancing plate;
- intermediate support cross member;
- rear driveshaft;
- flange universal joint fork;
- rubber bushing
- spacer sleeve.
How to remove the cross with your own hands
To properly repair the crosspiece, you must have a set of tools and parts available:
- new universal joint;
- retaining rings;
- suspension type bearing;
- new bolts and nuts (they are needed because often during dismantling the old ones fail or are even cut off due to the impossibility of unscrewing);
- socket and wrenches for 12, 13, 27;
- hammer;
- attachment made of aluminum or copper;
- shaped screwdriver;
- pliers for removing retaining rings.
As a rule, an inspection hole is required to carry out the work, since lifting the car on a jack is often not enough.
Dismantling: method one
So, replacing the crosspiece on a VAZ 2104 begins:
- the first thing to do is remove the cardan;
- Using a 13mm wrench, unscrew the bolts that secure the suspension bearing (as you know, the cardan is attached to the cross beam of the car);
- we unscrew those fasteners that connect the cardan to the tail part of the rear axle (this operation will require the use of a center punch, which needs to be marked so as not to confuse anything during assembly);
- remove the crosspiece (for this we use pre-prepared pliers, with which we open the locking ring);
- We turn the cardan so that the cross is in a hanging position;
- we knock out the cup of the cross (we use a hammer or you can use a thin metal rod);
- turn the cardan;
- remove the cup of the cross;
- knock out the next one in the same way.
DETAILS: Cleaning the Toyota Allion air conditioner Photo instructions for cleaning the car air conditioner with your own hands
Attention: It is worth noting that before replacing the crosspiece, you need to carefully prepare the universal joint eyes. For this purpose, they are cleaned of dirt and rust. Similar cleaning is carried out with the grooves of the retaining rings.
Dismantling: method two
Begin:
- we lift the car onto the inspection hole;
- remove the parking brake cable spring;
- We apply marks to the joints of the cardan shaft and gearbox;
- unscrew the four self-locking nuts, holding the cardan from turning with a screwdriver;
- remove one end of the propeller shaft;
- mark the position of the cardan and the EF flange;
- we find four locking tendrils on the clip, near the EF and bend them;
- we move the clip forward together with the seal;
- take the key to 13;
- use it to unscrew the two nuts securing the safety bar;
- remove the safety bar;
- remove the plate of the outboard bearing from the studs, holding the cardan and unscrewing the nuts securing these connections with a 13mm wrench (usually the plate is secured through rubber washers);
- remove the cardan from the splines;
- take it out;
- Using a center punch or chisel, we mark the relative positions of the parts so that the balancing is not disturbed;
- mark the location of the forks and shafts;
- we remove the retaining rings with a special tool;
- take a special puller and install it on the fork of the cross;
- press out the needle bearing, which should automatically fall into the puller cup.
Attention: It should be remembered that the bearing will only extend to a third of its height.
- press out the opposite bearing in the same way as the first;
- knock out the bearings completely, pressing the screwdriver against the edge of the bearing housing;
- we remove the cross from the cardan fork;
- We place a special puller, which was used to press out the bearing, on the crosspiece;
- press out another pair of bearings;
- We put seals and plastic plugs on the crosspiece;
- take Fiol and lubricate the crosspiece bearings with it thoroughly.
We can say that this completes the dismantling process. Now you need to correctly install the cross in place. This video will help those who have good visual memory to do everything correctly.
Installation of a new cross
We begin installing the new or repaired cross into place. So:
- insert the cross into the fork;
- take a puller and spacer;
- we press the bearing into the fork (this must be done so that it goes in much deeper than the groove under the retaining ring);
- insert the retaining ring;
- on the opposite side of the fork, bearing number two is pressed in so that the first rests on the retaining ring;
- fix the retaining ring of the second bearing;
- drive the retaining ring to the end using a hammer and bit;
- take a feeler gauge and measure the gap that is between the bearing and the retaining ring;
Attention: It should be noted that the gap should be no less than 0.01 and no more than 0.04 mm. As for the retaining rings, they come in five sizes and different colors.
- unpainted retaining rings have a thickness of 1.50 mm;
- brown – 1.52 mm;
- blue – 1.56;
- black – 1.59;
- yellow – 1.62.
Outboard bearing repair
Often it is not enough to replace the crosspiece and you have to change the suspension bearing as well. Let's look at the example below on how to do it yourself correctly:
- remove the rear cardan as required by the instructions;
- take the head at 27;
- unscrew the nut of the front cardan fork (this should not be done all the way!);
- take a puller;
- we tighten the bolt with it, creating a preload (in this case, it may happen that the fork does not move and then it will be necessary to help it move with hammer blows);
- Unscrew the outboard bearing mounting bolts using a 13mm wrench;
- knock out the bearing from the shaft;
- We collect everything in reverse order.
DETAILS: Changing the oil in a Honda Pilot automatic transmission Photo instructions on how to change the oil in a Pilot automatic transmission with your own hands
The step-by-step instructions described above will help motorists gain the necessary skills in their work. But not only. Working with your own hands is a good way to save money. After all, today the price for car repair services is quite high and not everyone can afford it, especially if you can repair domestic cars, such as the VAZ 2104, on your own.
Instructions for removing the steering wheel
Removing the VAZ classic steering wheel is necessary in the following situations:
- to repair the horn button or steering mechanism;
- to align the transverse bar after the camber procedure - toe-in of the front wheels;
- in order to replace the standard steering wheel with another, more comfortable or sporty one.
Thin and uncomfortable steering wheel of the VAZ 2101-02
Reference. On classic models, the manufacturer installed 3 types of steering wheels - a “two-spoke” one with a thin bar (VAZ 2101-02), the same with a thickened cross member (VAZ 2103, 06) and a “four-spoke” one with a massive central part (VAZ 2104.05, 07).
The steering wheel on the six is prettier, but just as uncomfortable
All of the listed elements can be removed equally easily, although there are minor differences in the disassembly technology, which is carried out using this set of tools:
- 2 types of screwdrivers - flat and Phillips;
- 24 mm nut head, extension spacer and knob;
- rags.
The most comfortable steering wheel was installed on the fourth, fifth and seventh VAZ models
Also, keep some thick grease of the “Solidol” type for applying to the splined part of the shaft.
Disassembly procedure
Removing the steering wheel on any classic VAZ model is performed in the following sequence:
- Place the car in a garage or on a level area so that the front wheels are as level as possible. Secure the car with the parking brake.
- Disconnect the battery from the on-board network by removing the negative terminal. During the disassembly process, you will probably touch the horn several times, which will buzz when there is tension.
- Sit in the driver's seat. In VAZ 2101-02 models, carefully remove the thin steering lining by prying it off with a flat screwdriver. The soft insert is pulled out from the VAZ 2104-07 steering wheel in the same way. Only on the “four”, “five” and “seven” this trim is located in the center (the AvtoVAZ logo is stamped on it). In the third and sixth models, the decorative trim is held in place by 2 screws, the heads of which are recessed into holes on the back side of the strip.
- Insert a 24 mm socket with a knob into the opened hole. While holding the steering wheel, loosen and unscrew the nut. Don't screw it all the way.
- Grab the steering wheel with both hands and pull it towards you with a sharp movement. If the part does not jump off the splines, tap it on the back side with your palms and in this way knock off the steering wheel.
- Unscrew the nut completely and remove the steering wheel.
Removing the decorative trim on the fourth model
Note. The nut holding the steering wheel must not be completely unscrewed for safety reasons. When you pull on a loose steering wheel, you can injure your head if it suddenly comes off. The nut will prevent the element from completely flying off the shaft.
If you unscrew the VAZ 2104 trim from the back, it will come off entirely
You can get to the nut of the “four-spoke” steering wheel of the VAZ 2107 in another way, by unscrewing 2 screws on the back of the wheel. Then the entire signal button made of plastic, equipped with springs, will be removed. After dismantling, take a rag and carefully wipe the shaft splines to remove old grease that has hardened in places. Now you can begin repairing or installing a new steering wheel.
On a penny, the signal key can be easily removed by hand
Advice. If you remove a part for repairs and plan to put it back, then before dismantling it is recommended to mark the end of the shaft and the steering wheel hub with a marker. This will help you immediately place the element in the correct position during assembly.
On the six, to remove the trim you need to unscrew 2 screws on the other side of the steering wheel
Photo of removing the steering wheel
Disassembly process on video
What steering wheel should I put on a VAZ classic?
It must be admitted that the steering wheels installed on the first modifications of Zhiguli leave much to be desired in terms of convenience and aesthetics. Of the entire line of classic models, only the “four”, “five” and “seven” had a nice steering wheel with a comfortable grip for the hands. Accordingly, the owners of “kopecks” and “sixes” sought to purchase and install the same one for themselves.
Nice factory steering wheel Lada Kalina
At the moment, there are other options for replacing the steering wheel on the “classic”:
- steering wheels from front-wheel drive VAZs of later years of production - VAZ 2115, Kalina, Priora.
- various steering wheels made in China;
- tuning sports steering wheels from famous brands - Sparco, Momo and so on.
This is what the sports steering wheel looks like on a VAZ 2106
Note. Tuning and sports steering wheels available for sale are universal. That is, they are installed on different cars using an adapter designed for a particular car model.
It is strictly not recommended to install cheap products from unknown Chinese brands on rear-wheel drive Zhigulis. The fact is that in the first VAZs the front wheels are turned by a worm mechanism, and not by a rack, as on new cars. Since there is no power steering there either, situations often occur that require the driver to put more pressure on the steering wheel. By installing a low-quality product, you run the risk of ending up with a steering wheel in your hands and a broken car - at best.
Adapter for mounting a sports steering wheel
Hence the conclusion: in addition to convenience and ergonomics, the steering wheel must meet safety requirements. These include factory parts from AvtoVAZ, properly tested, and steering wheels from well-known European brands.
Advice. Do not rush to buy products of a smaller diameter, in which the steering wheel itself is not moved forward relative to the central part. Firstly, such steering wheels are not comfortable for everyone, and secondly, out of habit, you will begin to touch the steering column switches with your hands when turning. If someone you know already has a small steering wheel on their car, test it and make sure that it will be convenient for you.
Sports steering wheel Sparco forward
Installation instructions
First of all, before assembly, lubricate the shaft splines with grease, then proceed in the reverse order:
- Place the steering wheel onto the splines, aligning the previously made marks. If the task is to level the position of the bar or install a new product, try to install it as evenly as possible.
- Place the nut inside the head, slide it onto the threads using the extension and tighten.
- Hold the steering wheel and tighten the nut with a wrench.
- Connect the battery and try driving the car 50-100 m on a road free of traffic. This way you will make sure that the steering wheel position is set correctly. Otherwise, unscrew the nut again and move the element 1 tooth to the right or left.
- Reinstall the top trim.
The position of the steering wheel can be fixed using a ruler
When installing a sports steering wheel, use an adapter for VAZ 2101-07 cars, which is a cylinder with holes for bolts (included in the kit) and a splined part in the center. It is installed simply: screw the steering wheel to the adapter, and then put it on the shaft, as described above.
Reassembly video
Replacement
Now you can proceed directly to replacing the crosspiece on the VAZ 2107. Repair work includes a mandatory preparatory stage, during which it is necessary to prepare spare parts and tools.
Spare parts
To ensure that the crosspiece is replaced efficiently and reliably, that is, after a short period of time you do not have to do the work again, buy high-quality parts.
Spare parts
Today there is a large volume of cheap Chinese spare parts on the market. Their quality leaves much to be desired. By purchasing such items, you will incur even greater financial losses. And that's why:
- When replacing the driveshaft crosspiece on a VAZ 2107, you must simultaneously change the bearing. When purchasing, check how smooth its movement is;
- Check the rubber for elasticity. The bearing must not have any obstructions when moving. Feeling that it is clinging, put such a part away and take another one;
- Rubber must have the required level of elasticity. This is because when moving through it, vibrations are transmitted to the body. If the tires turn out to be hard, you will notice this in the behavior of the car and the roughness of the movement;
- It is recommended to replace the old crosspiece with a new one using standard VAZ components. Just before purchasing, make sure that they are made with high quality and are not defective;
- When purchasing crosspieces and bearings, at the same time buy new snap rings. Old elements cannot withstand long-term use, become deformed, and stop working properly. Trying to save money on something like this is a big mistake of many VAZ 2107 owners. Don’t repeat them.
Tools
If you often do car repairs and maintenance on your own, then the tool necessary to replace the crosspiece will definitely be found in your garage:
- Open-end wrenches for 12 and 13;
- Set of socket wrenches. The most important ones are on 13 and 27;
- Hammer with a handle made of aluminum or copper;
- Pliers (needed when removing circlips);
- Puller and flange.
Phased dismantling
First you need to dismantle the car unit:
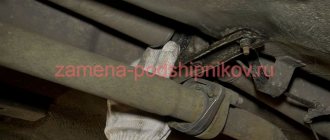
- Since it is not possible to replace the crosspiece without removing the driveshaft, you first need to remove this unit from the car. To do this, you will need a size 13 wrench; use it to simply unscrew the two clamps that secure the suspension bearing to the transverse support.
- The fasteners are unscrewed from the junction of the rear axle shank with the vehicle assembly. To make it easier to assemble the entire structure in the future, experts recommend placing marks before unscrewing the fasteners. Quite often, if the cardan is assembled incorrectly, vibrations and even beating are felt when operating the machine.
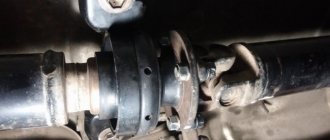
- Using pliers, carefully remove the cross from the propeller shaft.
- The locking wheel is removed.
- Next, you need to rotate the cardan to such a position that the crosspiece takes on the so-called “hanging” position.
- Using a hammer and a mandrel, you need to knock the “cup” out of the cross.
- After removing the “cup,” the cardan rotates to a different position to make it more convenient to repeat this process with the next element.
Before installing a new cross, the surface of the assembly must be thoroughly cleaned of dirt and do not forget to inspect the condition of the grooves that are used for the retaining rings.