Fray 26 Aug 2013, 01:20
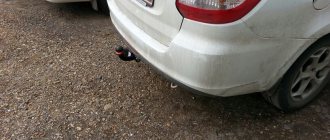
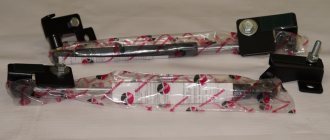
I bought a lock with an electric drive inside. Mating part 2190, catalog number in the photo (not suitable from Kalina).
First of all, I screwed the mate and put a lock on it. I tried it on and thought through the design.
You can adjust the lock left and right using 4 oval holes through which the bracket is attached to the body. You can adjust the height of the lock by placing washers at the connection between the lock itself and the bracket.
Tags: trunk lid lock, fifth door lock, VAZ 2108, 2109, 2113, 2114, electric lock, Granta lock, Kalina lock, Granta, Kalina, 2190, 1118, opening the trunk lock with an alarm.
Re: Trunk lock from Granta in Samara
Evil 15 Sep 2013, 21:30
And yet, which alternative lock is better? in terms of reliability and noiselessness of the rear door. If you need to stupidly change the old one, it doesn’t have to be one with an electric drive, etc. I rarely use the trunk, I remember trying to adjust it a long time ago, but yes, it’s useless. It either does not close or opens on a bump, and in all cases it rattles wildly. I changed the lock several times, no matter what. Right now it stopped opening altogether and needs to be replaced with something. So out of so many options - which is the best in terms of reliability and preferably without wild alterations, there is no welding yet. It’s already real, at least weld the lid and climb into the compartment through the interior when necessary
It thunders wildly.
I’ve heard so many reviews about the Kalino lock - some are fine, others say that it’s better to buy a real stock one, because the lid will play on the Kalino lock in any case, without installing some kind of rubber crap on the sides. There are a lot of reviews like this and a lot of opposite ones.
Re: Trunk lock from Granta in Samara
Fray 16 Sep 2013, 01:22
Yes, there will be no play on the Kalino lock. One person finally installed 2 locks - this is the diagnosis
but the stock is also ok. but it is difficult to turn on the drive. and the cost is 450 rubles, the lock + a new lock is required.
Added after 22 seconds: And if the trunk hinges are loose, then nothing will help.
Re: Trunk lock from Granta in Samara
Evil 17 Sep 2013, 01:36
Two castles is harsh
In principle, I don’t care about the drive, it wouldn’t hurt, but it’s not critical. The main thing is reliability and noiselessness, in principle they are one and the same. New answer, I don’t understand - do you need a new one for Daaz? It’s understandable for the Kalino castle. Right now the door is sticking up and rattling, it’s been there for years. Washers were placed under the response; when I adjusted it, I was glad that it closed at all, even if I left it that way. Because as far as I remember, if you lower the door lower, as it should be, then, I don’t remember, it either doesn’t close or opens at the first bump.
I remember sawing the new lock in rage
There was clearly some kind of wild fake there, although it didn’t seem to be much better. Daaz isn't black by any chance?
Installation of a Lada Granta trunk lock with electric drive
The trunk lock of the Lada Granta Standard can only be opened with the key, which causes some inconvenience.
We suggest you make the operation of your car more comfortable with a simple modification - install an electric trunk lock from the Lada Granta Norma or Lux. Required :
- buy a trunk lock with an electric drive (catalog number: 2190-5606010-10), approximate price 900 rubles.
- connector VAZ-21082/12 idle speed sensor.
- fuse holder.
- electrical wiring wire 0.75 MM (length 10M).
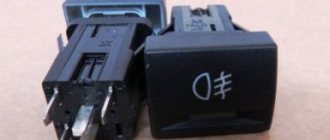
- trunk opening button from VAZ-2110.
- 10 A fuse.
- 4-pin relay (90.3747.10).
We connect contact No. 4 of the electric trunk lock to contact 30 of the relay, and contact 3 to ground. Constant +12 V can be taken from pin 30 of the lighting control module (pink wire). It is most convenient to place the relay in the mounting block. We install the trunk opening button under the lighting control unit. We pull the wire into the trunk under the floor lining. We attach the lock to the trunk lid and check the operation of the circuit.
By the way, there is a cheaper modification option: leave the standard trunk lock, and next to it attach the drive activator with 2 screws (for 100 rubles), where there was a link to the lock - we change it to a VAZ throttle cable. The connection diagram is similar.
Which option for installing an electric trunk lock will you choose? Let us remind you that if you often use the trunk of a Lada Grant, then it makes sense to install a trim on the rear bumper.
Key words: trunk of Lada Granta
Source
About the conventions
Let us remember that the practical Lada Granta model went into production back in 2011. This modern car is full of new modifications of complex instruments and electronic devices. All this aims to provide the driver with maximum driving comfort. Today VAZ produces the Lada Granta in three versions in terms of equipment:
The first two options have the same wiring diagram, but in the “Lux” it is different. It's a shame that the factory operating instructions for the car do not contain this wiring diagram. However, do not rush to get upset, because such an album with the entire list of schemes can be purchased in the market network of auto goods.
Electrical cabling involves the presence of a large number of bundles. The wiring diagram has symbols and serial numbers, each of which is assigned to a strictly specific pantograph. These consumers in the diagram are switched into the general network via conventional lines. To increase clarity, the developers used different colors for the lines. Next, the wires are assembled into bundles, which are connected to electrical units using special connectors.
The first number in the wire marking indicates the plug, connector or terminal to which this cable is connected. The number present behind the fraction sign indicates its correspondence to the contact number of the pantograph.
The reader can familiarize himself with the operating principle of a particular electronic unit on his own. If the defects are minor, then they do not create difficulties during the repair or replacement process. But the situation changes when a complex component fails, which implies the need to turn to electricians. To understand the situation with a malfunction of a specific pantograph, the owner of a LADA Granta does not need to remember all the details and details of the layout drawing, but it will be enough to know the location of the device and the features of the wiring leading to it.
How to install a power trunk
For work we will need:
1. Liftback)) 2. Opening button with connector or 2 female wires. 3. Electric drive (installed StarLine SL-2). 4. Cable (approximately 30 cm) and 2 clamps. 5. Electrical tape, wire cutters, wires, flat and Phillips screwdrivers, 8 and 7 wrench.
To install the drive, you need to get rid of the lock rod, probably many people know, it is firmly in place and will not allow the drive to open the lock until you insert the key into the lock, so we install a cable instead, this way you can open the trunk from the outside.
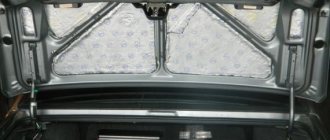
Disassembling the trunk door
We pull off the central plastic (2 pistons and on the edges of the latch)
Unscrew the 2 opened screws and pull them off (on two pistons)
A pair of screws have opened again, unscrew them
We will pull off the main casing from these corners, and before that we unscrew the 2 bolts in the front handles
The trim comes off very easily and this is what's underneath
And here is the thrust of the lock (from the cylinder to the lock itself), we will get rid of it.
The drive we will implement
We select a place for it, I found it here, we make notches for the holes
Pulling off the traction from the larva
We drill holes for the self-tapping screws, put the drive together with our rod inward and just attach it to our place to determine the length of the rod. We hooked up the drive, pulled it out to its full length and the door lock should be open. On the top of the lock there is a ring that you need to pull to open it (it will be clear later in the photo), we bring the rod to the ring and make a notch with wire cutters.
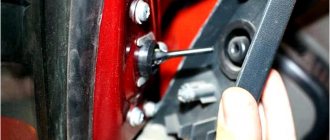
Now we take everything out, the electric drive and the lock itself, by unscrewing 2 bolts with a 8 key. We pull out the right corner of the lock and unhook the second end of the rod, then completely pull out the lock and remove the connector.
Here is the drive rod with a notch, at a distance of 2 cm from the notch we chop off the excess tail with a chisel
Along the notch we bend the rod into the letter “G” and insert it into the lock
Then we bend the end so that the rod does not fly out
We thread the cable onto the second ring of the lock, where the original rod was put on, and clamp it with a bracket (tighten the bracket with a 7 key)
We extend the electric drive wires by CUTTING them off
ends (folders), rather than wrapping wires around them. The blue wire will be connected to ground, and the green wire will go to the interior.
And we install the entire structure in place, insert everything through the lock hole, starting with the drive. We fasten the lock (don’t forget the connector), then the drive and go to install the second end of the cable.
Let's remove the cylinder and turn it 180 degrees, since the key pushed the original rod to open it, but you can't push the cable, you have to pull it, so we turn it around.
While we removed the cylinder, the place where the rod was inserted is not through, we drill a hole through, install the cylinder and thread the cable, pull it and clamp it in the bracket.
We run the wires over the inner door harness, as I said, connect the blue wire to ground, connect right there in the door to the lock harness. There are 2 wires: black and white is the limit switch and black and green is ground, and we put the blue wire on it.
We lead the wire into the roof in the central part, under the ceiling to the rear left window, then we lower it to the floor and along the threshold with the original harness to the fuse box. Like that.
We put the button in its rightful place.
We connect according to this diagram, everything is simple here.
We take a wire with a fuse (5A holder), connect one end to the thick pink-black wire under the fuse block (permanent plus). And we bring the second end to the button. That's all, the fuse block has 2 wires connected to the button, one from the drive, the second from the power supply, we connect them to the mothers or connector (whichever you buy), we use the parallel contacts of the button (normally open contacts).
We check what we have achieved, close the trunk door, it should open with the key and the button!
Let's assemble the car and enjoy the new option!)) I hope everything is accessible and understandable))
Many car enthusiasts who independently “pump” their cars are wondering: how to properly connect the electrics? This question arises in almost any installation. After all, simply screwing on the blocks, locks and strips is not difficult, but only properly connected electricians can make the system work. If we take into account one of the most pressing problems - the installation of remote control locks for the fifth door, then the correct wiring diagram for the electric trunk lock will help us here. You can find it either in the instructions that should be included with the device, or you can take it from a reliable source, but it is better to use proven options and ask friends and acquaintances what scheme they used.
Resynchronization of remote control codes
In cases where the remote control buttons are pressed outside the range of the radio channel, the “floating” code counter in the remote control goes out of synchronization with the counter in the system control unit. If the number of button presses outside the signal reception area of the system exceeds 1000, the system stops responding to remote control commands. In this case, the remote control training procedure should be repeated.
Updated August 01, 2013
Due to the increasing number of cases of lost training (master) keys for car owners of Kalina, Priora, Grant, Niva-Chevrolet, we are introducing a new type of service: registration of working keys in these cars, without a master key!
Usually in such cases, it is necessary to change a set of blocks: ECU (electronic engine control unit), APS unit, glass control unit, ignition switch complete with door cylinders and new keys, etc.
Now in our company you can register a working key with buttons without a training key, and for an additional fee you can receive a new training (red) key for your car. For this procedure, you need to come by car and leave it while the work is being carried out. The work includes dismantling the necessary units (ECU, APS, etc.) from the car, programmatically changing data, installing units on the car and registering keys. We emphasize that a key registered in this way will cost more than registering a remote control yourself if you have a training key, but naturally cheaper than buying and replacing a set of blocks with new ones.
Update January 05, 2014
Attention! It is now possible to make a duplicate chip for autostart using a working key with remote control buttons! A master or training key is not required. The chip obtained in this way can be used both for installation in the immobilizer bypass unit to implement autostart, and for everyday use, starting the engine of Lada Kalina, Priora, Niva-Chevrolet cars. Such a duplicate is more expensive than a regular chip, which can be registered using a master key, but this is a real solution in cases where the master (training) key is lost. To create a duplicate, you need a car, a working key with remote control buttons (and it doesn’t even matter if it is partially faulty, for example, the buttons don’t work, etc., the main thing is that the ignition key starts the engine). The entire copying procedure takes 10-15 minutes. Contact us by phone in contacts.
Preparation for installation
We purchase a lock kit. There are a lot of manufacturers of auto parts on the market now, but there are no special differences between the sets. It is important that the device has a warranty card and instructions for use and connection. Also in the box you will find:
Additionally, you need to stock up on a set of standard tools: pliers, screwdriver, screwdrivers, multimeter, drill with carbide drill bit. In addition to the standard accessories, immediately buy additional wires; it is quite possible that the length of those you find in the box will not be enough for you. Black heat-resistant insulating tape, corrugated tubes, and clips for fastening the trim will also be useful, since very often the trim of car elements is attached to disposable ones.
Important! Be sure to check that the warranty card for the purchased device is available and filled out correctly. Regardless of who performed the installation, you or the service, you have the right to free repairs within a year.
Catalyst malfunctions and their causes
Manufacturers write that the service life of the neutralizer is 100–150 thousand kilometers. But in practice, problems can arise even with less mileage, especially in large cities, where you often have to get stuck in traffic jams.
Depending on the operating conditions, the catalytic converter can be replaced every 3–7 years.
The main cause of the malfunction is the burnout of the layer of metals covering the honeycombs. This is a natural process as a result of which the quality of the exhaust deteriorates. The on-board computer shows a lit “check”, and in some cases does not allow the engine to work at all, turning off the ignition.
Low-quality fuel also accelerates the burnout process. Often the octane number of gasoline is increased by adding lead, this increases the load on the catalyst, reducing its service life. In a situation with diesel fuel, failure can be accelerated by the owner himself, using “antigel” additives in winter.
In some cases, the cause of the breakdown may be a faulty engine. If the ignition is incorrectly set and there are problems in the power system (the latter is especially important for diesel engines), the burnout of the catalytic layer accelerates.
Catalytic converter honeycomb
Self-installation
First of all, it is necessary to secure the electric drive to the trunk lid and provide it with a mechanical connection to the lock itself. To do this, you will have to make two cuts on the lock, and bend the resulting free “tongue”. Thus, we gained access directly to that part of the lock, by pulling which the trunk lid will open. Now we attach the long metal stick from the kit so that the lock can close when the system is operating. It is quite possible that you will have to cut off extra centimeters of this pin.
Now our device is installed properly and all that remains is to connect the electrics. To do this, we will use the diagram below.
Important! When working with electrical equipment, remove the battery!
In most cars, electrics operate on 12V positive voltage. However, if you doubt that everything is the same for you, it is better to check with the car dealer and not use this diagram for connection. It is very important to make the correct connection of the wires, since the proper operation of your car as a whole depends on it. At best, some options will simply not work correctly; at worst, a short circuit will occur. And it is not always possible to restore the electrics and electronics of the car after it. And this work will cost a lot of money. In addition to the above, lay wires where standard wiring is already laid. In difficult places, for example, when you have to pull the wire from the passenger compartment to the trunk, it is necessary to use protective corrugated tubes.
Electrical work
To begin with, according to the diagram, we connect all the elements located in the trunk. Now you need to tighten the wires to the driver's door. It all depends on the car model. For some it will be convenient to pull the electrics through the door sills from below, for others the option of protective strips from above is suitable. Immediately secure the wires with cable ties. If the length is not enough, take an additional wire, solder the joint with a soldering iron and rewind it with tape. Let's continue connecting. We connect the negative wire to the electric drive, and then connect the second negative wire to the main control relay. The third, also known as the last wire, needs to be connected to the alarm. To do this, you need to find the control unit; most likely, it is located under the dashboard. In it you will find free contacts for connection.
We check, find the negative one and connect. These are the last steps we need to complete. After this, we return the battery to its place and check the functionality of the system. There are cases when the lock does not have enough traction to close. In this option, it is enough to install an additional spring for the lock and the problem should be eliminated. There is one more point that we have not covered - the remote control button. Installation is very simple, and the connection method is described in the same diagram above. You can use absolutely any analogue for the button, even from power windows. And the location also depends solely on your preferences.
Stories from our readers
“Fucking basin. "
Hi all! My name is Mikhail, now I’ll tell you a story about how I managed to exchange my two-wheeler for a 2010 Camry. It all started with the fact that I began to be wildly irritated by the breakdowns of the two-wheeler, it seemed like nothing serious was broken, but damn it, there were so many little things that really started to irritate me. This is where the idea arose that it was time to change the car to a foreign car. The choice fell on the melting Camry of the tenth years.
Yes, I had matured morally, but financially I just couldn’t handle it. I’ll say right away that I am against loans and taking a car, especially not a new one, on credit is unreasonable. My salary is 24k a month, so collecting 600-700 thousand is almost impossible for me. I started looking for different ways to make money on the Internet. You can’t imagine how many scams there are, what I haven’t tried: sports betting, network marketing, and even the volcano casino, where I successfully lost about 10 thousand ((The only direction in which it seemed to me that I could make money was currency trading on the stock exchange, they call it Forex. But when I started delving into it, I realized that it was very difficult for me. I continued to dig further and came across binary options. The essence is the same as in Forex, but it’s much easier to understand. I started reading forums, studying trading strategies. I tried it on a demo account, then opened a real account. To be honest, I didn’t manage to start earning money right away, until I understood all the mechanics of options, I lost about 3,000 rubles, but as it turned out, it was a precious experience. Now I earn 5-7 thousand rubles a day. I managed to get the car buy after half a year, but in my opinion this is a good result, and it’s not about the car, my life has changed, I naturally quit my job, I have more free time for myself and my family. You’ll laugh, but I work directly on the phone)) If If you want to change your life like me, then here’s what I advise you to do right now: 1. Register on the site 2. Practice on a Demo account (it’s free). 3. As soon as you get something on the Demo account, top up your REAL ACCOUNT and go to REAL MONEY! I also advise you to download the application to your phone, it’s much more convenient to work from your phone. Download here.
Connection diagram:
This modification will require about 1000 rubles, but it’s worth it! Let us remind you that instead of the standard lock, the “tens” also install a trunk lock from the Lada Kalina, but such a modernization will require more effort and time. By the way, do you know how to implement automatic closing of the trunk lid?
Is it worth installing an electric lock from a Lada Granta on a VAZ?
Additional modernization of locks
If you dream of your car doors opening and closing as smoothly as in foreign cars, try installing silent locks. Such a device can be installed on any model of Zhiguli. For representatives of the retro era, such modernization is also possible, but the locks themselves will have to be filed a little. By the way, you can also put it on the trunk. In general, there is no limit to perfection.
And the installation is, in truth, very simple and transparent. It is enough to dismantle the old locks, try not to drop the necessary elements inside the door, or remove the trim in advance. And then install new analogues on two bolts. There are situations when, after installation, the door does not close tightly or warps slightly, causing cracks to form. Solving the problem is also very simple by adjusting the location of the device. In general, initially try to secure it exactly where the old one was.
Types of blocks and their location
It is the use of such fully electronic control units that has significantly improved the usability of a car with an automatic transmission. The design of the automatic transmission electronic control unit consists of memory blocks in which the logic of action under certain engine operating conditions and vehicle speed is recorded. The control unit is also responsible for diagnosing, adjusting the operation of the box and storing errors. The presence of such an electronic control unit can significantly simplify the diagnosis of errors in the operation of an automatic transmission, which allows you to quickly eliminate gearbox breakdowns.
Auxiliary automatic transmission control sensors
In addition to the main sensors related directly to the gearbox, its electronic control unit can also use information obtained from additional sources. Typically these are the following sensors:
- Brake pedal sensor - its signal is used when the selector is locked in the “P” position.
- Gas pedal position sensor – installed in the electronic accelerator pedal. It is necessary to determine the current driving mode request from the driver.
- Throttle position sensor – located in the throttle body. The signal from this sensor shows the current operating load of the engine and influences the choice of the optimal gear.
The combination of automatic transmission sensors ensures its proper operation and comfort during vehicle operation. If sensor malfunctions occur, the balance of the system is disrupted, about which the driver will be immediately warned by the on-board diagnostic system (i.e., the corresponding “error” will light up on the instrument cluster). Ignoring malfunction signals can lead to serious problems in the main components of the car, therefore, if malfunctions are detected, it is recommended to immediately contact a specialized service.