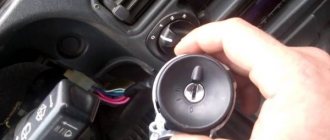
The ignition does not turn on on the VAZ 2112? One of the causes of the disease may be in the ignition switch. Don't rush to replace the ignition switch with a new one, first try checking it yourself.
Replacement
First, remove the negative terminal on the battery and remove the lower casing under the steering wheel.
1. Disconnect the ignition switch wiring harness connectors.
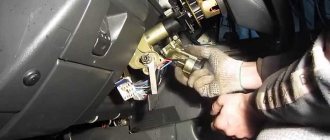
2. Having rested the chisel blade against the edge of the head of one of the bolts, lightly hit the chisel with a hammer to loosen the bolt.
3. Using pliers with narrow jaws, remove the bolt.
4. Similarly, unscrew the three remaining bolts securing the ignition switch.
5. Remove the lock mounting bracket...
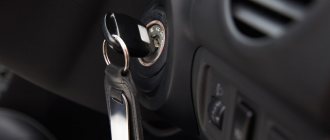
6. ...and the ignition switch itself from the steering column.
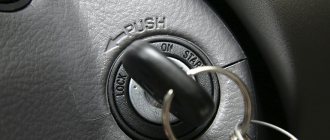
1. Before installing the ignition switch, insert the key into it and turn it to position I (“on”) so that the latch of the steering shaft locking mechanism is pushed into the lock body.
2. Install the ignition switch with mounting bracket on the steering column and hand-tighten the new mounting bolts.
3. Having removed the key from the ignition switch, we check the operation of the steering shaft locking mechanism. If the steering shaft does not lock after a full turn of the steering wheel, adjust the position of the ignition switch on the steering column so that the lock latch can fit into the groove on the steering shaft.
4. After making sure that the locking mechanism works, use a 10 mm spanner to tighten the bolts evenly (crosswise, half a turn) until their heads come off.
Geometric dimensions of the body at the link.
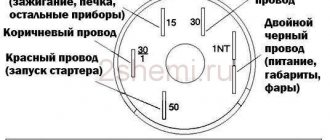
Connection diagram (pinout)
Connect and install the ignition switch in the reverse order, having previously recessed the tongue of the anti-theft device; to do this, you need to insert the key into the lock and turn it from position 0.
How to remove
Prepare the vehicle for operations. Remove the key from the ignition. Disconnect the cable from the negative terminal of the battery. To do this, simply use a wrench to loosen the terminal fastening nut and remove the wire. There is no need to remove the positive cable from the battery terminal.
Remove the steering wheel, steering column trim and steering column switch assembly. To do this, use a Phillips screwdriver to unscrew the four bolts securing the steering column trim and unscrew the three screws screwed into the steering column bracket. Lower the steering column adjustment lever all the way down and remove the lower casing. Then lift the lever all the way up and remove the upper casing.
Disconnect the connector of the wires coming from the steering column switch block. To remove the right steering column switch, squeeze the latches (top and bottom) with your fingers and remove it. Remove the left steering column switch in the same way. To remove the steering column switch connector, loosen the pinch bolt using a socket, disconnect the horn wires and remove the connector itself.
To remove the steering wheel, use a flat-blade screwdriver to pry up the horn button cover and remove it. After this, use a Phillips screwdriver to unscrew the two screws securing the steering wheel cover and remove the cover. Then remove the moving contact of the audio signal by unscrewing the three screws securing it and disconnecting the wire
Using a 24mm socket, unscrew the steering wheel mounting nut. Do not remove the nut completely. Using a rocking motion, pull the steering wheel toward you to remove it from the shaft. If it breaks off the shaft, a non-removed nut will protect your face from injury. If the steering wheel is very tight, have an assistant pull the steering wheel. At the same time, simultaneously strike with a hammer through a soft metal drift at the end of the steering shaft.
Disconnect the steering wheel slip ring wire. Then remove the ring itself by unscrewing the three screws securing it with a Phillips screwdriver. After this, remove the steering column switch block interlocked with the ignition switch (lock).
Reasons for replacing the ignition switch
There are 3 main reasons leading to breakdowns of this device:
- mechanical wear as a result of long-term use;
- problems with the electrical part of the lock;
- damage due to attempted break-ins and car theft.
Appearance of the ignition switch VAZ 2110—2112
Not every one of the listed reasons leads to a complete replacement of the element; sometimes you can get by with “little loss” by changing one of its parts. To determine this issue, you need to diagnose the signs of a malfunction:
- Contacts are burnt or oxidized. In this case, the mechanical part works, but the electrical part does not. The problem is solved by cleaning or replacing the contact group.
- The key gets stuck in the slot, after starting the engine it is not thrown back and you have to turn it by hand. These are malfunctions of the core (larvae) and the ejection spring, which can be completely repaired.
- Obvious mechanical failures of the locking tongue (the steering wheel is very difficult to rotate), jamming or cracks in the housing are a reason to replace the entire ignition switch.
In the event of a mechanical failure, the key may not turn or may not be released by the spring.
A separate issue is the loss of all keys by the owners. It can be solved in two ways - by replacing the entire device or the key turning mechanism - the cylinder. For obvious reasons, the second option will be cheaper, especially if you do the work yourself.
Checking the lock contact group with a multimeter
A faulty contact group can be easily diagnosed if you have a multimeter or other device with a resistance measurement function in your household. To do this, you need to get to the connector located under the plastic frame of the steering column and disconnect it. Then use a multimeter to measure the resistance between all contacts in the block, turning the key to different positions. Depending on the result, the following conclusions are drawn:
- the device shows infinity - the contact group is out of order and needs to be replaced;
- some resistance value indicates burnt or oxidized contacts, try to clean them;
- zero readings on the device indicate that the electrical part is fully operational.
VAZ 2110 ignition switch diagram
The connecting link of the whole organism
There is a misconception among most car owners that the main thing in a car is the engine, transmission, and chassis. Someone will ask, why is it wrong? It is necessary to consider the machine as a single, whole organism. And all components and assemblies are exclusively components.
For example, a breakdown of the starting system will lead to the fact that the vehicle will stop and will not be able to continue moving. Requires prompt repair. How well the example was chosen is the topic of today’s article. However, whether or not the reader agrees with my statement is up to him to decide individually.
Checking the lock's functionality and steering wheel lock test
All that remains is to check the functionality of the new lock and the steering wheel lock. You should start by checking the lock, to do this you need to remove the key from the ignition and turn the steering wheel slightly.
If there is no lock, it is necessary to adjust the position of the lock. Be sure to make sure that it fits into the groove on the steering shaft.
If the steering lock works as expected, tighten the breakaway bolts until they stop.
After this, connect the power and try to start the engine. If successful and the ignition system is operating correctly, you can tear off the bolt heads and begin installing the steering column casing and steering column switches back into place.
An important nuance is the use of breakaway bolts. Many people use regular ones instead, because this simplifies the subsequent replacement of the lock when it breaks again. But do not forget that breakaway bolts are used primarily to make life difficult for attackers when trying to steal a car, so you should not neglect them.
If you carefully follow the instructions and do everything slowly, then replacing the ignition switch is not a difficult job. The most unpleasant stage will most likely be the first removal of the lock and unscrewing the breakaway bolts. Also, try to buy new spare parts only from trusted sources, so that later it does not turn out that the repair was carried out correctly, but despite this, nothing works and the car does not start.
Replacing the ignition switch on a VAZ-2112
Replacing the entire assembly will take at most an hour and a half, and the price of a new ignition switch on a VAZ-2112 is within 1,000 rubles.
Sometimes you can save money and change only the contact group. Then replacing it yourself and purchasing a separate contact group will cost three hundred rubles at most.
Removal
We can talk about the reasons for the lock breakdown and possible malfunctions for a long time, but if the task is to remove the lock, then this can be done in half an hour if you follow a fairly simple algorithm of actions, but first you should listen to simple advice:
Any work with electricity requires disconnecting the battery. The first safety rule is to remove the negative terminal from the battery or turn off the ground switch, if there is one.
Only after this can you start working. And yet, it wouldn’t hurt to organize decent lighting. Working in the area of the steering column is always associated with cramped conditions and lack of light. By spending a few minutes organizing good lighting, we will save a lot of time and nerves during work.
In addition to the standard set of keys and screwdrivers, a hammer and chisel will be useful. It’s better to find two hammers to compensate for the impact force, but for now we remove the lock in this order:
- To access the ignition switch, it will be necessary to remove the decorative plastic casing, and it is more convenient to do this with the steering column lowered all the way. The adjustment mechanism lever is located directly under the steering wheel.
- Now you can remove the casing, and for this you need a Phillips screwdriver. We unscrew all the screws and carefully remove the plastic casing.
- After removing the casing, access to the wiring becomes available. First of all, you need to disconnect the contact block of the ignition switch contact group.
- To protect against theft, the lock body itself is attached to the steering shaft with a steel clamp. During installation, as a rule, the bolts break off, so it is impossible to unscrew them humanly. This is why we need a hammer and chisel. The lock is fastened not with bolts, but with studs. Most likely this was done for anti-theft purposes. And, if your new lock is equipped with bolts, then do not be alarmed, modern car thieves simply turn the cylinder.
- Now you will have to hit the bolt heads with a sharp chisel, and you need to strike in a counterclockwise direction. It is better if at this moment an assistant supports the second hammer on the opposite side of the steering shaft. In this way, it will be possible to avoid unnecessary vibrations and unnecessary unnecessary load on the steering column.
- After several blows with a chisel, the bolts should give way and begin to unscrew. Now they can be picked up with pliers, round nose pliers or a similar tool.
- Once the bolts are removed, the ignition switch assembly can be removed from the steering column for repair, diagnosis, or complete replacement.
Installing a new ignition switch
Regardless of whether we install a new lock or a repaired old one, we will have to buy four tricky bolts with heads that break off.
Of course, you can install simple bolts, but this way we will make life much easier for the thief if he sets his sights on our car. If we install the correct disposable bolts, then it will not be possible to unscrew the lock just like that, remember how much noise we made while knocking out the bolts.
Otherwise, the process of installing a new ignition switch on VAZ cars of the tenth family is quite simple:
- We install the lock body with the contact group assembly on the steering shaft and press it with a bar. We tighten the bolts.
- Use a spanner wrench or a socket wrench to tighten the bolts until they stop.
- Before breaking off the heads, it is necessary to adjust the position of the steering wheel so that the steering shaft is fixed in the position of the key in the lock against the “I” mark. If this does not happen, the steering wheel rotates freely and the shaft is not blocked, it is necessary to set the lock so that the latch fits into the groove on the shaft.
- After final fastening to the shaft, the heads should break off. At the very least, this is what needs to be achieved from them.
- Once again we check the functionality of the locking mechanism, connect the terminal block, connect the negative terminal of the battery and check the functionality of the ignition switch assembly. If everything is in order, you can install the decorative casing.
Ignition switch diagnostics
The ignition switch is one of the most reliable and durable components of a car. This unit rarely fails. Most often, in the ignition switch of the VAZ 2110, the cylinder becomes jammed and the elements of the contact group are damaged. To determine the true cause of the malfunction of the ignition switch, it is necessary to diagnose it.
To diagnose the ignition switch, we need a multimeter.
And so, diagnostics of the VAZ 2110 ignition switch is carried out as follows:
- Remove all decorative panels from the steering wheel column;
- Using a multimeter, we check the output contacts in different key positions;
- So, when the key is in the 0th position in the ignition switch of a VAZ 2110 car, voltage should be supplied only to pins 8 and 30;
- When the key is turned to the 1st position, voltage is supplied to the following electrical consumers (heated rear window, headlights, turn signals, side lights, heater fan, windshield washer, windshield wiper, cigarette lighter);
- When the key is turned to the 2nd position, voltage also begins to be supplied to all other electrical consumers intended for engine operation;
- When the key is turned to position 3, voltage is supplied to pin 50, namely to the starter. In this case, the key should automatically return to position 2 using a spring.
How to replace and disassemble?
- Remove the terminal on the battery from the o. If there is a central toggle switch in the car, you can turn it off.
- Using a Phillips screwdriver, unscrew the screws at the bottom of the steering wheel housing.
- We directly remove the casing itself.
- Using an “8” spanner, unscrew the ignition switch mounting bolts and disconnect the contact board.
- If the failure is in the core, then we replace it entirely with a new one; if the contact is damaged, then we replace the board.
- Assembly is carried out in a similar manner, only in reverse order. Electrical wiring must be packaged carefully and without damage.
For those who are unsure, you can use the car's operating manual, which describes in detail this or that unit, connection diagram, assembly, and photos are attached. Agree that the difference in price is significant, whether to buy the entire lock, or just the core.
Recommendation: good quality spare parts and components from the Dimitrovgrad Automotive Assembly Plant (DAAZ). Buy it, you won't regret it. The online store will help you quickly buy a part directly from the manufacturer. To choose a particular brand, be sure to read customer reviews and watch video tutorials.
The main thing when starting the car is to use the original key that “comes” from the factory. Since the immobilizer is a kind of anti-theft device that will prevent the engine from starting. The electrical circuit is connected to the car alarm or central locking.
Photo instructions for replacing larvae
After the door trim is removed, use a flat-head screwdriver to disconnect the rod from the cylinder. Insert a screwdriver between them:
And turn it slightly in a circle to disconnect the rod from the cylinder:
After this, take a flat screwdriver and use it to pry off the metal retaining plate. This is clearly shown in the photo below:
And finally pull it out using pliers:
Now, from the outside of the door, you can easily remove the entire assembly of the lock cylinder assembly, as is clearly shown in the photo below.
That's all the work. Installation of the larva occurs in the reverse order.
The price of a set of cylinders together with a trunk lock is about 550 rubles for everything. It’s better, of course, to change everything so as not to carry a huge bunch of keys with you.
As a result of a malfunction of the external or internal door lock on VAZ 2110-2112 vehicles, problems may arise with both opening and closing the car doors. Changing locks is not the most pleasant experience, especially for internal locks, but I will still describe this procedure below.
If we consider this procedure specifically, then you can completely get by with one Phillips screwdriver. I didn’t have a powerful screwdriver on hand, so I used a bat and a holder in the wrench.
So, in order to show the entire replacement process as clearly as possible, I decided to make a video clip of this work.
Basic principles
Regardless of the type of engine used, the basis of the wiring used in the VAZ 2110 car is the same. It's easy to find a diagram, but not so easy to understand.
Let's look at the basic principles of wiring.
- All equipment and devices powered by electricity in the VAZ 2110 are based on a single-wire connection. VAZ designers specially provided for wires of certain colors to each be responsible for their own functions. Therefore, certain equipment is connected using wires of their own color. This allows you to independently understand the wiring, make it easier to carry out repair work and not spend money on car repair services.
- The downside to the VAZ 2110 is that the mass is the car body itself.
- The positive wire of the batteries on the top ten always comes only in red. Therefore, when making repairs, try not to change the color of the wire, so as not to confuse yourself.
- For each system that is connected to the electrical system, it is equipped with its own separate wiring harness.
- The VAZ 2110 is designed in such a way that when the battery is turned on, all electrics and electrical equipment are energized. This is related to the most common recommendation, which you have seen more than once in our materials, where we described the repair or replacement of certain components - disconnecting the negative terminal from the battery.
- Do not forget about the existence of the so-called contactless system. This system is required to create a high-quality spark, which is simply necessary to ensure combustion of the air-fuel mixture. In order for a contactless system to function, high voltages are indispensable.
Carburetor models
The first versions of the VAZ 2110 model, which the domestic plant began to produce, were equipped exclusively with carburetor engines. Only after some time more modern injection versions appeared. They are objectively better. But this does not take away the fact that many have dozens of them under the hood with a carburetor.
Are there any significant differences in terms of electrical circuitry between a carburetor and an injector? We can say no. The carburetor systems used are almost entirely the same as on the more modern version.
Part of interior wiring
Also, you will not encounter serious problems in the form of electrical wiring if you suddenly want to replace a carburetor engine with an injection engine or equip the car with additional electrical equipment. You will even find identical plugs in the engine compartment.
The only nuance of switching from a carurator to an injector is the need to install additional wiring from the fuel pump to the on-board computer.
Injector
In addition to the wiring, which is identical for the carburetor and injector, the latter is additionally equipped with fuses and sensors.
In practice, due to the large number of regulators that ensure the operation of an electronic engine control unit of an injection type with 8 or 16 valves (there is none on the carburetor), the system turns out to be more complex. To repair it, you need to carefully understand all the components and their location.
Electrical diagram
Advice from professionals
- Every year, replacing the cylinder and contact group of the ignition switch becomes less and less relevant. This happens for the reason that it is much safer, more convenient and faster to completely replace the ignition switch.
- Despite the apparent prostate replacement of the contact group or cylinder of the ignition switch. The process is quite labor-intensive, and if you are not confident in your abilities, it is better not to undertake it.
- Often, when the ignition lock cylinder is biting or jamming, regular lubrication helps. Graphite grease is best suited for lubricating the ignition lock cylinder.
- To avoid malfunctions in the ignition switch after its immediate replacement. Only the original ignition switch must be installed. This is a guarantee that it will serve you for a long time.
Board layout and layout
For the entire Lada line, the lock is located on the right side of the steering wheel, sewn into a plastic box, presented in the form of a complete block made of duralumin alloy. On the back side there is a board with contact connectors (8 in total). The contact group of wires has strictly its purpose, the diagram (pinout) is as follows:
- Key microswitch;
- Driver's door weight;
- Circuit for starter to supply “plus”;
- 12 W. for supply to the starting system;
- Zero on the key when it is in the keyhole;
- Illuminated lock slot;
- Voltage directly from the battery;
- Reserve socket for connecting other devices at the driver’s discretion.
Despite the fact that old and new locks are sold, with and without backlighting, the structure of the core and contact board is absolutely identical. When the wire connection diagram does not match, carefully refer to the operating instructions.
Order of Operations
It is worth immediately noting that independently replacing the ignition switch cylinder of VAZ 2110, 2111 and 2112 is problematic. This part is difficult to find on sale, and working with it requires special skills. An incorrectly performed operation will result in unstable operation of the ignition system. In this case, you need to purchase the assembly and change it completely:
- Since there is work to be done on the on-board electrical system, you need to disconnect the battery; to do this, disconnect the negative terminal of the battery. In addition, it is rational to provide good lighting in the work area, so you will spend less time performing operations.
- Now you need to lower the steering column all the way and remove the plastic casing, after unscrewing the screws.
- Using a chisel, unscrew the bolts with cut heads and pull them out with pliers. Hammer blows should be directed clockwise.
- Now you can remove the bracket and the lock itself from the steering column by disconnecting the electrical connector.
- If the backlight lamp needs to be replaced, the contact is disconnected and its socket is removed with pliers. Installing a new device.
- To replace the contact group of the ignition switch of a VAZ 2110, 2111 or 2112, the clamps are released.
- If the microswitch stops working, unscrew the screws, remove the rod, and pull out the latch. We install a working device.
- We replace the contact group of the ignition switch of VAZ 2110, 2111 or 2112.
- Now the operations are performed in reverse order. We install the assembled unit on the steering shaft, clamp it with a strap and tighten it with bolts. They need to be screwed in all the way; for this you can use a 10mm spanner or a socket with a knob. IMG8
- Without breaking off the heads from the fasteners, we begin to adjust the steering wheel: the key is located opposite the I icon, and the steering shaft is in the same position. If the shaft does not lock and the steering wheel continues to rotate freely, you need to find the correct location of the lock so that its latch engages the groove in the shaft.
- Now you can break off the heads from the bolts.
- Once again we test the functionality of the mechanism. If everything is in order, you can connect the contacts.
- We connect the lock with the battery by replacing the negative terminal. And again we test the performance of the node. If the results are positive, the decorative plastic casing is mounted in its original place.
Failure of the lock may be due to normal oxidation of the contacts in the group. In this case, you only need to clean with fine sandpaper. This malfunction can be determined using a multimeter in ohmmeter mode. Each pair must be tested for short circuits.
Repair of the ignition switch for VAZ 2110, 2111 and 2112 can be seen in this video:
This is interesting: Replacing generator bearings on a VAZ-2110 - which bearings?
Checking for a spark
This method is most suitable for testing the module in “field” conditions. However, it requires having at least one new spark plug on hand in your car's inventory:
- One by one, remove the spark plug caps from the cylinder head cover, insert a new spark plug, which we ground to ground or to the body
- We rotate the starter, if there is no spark, then the problem does not lie in the spark plugs, and we should continue to study the ignition system
- Let's try to replace the armor wire on the cap on which there is a lack of spark.
- All wires are numbered on the module cover, so remove the wire from the non-working contact and put it on the working one (let's swap them)
- Thus, we will check the condition of the connecting contacts themselves and the integrity of the core
- If a spark appears after changing a non-working wire to a working one, then the problem was in the wire
- If the problem remains, it means that for the VAZ 2110, repair of the ignition module is inevitable, or replacement if repair is impossible
- If there is a complete absence of spark on all spark plugs, it means failure of the module or its high-voltage coil
- In cars with fuel injection, the electronic system that controls the ignition and fuel distribution may be damaged, signs of such a failure as if the ignition module breaks down
- To repair the module you will need a screwdriver, a soldering iron and spare parts, if you have nowhere to rush, then you can sit at home and calmly disassemble it and re-solder it, after watching a video on this issue
- It is often much faster to replace the ignition module or high-voltage armor wires with similar ones purchased or temporarily removed from a car of the same brand
- Replacement does not take long, the module can be removed easier than a distributor, the cylinder numbers are always marked on it
- This operation allows you to determine general faults of the entire system without unnecessary effort in some cases
That's all, we wish you success in self-repair and troubleshooting.