The need to replace the contact group of the ignition switch arises when the metal plates burn or break. Damaged elements do not allow power to be supplied to the starter or fuel pump circuits, blocking an attempt to start the engine. The driver can make the repairs with his own hands; the cylinder and the key with an integrated chip to disable the immobilizer remain standard.
Replacing the ignition switch contact group on VAZ 2110 and 2112. When you need to start the first time »
Replacing the ignition switch contact group on VAZ 2110 and 2112. When you need to start the first time
Replacing the ignition switch contact group on VAZ 2110 and 2112
, is performed in case of its malfunction. Like any problem, breakdown is best avoided. To do this, you need to know what leads to it.
Often, the contact group is simply oxidized. Therefore, it is simply necessary to pull the connector off the lock once a year and treat it with a special lubricant. This will push aside problems with this important detail.
Most often, the contact group burns out. It happens that this happens due to a long service life. The average service life of an element is about 3 years. If failure occurs more often, you need to look for the reason. Such a breakdown occurs due to too high a load on a particular contact. First, we determine what is connected through this contact. After that, we look for our own improvements. The most common cause is too powerful speakers and fog lights. But, in fact, the problem can be anywhere. Check all modifications for excess power.
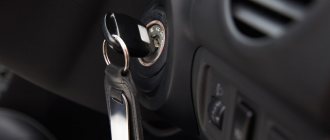
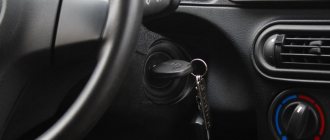
To check or change this part, you will have to remove the lock. Be sure to disconnect the battery before doing this work. You will be working with electrical equipment; an accidental short circuit will not benefit your car. The work is carried out in the following order:
- Remove the cover from the steering column. To do this, you will need a Phillips screwdriver;
- Disconnect the connector with wires from the ignition switch;
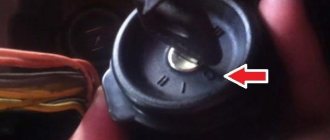
- The next step is to remove the lock itself. Some difficulty arises here; for safety reasons, the manufacturer made the heads of the bolts securing the lock break off. Therefore, you can’t just unscrew them. To do this, take a thin chisel and, pushing it towards the unscrewing side, tear the bolts out of place. Then you can unscrew them using simple pliers;
- Remove the mounting bracket and the lock itself from the steering column.
- Now you can repair this part. Replacing the contact is done as follows:
Source
Characteristics of a contact group
To begin with, we suggest finding out why an ignition switch contact group is needed, what its structure is and how it works.
Purpose and functions
In essence, KGZZ is used to ensure the connection of all electrical circuits of the vehicle without exception. That is, when the driver turns the key in the lock, the KGZZ closes the contacts, thus allowing the use of all electrical devices without exception.
Device
Diagram of the lock
The ignition switch itself is a simple circuit breaker. When you turn the key, the contacts are adjusted, making it possible to start the engine, power the equipment, and also stop the power unit. If you disassemble the body of the lock itself, you will see that the device itself is located inside it, as well as a large number of wires connected to each other. The wires to the lock come from the battery.
The contact group of the ignition switch itself goes directly to the connection point of these electrical devices. To prevent short circuits and to delimit the contact elements themselves, the KGZZ is mounted in a plastic case.
Principle of operation
An automobile ignition system can be either battery-based or generator-based. Their fundamental difference is that battery ignition is equipped with an autonomous power source; accordingly, all electrical equipment can be turned on without starting the engine. As for the generator system, in this case, activation of electrical equipment is possible only after starting the engine.
When the driver turns the key in the lock, the electrical circuit contacts are closed from the negative terminal on the battery to the coil. At the same time, voltage begins to flow through the wiring to the lock, which is supplied to the coil through contacts, after which it returns to the positive output of the battery.
At the moment when the voltage passes through the coil, a very high voltage is generated in it, which is subsequently transmitted to the spark plugs. Ultimately, the contacts close and the engine starts. In addition to the ignition circuit itself, there are other electrical circuits in the car that conduct voltage from the key to electrical appliances. Each of the wires is responsible for connecting the contacts to each other (the author of the video is the Auto Repair and Maintenance channel).
Basic faults
Briefly about the reasons why repair of the ignition switch contact group may be required:
- Overloading of the device, which may be due to the installation of additional devices of increased power, as a result of which a higher voltage will pass through the KGZZ. For some time, the device can cope with this current, but over time, carbon deposits will begin to form on it. It should be noted that this deposit, as a rule, appears precisely inside the contact, and not on its surface, then the only way out is to replace the contact group. To prevent this problem, all additional devices must be connected via fuses or relays.
- Short circuit in the electrical network. If a short circuit occurs, this may also cause high power voltage to pass through the CGZZ, which again will cause its failure.
- Many motorists who changed the KGZZ faced the problem of abrasion of the tracks, as well as the contacts themselves. This problem usually occurs as a result of wear and tear on the lock, but in some cases the cause may be faulty.
- Mechanical failure of contact elements, as well as other components of the group.
- Overheating of the device, which can lead to damage to the design of the CGZZ. Overheating, as a rule, also occurs as a result of increased load on the device. When working in conditions of elevated temperatures, the tracks may move or even break (video author - AlexAvtoKhlam).
Repair and replacement of the ignition switch of a VAZ 2110—2112 car
The VAZ 2110 ignition switch cannot be called a reliable part, especially when you compare its service life with the same devices on cars of foreign origin. Therefore, owners of the tenth - twelfth model, who use the car for a long time, sooner or later encounter problems with the lock and its repair. On the other hand, the element can be easily removed from the car and every skilled motorist can replace it. But first you should figure out whether the entire part needs to be replaced, since in most cases it can be repaired.
Reasons for replacing the ignition switch
There are 3 main reasons leading to breakdowns of this device:
- mechanical wear as a result of long-term use;
- problems with the electrical part of the lock;
- damage due to attempted break-ins and car theft.
Reference. The first troubles associated with turning on the ignition and starting the engine may appear after three years of operation of the VAZ 2110-2112.
Not every one of the listed reasons leads to a complete replacement of the element; sometimes you can get by with “little loss” by changing one of its parts. To determine this issue, you need to diagnose the signs of a malfunction:
- Contacts are burnt or oxidized. In this case, the mechanical part works, but the electrical part does not. The problem is solved by cleaning or replacing the contact group.
- The key gets stuck in the slot, after starting the engine it is not thrown back and you have to turn it by hand. These are malfunctions of the core (larvae) and the ejection spring, which can be completely repaired.
- Obvious mechanical failures of the locking tongue (the steering wheel is very difficult to rotate), jamming or cracks in the housing are a reason to replace the entire ignition switch.
A separate issue is the loss of all keys by the owners. It can be solved in two ways - by replacing the entire device or the key turning mechanism - the cylinder. For obvious reasons, the second option will be cheaper, especially if you do the work yourself.
Reference. As practice shows, the mechanical insides of an element can be broken by an ignorant driver who has lost his keys and is trying to unlock the steering wheel in order to start the engine by shorting the wires. There is a more elegant way - to remove the lock, and only then connect the wires of certain colors, as described below.
A faulty contact group can be easily diagnosed if you have a multimeter or other device with a resistance measurement function in your household. To do this, you need to get to the connector located under the plastic frame of the steering column and disconnect it. Then use a multimeter to measure the resistance between all contacts in the block, turning the key to different positions. Depending on the result, the following conclusions are drawn:
- the device shows infinity - the contact group is out of order and needs to be replaced;
- some resistance value indicates burnt or oxidized contacts, try to clean them;
- zero readings on the device indicate that the electrical part is fully operational.
Important! You need to measure the resistance in the block whose wires come from the ignition switch (male connector), do not confuse it with other contacts connected to the car’s on-board network.
Vehicle starting problems
Problems with this part of the vehicle (hereinafter referred to as the vehicle) are familiar to many. It also happens that when the key is removed from the keyhole of this system, the car continues to work.
It is interesting that most car owners in such cases, before turning off the engine, engage in reverse gear and move the key to the third position. Then the car stalls.
For those who are ready to spend their free time correcting this situation, I recommend inspecting the ignition switch contacts. With the multimeter you have, things will go smoothly.
The reason is in contacts
To start checking, you need to connect the ohmmeter contacts alternately to the terminals of the ignition switch and, turning the key to different positions, check the activity of these contacts in the lock. When this part of the contacts is in good condition, the resistance tends to zero.
If the values are positive, the reason is obvious: the contacts of the car’s starting system have burned out or become dirty. In this situation, you will need to replace the contact group of the ignition switch - all this can be done easily, but first you will have to disconnect the battery. Otherwise, you are guaranteed a burnt fuse box.
Cause of alarm
Another case not related to the contact group. Try to separate the contact and alarm disconnect connectors, most likely there is a problem here.
If this is the case, then it is recommended to replace the switch with a new one.
The reason is the rear window heating system
Another reason for such a breakdown is the heated rear window, or rather, its switch. To check operation, remove the button from the panel and inspect the hole located on the side of the harness, first disconnecting the wiring.
This is interesting: Power steering hums when cold or constantly: causes and repair of power steering
Insert the key into the lock and monitor the voltage between the terminals and ground. There should be no voltage in the Lock and Acc positions. Replacing the switch will be required if the problem occurs because of it.
Instructions for removing the element
For disassembly you need to prepare a simple set of tools:
- 10 mm head and ratchet drive;
- Phillips screwdriver;
- narrow chisel (width 5-8 mm);
- hammer;
- round nose pliers with tapered, curved ends.
To successfully install a new or repaired lock in place, it is advisable to purchase 4 special fastening bolts with M6 threads with a head size of 10 mm and a length of 20 mm. Their feature is the heads that come off with a key at a certain tightening torque. After tearing off the heads, semicircular caps remain on the surface, which are much more difficult to unscrew for an untrained person. But you will have to do this during disassembly.
Like any event related to tampering with the electrical part of the car, dismantling the ignition switch begins with disconnecting the negative terminal of the battery. Then proceed in this order:
- Using a Phillips screwdriver, remove the screws holding the two halves of the plastic frame of the steering column together.
- Lower the handle that fixes the position of the steering wheel during adjustment all the way down and remove the plastic panels. Disconnect the ignition switch block and carefully cut the tape connecting your bundle of wires to the common harness. In order not to cling to the steering column switch during operation, it can also be pulled out of the connector.
- On the metal casing of the steering column you will see a lock mount consisting of two clamps. They are held together by 4 bolts with the heads torn off (visible on the left side). Pointing the chisel at the semicircular caps, use a hammer to loosen the tightening of these bolts one by one.
- Using pliers and then your hands, unscrew all 4 bolts and remove the ignition switch.
Note. There are “dozens” in which not all the bolt heads are torn off during assembly. This simplifies the matter; the fasteners can be easily unscrewed with a 10 mm socket.
At the stage of disconnecting the connectors, it becomes possible to check the functionality of the contact group by measuring resistance, as described in the previous section. If you remove the lock due to the loss of the keys and want to move on, then after dismantling you need to do the following:
- On the “mother” block, which remains hanging after the lock is turned off, find contacts with thick wires of purple and blue color (the latter with a black stripe).
- Connect these terminals with any conductor, after which the ignition will turn on.
- The thick red wire leads to the starter. To start, its contact must be temporarily connected to the installed jumper. When the engine starts, the red wire must be disconnected.
Advice. It is more convenient to look at the colors of the conductors on the harness of the removed device, and then find them on the “mother”.
Assembly is carried out in the reverse order, but taking into account the following precautions:
- do not tighten the fastening bolts until you have accurately aligned the position of the lock on the casing so that the facing plastic panel fits smoothly into place;
- before final tightening the bolts, make sure that the lock snaps into place when turning the steering wheel, otherwise adjust the position of the lock;
- The tightening torque should be such that the heads of the new bolts come off and the round heads remain.
Replacing the ignition lock cylinder on a Daewoo Nexia - removal algorithm
/ Foreign cars /
It is very unpleasant when your favorite car presents unexpected surprises, for example, it refuses to start when the moment is not at all suitable. Such a nuisance can happen to you on the road and be completely unpredictable, because there may be no visible signs of malfunctions.
Car enthusiasts
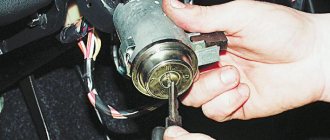
We remove the connector from the contact group photo 6. Using a short and thin screwdriver we unscrew the fixing screw; it is located on the inside of the ignition switch, so access to it is limited to photos 7 and 8. As for me, having removed the contact group photo 9, I was convinced that it was all OK. The ignition switch contact group connector is not broken.
By inserting a screwdriver of the appropriate width into the connector and connecting the block with wires, I started the car without any problems. The cause of the breakdown, after removing the contact group, became obvious. Photo The shank of the ignition switch cylinder broke off. It is not difficult to pull out the cylinder, just use a wire with a pin with a diameter of mm, bent in the shape of an G; for this I used a hexagon, press the latch through the hole in photo 11 and at this time turn the key to the second position.
If everything is done correctly, the larva itself will come out of the body by 5 mm.
All you have to do is pull it out completely. Perhaps some will be struck by the idea, and not easier, to remove and replace the ignition switch completely, the cylinder with the housing!? Remove the steering column cover; Disconnect the connector through which power is supplied from the contact group; The ignition key is placed in position 2; Using a Phillips screwdriver, unscrew the screw securing the part; Remove the contact group from the lock body.
Sometimes, this requires prying it off with a screwdriver. Installation
A piece of the key is stuck in the ignition switch
Help people!!! The key in the ignition switch broke in half, half mine, half in the lock. The steering wheel is locked! How to remove the cylinder, provided that the cylinder does not rotate to the second position? How to remove the steering wheel lock, where is it located, how can it be disabled without a key? Tell me a way to remove the cylinder without removing the entire lock. Maybe it will be possible to insert plates on both sides of the secret plates in order to rotate the larva? please help, I'm sure someone else had the exact same situation. I searched the forum and found no answers to this question.
Nexia in the old body 16 valve
How to change the ignition lock cylinder of a Daewoo Matiz, Nexia
Installation is in the reverse order. This is what was done. If you did not take care of purchasing the necessary components in advance, then at this stage you can easily drive to the nearest automobile store or market and buy spare parts that require replacement.
Replacing the ignition lock cylinder. To change the ignition switch on your Daewoo Nexia yourself, you need to insert a new...
It involves transferring secretions from the old larva to the new one.
After inserting the key into the ignition and turning it all the way, I did not hear the sound of the starter operating. Pull out the cylinder, for this you will need a wire or pin with a suitable diameter, about mm, bend it at a right angle using a hexagon, and press through the hole onto the latch. This option is quite common and is the cheapest and fastest, but it will be necessary to carry two keys with you.
Using a Phillips screwdriver, unscrew the 8 screws securing the plastic steering column covers, see photos 1,2,3,4,5. Remove the two halves of the casing.
How to replace the Daewoo Nexia ignition switch with your own hands?
- Disconnect the negative terminal from the battery. Use a Phillips screwdriver to remove the screws that secure the plastic covers to the steering column and remove the two halves.
- Remove the connectors suitable for the contact group. Use a thin, short screwdriver to remove the retaining screw located on the inside of the ignition switch; note that its accessibility is limited.
- The cause of the malfunction may be a breakage of the shank on the cylinder of the lock itself.
Pull out the cylinder, for this you will need a wire or pin with a suitable diameter, about 2-3 mm, bend it at a right angle using a hexagon, and press through the hole onto the latch. At the same time turn the key to the second position. If everything is done correctly, this will allow the larva to come out of the body by five millimeters on its own; all you have to do is remove it. It is not recommended to remove the ignition switch assembly with the cylinder, as this is a very labor-intensive process; you will have to remove the entire steering column to be able to get to its mounting bolts. - If you have not taken care of purchasing the necessary components in advance, then at this stage you can easily drive to the nearest automobile store or market and buy spare parts that require replacement. You can turn off the car using a contact group and a screwdriver.
- As a rule, there are two ways to solve this problem.
In the first case, you can buy and replace only the ignition switch cylinder. This option is quite common and is the cheapest and fastest, but it will require you to always carry two keys with you, since the ignition key will be different from the key that opens the doors and trunk. In the second case, you can purchase a set of cylinders, which will include the cylinders of the ignition switch, trunk and front doors. The replacement process in this option will be more labor-intensive and will cost a little more, but you will have one key for everything. Which method to choose is up to you. - Assembly is carried out in reverse order.
Insert the new cylinder inside the ignition switch housing, together with the key in position 2, while simultaneously pressing the lock with wire. The most important thing is not to stumble upon a cheap Chinese counterfeit cylinder, because if you try to install it in the lock body, a problem will arise, you simply cannot do this, it will not fit there. The remaining options for larvae manufacturers are of quite high quality and can easily withstand replacement; they are installed the first time, just like factory ones.
Good to know…
If you want to save money and buy only the cylinder itself, and at the same time have only one key left, then there is another option that is useful to know about. It will consist in the interchangeability of secrets between the old and new ignition lock cylinder.
- Turn the cylinder, or rather its inner part, until the lock stops, press it with a screwdriver and disengage it. Be very careful when performing this procedure as the retainer and spring may come loose and become lost. There is also a locking tab on the opposite side of the larva; you should also keep an eye on it and protect it from loss.
- By analogy, it is necessary to take the same actions with a new larva.
- Compare the sizes of the secrets with each other.
- If the secrets are the same, you can start replacing them. Change each secret in turn and make sure not to confuse the location of each of them; if the position of at least one is incorrect, the cylinder key will no longer turn.
- If the secretions of the new larva differ in size, then you will have to replace it using one of the methods described earlier.
Replacing the ignition switch on a Daewoo Nexia. It’s very simple
You can turn off the car using a contact group and a screwdriver. To do this, carefully remove it from the lock.
It is secured with a countersunk screw, which can be unscrewed from the ignition switch housing with a thin slotted screwdriver. We turn the contact group core and if the engine starts, we conclude that the larva is to blame. Insert a flathead screwdriver here and turn it. Articles The new Korean ignition lock cylinder KR received the article number S and costs within rubles.
The original set of cylinders for the doors, trunk lock and ignition switch costs about 3 thousand. If it doesn’t bother us that we will have one key for the door and trunk lock, and a second one for the ignition switch, we’ll spend rubles and put a new cylinder in place.
How to replace the ignition switch assembly yourself?
The installation location for the ignition switch is the steering column; it is secured with two bolts; to replace it, the column will need to be removed, and the bolts will have to be drilled out. A hammer and chisel will come in handy.
- Remove the steering column from the car.
- Unscrew the bolt securing the switch, strike the chisel tangentially with a hammer in a reverse clockwise direction.
- Similarly, unscrew the second bolt and remove the ignition switch housing assembly.
- Install the new lock in the reverse order; new bolts will be required; their tightening torque will be until the head is cut off.
How to replace the contact group on the Daewoo Nexia ignition switch with your own hands?
- If a malfunction of the contact group is detected, then work to replace it will not require removing the ignition switch assembly. For the work you need two screwdrivers, a Phillips and a flathead.
- Disconnect the negative terminal of the battery.
- Remove the two screws that connect the two parts of the plastic steering column housing.
- Use a screwdriver to remove the plug.
- Remove the top column casing. Then, unscrew the 4 screws securing the lower casing, remove the rubber O-ring and remove it.
- Disconnect the block with wiring harnesses, insert the key into the lock and set it to the second position.
- Unscrew the screw to secure it.
- Remove the contact group from the lock.
- Installation of the contact group and other removed parts is carried out in the reverse order.
Replacing the contact group
In the event that, as a result of diagnostics, a malfunction of the contact group is detected, you will still have to remove the ignition switch, since it will not be possible to get to it in any other way. After removing the element, disassemble it using the following algorithm:
- Disconnect the connectors with the backlight power wires.
- Remove the decorative plastic cover by releasing the 4 latches. Work carefully because these clips are easy to break off, and buying a cover separately is quite a task. It is not advisable to change the entire lock because of it.
- By bending the 2 clamps holding the contact group, remove it from the ignition switch.
Note. You will additionally need a small flat-head screwdriver as a tool to bend the latches.
First of all, examine the status of the contacts. If they have darkened (oxidized), then clean the current-carrying surfaces with fine sandpaper P1000. Then put the group in place and, without installing the lock, connect it to the vehicle's on-board electrical system to check its functionality. If unsuccessful, the part must be replaced. The same will have to be done if the contacts are burnt or the group does not work without any external signs of malfunction.
What signs indicate problems?
The main signs of a faulty contact group on a car:
- Lack of power supply to groups or all consumers connected to the lock (for example, external lighting or components that ensure the operation of the engine). The problem may be sporadic but progress with further wear.
- Inability to turn on the starter due to lack of power at the contacts of the solenoid relay. In this case, the battery is in a charged state, and the electric motor and clutch are known to be in good working order.
- Sudden shutdown of electrical equipment that does not have common power circuits, but is connected to the ignition switch. When the cylinder is switched again (turning the key from one extreme position to another), performance can be restored. For example, when driving on uneven roads, contacts may stick together and come loose due to vibration, causing electrical equipment to operate erratically.
Installation of a new larva
To replace the lock core due to mechanical failure, remove it from the vehicle as described above. Then follow this algorithm:
- Insert the key into the slot and use a Phillips screwdriver to unscrew the 3 screws holding the 2 halves of the lock body together.
- Separate the housing while holding it with the key facing up. If you hold the lock in a different position during disassembly and do not insert the key, the insides will spill out and you will not understand how to put them back together. In this case, the ball with springs may get lost.
- Remove the locking mechanism, which consists of two spring-loaded parts, and pull out the spring itself.
- After removing the key, carefully remove the core so that the ball with the spring (located on the side of the cylinder) is not lost.
Before replacing, it is necessary to remove the return spring from the old cylinder, since it is not sold complete with a new core. The spring is inside the part on the back side in a cocked state; it must be installed in the same form on the new cylinder. Also, do not forget to remove the thin spring from the hole where the ball is inserted.
Important point. Remember that if you replace the core because it is broken, the new key will no longer fit the door lock. There are 2 options: use two separate keys or simultaneously change the cylinder in the door. The last method becomes the only applicable one when all the keys are lost.
When installing the core, you need to move the spring for the ball into the hole and insert the part into the body. Then push the larva all the way, while simultaneously inserting the ball into the socket. After that, all that remains is to assemble the locking mechanism and tighten the housing with screws. When finished, check the operation of the ignition switch by turning the key to different positions.
How the larva changes - video
The video demonstrates how to disassemble the mechanical part of the ignition switch of a VAZ 2170 (Lada Priora), but in design it does not differ from the elements installed on VAZ 2110-2112 cars.
As a rule, there is no need to change the entire ignition switch, although car enthusiasts often resort to this option to save time. The operation will take the technician at the service station no more than 20 minutes. Replacing it yourself will require more time, but you will be able to replace only the broken part (cylinder or contact group), thereby saving personal funds.
Source
Ignition system VAZ 2110 2111 2112: ignition switch, spark plugs, ignition coil
The VAZ 2110 ignition switch cannot be called a reliable part, especially when you compare its service life with the same devices on cars of foreign origin. Therefore, owners of the tenth - twelfth model, who use the car for a long time, sooner or later encounter problems with the lock and its repair. On the other hand, the element can be easily removed from the car and every skilled motorist can replace it. But first you should figure out whether the entire part needs to be replaced, since in most cases it can be repaired.
- Instructions for removing the element Dismantling the VAZ 2110 lock in the photo
- Training video on replacing the ignition switch
- Replacing the contact group
- Installation of a new larva
- How the larva changes - video
Location
For most domestic and foreign cars, the ignition switch is structurally located in the steering column housing or under the panel of technical sensors. The contact group is located behind the plane of the ignition key cylinder.
It is typical for many vehicles to install the ignition switch on the right or left side of the steering column. Sometimes there are foreign car models where the lock and key are located on the car's dashboard or navigation panel.
This is interesting: Video review and photos of Audi S1 Quattro 2015
Reasons for replacing the ignition switch
There are 3 main reasons leading to breakdowns of this device:
problems with the electrical part of the lock;
Reference. The first troubles associated with turning on the ignition and starting the engine may appear after three years of operation of the VAZ 2110-2112.
Appearance of the ignition switch VAZ 2110—2112
Not every one of the listed reasons leads to a complete replacement of the element; sometimes you can get by with “little loss” by changing one of its parts. To determine this issue, you need to diagnose the signs of a malfunction:
- Contacts are burnt or oxidized. In this case, the mechanical part works, but the electrical part does not. The problem is solved by cleaning or replacing the contact group.
- The key gets stuck in the slot, after starting the engine it is not thrown back and you have to turn it by hand. These are malfunctions of the core (larvae) and the ejection spring, which can be completely repaired.
- Obvious mechanical failures of the locking tongue (the steering wheel is very difficult to rotate), jamming or cracks in the housing are a reason to replace the entire ignition switch.
How to properly connect the ignition switch
If the wires are collected into one chip, then connecting the lock will not be difficult, you just need to install it on the contacts.
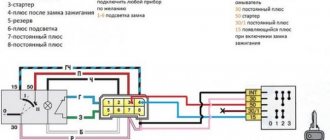
If the wires are connected separately, then you need to pay attention to the diagram:
- terminal 50 – red wire, the starter operates with it;
- terminal 15 – blue with a black stripe, responsible for heating the interior, ignition and other devices;
- terminal 30 – pink wire;
- terminal 30/1 – brown wire;
- INT – black wire responsible for dimensions and headlights.
Repair of the ignition switch on a VAZ 2110 car
Having identified a malfunction that has arisen in the car’s ignition switch and if it is not possible to make repairs using soldering. Repair is carried out by directly replacing the faulty element. As mentioned earlier, this is usually the cylinder or contact group of the ignition switch.
To repair the ignition switch of a VAZ 2110 car, we will need the following tools.
replacing the lock cylinder, step-by-step instructions
The ignition switch cylinder on a VAZ 2110 car is replaced in case of direct damage, biting, etc. As a rule, such problems appear after long-term use of the car or in the event of an attempted theft.
And so, replacing the ignition switch cylinder on a VAZ 2110 car is carried out in the following sequence:
- Remove the terminals from the battery (to de-energize the ignition switch);
- Remove the casing from the steering column of the car;
- Unscrew the ignition switch mounting bolts;
- Pull out the ignition switch (to make it convenient to work);
- Carefully pull out the pin from the side; it holds the ignition lock cylinder (the easiest way to pull it out is with a thin screwdriver and a small hammer);
- Having pulled out the larva, we install a new one;
- We check the functionality of the ignition switch;
- Check the adjustment of the steering wheel lock when turning;
- We adjust the blocking (if necessary);
- Let's put everything in its place.
replacing the ignition switch contact group, step-by-step instructions
After diagnostics, if a malfunction is detected in the operation of the ignition switch contact group itself. You can only replace it. The contact group of the ignition switch, like the cylinder, is a replaceable part and is sold in car dealerships.
And so, replacing the contact group of the ignition switch on a VAZ 2110 car is carried out in the following sequence:
- Remove the terminals from the battery (to de-energize the ignition switch);
- Remove the casing from the steering column of the car;
- We unscrew or knock down the ignition switch mounting bolts with a hammer and chisel;
- Remove the plastic cover from the ignition switch;
- We disconnect all contacts (before disconnecting it is recommended to number them to avoid confusion in the future);
- Using a screwdriver, unfasten the two latches;
- We take out the contact group;
- Installing a new contact group;
- We put everything back together in reverse order.
If a problem comes
What if there is something wrong with the ignition switch? Is it impossible to turn the key without force, or is it even jammed? It’s clear that the lock cylinder is damaged, and you can’t go far in such a car. This can happen for various reasons: the larva was caught with a defect, or over time it simply accumulated dust and dirt. In this case, you can try replacing the larva.
If the key still turns, but the ignition system does not respond, then the contact group has clearly failed. Of course, you can replace it, but in this case you run the risk of purchasing a spare part that is not of very high quality. This will not get rid of the problem, but will only temporarily postpone its solution.
What if you simply lost your key and it was the only one you had? Or another, very unpleasant situation: an attempt was made to steal your car (God forbid, of course!), and the ignition switch was completely damaged.
Instructions for removing the element
For disassembly you need to prepare a simple set of tools:
- 10 mm head and ratchet drive;
- Phillips screwdriver;
- narrow chisel (width 5-8 mm);
- hammer;
- round nose pliers with tapered, curved ends.
Ignition switch replacement tool
To successfully install a new or repaired lock in place, it is advisable to purchase 4 special fastening bolts with M6 threads with a head size of 10 mm and a length of 20 mm. Their feature is the heads that come off with a key at a certain tightening torque. After tearing off the heads, semicircular caps remain on the surface, which are much more difficult to unscrew for an untrained person. But you will have to do this during disassembly.
The battery must be disconnected before starting work.
Like any event related to tampering with the electrical part of the car, dismantling the ignition switch begins with disconnecting the negative terminal of the battery. Then proceed in this order:
- Using a Phillips screwdriver, remove the screws holding the two halves of the plastic frame of the steering column together.
- Lower the handle that fixes the position of the steering wheel during adjustment all the way down and remove the plastic panels. Disconnect the ignition switch block and carefully cut the tape connecting your bundle of wires to the common harness. In order not to cling to the steering column switch during operation, it can also be pulled out of the connector.
- On the metal casing of the steering column you will see a lock mount consisting of two clamps. They are held together by 4 bolts with the heads torn off (visible on the left side). Pointing the chisel at the semicircular caps, use a hammer to loosen the tightening of these bolts one by one.
- Using pliers and then your hands, unscrew all 4 bolts and remove the ignition switch.
Unscrewing the plastic steering column cover
Note. There are “dozens” in which not all the bolt heads are torn off during assembly. This simplifies the matter; the fasteners can be easily unscrewed with a 10 mm socket.
Bolts with intact heads can be unscrewed with a wrench
At the stage of disconnecting the connectors, it becomes possible to check the functionality of the contact group by measuring resistance, as described in the previous section. If you remove the lock due to the loss of the keys and want to move on, then after dismantling you need to do the following:
- On the “mother” block, which remains hanging after the lock is turned off, find contacts with thick wires of purple and blue color (the latter with a black stripe).
- Connect these terminals with any conductor, after which the ignition will turn on.
- The thick red wire leads to the starter. To start, its contact must be temporarily connected to the installed jumper. When the engine starts, the red wire must be disconnected.
Installing the "Start" button
Some VAZ 2106 owners install a button for ease of starting the engine. It is connected via the starter power circuit to the break in the red wire, which goes to terminal 50 of the ignition switch. In this case, the engine starts as follows:
- The key is inserted into the lock.
- Turn it to position I.
- The starter is started by pressing the button.
- When the engine starts, the button is released.
To stop the power unit, you must turn the key counterclockwise. A slightly different option for connecting the button is also possible, so that with its help you can not only start the engine, but also turn it off. For these purposes you will need the following parts:
- headlight relay RS 711;
- starter relay 113.3747–10 or 90.3747–10.
According to the diagram, when the button is pressed, power is supplied to the headlight relay, and after the contacts are closed, to the starter. When starting the power unit, the button is released, thereby opening the contacts of the starter relay and breaking its power circuit. If you press the button again, the contacts of the switching device open, the ignition circuit is broken and engine operation stops. The second option for using the button is called “Start-Stop”.
Even a car owner who is encountering such a problem for the first time can replace or repair the ignition switch on a VAZ 2106. To carry out the work you will need a minimum of tools and following step-by-step instructions. The main thing is to connect the wiring to the lock in accordance with the diagram.
Schematic electrical diagrams, connecting devices and pinouts of connectors
The ignition switch in cars of the VAZ family fails from time to time due to weakening of the contact posts or burning of the contacts inside it. It also happens that the cams of a plastic roller are produced. You can disassemble the lock and clean it, but it’s better to just replace it with a new one, considering that it costs pennies compared to imported locks.
But if connecting the wires together did not result in the starter operating (or it did not turn on the first time), check the solenoid relay on the starter. The contact spots on it may also burn out, which will prevent the circuit from closing normally. Alternatively, you can use a screwdriver to short-circuit the two large terminals on the solenoid relay (before doing this, put the car in neutral and use the handbrake). When closed, the starter should begin to spin vigorously. If this happens, remove and change the solenoid relay. If the starter rotates “sluggishly” when it closes, you will have to remove it and check the condition of the brushes.
All operations are performed with your own hands, without the help of car service specialists. Moreover, the price of an ignition switch on a VAZ2106 is up to 100 rubles. To replace it, you will need to know the pinout of the wires coming from it, for which the editors of the site 2 Schemes.ru have prepared a large reference material.
The ignition switch is designed not only to start the engine - it performs several functions at once:
- supplies voltage to the vehicle’s on-board network, closing the circuits of the ignition system, lighting, sound alarm, additional devices and instruments;
- at the driver’s command, turns on the starter to start the power plant and turns it off;
- turns off the power to the on-board circuit, preserving the battery charge;
- protects the car from theft by fixing the steering shaft.
Changing the ignition switch of a VAZ 2110 step by step
- The hood of the car is opened and the negative terminal is removed from the battery.
- The lower part of the cover on the steering column opens. The photo shows the progress of work with the VAZ 2109 lock, but these locks are structurally similar to the tenth model. The difference is the electrical circuit of the contact group, the replacement of which will be discussed below.
The protective cover has been removed from the bottom of the steering column
Carefully, using a chisel, loosen the fastening bolts of the lock (these are bolts with break-off heads).
The tension on the breakaway bolts is released using a chisel or a powerful screwdriver.
Stages of work on video
The ignition switch consists of two parts:
- Mechanical - cylindrical lock (cylinder), it consists of a cylinder, into which the ignition key is inserted.
- Electrical - contact unit, consists of a group of contacts that closes using a certain algorithm when the key is turned.
The ignition key usually has a cylindrical lock, which copes with several tasks simultaneously, such as turning the contact assembly and locking the steering wheel. To lock, it uses a special locking rod, which, when you turn the key, moves out of the lock body and into a special groove in the steering column. The ignition switch itself has a simple design; now let’s try to disassemble all its components. For a more clear example, let’s look at how the ignition switch works:
Ignition switch parts
- a) type KZ813;
- b) type 2108-3704005-40;
- Brace.
- Frame.
- Contact part.
- Facing.
- Lock.
- A - hole for the fixing pin.
- B—fixing pin.
The cylinder is connected to a wire and installed inside a wide cylindrical spring, with one edge attached to the cylinder itself, and the other directly to the lock body. Using the spring, the lock can automatically return to its original position after turning on the ignition or after an unsuccessful attempt to start the power unit.
The lock driver can not only rotate the contact unit disk, but also fix the lock in the desired position. Especially for this purpose, the leash is made in the form of a wide cylinder, in which there is a radial channel passing through. There are balls on both sides of the channel, between them there is a spring, with the help of which the balls enter the holes from the inside of the lock body, thus ensuring their fixation.
The contact assembly has two main parts , such as: a contact disk that can be driven and a stationary block with visible contacts. There are plates installed on the disk itself; it is through them that current passes after turning the key in the ignition switch. Basically, up to 6 or more contacts are placed on the block; their outputs, as a rule, are located on the reverse side. Today, modern locks use contacts in the form of plates with a single connector.
The contact group is mainly responsible for starting the starter, the ignition system, and instrumentation; it is located deep in the lock body. You can check its functionality using a special test lamp. But first, before doing this, experts recommend checking for damage to the cables that go to the lock; if any are found, the damaged areas will need to be insulated with tape.
Electrical diagram of the ignition switch VAZ 2109
Replacing the contact group
In the event that, as a result of diagnostics, a malfunction of the contact group is detected, you will still have to remove the ignition switch, since it will not be possible to get to it in any other way. After removing the element, disassemble it using the following algorithm:
- Disconnect the connectors with the backlight power wires.
- Remove the decorative plastic cover by releasing the 4 latches. Work carefully because these clips are easy to break off, and buying a cover separately is quite a task. It is not advisable to change the entire lock because of it.
- By bending the 2 clamps holding the contact group, remove it from the ignition switch.
The plastic cover can be removed using a screwdriver
Note. You will additionally need a small flat-head screwdriver as a tool to bend the latches.
The contact group is located immediately under the cover
First of all, examine the status of the contacts. If they have darkened (oxidized), then clean the current-carrying surfaces with fine sandpaper P1000. Then put the group in place and, without installing the lock, connect it to the vehicle's on-board electrical system to check its functionality. If unsuccessful, the part must be replaced. The same will have to be done if the contacts are burnt or the group does not work without any external signs of malfunction.
The part is removed after bending two latches