How to remove the rear bumper of LADA Kalina
Tools required: Phillips screwdriver and two 10mm wrenches.
- In the wheel arch of the right rear wheel, use a Phillips screwdriver to unscrew the screw for the upper fastening of the bumper to the body, as well as three screws for fastening the rubber mudguard (the third screw is not visible in the photo);
- From the bottom of the car, use a Phillips screwdriver to unscrew the screw of the lower fastening of the rubber mudguard and remove the mudguard. Similarly, remove the mudguard of the left wheel;
- Using a 10mm socket, unscrew the three bolts of the lower bumper-to-body mounting;
- Having opened the trunk lid with a 10mm head, unscrew the four bolts of the upper fastening of the bumper to the body.
- Grasping the side of the bumper with both hands and applying the necessary force, remove the top of the side from the flange of the body bracket. We perform a similar operation on the other side of the car;
- Remove the rear bumper of Kalina;
- Using a 10mm socket, unscrew the three nuts securing the energy-absorbing beam of the rear bumper;
- And we take it off.
Installation of the Kalina rear bumper is carried out in the reverse order.
To remove/install Kalina's front and rear bumpers with your own hands, an assistant is not required. By the way, do you know how to install a tuning bumper?
Removal Guide:
- The first step is to unscrew the self-tapping screws that secure the fender liners using a Phillips screwdriver; there are two of them on each side:
- And one more screw is located under the bottom, on the right and left sides:
- Now we take a ratchet and a 10mm socket and unscrew the three bolts securing the bumper from below, two of which are located at the edges and one in the middle. The photo below shows everything in more detail:
- Next, you need to remove the radiator grille, more about this is written here.
- And unscrew the 4 bolts securing the Kalina front bumper, which are located under the grille:
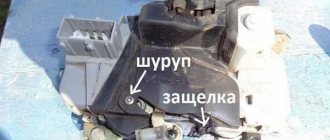
- Then we take out the lower plastic decorative grille, which is located under the license plate. It is fastened with two bolts, I think there is no need to describe this, everything is clear. The only thing is that you will have to make a little effort to remove it, since it is still secured with clips. Just pull harder.
- And in that place, almost under the very number, it will be necessary to unscrew two more screws:
- Almost everything is ready, all that remains is to grab each edge of the front bumper and pull it towards you, tearing it off the latches on the sides, as shown in the picture below:
After the work has been done, the bumper should be easily removed from Kalina without any difficulty, especially since it is quite light, so no outside help will be needed. If you have any questions about this Kalina repair, ask below in the comments, we’ll sort it out! Installation or replacement with a new one occurs in the reverse order of removal. After I put everything in place, I removed the gaps by tightly filling the bumper on each side with my hand, and now everything is fine, there are no gaps or protrusions.
Sources used:
- https://vaz.today/snyatie-perednego-bampera-u-lady-kalina
- https://vaz-remont.ru/kak-snyat-perednij-bamper-lada-kalina-zamena-bampera-svoimi-rukami/
- https://ladakalinablog.ru/kak-snyat-zadnij-bamper-bez-problem/
- https://ladaservice.info/lada-kalina/raznoe-lada-kalina/kak-snyat-perednij-bamper-lada-kalina/
- https://ladakalinablog.ru/snyatie-i-ustanovka-perednego-bampera/
How to remove and replace the front bumper of a Lada Kalina: photos and videos
Dismantling the front bumper of a Lada Kalina is not an easy task and requires some knowledge. Removal is carried out for various reasons, but sooner or later every car owner may encounter this.
The video shows the complete process of removing the bumper, although it consists of pictures, but in great detail:
The process of replacing a bumper on Kalina
So, the time has come for “X”, everything is ready to get to work. It is worth clarifying that the car must be installed on a pit or a lift, since access from below will be required. Without them it will be very difficult to dismantle the bumper.
Necessary tool
If you dismantle the front bumper of Kalina, you will need tools. You don’t need anything fancy, just the most common tools, namely: flat-head and Phillips-head screwdrivers, 8- and 10-size wrenches. It would be more convenient to use sockets instead of wrenches.
Let's look at the step-by-step process of removing the front bumper:
- After unscrewing 3 screws, remove the radiator grille.
Fastening bolts are marked with an arrow - Now you need to remove the grille on the bumper itself. To do this, you need to unscrew 2 screws.
- Unscrew the fastenings of the fender liner to the bumper.
- We climb up from below and see three screws securing the bumper from below. They need to be dismantled.
- Now, we remove the bumper from the engagement of the wings.
- With a slight movement of your hands, remove it first from one side and then from the other.
Bumper removed - We move the bumper to the side.
- Assembly, as always, is in reverse order.
Reasons for removing the bumper
There are several reasons why you will need to remove the front bumper from Kalina. This is mainly due to physical destruction of both the part itself and the elements underneath it. Let's consider what factors push the owner to begin this difficult task:
- Road accident. Typically, damage to the front bumper due to a collision is the fault of the driver himself. A simple failure to maintain distance can cause disaster.
- Painting jobs involving paint fading will also require removal of the bumper.
We'll paint the bumper - Tuning.
Installing a new body kit will require dismantling the front buffer. Exclusive tuned bumper - A separate case may be dismantling the radiator.
- Damage to body parts when the bumper is not damaged. Hitting an obstacle when the radiator frame is damaged from below.
All these reasons push the owner to dismantle the front bumper. Many of them, not wanting to pay for removal at a car service, do this procedure with their own hands.
Removing the front bumper of the Lada Kalina is quite easy and does not require special tools or knowledge. Installation is also quite simple. If you do not want to accidentally damage the paintwork of the bumper, it is recommended to carry out the dismantling operation with an assistant.
Do-it-yourself bumper repair Alexey Marakulin's blog
Lada Kalina Sport 1.6 Logbook Alternator belt tightening
This article will be of interest not only to users of the Lada Kalina station wagon, but also to all car enthusiasts who, for some reason, have broken their bumper. It is not difficult to treat, the main thing is to do everything carefully, then the result will be quite good.
Either I was in a bad mood or simply careless - I drove into a snowdrift while turning between the rows of garages. Just think, a snowdrift. But I didn’t take into account that a week ago this snowdrift was melting, and a few days ago it was completely frozen. The result was that the lower part of the front bumper was broken.
It is not good to drive with bumper parts glued with tape; you can lose them on the road, so on Sunday, November 16, it was decided to spend a day on repairs. I carefully learned the process of removing the bumper on the Internet, took the tool and went tinkering. Removing the bumper took me about an hour. I found all the screws and unscrewed them, but the bumper was difficult to remove; it sat very tightly under the wings.
The bumper has been removed! It's -5 C outside. Keep in mind that in sub-zero weather the plastic becomes more fragile.
I glued the bumper at home. Before I took it off, yesterday, I washed it. At home I just washed the broken parts and wiped all the connections with kerosene. So, what did I glue it with?
Molecular glue Cosmofen, Epoxy and Kerosene for degreasing joints. The price of the set is 270 rubles.
The decorative grille suffered the most damage. She's very fragile!
Bumper
Let's start gluing. We thoroughly wipe all connections with kerosene. First, we glue the parts together with Cosmofen glue, then we glue the parts inside. Cosmofen glue wonderfully glues fingers to objects, so be careful! It glues quickly and firmly. The quality of the joining of the pieces determines the appearance of your bumper after repair.
After gluing all the parts, I reinforced the strategically important seams - those that create a lot of stress. I strengthened it by soldering staples from a stapler with a regular soldering iron. In other words, he put stitches.
This is what I ended up with.
Although Cosmofen glue is strong, the entire structure was reinforced with Epoxy. To do this, I applied it to the inside of the bumper on the seams and details. In other words, flooded them. The epoxy also penetrated between the parts where Cosmofen did not grab, which is very good.
That's all! The next morning I checked the strength of the dried Epoxy, took the bumper and screwed it into place. This procedure also took an hour. I struggled for a long time trying to fit the bumper under the wings. Bottom line.
I'll paste the number up someday too.
The idea was to apply oil paint to match the body color and paint over the seams. But, since the lower part of the bumper is practically visible, I abandoned this idea. Later, I finally got around to painting the scratches on the rear bumper and painting over the small paint chip on the dent in the trunk.
P.S.
This is how I use my Kalina.
Commenting and posting links is prohibited.
Removing and installing the front body kit
Since the bumper of the Lada Kalina car is attached in many places, including from below, it is most convenient to carry out work in the inspection hole. If necessary, you can do it without it, but then you will have to look for the lower screws by touch or lie under the car to see them.
The list of tools for disassembly is quite short:
- Phillips-head screwdrivers of different lengths;
- 10 mm socket wrench or socket;
- extension cord and ratchet wrench.
Article on the topic: What is a catalyst in a car
At the moment, there are 2 generations of VAZ 1118 cars, and they are disassembled in different ways. Therefore, the order of work must be considered separately for each modification.
Kalina 1
If you have fog lights installed, then before starting work, disconnect the battery and follow this algorithm:
- Open the hood lid and unscrew the 3 screws holding the plastic radiator grille and carefully remove it.
- Do the same with the bottom grille, removing the 2 screws that secure it.
- Behind the grille there are 2 screws securing the bumper itself, unscrew them.
- Move into the inspection hole and unscrew the 3 lower bolts located in the center.
- Remove 2 pairs of lower screws located on the sides. They attach the body kit to the fender liner from below.
- There are 2 more pairs of screws located in the front of the wheel arches; unscrew them last.
- When all the fasteners are unscrewed, the bumper continues to be held on by plastic latches. To remove it and not break off the latches, pry the side edge of the element (near the wheel) with your hands and gently pull it to the side, disengaging the latches.
- Move the body kit forward a little and remove it from the car. At this time, the assistant must support the other end of the part, preventing it from falling.
Corrosion of body parts is often found under the removed element. To see the whole picture, remove the plastic amplifier (you need to unscrew 3 bolts) and remove the rust, then touch up these areas.
In case of corrosion of body parts, remove the plastic reinforcement and remove the rust
An important point when installing a new bumper is that you need to put it in place correctly and secure the latches.
- Put on one side of the element immediately, and pull the other side together with an assistant. He should press on the corner of the part from the front, and you - from the side, until a characteristic click is heard.
- Then screw all the screws into place.
- Connect the connectors.
- Install gratings.
Photo of the attachment points of the part
3 bolts press the bumper to the body from below 2 pairs of self-tapping screws secure the body kit along the edges 2 self-tapping screws connect the element to the fender liner Top fastening points To remove the grille, you need to unscrew the countersunk screws Access to these bolts opens after removing the grille
Front bumper on Kalina 2
On the new Lada Kalina model, the front body kit is attached differently: the lower screws are located far from the plumb line of the element, so it is very inconvenient to unscrew them without an inspection ditch. But you don’t need to dismantle the radiator grilles to get to the hidden fasteners. The removal operation is performed as follows:
- Open the hood and remove the negative battery terminal.
- From the inspection hole, unscrew the 3 bolts screwed to the bottom of the car. Two of them are in the center, the third is to the side (to the right in the direction of travel).
- Unscrew 2 pairs of lower screws located at the edges of the bumper.
- As in Kalina 1, unscrew 2 pairs of screws connecting the part to the fender liner and located in front of the wheel arches.
- Unscrew the 6 bolts of the upper mounting of the body kit; they are located on the horizontal panel above the radiator.
The procedure for dismantling and replacing the front body kit is carried out together with an assistant, as described above. Immediately after removing the element, disconnect the power supply connectors for the fog lights, and when installing, do not forget to connect them back.
Where is the fastener located - photo
The bolts on Kalina 2 are located quite deep A pair of self-tapping screws connect the fender liner to the bumper 6 bolts of the upper fastening Article on the topic: Malfunctions of the car air conditioner - what can leave us without coolness?
Advantages and disadvantages
Lada Kalina Hatchback 1.4 KALINVAGEN Logbook Muffler failure or sports exhaust
Handling can be called interesting. Unlike Granta Sport, the car described has a more rigid mounting of the rack to the engine shield. The elimination of one of the dampers allowed for a more precise response when making turns, which is especially true for sharp maneuvers. The front shock absorbers turned out to be convenient for the average car enthusiast.
At some point, the elasticity of the suspension turns out to be insufficient, Kalina Sport from the manufacturer VAZ squats on the loaded wheel, which leads to rubber grinding along the arch. This circumstance can be called not only uncomfortable, but also dangerous, since a tire locked in the opening increases the force on the steering wheel.
A video that talks about the car's handling will always help you decide whether a certain model is right for you. The manufacturer equipped the car with 16-inch wheels, which led to the need to limit the steering rack travel. This was necessary so that when making turns the tires would not touch the arches.
The number of steering wheel turns from lock to lock is less than in the compared Grant. It is equal to 2.6. However, even in this case, the tires in the extreme positions of the steering wheel still continue to scrape against the plastic of the lockers. It would be possible to increase the wheel offset, but this would cause increased wear on the wheel bearings.
The handling of Kalina Sport turned out to be more attractive compared to the “Grant”, this is due to its lightness and less stress. The decision to purchase a particular car is influenced by the photo and description. In fifth overdrive, Kalina Sport reaches 183.3 km/h, but is unable to move above this limit.
The result cannot be considered completely clear, since the Granta Sport with a similar engine and chassis reaches a speed of 200 km/h. The hatchback should be more streamlined. This can perhaps be explained by the new body kit, which does not have a positive effect on the aerodynamic characteristics.
By looking at the photo, you can always choose the car that will be closer to you in terms of characteristics. The noticed differences between the described cars cannot objectively be considered impressive. It should also be mentioned that in new cars the manufacturer tries to use higher quality components.
Installation of bumpers on Lada Kalina
Installing the bumper on the Lada Kalina, both front and rear, is performed in the reverse order.
When reassembling the lower grille, as well as the bumper device itself, it is necessary to pay attention to the exact fit of all parts, so if it is done poorly and does not get “in place,” you can only spoil very expensive parts.
The instructions for the car will help you put the front or rear shock absorber back correctly, which you should always have with you. So, for example, if the front bumper mounts cause problems, you can always find answers to the most difficult questions in it. In especially difficult cases, you can ask for help from a more experienced car owner who has already changed this element several times.
In what cases should the bumper be replaced?
Only the owner of the car can decide whether to replace the bumper. The reasons for this step are as follows:
- at some point the car hit the road barrier;
- the car was in an accident;
- the owner had a desire to stand out or do some tuning.
The Lada-Kalina is running, but the front bumper and headlight require replacement.
Changing the part itself is not so difficult; you need to be patient, time and a set of tools. And it’s also worth purchasing a new bumper in advance or agreeing with a car repair shop where they will repair your old one.
Types of punishment
In practice, for the unauthorized installation of additional headlights, 3 types of punishment are possible:
- A fine of 500 rubles for upgrading a car in the form of additional headlights without approval from the traffic police.
- Deprivation of the right to drive a car for a period of 6 months to 1 year for violating the operation of lighting devices.
- Deregistration of a vehicle.
Of the listed penalties, only 2 comply with the law. Let's take a closer look at them.
Deprivation of rights
In this case, this measure would be illegal. The issue is that drivers driving cars with factory-installed halogen headlights that have xenon or LED bulbs are similarly illegally penalized. This is considered a violation of the operating mode of lighting devices.
In a similar way, the court can make a decision with auxiliary headlights, because they are not provided by the factory, and therefore violate the operating mode. Many car owners consider this a contradictory proposition. But the same contradiction can be attributed to xenon, since according to the Technical Regulations the operating mode can be constant or flashing. This does not apply to the type of light source. Therefore, in practice it happens differently.
The Supreme Court of the Russian Federation recently prohibited the deprivation of the rights of drivers who installed xenon under this regulatory act. Therefore, it is hardly possible to apply such a punishment for additional headlights.
Flashing lights
The situation is different if not ordinary headlights are installed, but those that flash. Then the traffic police inspector can file documents against you in court to deprive you of your license. But this issue is controversial, and the court may consider it illegal. Let's figure out what the question is here.
In this case, the law provides for punishment for violating the operating conditions of lighting devices, as well as their color. If you carefully read the text of the sanction, these conditions are also connected by the conjunction “and”. This means that both conditions must be met simultaneously. If additional headlights emit orange, yellow or white light, then this is not prohibited by the Road Traffic Regulations. Only the operating mode is disrupted.
But in this case, the norm of Part 4 of the same Article 12.5 of the Code of Administrative Offenses can also be used. It indicates a possible penalty in the form of deprivation of rights for a period of 1 year to 1 year 6 months. Plus, your additional headlights that are installed on the car may be confiscated. If such headlights are used while driving on the road, your license may be revoked for up to 2 years.
Deregistration of a car
In 2022, this punishment is quite realistic and complies with the law. Many car owners know that if design changes are detected without registration, such a vehicle will be impossible to register with the State Traffic Inspectorate. The inspector will simply refuse you and he will be right.
However, not all drivers know that if a car is already registered with the traffic police, and unregistered additional headlights are found on it, it will be deregistered.
In practice, in real life it goes like this:
- You are driving along the road, a traffic police inspector stops and checks the documents for the car.
- He sees additional lighting devices that are not provided by the manufacturer.
- Checks the registration certificate and finds that the change has not been registered.
- Draws up a resolution imposing a fine of 500 rubles.
- Submits a report to a superior.
- The authorities review the documents and make a decision to deregister the car.
- You will receive a letter by mail about the decision of the traffic police to terminate the registration of the car.
- The issue can only be resolved by removing the additional headlights and presenting the car to a traffic police inspector.
If, after deregistration, you continue to drive your car (even without additional headlights), then when a traffic police inspector stops you on the road, he will take away the registration numbers, STS and put the car in a impound lot. To pick it up, you will have to go through all the procedures again, and also pay for new license plates. Therefore, it is worth thinking before installing illegal lighting devices.
Adjusting the luminous flux from PTF
A car enthusiast needs to know not only how to install and connect fog lights, but also how to adjust their luminous flux. To do this, you need to check the tire pressure, load the car with cargo close in weight to the total weight of the passengers, fill the tank with gasoline, and put on a spare tire.
Then the car (Priora se or another modification) is placed on a flat area opposite a steep smooth wall at a distance of five meters, and the fogs are turned on. Next, the distance from the center of the headlights to the ground is measured, and a line is drawn on the wall five centimeters lower than this distance. After this, you need to adjust the light spot so that its upper boundary is at the level of the drawn line.
The work is carried out for each headlight separately (with one of the headlights closed), after which the results are compared, and the position of the light spots is replaced until both are at the same level. Domestic-made headlights are adjustable only in the “up” and “down” positions; all work with them is done using a long or Phillips screwdriver.
Check and adjust the headlights on a equipped Lada Priora VAZ 2170 car: with a fully filled fuel tank, a set of tools and a spare wheel.
To adjust the headlights on a Lada Priora VAZ 2170, you will need a 6.1 hexagon. Pre-check and, if necessary, adjust the air pressure in the tires.2. Place the car perpendicular to a smooth wall (for example, a garage) at a distance of 5 m. Place an additional weight weighing 75 kg on the driver's seat. Mark the screen on the wall as shown in Fig. 4.4, and draw vertical lines on it: center line O and lines A, B, passing through the points corresponding to the centers of the low beam headlights. These lines must be symmetrical with respect to the center line of the vehicle. At a height h corresponding to the distance of the centers of the headlights from the floor, draw line 1 and 75 mm below it, line 2 of the centers of light spots.3. Turn on the ignition and low beam headlights, turn the headlight electric adjustment knob to position “0” (this position corresponds to the load of a car with one driver). Screws 1 (in the vertical plane) and 2 (in the horizontal plane) manually adjust the light beam to position the light spot for each lights on the screen if the location of the light spots on the screen does not correspond to the figure.5. Adjust the direction of the light spot for each headlight separately. During adjustment, cover the second headlight with opaque material or disconnect the wire connector from it.6. The headlight light is considered adjusted if the upper border of the left parts of the light spots coincides with line 2, and the vertical lines A and B pass through the intersection points of the horizontal and inclined sections of the light spots.
Adjusting the fog lights
Select a flat horizontal area at a distance of five meters from the screen. Any flat vertical surface, such as a wall, garage door, etc., can serve as a screen.
— Check the tire pressure.
— Load the vehicle with a weight close to the weight of the cargo and passengers during the main period of operation.
— Measure the distance from the centers of the fog lights to the ground (floor).
— Draw a horizontal stripe on the screen 50mm lower than the height from the fog lights to the ground.
— Adjust the light spot so that the upper border on the screen is at the level of the drawn strip. The position of the light spot for each headlight is adjusted separately. Close the other headlight tightly during adjustment. The adjustment is carried out by rotating the adjusting screw, which is located in the upper part of the fog lamp.
— Open the headlights. The upper boundaries of the light spots from both headlights should be at the same level. If necessary, further adjust one of the headlights.
The headlights of a new vehicle are set correctly by the manufacturer. However, during operation a situation may arise when it is necessary to adjust the direction of the headlight beams. To do this, it is not necessary to contact specialists; adjusting the headlights is not difficult with your own hands. Let's look at the features of this event using the Lada Priora car as an example.
Sports modification
Using a modernized plastic element, you can give your car a unique look. Since the Lada Kalina model has been on the assembly line for quite a long time, auto accessory stores have a wide selection of tuning bumpers. Here you will need to choose the bumper wisely so as not to go wrong with the combination of the color of the product and the car body. If this action fails, then you can paint the purchased bumper yourself.
The sports version of the product for LADA Kalina consists of some components:
- gratings;
- reinforcing element;
- spoiler;
- overlays.
The design includes integrated air intake deflectors located on both sides. Also, the tuning version involves the installation of several ribs to improve rigidity.
The modified bumper for the stern has an original element - a diffuser, placed by the designers in the central part of the product.
To independently tune the bumper, you will need to first dismantle it. Then the installation of the structure is carried out as follows:
- install the amplifier;
- We mount the main component with the grille.
Usually there are no problems with this procedure. However, for example, the “I am a robot” version of the bumper is a few centimeters lower than the standard product, so during installation there is a certain risk of breaking the structure. It is also recommended to cover the bottom panel of this LADA Kalina body component with film to prevent damage to the coating.
Are additional headlights allowed by law?
Of course they are prohibited. This is not allowed according to several regulatory documents:
- Appendix to the Traffic Rules. Clause 3.1 of the Basic Provisions for the approval of vehicles for operation states that you cannot drive a car if the number of lighting devices does not correspond to the factory design.
Therefore, it is impossible to equip the car with additional headlights.
It does not matter what kind of light bulbs will be installed in them: xenon, halogen or LED. All of them are prohibited
Is it possible to change the design in agreement with the traffic police?
Some modernization of a vehicle can be officially registered with the traffic police by obtaining the appropriate permission. For example, it is allowed to install gas equipment or a tow hitch on a passenger car. Is it also possible to install additional headlights as light sources and obtain permission from the State Traffic Inspectorate? No, this is prohibited.
The question is that this modernization is not allowed, since the Technical Regulations directly prohibit equipping a vehicle with additional light sources. This includes fog lights, as well as high and low beams.
But in the Technical Regulations there is the concept of “optional lighting source”. It must satisfy certain conditions. But no auxiliary headlights for cars are specified in this document.
Additional headlights can only be installed on trucks that belong to category N3 and weigh more than 12 tons. Passenger cars are included in the M and M1 categories.
Therefore, if you decide to register the modernization of your car by installing optional light sources other than standard ones, you will have to go through a lengthy registration procedure. This will include safety tests and additional examinations. You will have to pay a lot of money for them, but as a result you will probably be denied registration.
In this case, we mean standard headlights, which are usually installed on the bumper or in the radiator grill of a car. However, in the Technical Regulations there is another concept - “spotlight”.
Installing a floodlight on the roof
It is permissible to install a spotlight on a vehicle if this device is provided by the vehicle manufacturer. The same requirements are specified for optional lighting sources.
Fog lights
If your stock car was produced without fog lights, but you wanted to install them additionally, then there may be 2 options for resolving the issue:
- If your car does have a configuration that is equipped with fog lights, then this will not be a change in the device. Moreover, if you install the factory fog lights in the standard places that were plugged, the inspector will not pay attention to this.
- If PTFs are not installed on any version of a car from the factory, then if installed independently, this will be regarded as an illegal design change. After all, the manufacturer did not provide fog lights, which means that appropriate measures will follow from the State Traffic Inspectorate.
This issue is worth considering in more detail.
Installation of bumpers on Lada Kalina
Installing the bumper on the Lada Kalina, both front and rear, is performed in the reverse order.
Before starting work, it is imperative to clean the places where the bumper is attached to the body from dirt and rust. The same applies to the attachment points of the lower grille.
When reassembling the lower grille, as well as the bumper device itself, it is necessary to pay attention to the exact fit of all parts, so if it is done poorly and does not get “in place,” you can only spoil very expensive parts.
The instructions for the car will help you put the front or rear shock absorber back correctly, which you should always have with you. So, for example, if the front bumper mounts cause problems, you can always find answers to the most difficult questions in it. In especially difficult cases, you can ask for help from a more experienced car owner who has already changed this element several times.
Features of dismantling
Before moving on to the question of how to remove the front bumper of the Lada Kalina, you need to do some preparatory work. The dismantling procedure is carried out in a viewing hole or using a lift, since many of the fixing elements are located below. If this is not possible, you will need to unscrew the bolts blindly. An alternative is to position yourself on the ground to visualize the fastening points.
We recommend performing the activities with a partner. An assistant will be able to hold one part while you unscrew the fasteners from the Kalina front bumper. Independent actions do not guarantee the quality and safety of the process.
For the procedure you will need:
- Extension.
- Screwdrivers - Phillips head and standard version.
- Special head for 8.
- Key for 10.
- Drive with an additional ratchet.
Today, the manufacturer supplies the market with two modifications of Kalina vehicles. They differ from each other in clamps. Therefore, there are some differences in the order of dismantling the part.
Adjusting PTF on Prior
PTFs are installed on the Priora to improve the standard light when driving through dark sections of the road or in fog, they are simply necessary. Fog lights on the Priora are a privilege of luxury trim levels. Lada Priora was produced in 2 bumper design options: restyling SE, pre-restyling, so the part number is different - more about it below. In all other, empty configurations of the Priora car, plugs are installed in place of the PTF, which over time you want to replace with fog lights. Usually this moment comes when the driver drives his car for the first time through dense fog - so that visibility is minimal, it’s scary to drive, but it’s necessary. In such cases, the emergency lights turn on, movement should be slow and careful - and if there were fog lights, the driver would feel more confident.
Connecting the PTF is done in 7-8 steps; if you wish, you can do it yourself in the garage - read about it in this article.
The turning point leads to the choice between lens PTFs in the Priora and LED PTFs. One way or another, when driving in conditions of insufficient visibility, the light will become much larger. The driver will do everything possible to fulfill his duty to ensure traffic safety. But the fulfillment of this duty will have to be supported.
Requirements of legislative documents
The design features of fog lights are regulated by several laws. The most important of them are:
- Traffic Laws;
- UNECE Regulations;
- GOST 8769-75.
These documents indicate the following basic requirements regarding the settings of fog lights.
- Optical devices must be installed on the vehicle at a height of more than 250 mm from the road surface.
- The maximum distance from the fog lamp to the external dimensions of the vehicle should not exceed 400 mm.
The following requirements are imposed on the light beam:
- the beam should be directed downwards, and its upper boundary should have a clear outline;
- The horizontal dispersion angle should not exceed 700.
Therefore, the fog lights are adjusted taking into account these parameters that affect driving safety.
The rules also define the mode of use of fog lights. These are conditions of limited (sharp turns, mountain serpentines) and insufficient (fog, snow, rain) visibility.
Instructions for the second generation machine
For owners of second-generation vehicles, the procedure has minor differences. We bring to your attention detailed instructions on how to remove the bumper on a viburnum, taking into account changes in the modification:
- Unscrew the 3 bolts located at the bottom.
Central lower screws for Lada Kalina
- Unscrew the two pairs of side screws.
- Remove 2 pairs of screws that secure the fender liners.
- Unscrew the 6 screws located on top.
- Using gentle and smooth movements, release the plastic clips.
- Next, we advise you to use help - carefully pull the part forward, while the latches are removed from the grooves.
- Completely dismantle the element.
If you are interested not only in how to remove the front bumper of a Lada Kalina, but also in installing a new part, we recommend that you go through all the described steps in reverse order.
The given hint on how to remove the front bumper on a viburnum shows that the procedure is not labor-intensive and can be done by every driver. Using the acquired knowledge and tools, you can easily cope with the task.
How to choose fog lights?
This is how this headlight shines
Installation of fog lights is preceded by purchasing them at the store. In this case, you must first look at the integrity of the glass of each light bulb, the matching of the headlights and mounting systems.
Compliance with the UNECE is confirmed by the presence of the “E” stamp on the diffuser; it is also desirable to have a GOST terminal, TU, date of manufacture and manufacturer. When we choose fog lights, Priora as a model allows us to purchase articles of predominantly round shape, while the latest fashion is considered to be slit headlights, which have small vertical angles (about 30-50 degrees) and are very well suited as fog equipment.
Fog lights can be produced in:
The first options almost always do not have certification data and have a lot of power, which only causes harm on the road (blinds oncoming drivers). Japanese and European models have moderate power, but are quite expensive. Therefore, when purchasing, it is better to focus on domestic models that comply with GOST standards and are relatively inexpensive.
The installation of fog lights begins for Priora owners by disconnecting the ground wire from the battery (needed to prevent a short circuit). Then the protection is removed from the engine crankcase. To do this, you need to take a key for “10” and two keys for “19”. The usual front crankcase protection has 5 “studs”, but the reinforced one can be attached to the front beam with two half-clamps. Removing the protection is a sequence of simple steps - first, use keys “19” to unscrew the nuts attaching the levers. (The second key is used to keep it from turning). Then use a 10mm wrench to unscrew the five nuts. Installation of protection is carried out in the reverse order.
Step-by-step removal procedure for a 1st generation car
If you are the owner of a first generation Lada vehicle, to dismantle the Kalina front bumper you will need to perform the following steps:
- lift the hood lid;
- unscrew the three screws that are responsible for fastening the plastic radiator grille;
- remove the radiator mesh;
- unscrew the 2 screws located on the bottom mesh and remove it;
- disconnect the fog lamp connectors;
- behind the grille there are two screws that secure the bumper, unscrew them;
- lift the car on a lift or move to a special viewing hole. In this position, you need to remove 3 central and 2 side screws, as well as 2 screws located in front of the wheel arch;
Placement of lower clamps on viburnum
- with careful movements, pry up and snap off the plastic clips holding the part to the body;
- slowly move the bumper towards you, forward. This way the latches are removed from the grooves on the body. Then you can completely remove the front bumper of the Kalina.
Above we explained step by step how to remove the front bumper of the Lada Kalina of the first modification. Installation of the new part is carried out in the reverse order.
To remove the Kalina bumper you will need:
- Screwdrivers: Phillips and flat;
- Key to "10";
- “Straight hands” and a little patience.
Replacing the rear bumper
Hatchback, sedan, and station wagon bodies are equipped with bumpers of different configurations, which have their own characteristic mounting features. As a result, when installing them, it is necessary to perform some additional operations that differ from the standard algorithm of actions.
As for the step-by-step instructions for performing this operation, they are as follows:
- The first step is to remove the standard mudguard. To do this, unscrew three screws in the wheel arch of the rear wheel with a Phillips screwdriver and remove the mudguard.
- From the bottom of the car, use a screwdriver to unscrew the screw of the lower fastening of the mudguard and dismantle the mudguard itself. The mudguard located on the left wheel is also removed in the same way.
- Use the “tenth” head to unscrew the lower fastening bolts.
- open the trunk lid and use the same head to remove the four upper mounting bolts.
- With the application of force with both hands, remove the top of the body bracket from the side of the bumper. We repeat this operation on the other side of the machine.
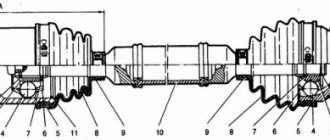
- dismantle the shock absorber, unscrew the three nuts on the “10” energy-absorbing beam of the rear damper and also dismantle it.
How to choose a front bumper for LADA “Kalina”
If you do not take into account tuning parts, there are two types of standard front bumpers for Kalina on sale: painted and unpainted. The first ones must be carefully selected by color so that they do not differ from neighboring body elements. The paintwork changes color slightly as a result of exposure to the sun, so selection by catalog number is not always effective and it is better to choose the appropriate color “on the spot”
Unpainted bumpers are suitable when painting adjacent parts of the car (fenders, hood) is required, for example, after an accident. When purchasing a new bumper, you should pay attention to the following points:
- the paintwork of the part should not have chips or cracks (they especially often appear near the fasteners);
- the plastic of the bumper must be elastic, because excessive rigidity causes cracks even with mild impacts, for example, on snow or sand;
- when purchasing a tuned bumper, you should make sure that it has holes for fog lights;
- There must be stiffening ribs inside the bumper, otherwise it may “lead” and lose its original shape.
What is needed to remove the front bumper of LADA “Kalina”
It is better to carry out work on dismantling the bumper in the inspection hole, because part of the fastenings for this part are located at the bottom of the car. If there is no hole or lift, the job will not be impossible, but you will have to unscrew some nuts by feel or lie on the ground to see the attachment points. It is better to remove and install the bumper with an assistant who can hold one side while you unscrew the fastenings of the other. If you perform the operation yourself, you may not be able to hold the part, which as a result will fall and be damaged. To remove the front bumper of LADA “Kalina” you need:
- crosshead screwdriver;
- socket or socket wrench 10;
- extension;
- wrench (preferably with a ratchet, which will make the work much easier).
Currently, two generations of Kalina have been produced, differing in the way the bumper is mounted. Accordingly, the procedure for removing this part is slightly different.
Why is it being removed?
The conversation about the need to replace the bumper comes up in a number of cases, not always directly related to this part. Sometimes for such manipulations it is enough that the spare part located next to it requires replacement or repair. The main reasons why removing the front bumper of the Lada Kalina, as well as replacing the bumper may be necessary:
- If it's time to restore this part of the car, update the decorative coating. After all, it is regularly exposed to external influences of varying degrees of aggressiveness. As a result, the paint loses its appearance, scratches, dents and other defects appear.
- If the front bumper needs to be replaced, then most often the reason is cracked carbon fiber, which is not impact resistant. This may be a consequence of a collision with a snowdrift with increased fragility due to weather conditions.
- Sometimes this part suffers greatly after accidents or other accidents.
- When you need to replace the headlight units, you also need to remove the bumper.
- If you need to install a front body kit, you will first have to dismantle the main part, tune it, or replace it with a ready-made improved version.
Some correction work does not necessarily require removing the Kalina front bumper; the correction can be carried out directly.
What is needed for that
It is necessary to create conditions for the operation to be carried out: to provide access under the machine. The best way is to provide an inspection hole, or in extreme cases, a lift. They are needed for visual contact with the parts and the device itself even before removing the bumper on Kalina.
If this is not possible, the task remains feasible, however, the conditions become more complicated: you will have to work by touch. This means that the task will be to determine where the nuts are located and unscrew them. You can also lie with your back under the car.
It is recommended to leave the idea of starting to remove the Kalina front bumper alone and do it with a partner or assistant. At some points you will need a second pair of hands, and the tools you need to have are:
- curved screwdriver;
- socket wrench number 10, socket will also work;
- extension;
- collar
All this will come in handy if the bumper is replaced or simply dismantled.
It is important to remember to remove the ground from the battery so that after electrical appliances are turned off, a short circuit does not occur.
Kalina-1
Before removing the front bumper of the Lada Kalina -1, you should read the instructions, because damaging the part will not be difficult, but fixing it will be problematic.
First, under the open hood you need to find a plastic radiator grille, which is secured with 3 self-tapping screws. Unscrew them and remove the plastic. Below there is also a similar part; replacing the bumper also involves dismantling it by unscrewing 2 screws. All that remains is to disconnect the PTF and screw together the two fasteners of the main part (they are behind the grille) in order to start working from the inspection hole.
Find 3 bolts from below, which can be considered central fasteners, and unscrew them. You also need to get rid of 2 pairs of screws located on the sides; they secure the body kit and fender liners. The same must be done with the screws in the front wheel arches.
The last stage is to detach the plastic latches and remove them from the clutch. The owner must hear a click before removing the front bumper on Kalina. It is better to do this step by two people so that the spare part has no chance of being damaged during the dismantling process. After all, this is a long object, it can fall out of your hands and become deformed, then it will not fulfill its functions, and the bumper may need to be replaced.
Kalina-2
This car is a new generation model, so replacing or removing the bumper is different from the first option. This procedure looks like this:
- You need to unscrew 3 fastening bolts located at the bottom (a couple of them are central, the last one is on the left).
- Remove 4 self-tapping screws, which are edge fasteners; without this, replacing the bumper cannot be carried out.
- Unscrew a pair of self-tapping screws securing the fender liners on each side. .
- Find 6 bolts on top and remove them one by one.
- By prying and unsnapping the plastic clasps, slightly move the bumper forward to unlock them.
- Call a partner to take the part from each side and carefully remove it without damaging the part.
You can install it in the same way as removing the front bumper of a Lada Kalina, only in the reverse order.