We often hear complaints from car owners about poor-quality Granta Liftback trunk door locks. They say they fail prematurely.
The dissatisfaction is well founded, since from 2014 to 2022 the manufacturer installed one type of lock, and then a number of improvements were made and a new version appeared. It is still used in mass production. In order to provide methodological assistance to drivers, we will consider in detail the stages of prevention and replacement of door locks on Grant Liftback.
How to select and adjust locks on the trunk and doors of the Lada Granta Liftback
We often hear complaints from car owners about poor-quality Granta Liftback trunk door locks. They say they fail prematurely.
The dissatisfaction is well founded, since from 2014 to 2022 the manufacturer installed one type of lock, and then a number of improvements were made and a new version appeared. It is still used in mass production.
In order to provide methodological assistance to drivers, we will consider in detail the stages of prevention and replacement of door locks on Grant Liftback.
Replacement of the ignition switch of a VAZ 2110, dismantling.
First of all, we need to disconnect the ground from the battery so that in further work we do not accidentally close the contacts, which will lead to a short circuit.
Next, remove the casing on the steering column, otherwise we simply won’t be able to get to the lock. You can also remove the turn switches if they really bother you too much.
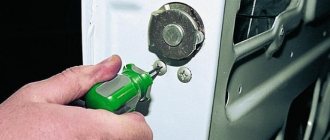
Using a chisel and hammer, unscrew the fastening bolts; their heads are round (photo 1)
Therefore, this must be done carefully so as not to knock off the head on the bolt and unscrew them with pliers.
Insert and turn the key to the “zero” position. This action will disable the anti-theft device.
We remove the bracket on which these bolts and the ignition switch of the VAZ 2110 were attached. Place labels on the contact wires in different colors so as not to confuse them.
If you decide to partially repair the ignition switch. Maybe changing the lamp that illuminates the larva, the microswitch. Then you should follow some tips. And also first remove the lock itself.
Sequencing:
- We disconnect the connectors that used to operate the ignition switch.
- To change the backlight bulbs, disconnect the connector and remove it with pliers.
- To replace the contacts, press the latches with a screwdriver.
- We take a shaped screwdriver, unscrew the three screws, and remove the rod.
- Use a regular screwdriver to remove the latch and remove the microswitch itself.
Review of Manufacturer Prices
| Lock marking / article number | Price, rub.) |
| left rear 21911-6204986-30 | from 1500 |
| right rear 21911-6204986-30 | —/— |
| thrust 21911-6104986-10 | from 500 |
| handles 21911-6204986-20 | from 270 |
| —/— 21911-6204986-20 | —/— |
| limiters 21920-6104986-00 | from 360 |
| —/— 21911-6204986-00 | |
| Power trunk lid lock |
*prices are current as of 10/08/18.
What is important to know about silent locks on the Lada Granta Liftback
Not all car owners are satisfied with the ease and noise level when closing the doors of their car. The defect is caused by excessive wear of parts and design flaws at the manufacturer level.
The principle of noise suppression is implemented by an installed noise absorber. In Lada Granta Liftback models, this is a rubber insert or a plastic polymer.
Silent locks are structurally composed of a pin and a shackle with a noise-absorbing insert. Some car owners practice replacing the arms, while leaving the standard locks unchanged. Already in this case, the noise level will be significantly lower, and locking the door will be easier.
At the same time, systematic use of the door lock leads to rapid wear of the polymer/rubber material. The owner has to come back for preventative maintenance again and again.
The principle of operation of the trunk opening and closing mechanism
Such a mechanism consists of a small number of parts:
- motor;
- a pair of four-pin relays;
- push rod;
- fuse;
- button to control the mechanism.
Installed tailgate servo
The drive responsible for the operation of the rod is available in two varieties. A more common option is a mechanism with a motor. It is highly practical and durable, which explains its popularity. The magnetic platter drive has not received such wide demand because it is complex and problematic. Its operation is based on the interaction of a relay with magnetic plates.
As a result of power supply to the relay, the rod is pulled back, which leads to the opening of the trunk lid. Old VAZ models are not designed for such a mechanism. On such cars, such mechanisms turn out to be impractical. During the installation process, you will have to carry out complex modernization, which often turns out to be irrational.
Preparatory stage
Procedure for independently replacing the driver's door lock on a Lada Granta Liftback
During the installation process, we pay attention to the integrity of the electrical wiring, insulating layer, terminals, and blocks with wires. If there are signs of wear, replace them with new ones. Do not operate the machine with faulty electrical wiring.
Typical door lock malfunctions
Common Causes of Premature Wear
The defect is eliminated by replacing the constipation assembly.
Replacing the rear (passenger) door lock
The procedure for preventing locking of the front/rear passenger door is carried out by analogy. The design and method of fixation are typical.
Installing a trunk lock on Lada Granta Liftback
Replacing the hood lock
Front and rear wiring diagram
The wiring diagram for the front of the Lada Granta is quite simple, the main thing is not to confuse it with the wiring of the ignition system.
The following devices are available here.
Car front wiring diagram
- Right block headlight.
- Room lighting bulb.
- Left block headlight.
- Electric washer motor.
- Accumulator battery.
- Mounting block with power fuses.
- DC generator.
- Klaxon.
- The plug connecting the front wiring harness to plug 1 of the instrument panel.
- Plug connecting the front harness and plug 2 of the instrument panel.
- Plug connecting the front harness to plug 2 of the instrument panel.
- Reverse indicator switch.
- Radiator fan.
The electrical circuit for the rear of the car is more complex, it has more elements and connects to 6 wire harnesses.
Wiring diagram of the rear part of Granta
- Socket to connector 3 of the tidy.
- Socket to connector 4 of the tidy.
- Right side turn signal.
- Left side turn signal.
- Handbrake position sensor.
- Rear window heating element.
- Interior lighting lamp.
- The switch is in the driver's seat belt.
- Luggage compartment lighting.
- Fuel pump module.
- Right rear light.
- Trunk lock drive.
- Interior lighting switch.
- Stop signal.
- Left rear headlight.
- Clamp to the left rear door harness block.
- Clamp to the right rear door harness block.
- Clamp to the harness block of the right front door.
- Clamp to the left front door harness block.
- Airbag control unit.
- Clamp to the license plate light bulb harness block.
Reviews
| from 1900 | |
| 21911-136800 | from 1500 |
| 21911-6104986-10 | —/— |
| 21911-6104986 | —/— |
| 21911-610504986 | —/— |
| 21911-6104986-10 | —/— |
| thrust 21910511800 | from 150 |
| bracket 2345983790 | from 100 |
| bushing 1118234598 | from 200 |
| —/— 111806105 | —/— |
| lock retainer gasket 34580610 | from 100 |
| clamp housing 5698710800 | from 300 |
| lock pin 63541800 | from 100 |
| front lock 21900610 | from 1400 |
| —/— 219006105 silent | from 2100 |
| 21911-610501310 —/— | —/— |
| 21911-610501300 —/— | —/— |
| 21911-610508426 —/— | —/— |
| № | Positive |
| 1. | Vasily: two years have passed since the purchase of the car, I have not made any capital investments, with the exception of the purchase of consumables for maintenance. |
| 2. | Kirill: I heard that some owners have difficulties with door locks. I can’t confirm, since everything is in good order, the doors close easily, without squeaking or knocking. |
| 3. | Vyacheslav: I systematically prevent constipation, lubricate it with silicone sealant, and try not to knock doors loudly. |
| 4. | Victor: in a year and a half of using the car, the front door creaked once. I lubricated it myself, no comments. I assume that a grain of sand got in, which caused the creaking. |
| 5. | Gennady: I would like to recommend silicone sealant. This is the second year I have lubricated the door hinges, there are no problems with the locks, everything works properly. The price is affordable, sold in any auto store. |
| 6. | Sergey: private entrepreneur, I deliver goods, I often use the trunk. In six months of use, I only lubricated the lock with graphite lubricant once. It works properly, there are no knocks or squeaks. |
| 7. | Igor: I periodically conduct an independent inspection of the car, add fluid, lubricate external mechanisms, and adjust clearances. There are no complaints about the operation of the constipation. |
| Negative | |
| 1. | Kirill: I’m dissatisfied with the quality of the locks, this is the third time I’ve changed them in the last year and a half. I heard that you can install silent locks, I will try it. |
| 2. | Vladimir: my negative review is about the standard constipations, the workmanship is poor, the material quickly wears out and gets washed out. When driving the car there is a constant knocking or metallic grinding noise. |
| 3. | Ivan: after six months of using the car with the original locks, I replaced the set with silent ones. I spent a little money, but the result is pleasing, everything works properly, there are no comments. |
Conclusion
The standard door locks on the Lada Granta Liftback are of good quality. Subject to careful handling and periodic lubrication, the service life is five years without mileage limitation.
Negative reviews are associated with violation of the terms of use of the mechanisms by the owners themselves.
Source
How to diagnose the trunk door lock of a Lada Granta liftback
During the operation of Lada Granta liftbacks, owners may encounter a situation where, while driving, the door open indicator lights up on the instrument cluster. Or, when the fifth door is closed, the light in the trunk is on and the car cannot be set to alarm. To identify the causes of these malfunctions, LADA dealership centers use information letter No. 87-19 “On diagnostics of the tailgate lock of Lada Granta liftback cars.”
The diagnostic technique is as follows
:
1. Open the tailgate (the trunk light is on), note that in this case a two-position lock 21910-6305010-10 (84500-02338) is used.
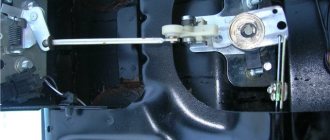
2. With the door open, manually close the lock 2 clicks using a screwdriver with a diameter of up to 6 mm, moving it beyond sector “B”. Closing the lock by 2 clicks is shown by the levers “A” located at the right point of movement until it stops according to the photo below:
Check that there is a guaranteed gap between the emergency trunk release lever and the inner panel of the tailgate. The gap should be from 0.3 mm to 0.9 mm.
If there is no guaranteed gap between the lever and the door panel, or the lever is jammed, with the formation of rubbing on the lock lever, it is necessary to remove the lock to modify the plane of the plastic lever. Using a mechanic's tool, remove 0.5 mm of the width of the lever to eliminate harmful contact causing blocking of the lever and blocking of the limit switch.
If, after carrying out the above actions, the lighting in the trunk when closing the trunk lock manually with a screwdriver for two clicks with the tailgate open, while the interior doors are closed (make sure the door limit switches are in working order, if any, taking into account the configuration), and the hood is closed (make sure the limit switch is in good condition if it is included in the package), dismantle the trunk lock and check the limit switch circuit along the circuit of pins No. 1 – 2 for opening when the lock is closed.
If the lock's limit switch does not open the circuit at pin No. 1–2 when closing it, replace the lock and consider the lock to be a defective part.
If there is no closed circuit at pins No. 1–2 when opening the lock, also replace the lock and consider the lock to be a defective part.
3. If the lock is in good working order after carrying out diagnostics according to point 2, and the defect “the light is on in the trunk” is absent when the lock is manually closed with two clicks on the open tailgate, but the defect is present when the tailgate is actually closed, while the door is in the gaps has no deviations relative to the body, and it is impossible to determine visually how many clicks the tailgate lock is closed; it is necessary to adjust the door lock latch.
Let us remind you that you will find other instructions for self-repairing Grants in this section.
Source
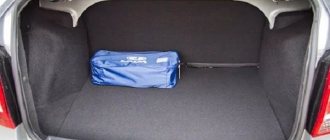
What are the characteristics of the trunk?
What is the actual volume in liters? If you fold the rear row of seats, the Granta's trunk volume will reach 770 liters, and in the standard position of the rear passenger row, the trunk volume will be 440 liters. This model is the first ever liftback among the entire AvtoVAZ family. In terms of luggage compartment capacity in its standard state, the Granta managed to outstrip such a popular European hatchback as the Volkswagen Golf. However, with the rear row seats folded, the Golf takes the lead thanks to the trunk volume of 1200 liters, which turned out to be unattainable for the Lada designers. After all, the primary goal was to maintain a single wheelbase and platform similar to a sedan.
So, what is the real opinion of Granta owners about the capacity and ease of use of the luggage section, because its volume in liters is quite impressive. The Internet is replete with an incredible variety of photographs posted by the owners. Sometimes the Lada Granta liftback can plunge you into amazement - how much useful luggage its luggage compartment is ready to accommodate. However, in reality, not everything becomes as rosy with the amount of space in the trunk as it is positioned in advertising.
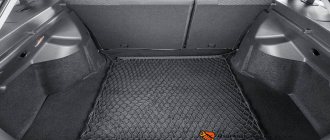
The rear seats have the only ability to fold completely when the front seats are moved close to the instrument panel. The inconvenience is that the rear headrest requires preliminary dismantling before folding. The top shelf in the luggage compartment can be removed without any extra effort, which is very convenient when transporting large items. Due to this action, space will not be added, but the luggage will not rest against anything. Niches on the right and left sides are suitable for storing medium-sized bags or a set of essential tools in case of an unexpected breakdown.
Above these technological recesses there are hangers designed for bags, which eliminates the need to clutter the rear seats with them. There is a light above the left niche, but it turns on when the low beam of the head optics is activated. An excellent solution for cloudy weather or dark periods of the day, however, the inconvenience is that you may forget to turn on the headlights beforehand.
Under the luggage mat you can find a full-fledged spare wheel, to which the manufacturer has added traditional attributes: a jack and a wheel wrench. There is enough space in the niche to accommodate a spare wheel with a large radius (if you wish to install 16-inch wheels). There is still room for the tool. This is easy to verify, you just have to look at the photo.
The wipers do not adhere well to the glass
The luggage compartment mat in the LADA Granta liftback made of rubber has not become popular among owners. The quality of the material is a little worse than expected, and it will not be possible to stick a traditional “motorist’s bag” to its surface with Velcro. The option of a rug with a pile covering will not be practical, since it is subject to the risk of contamination from spills of various liquids or dirt.
The rubber cover in the trunk can be easily placed on top of the standard one. If the niche for the spare wheel will be used for other luggage, then you should take into account the fact that one mat will rest against the niches on the sides of the trunk. If you place any object above the spare wheel niche, it will fall into its recess.
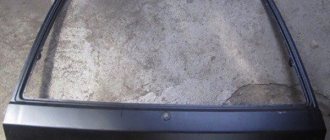
Trunk lid rattling
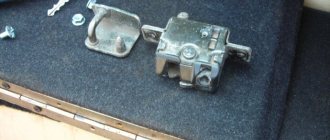
If we consider the rear door of the car, which closes the luggage compartment, then it is attached at three points:
The door obviously cannot rattle in the upper hinges. It remains to look for the reason in the castle. On modern cars, the closing elements of the lock are covered with plastic. Therefore, the trunk doors rattle less in these places. On cars of earlier releases, all parts are metal without any coating.
The knocking sound occurs due to the fact that when the rear door is closed, a small gap remains between the lock parts and the fixing element on the body.
When the car moves, especially on a bad road with uneven surfaces, the door moves and the lock latch hits the locking element on the body. As a result, a knock is heard from the rear of the car - this is the trunk rattling, and specifically the trunk lid.
How to find the cause of the sound and fix the problem, you ask? If you don’t improve anything, then nothing. But car owners use different tricks and give their “experienced advice.” For example, some drivers wrap 2-3 layers of regular electrical tape around the body clamp. As a result, the gap after closing the door decreases or disappears altogether.
Of course, electrical tape will not solve the problem forever, since when moving it is affected by the lock, and it becomes unusable. But if you rarely open the trunk, then for a month or two you will get rid of the problem and drive in silence.
In addition, on the sides of the door from below it is supported by two rubber buffers, which can be twisted and extended. Therefore, you need to adjust the length of the buffers so that they support the door sufficiently when closing it. If adjusted correctly, electrical tape may not be needed.
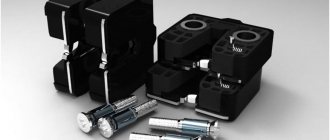
Electric drive: easy installation
The manipulation algorithm is very simple. Here you will need to make the rotary plate together with the rod yourself. The wiring is laid directly to the lock and connected to a special control unit. When the car is “disarmed”, the electric drive of the luggage lock is activated following the unlocking of the button responsible for opening the rear door of the Lada Kalina.
The whole essence of the action comes down to connecting the electric lock to two cable lines. You can buy the product at a specialized retail outlet. The end of the luggage compartment will need to be hidden in order to prevent the risk of moisture getting into it. If this is neglected, then with the penetration of water a short circuit will be observed in the designated area.
Much attention should be paid to the area near the door hinges, because broken wires are a common occurrence here. To prevent this, it is recommended to regularly monitor this section of the highway.
Before starting the procedure for installing the electric drive in a Lada Kalina car, you will need to remove the plastic trim. Here you need to be careful not to damage the specified protective element.
The choice of a lock for LADA Kalina should mean that there is no subsequent need for modifications before installation. This means drilling additional holes.
An important point in the installation procedure is the laying of electrical lines. For these purposes, you will need about 3.5 m of appropriate cable. You can use standard wiring suitable for the rear door. The power supply can be a cigarette lighter socket
It is also important to install the fuse correctly
We do all switching in LADA Kalina in accordance with the diagram.
Trunk lock rattling
In addition to the trunk lid rattling, the lock itself can make similar sounds. This happens when it is already so worn out that nothing can be done with it. It's easier to buy a new lock and replace the old one.
The trunk lock does not rattle only in recent foreign cars, and even then not in all brands. This problem is all too common among domestically produced vehicles, and even the Lada Vesta. She sometimes experiences noise from the lock.
Knocks from the rear can appear when starting from a stop, when driving on a bad road, over uneven surfaces, or when turning. In all cases, there is a reason for the knocking, why the rear rattles or the trunk knocks.
How to close the trunk?
The roomy 480-liter trunk, although it seems problem-free, is weak in one area - the loop into which the trunk lock is latched barely holds on and does not always go where it should.
You should pick up the tools (swearing loudly about the shitty pre-sale preparation at the dealer and the entire Russian auto industry is allowed), tighten everything that can be tightened. And the loop from the body, where the trunk lock is hooked, also needs to be corrected. We take a Phillips screwdriver, unscrew (yes, unscrew!), the entire structure of the hinge, we see that the hinge itself is wobbly, that it is not securely fastened with anything (we are swearing again)). )
This miracle can be corrected only by additional hammering with a hammer (when we hit, we imagine the face of the engineer at the factory during the design, and the worker who tightened all the bolts), the screws are as tight as possible. If you want the trunk to close even more easily, you should lubricate the contact points between the hinge and the lock with any industrial grease.
Trunk shelf rattles
This reason occurs in almost all car brands, except Japanese cars, with rare exceptions. Here drivers manage as best they can. Some people place soft elements under the sides of the shelf, for example, glue strips of soft foam rubber. Other drivers simply put a rag on hand and don’t bother too much.
On many cars, the rear parcel shelf rattles because the rubber buffer that is installed on it from the factory is missing or lost. When closing, the door presses the shelf through this rubber element, and the shelf is pressed tightly. As a result, the rear parcel shelf no longer rattles. Therefore, if there is no rubber band, buy it at a car store and get rid of the problem. Or install a homemade support instead.
Let's make the alarm system and central locking together
Any modern alarm unit is equipped with two relays connected to the central locking control unit. One relay is opening, the second is locking, and the circuit in the general case looks like this:
In our case, the green and white cords coming from the signaling unit will be required, as indicated in the diagram. However, they will not be the only ones needed. We will connect the relay contacts to breaks in the standard wiring. This means there will be not 2, but 4 cords.
Connection diagram for VAZ central locker
Take another look at the diagram published in the first chapter. We will connect the relay to the gap in the white and brown wires going from the microswitch to the central lock control unit. And it is obvious that it is easier to break these wires near the 8-pin connector. The same one shown at the beginning.
To avoid any questions, we will show you what should happen as a result:
Connection diagram, central lock VAZ
The common contacts are connected to the wires coming out of the microphone. The white cord continues with the brown wire coming from the door, and so on. Normally closed contacts are also used, along with normally open ones. These are the features of connecting to the VAZ central locking system.
An approximate sequence of actions performed by the installer:
- Make and lay a 4-core cable running from the signaling unit to the 8-pin connector;
- Connect the cable on the side of the alarm unit (see the last diagram);
- Near the 8-pin connector, disconnect the white and brown wires coming from the microswitch (pins 5 and 7). The main thing is not to confuse them with the wires going to the triangular connector “C”;
- Make connections to the broken wires, white and brown. That's all.
We have given this sequence to emphasize once again that the relays are switched on between the microphone and the central lock control unit. There is no need to connect any additional devices. As a result, the alarm system will be able to control the state of the locks.
All wires added to the car structure must be protected (use heat-resistant tubes or electrical tape). Twisting is not the worst method to connect two wires. But it's even better to use soldering.
It would seem that if a person has experience working with electrical equipment, he can do everything according to the instructions given. As a result, if no mistakes are made, you may encounter an interesting phenomenon. Instead of closing, there will be a short-term locking followed by opening. And vice versa. What to do in this case?
Take a look at what exactly may be present in some of the configurations:
The driver's door may not have an actuator. And then, it is useless to connect the signaling system to the control unit. There is no actuator, which means there is no one to close or open the door and move the microphone lever. Let's say the locks are closed, and then we remove ground from the brown wire and we get the following: the white wire is on ground, unlocking occurs.
We note the following: installation can only be carried out when you are sure that there is an actuator in the driver's door.
There were configurations where only a microswitch was installed. There is no need for arrogance here - adding an actuator will be difficult, since standard wiring must go to it. As you understand, it may not be available from the factory. And it’s unclear what to do then.
There remains one unanswered question - where exactly the central locking control unit is located. In these VAZ models, if there is a central locking system, then there is also a control unit. And it is located under the torpedo cover, next to the driver, on the right:
We remove the “beard” of the torpedo and look at what is on the upper right. On the same plane with the radio connector there are two boxes attached - the one we need, as well as the immobilizer (if there is one).
We would be lying if we did not say that in reality there is another option for installing the alarm. Standardly, only two power cables go to the actuators. Having a power outlet equipped with a fuse, these cables are connected directly to the alarm relay. This option, as you might guess, is not recommended. Imagine what would happen if the alarm system broke. The central lock must remain, but in this case this will not be done. Happy connection!
Knock from front or rear
If you hear knocks in the front of your car, this is a topic for a separate discussion. There the issue may be in the brakes and suspension, chassis and other components. A knock from the rear on the right or left also applies to the luggage compartment of the car. Here, look at what you have there, what things or objects can make sounds.
A pump that is not secured and on bumps in the road simply jumps and rattles can knock. A jack can create the same problem. Most often, after putting things in order, everything returns to normal. Keep an eye on your “iron horse” and everything will be fine.
Granta sedan. Something is knocking on the bumps in the back, I can’t tell from the sound that it’s like a trunk or like a shelf. Maybe someone had something similar?
Place a passenger and let him listen
0 0 Answer rating: 0
Same problem, I looked through everything, it seems as if the spare wheel in the trunk is jumping.
0 0 Answer rating: 0
There's something rattling around my right rear door. Just as the backside is packed with passengers or cargo, so is the silence
0 0 Answer rating: 0
check the handbrake cable
0 0 Answer rating: 0
That's how it should be, it's an AvtoVAZ. Joke. No matter where it makes noise, my car is three and a half years old. We don't have normal roads at all. Today I changed the wheels and looked at the suspension, which was all dead. There is not enough time, spare parts were purchased a long time ago.
0 0 Answer rating: 0
The back of the seat was knocking like that
0 0 Answer rating: 0
Perhaps you need to change the bagels and put a screw nut under the plate! Oh, I'm exhausted with these bagels. Also on the back right! I ate all my nerves. As a result, I welded the puck there and replaced the original bagels with some foreign ones, the weights were several times greater. I also placed a rubber washer under the plate and on the plate and tightened it. All voila silence
0 0 Answer rating: 0
The rear suspension of a car is represented by a set of components and parts that act as a connecting link between the body and the road surface. It, in comparison with the front suspension, often has a simpler design, which is due to the absence of steering system elements, load distribution and the position of the center of gravity. Despite this, nodes can still fail. The first sign of a malfunction is the appearance of a knocking sound from the chassis.
Ways to open the trunk without a key
There are several similar methods. The choice in favor of a particular one depends on the vehicle configuration, the lock mechanism and the manufacturer. Let's take a closer look at them.
From the inside
We are used to hearing the phrases five-door hatchback, three-door sedan. But it doesn’t always occur to you that the outermost odd-numbered door is intended for the luggage compartment. In an emergency, you need to fold down the rear seats and get into the luggage compartment of the body. Use a flashlight or touch to explore the door. Stumbled upon a pen? Open it with confidence.
Car trunk lock mechanism
Tools to help
In most domestic cars, it is impossible to open the trunk from the passenger compartment. One thing is missing: either a handle or that same door. You will have to remove the rear sofa, and then return it to its place and re-weld the hinges to the body. Sometimes this is not an option, since access to the compartment is made difficult by the rigid frames. In this case, a screwdriver or other hand tool will come to the rescue. Insert and turn the trunk lid retaining loop.
If the trunk does not open even in this case, a wrench is needed to remove the lock. The size of the bolts for fastening the actuator is M10 - M15. The procedure is effective if you have the skills to restore the lock yourself.
If the drive is electric
Despite the reliability of the electrical lock mechanisms, manufacturers play it safe. The set of car keys on the key fob also includes a mechanical opening key in emergency situations. It is advisable to make sure that it is available when purchasing a vehicle, otherwise you will have to contact the dealer again.
The problem with new cars
The methods described above are relevant for used cars. Modern cars, stuffed with electronics, do not tolerate such amateur activities. The same applies to new cars under warranty. To avoid early violation of the warranty, contact your dealership or authorized service station. A qualified specialist will qualitatively perform the task assigned to him.
There are also mobile technical assistance services in every city or region. You need to contact them if the problem occurs at the wrong time - you urgently need a spare tire or a set of tools in the trunk.
Rear suspension design
In order to determine what could be knocking in the suspension, you should know what this element of the car consists of.
A sound in the rear suspension may appear when one of the above elements fails. At the same time, we note that if there is a constant knocking, it is imperative to carry out diagnostics of the suspension. If working with a car causes many problems, then you can entrust the diagnostics to specialists from a car service center. Note that the rear suspension has a very simple design and you can dismantle the worn part yourself.
Possible causes not related to suspension
Before determining what might be knocking, you should make sure that there is a problem with the suspension. Often, a knock may appear due to a minor malfunction of another element, but with strong vibration on the road, it seems that the problem is with the chassis elements. Possible causes of knocking include the following:
Reasons for replacement
It is necessary to replace the entire lock or just the contact group, depending on the nature of the breakdown and the situation with your car. Therefore, we will consider options when replacement may still be required.
| Reason for replacement | Your actions |
| There was an attempted theft, as a result of which the integrity of the lock was compromised | In this case, only the contact group and the cylinder can be replaced, since the lock itself is most likely intact. Lower costs and required repair efficiency. Although experts advise purchasing a new lock right away and installing it |
| The keys were lost and there was no spare | There is no point in trying to find a master who will turn you exactly the same key as before. You will have to purchase a lock and install it on your car |
| Problems with contacts or contact group | It is not difficult to check whether this is really the problem. Turn off the battery by disconnecting the negative terminal, then remove the cover under the steering column and check the wires for resistance. Switch the key alternately to positions 1,2 and 3, while measuring the resistance. If the ohmmeter shows “zero”, then the lock really has a problem and needs to be replaced. |
| There was a desire to improve the castle | Often, car owners replace the standard ignition with a more modern one, equipped with lighting. It is not expensive, but it is convenient to use in the dark. No need to fumble for the key slot |
When checking the contact group, be sure to disconnect the negative terminal from the battery, otherwise a short circuit will occur, and not only the contactor will have to be replaced.
Circuit and pinout
First of all, get acquainted with the lock diagram and wire connection diagram, which will allow you to better understand the features of the 3Z pinout.
As you can see, the pinout includes 8 elements. What does each of them mean and what functions are they responsible for? We'll figure out.
- Power supply for the inserted key sensor microswitch (+12Volt).
- Power supply to ground when doors are opened on the driver's side.
- Power supply that supplies current to the starter (+12Volt, pin 50 on the diagram).
- Source at +12Volt. Activated after turning on the ignition. Power supply for additional equipment, such as video recorders, clocks, etc. (pin 15 in the diagram).
- Source at +12 Volts. Triggers when the key is inserted. Goes to pin 5.
- Power supply +12Volt. The illumination of the 3Z larva is activated.
- +12V source from the battery (pin 30 in the diagram).
- Not active.
Diagnostics of suspension guides
Many cars have a similar rear suspension design, which makes diagnostics and dismantling easier. The differences can only be in the principle of fastening and the type of installed parts. During the diagnosis you should:
The threaded connection of the flanges used when attaching the guide elements can also cause a problem. The flanges can be repaired, but it is recommended to install new ones. The check is carried out on an overpass or pit, since problems are determined visually or using force (that is, you need to strongly loosen the guide elements with your hands). This will require good lighting. Therefore, it is recommended to carry out work in the garage.
How the central lock works
On the VAZ 2110, the central lock is a system designed to open and close vehicle doors. For more convenient control of the central locking on the VAZ 2110, and on other cars, a remote control has long been used. If necessary, the central lock can be configured so that it turns on automatically after a certain period of time. Depending on the system, the key fob can be used to control the trunk door, the engine compartment, and sometimes the central locking system even allows you to open and close the windows. In the event of an accident, the central locking system can operate automatically, opening all doors of the vehicle.
The VAZ central locking system includes sensors in its design - these are door limit switches, solenoids, and a control unit. The limit switch is designed to fix the position of the doors, and data about this, in turn, is transmitted to the VAZ 2110. The purpose of the switches is to secure the structural elements of the door lock.
The system itself is locked using one switch, and the unlocking function is performed by another sensor. The design includes two more switches that ensure normal operation of the locking mechanism. Another one, the fifth switch, is mounted on the lever mechanism of the drive; its purpose is to detect the position of the door. If the car door is open, the contacts of the elements close, and accordingly, the entire system is deactivated. To perform a particular function, the control unit transmits an impulse to certain control devices, thus activating the drive.
Spring problem
Although springs are very durable, they can also wear out over time under certain operating conditions. Often, spring wear manifests itself in a slightly different way: the car wobbles at high speed, strong rocking, or a sagging rear end. However, when looking for something that may be knocking, you can conduct a visual inspection and pay attention to the following points:
In most cases, springs lose their elasticity due to long service life or when exposed to heavy loads (for example, a passenger car has been used for a long time to transport a heavy load). The appearance of defects in the turns indicates poor quality of the metal used in manufacturing, a manufacturing defect, or severe wear. If everything is in order, we carry out further inspection.
Shock absorbers: a common problem caused by rough roads.
Shock absorbers can be considered the most vulnerable structural element. They are designed to absorb impacts when overcoming broken sections of the road. You can determine shock absorber wear as follows:
Features of door adjustment
The opening device may become stuck because the door is sagging or poorly adjusted. Several effective methods have been developed:
The adjustment is carried out using the lock latch located on the door fragment pillar. Using an impact screwdriver, three bolts are loosened, the door is adjusted, and the screws are tightened. Adjustment of the response part. It provides soft and silent closing/opening. To do this, the door is moved outward using external adjustment screws. Hammering the bracket with a hammer
After a slight shift, it is important to check the functionality of the door, then repeat the procedure if necessary.
Loosen - tighten, this is an algorithm that will allow you to adjust any structure, even the trunk. If the door element is skewed, it means that the points on the rotation axis have shifted. Therefore, the loops are simply tightened by 5 mm. If these actions do not help, then the distortion should be looked for in another part of the body.
Consequences of ignoring a knock
Any extraneous sounds that appear while driving must be identified without delay, as their presence may indicate a serious malfunction. In this case, let’s look at the consequences of knocking in the rear suspension:
In most cases, a knock in the rear suspension is detected almost immediately, as it occurs while overcoming a bump or pothole on the road. As a rule, suspension elements fail after their service life has expired. If you replace parts in a timely manner, you can avoid road accidents and serious material costs.
Source