The hood lock is removed if it is necessary to replace the cable or the entire lock, as well as when the hood opening mechanism interferes with various painting jobs, replacing the lid, etc. How to remove and adjust the hood lock for a VAZ 2107?
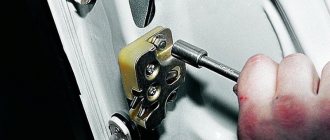
To remove the hood lock, you need to use a screwdriver and a 10mm wrench. In addition, you will need a marker or pencil, which should be used to outline the outline of the lock for ease of reinstallation or when completely replacing the mechanism. When the outline is drawn, use a standard screwdriver to pry the locking cable clamps and remove them from their seats. Now slightly straighten the cable and remove the retaining sleeve, and then remove the cable from the mechanism. Using a wrench, unscrew the two nuts that secure the lock to the hood along with the washers.
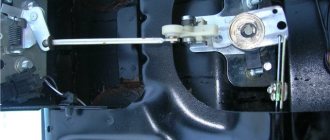
After this, straighten the rod and remove the fixing tube. In the interior, under the dashboard, pull the sheathed cable into the lock drive hole using pliers. Removing the traction mechanism using the described method is only possible if the linkage breaks on the side of the handle in the car interior. If the cable breaks in the hood area, then you will need to crawl under the hood to pull the lock spring towards the battery.
It is also worth saying a few words about the locking cables on the VAZ 2107 and other “classics”. There are single-core and multi-core rods, which differ in strength. We recommend purchasing a multi-strand cable (cost up to 150 rubles).
Tensioning the cable and installing the lock occurs in the reverse order. Use the contour that was marked during removal; you can use it to adjust the position of the lock.
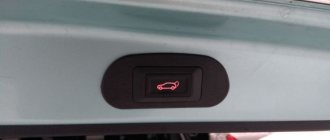
On some Lada models, including the VAZ 2107, you can install an additional electric drive for the trunk lock with the button located in the car interior.
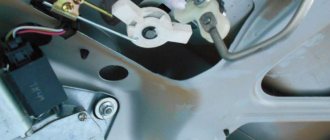
Trunk lock device for VAZ 2107
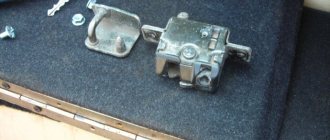
The trunk lock of the VAZ 2107 consists of the following parts:
A retainer with a plate is installed on the car body, with which the rotor and lock body engage. If any of the parts is damaged, it must be replaced. If it simply does not work well, but there is no visible damage, you must first try to lubricate the device and adjust the position of the lock relative to the latch on the body. If these operations do not help, the part should be replaced with a new one.
What is needed for replacement
Before changing the trunk lock of a VAZ 2107, you need to stock up on four items:
- 10mm wrench (preferably a socket wrench);
- installation (needed to adjust the closing force of the trunk lid);
- pencil;
- new trunk lock for VAZ 2107.
You will also need aerosol lubricant or “Litol”.
Why doors don't close: common reasons
Diagnostics is the first action that the driver must take if the rear door of the VAZ 2107 does not close with a latch or the driver's seat is acting up. Inspecting the vehicle will reveal cause and effect. Main nuances:
Without periodic preventive maintenance, over time, body parts will stop working normally.
You should start by checking the adjusting mechanisms, then inspect the condition of the seal. If the rubber band has come loose somewhere, it will not allow you to close the door easily. An external inspection will allow you to find out whether there is any distortion or sagging of the structure. Based on the data obtained, the repair stages are worked out.
Replacing the trunk lock of a VAZ 2107
To remove the trunk lock, you must perform the following steps:
If you are only replacing the trunk lock cylinder of a VAZ 2107, then the removed lock must be cleaned and the parts lubricated with “Litol” or aerosol lubricant. If the old lock also needs to be replaced, then it is necessary to lubricate the parts of the new lock. Once the lock is lubricated, install it as follows:
- insert the sealing ring of the lock into the trunk lid;
- insert the lock cylinder into the drive extension (distance sleeve);
- install the cylinder with the bushing into the lock;
- install the lock assembly in its regular place on the trunk lid, focusing on the pencil marks;
- secure the lock with two bolts and tighten them with a 10mm wrench.
If the lock does not close well, its position relative to the latch should be adjusted. To do this, you need to loosen the fastening bolts and change its position so that the latch fits freely into the body and the lever securely fixes it, and there is a uniform gap between the trunk lid and the body around the entire perimeter. To adjust the force of opening the trunk lid, you need to use a mounting tool to move the ends of the torsion bars of the springs to one of the teeth of the trunk hinges.
This completes the replacement of the VAZ 2107 trunk lock.
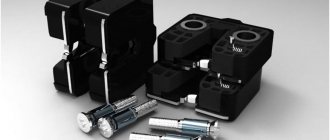
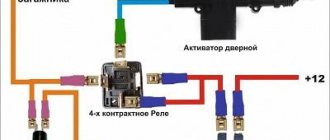
In order to open the trunk with a button, we need the following:
Electric drive for the lock with accessories, all of them come with it! Be sure to check the package, they tried to push the lock onto me without fasteners (like they forgot to put it in), but then the installation process becomes more complicated :) We also need an ordinary relay (4 or 5 contact does not matter, we only need 4 of them):
VAZ relay and a couple more meters of wire, female connectors and, ideally, a “chip” for the relay, but you can do without it :) So, initially the task was to decide where to place the electric drive - I didn’t reinvent the wheel and placed it like this: And secured it through the bar with self-tapping screws: Ideally, of course, you can and should also screw in the second bar, but I was too lazy, and the lock fit tightly with its protruding end into the hole in the trunk lid (this hole even had to be widened a little with pliers) and out of the way it is impossible to move it by hand :) Next, the task was to make a mechanical connection between the electric drive and the trunk lock. After surfing the Internet, I took the simple route - without welding or disassembling the lock. We look at the photo, under the photo there is a description :) So, with a hacksaw we make cuts for metal, as shown in the photo, we bend the “tongue” that appeared as a result of these manipulations, and we have access to the lock element, by pulling which the lid will open :) Then we take the pulley that came with the electric drive, measure it in length, bend it in such a way that the electric drive has the ability to pull it into itself to open the lock, bite off the excess (saw off, break off). Looking ahead, I will say that during operation I encountered a problem that after opening the lock with a button, this pulley did not allow the lock to close, each time I had to use the handles to push it back a little - this problem was solved with the help of a return spring (the spring is like on the drive to the carburetor ) see photo, spring engagement points are circled in red:
But there is a second option, which is to put a regular spring under the rubber boot on the central locking under which it will not be visible.
The trunk lock on a VAZ 2107, like any mechanism, tends to fail over time. As a result, the lid does not fix well and knocks during the trip. Replacement is not the only reason why you sometimes have to remove the lock. The key may be lost or the cylinder mechanism may break. Let's look at how to carry out repairs yourself without visiting a service station.
What is needed for adjustment
If the rear car door of a VAZ 2107 does not lock, then preparations are made for adjustment or repair work. To do this you will need a set of equipment:
If it is determined that the problem is hidden in the adjusting screws, then it is enough to have a wrench and a screwdriver on hand.
To repair the closing device or handle, you will need to disassemble the interior decorative panel. When replacing, a new euro handle, lock core or solid device is purchased. A wrench and a simple hammer will help straighten the gaps.
Replacing the lock
The process of dismantling the old device and installing a new one will take no more than 30 minutes. Follow these steps:
1. Trace the outline with a pencil to accurately mark the position of the mechanism on the body. 2. Using a socket wrench, unscrew the two nuts that secure the device. 3. Carefully remove the lock without scratching the body covering. 4. Use your finger to push the cylinder inside the cover and remove it along with the bushing. 5. If necessary, remove the gasket. 6. Clean the new lock from dirt and dust, lubricate all its parts. 7. Put the gasket in place. 8. Insert the new cylinder into the bushing. 9. Install them in the lock. 10. Place the assembled lock in the place marked with a pencil. 11. Tighten the mounting bolts using a 10mm socket wrench.
If the trunk is difficult to open, you need to adjust the position of the lock in relation to the latch. To do this, the mounting bolts are slightly loosened and the mechanism is slightly moved so that the latch can easily enter and be securely fixed by the lever.
To adjust the force required to open the lid, the spring torsion bars are shifted by one tooth in the hinge using the installation tool.
For a whole year I was planning to make an electric trunk lock for a VAZ 2107. And then one fine day, when I finally got tired of every time I need to get into the trunk, pull the keys out of the lock, open the trunk, then stick it back again, and if I also need to turn it off, I finally got around to doing it. The door lock activator, which is used in central locks and alarms, was already lying around waiting. I didn’t even have to buy it, although the price was not more than 200 rubles.
If I had asked on the Internet how to install an electric trunk lock on a VAZ 2107, I might have done it differently, but it turned out not bad either. The installation of the electric lock is almost the same on one side, but the traction is done differently, with a cable or wire. Some install a solenoid to unlock the trunk.
There were difficulties in resolving the issue of attaching the rod to the trunk lock. I decided to make a pin and attach it to it. Drilling and threading, but it was not possible because the metal turned out to be very hard. After thinking, I decided to weld the bolt 4 by welding. Even though the hole was small, everything worked out.
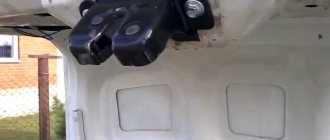
Installation of the activator
Initially, it is necessary to install an activator, which is an electric drive that works to retract or repel, depending on the connection. The first step is to remove the lock and install the activator rod. To remove the lock, you will need to unscrew two nuts.
After this, you need to drill a hole in the side of the lock to insert the rod and connect it to the lock tongue. The rod will need to be bent (secured), it should look something like the one shown in the photo below.
After fixing the rod to the lock, the latter can be installed in place. It is advisable to remember the tilt level of the lock and install it as well, so that you do not have to adjust it during installation. Now you can attach the activator to the trunk. To do this, you will need 2 self-tapping screws and a special plate, which comes with the product. After this, you can manually try to see if the lock will work when opening. When the activator is installed on your VAZ 2107, you can proceed to the next stage: connection.
When to repair rather than adjust
The silent lock and Euro handle are smart devices that were previously available only for foreign cars. They can block the door operation if problems are detected. Therefore, adjustment will not always correct the situation. Repair of elements is indicated in the following situations:
Regular diagnostics, care and prevention minimize the percentage of problems. Twice a year it is important to lubricate fasteners, clean, inspect seals and adjust doors.
Source
| The door creaks and slams when the structure is closed. | The rubber seals are leaking. |
| The canvas bounces off the rim. | The cause of the breakdown is washing, exposure to aggressive cleaning substances. |
| There has been sagging, subsidence, and displacement. | The body was deformed after a strong impact or collision. |
| Measurements showed that the gap has increased. | Long-term operation, wear of the seal or mounting bolts. |
| The door moved away from the counter. | Consequences after winter, frost and moisture. |
| There is a kickback when closing. You have to press the element with force. | No adjustments have been made for a long time. |
| The backlash is set incorrectly. | Poor adjustment of hinges and screws. |
| Broken inner or outer handle. | The latch, the blocker, has come off. The door card needs to be disassembled and the handle repaired. |
| While driving, a whistle is heard and the door rattles. | Poor quality repair work. Refinement and lubrication of individual parts is required. |
| When closing, there is a feeling of obstruction, as if something is stuck in the doorway. | Periodic blocking of the closing mechanism. |
Adviсe
- When adjusting clearances, never loosen all bolts at the same time. You must leave at least one bolt tightened. Otherwise, the body panel will dangle in the opening and will slide off when you want to tighten it, holding it in the desired position. Always try to gradually move the panel into the desired position by loosening one bolt or the other.
- You can use a simple technique. It consists of tightening the fastening bolts so that they can hold the body panel, but at the same time allow it to be moved into the desired position in place with little effort. You need to experiment and understand with what force you need to tighten the bolts.
- When installing the doors, hood and trunk lid, you can temporarily remove the lock hinge from the opening. This will allow the doors and hood to open and close freely. Having aligned the desired panel according to the gaps, you can screw the lock loop back into the opening and adjust its location.
- It is possible to place washers under the hinges to change the position of the panel by the required few millimeters. In this case, it is advisable not to overdo it with the thickness and number of washers, so that this is not noticeable and is not an additional sign of the car being repaired. There are even special shims for such purposes that can be inserted under the mounting bolts without removing them.
- Sometimes, when all parameters for the location of a body panel are adjusted as much as possible and the gaps are even, but the panel is not at the same level as adjacent panels. This often happens with edges that protrude slightly. In this case, you can press this edge, having previously made a safe stop for this panel, so as not to damage anything.