The site allows you to answer your request for a trunk limit switch for the Lada Granta sedan - go here. Videos and reviews on do-it-yourself car maintenance and repair. How to repair a car yourself at home. We will help you with repairs and repair the car yourself. We know how to restore a car with minimal investment. I have attached video instructions.
Category: Car repair yourself
Laughter on topic: When asked about chemistry, what can I say about salt molecules, I answer: “They go well with cucumber molecules.”
Published by Admin: at the request of Dzhokhar
Feedback from a car owner: 1. Dynamics and acceleration. Especially on the highway after 120 km/h.2. Handling on R17 wheels with good tires.3. Impenetrable suspension. But it’s a bit harsh, especially with R17 and for rear passengers.4. Stability control system. Forgives most mistakes in choosing speed. It’s a shame that it’s not available in current trim levels.5. Active antenna allows you to pick up radio on long trips
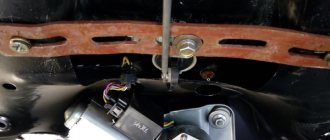
And so, after a trial installation of the front right door limit switch, I found out where and how the trunk is connected. The answer turned out to be as simple as shelling pears, the switch is in the lock, the wire is in the light bulb and in the alarm unit. When installing the alarm, the “master” apparently decided that the trunk was an extra waste and put a bolt... I, in turn, squirming under the steering wheel, found the alarm unit and the wire that was responsible for the trunk lock - this wire is orange-white. Everything is very simple:
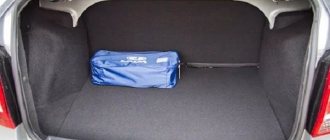
And for one thing, I decided to put a permanent plus on the light bulb, took it from the radio (yellow wire), so that it would light up when the trunk is opened, regardless of whether the dimensions are on or not.
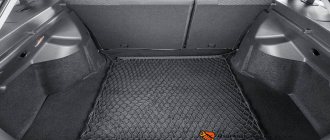
The wires were pulled along the floor using a standard harness that went straight into the trunk. The positive wire took 5m straight, a little less for the end switch. Now I’m calm about all the doors with locks =) The hood switch is there, but I don’t understand whether it’s connected or not, the wire from it goes into the corrugation, I set the car to alarm with the hood open, after activation I pressed the switch, zero emotions, maybe it’s necessary It was easy to just unlatch the hood and then lift it... If anyone knows, please sign up. I'll try it later with the hood unlocked.
Trunk lock, disassembly, limit switch
Like many others, I encountered the fact that the trunk light stopped working.
The reason is simple - the limit switch in the lock has died. The purpose of the preparation is to clarify the cause and take measurements. Result: 1. Worn limit switch 2. Width between contacts - 10mm I poked the switch, checked it with a tester, put everything back together, the lock worked. Apparently the switch is stuck, or the contact pair has oxidized. I’ll buy an analogue in radio components. Disassembly is hampered by the rivet, which is the axle. Sharpen it. Unclip the housing and move it away from the metal part. Then the pressed cover will come out of the grooves.
The limit switch was re-soldered. I bought one similar in size from radio parts, but with a ski. Because with a long pusher it was not.
Review of Manufacturer Prices
| Name/article | Price, rub.) |
| Limit switch with cap 1118-3710199 | from 160 |
| 11190-3710200 | —/— |
| Rubber cap 11190-371020600 | from 35 |
| 104035756 | from 175 |
| Dello 3094705636N0 | —/— |
| Hans Pries 104035756 | —/— |
| 11190-371020000 | —/— |
*prices are current as of 10/07/18.
The service life of factory rubber caps is limited, only 1.5 - 2 years. The reason lies in the low quality of materials. In winter, drivers often encounter freezing of the limit switch and hardening of the rubber cap. As a result, lighting activation is delayed. The central lock often blocks the doors due to unstable operation of the limit switch. There are several ways to troubleshoot the problem, which we will discuss below.
general information
The functioning of the car alarm, the light in the cabin and the operation of the door opening lamp on the instrument panel are closely related to the operation of the limit switches. The cost of the described devices is approximately 160-175 rubles. (for example, this is the cost of devices with a cap with article number 1118-3710199 and end switches with article number 104035756).
Let us also note a number of differences that exist in various Grant configurations:
- In the “Standard” configuration car, the buttons on the seats are replaced with plastic plugs. There is no wiring in machines of this configuration;
- On the Norma Grant, limit switches are installed not only on the driver’s door, but also on all other doors, however, all other seats (except the driver’s) are equipped with plugs. In vehicles of the specified configuration, wiring is installed;
- Luxury vehicles also have a full set of sensors installed on each of the car doors, but only the device installed on the driver's door is responsible for turning on the lighting lamp and the door closed indicator on the instrument panel. When the remaining doors are opened, only the light comes on.
The operation of limit switches is based on closing the circuit of an electromechanical device when the door is opened. It is at this moment that power is supplied to the lamp illuminating the car showroom and a parallel direction of the electrical pulse to the alarm system. When operating limit switches installed on Volzhsky Automobile Plant vehicles (including Grants), some problems are noted that the car owner himself will have to solve.
Photo: https://www.drive2.ru/l/288230376152835049/
How to extend the service life of the door activation sensor using the traditional method
Craftsmen have come up with many ways to resuscitate a rubber cap, prevent it from deforming and freezing. We present the most effective methods:
- insert for the rubber tip of the spring. The diameter of the coil is “6”, the length is 1.0 cm. When the door is opened, the spring pushes the tip to its original position, the contacts close, the interior lighting is activated;
- replacement of standard caps with parts from the second generation Opel Astra. The dimensions are identical, the only difference is in the shape, it is more convex, which contributes to the sensor’s quick response to opening/closing the door;
- systematic application of silicone lubricant to a rubber product to restore elasticity.
Reviews
| № | Positive |
| 1. | Kirill: I knew about the problem of freezing tips initially when I bought the machine. I immediately bought silicone grease and lubricated it on the inside once a quarter. It's been a year now that I haven't had any problems. |
| 2. | Vasily: after the first winter the sensor jammed several times. I took the cap off, cleaned it, and lubed it. Works properly, no comments. What happened is also my fault, since I did not carry out preventive measures in a timely manner. |
| 3. | Konstantin: I bought Grant at a dealership six months ago, the activation sensor works properly, the light comes on without delay, and an indicator lights up on the dashboard. |
| 4. | Ignat: a year has passed since the purchase, I have not made any investments, there are no comments on the mechanisms. Once there was a malfunction of the sensor. Moisture got inside, after drying the defect was eliminated. |
| 5. | Sergey: I agree with the majority of positive reviews, the limit switch works properly, the workmanship is good. Every month I lubricate the rubber tip with silicone. |
| 6. | Vladimir: It’s been the second year since I bought the car, I haven’t made any investments other than scheduled maintenance. I heard about the “disease” of the sensors on Grant, but I can’t confirm it. |
| 7. | Ivan: once in the winter the limit switch jammed, I didn’t buy a new one, I cleaned the old one. It still works fine. |
| Negative | |
| 1. | Victor: I can’t speak positively about the activation sensor, since this is the second time in a year that I change it at a service station. The doors of the Lada Granta locked themselves twice. |
| 2. | Vyacheslav: after the winter the sensor jammed, the doors were locked, the keys remained in the cabin. I called a service station technician to open it. |
| 3. | Alexey: I can’t recommend factory door activation sensors, as their quality is poor. Comrades advised installing from Opel, they say that the diameter is identical. |
Conclusion Limit switches on a car should always be in good working order. Provided proper maintenance and lubrication, the service life is at least two years. It is necessary to regularly analyze the condition of the limit switches in order to notice and prevent malfunctions in time. You should also adhere to the operating instructions.
Video - Lada Granta - door switches freeze? 3 solutions to the problem.
Methods for solving problems with door limit switches
We will look at a number of fairly simple ways to solve the problems described above, which every car owner can easily put into practice. Thus, if problems arise caused by the operation of limit switches in the winter months, you can resort to the following methods:
- Remove the anthers from the limit switches. Remember that these rubber caps serve a protective function, and therefore when removing them you will have to be very careful about cleanliness. It is recommended to remove the anthers only for a short time, in frosty weather outside.
- Replace the “original” caps with analogues. Anthers from other end caps, for example, Toprun, which are practically a copy of the original Granta caps, are suitable as analogues. However, these anthers are made from materials that do not lose their elasticity at sub-zero temperatures, which is their undoubted advantage. You do not need to change the end switches themselves, only the caps should be replaced.
- Install a spring under the switch boot. For this purpose, springs with a length of approximately 18-20 mm and a diameter of 12-13 mm with a wire thickness of 1 mm can be used. They need to be installed on the limit switch rod, directly under the anthers. A good spring will not allow the cap to be constantly in a compressed state and will not let you down even at a temperature of -40C.
- Lubricate all rubber surfaces with silicone, this will help in relatively mild frosts (about -10C or less).
- Treat the surface with a water-repellent liquid. This measure works in a fairly wide temperature range (up to -50C), but is purely temporary.
Size-independent trunk lighting Grants
| The trunk lighting of the VAZ 2190 is no different from previous AvtoVAZ cars, and only works if the dimensions are turned on and the trunk lid is open. To simplify the circuit, it is proposed to make the trunk lighting independent. |
The Lada Granta trunk light connector has two wires:
- Black and white is a mass.
- Yellow-red - this +12V appears when the lights are on.
Goal: route a permanent plus to the trunk light, and connect it instead of the yellow-red one. As a result, the trunk light will turn on when it is opened, regardless of whether the tailgate is on or not.
- White and red are a constant plus.
- Black is constant mass.
- Brown and green - mass from limit switches.
You can take the permanent positive from the ignition switch, we need the red wire.
The permanent plus from the radio (ISO connector) hangs on pin A4.
Some people are used to taking the permanent positive from the cigarette lighter (how to remove it); in the Lada Granta it is a white-red wire.
These are just some of the options where it is convenient to connect to constant +12V. We lay the wires inside the cabin under the plastic thresholds or under the headliner. By the way, the standard lighting in the Granta trunk is very dim, it is recommended to modify it.
Similar materials
- Author
- Message
Trunk light (does not go out)
Post by Spekrob » Thu Dec 18, 2008 5:31 pm
Re: Trunk light (won't go out)
Post by NeedAngel » Thu Dec 18, 2008 6:28 pm
Re: Trunk light (won't go out)
Post by Hranitel » Thu Dec 18, 2008 8:18 pm
Re: Trunk light (won't go out)
Post by Magadanec » Thu Dec 18, 2008 10:20 pm
Re: Trunk light (won't go out)
Post by Lehatrd » Thu Dec 18, 2008 11:19 pm
Re: Trunk light (won't go out)
Post by Hranitel » Fri Dec 19, 2008 11:35 am
Connecting the signaling to the central locking system
Now we get to the most interesting part. The contacts of the signaling relay must be connected to the gap in the brown wire (see diagram in Chapter 1). Moreover, this will be required regardless of the configuration. Oddly enough, we won’t need power cables at all. And the task now looks like this: you need a two-wire signal cable connected to the break in the brown cord.
The moral here is:
- If you were able to remove the central lock control unit, connect the cable to the break in the wire connected to pin “7” of the control unit;
- If you have removed the door trim, then pull the cable out of it (from the point where the brown cord breaks).
It is clear that the second side of the cable must reach the relay connector of your alarm.
Option for the “Lux” package
So, this means that there is a button on the armrest in the cabin that allows you to lock the locks. From one of the contacts of the button, to which a “plus” is applied when pressed, you need to stretch the cord to the signaling unit. Nothing else is required, and you can connect the alarm according to the following scheme:
According to reviews, this option is suitable if we are talking specifically about the “luxury” configuration. By the way, the resistor can be connected to the gap in the wire designated “blue” (the common contacts are then connected with a jumper).
It must be remembered that when working with any electrical equipment, you must first remove the negative terminal from the battery.
Each cord that is re-laid must not touch metal surfaces. Otherwise, in places of contact, the wire is protected with a tube that can withstand temperatures of 250 degrees. This is how you can protect yourself from unforeseen consequences.
Installation in a lock
With the second option, the part will be placed not in the threshold, but at the top of the door. The wires are redirected to the lock. In this case, the function of the switch is taken over by the lock contacts. There are practically no difficulties in installation. Refining the circuit involves installing additional wiring and plugs for connections. During installation, it is necessary to protect the wires from abrasion using a corrugated hose or insulating tape. To implement this method, it is necessary to disassemble the lock and remove the locking bracket. The work is carried out in the following sequence:
- Remove the lock.
- Pull out the protective bracket.
- Open the connector plugs.
- Insert terminals.
- Connect the wires on the driver's door side.
It should be remembered that installing and connecting switches on the Lada does not guarantee their stable operation. To eliminate possible problems, you need to know their causes and solutions.
What is important to know about silent locks on the Lada Granta Liftback
Not all car owners are satisfied with the ease and noise level when closing the doors of their car. The defect is caused by excessive wear of parts and design flaws at the manufacturer level.
The principle of noise suppression is implemented by an installed noise absorber. In Lada Granta Liftback models, this is a rubber insert or a plastic polymer.
Silent locks are structurally composed of a pin and a shackle with a noise-absorbing insert. Some car owners practice replacing the arms, while leaving the standard locks unchanged. Already in this case, the noise level will be significantly lower, and locking the door will be easier.
At the same time, systematic use of the door lock leads to rapid wear of the polymer/rubber material. The owner has to come back for preventative maintenance again and again.
Photo report on connecting a car alarm to a Lada Granta Luxury package
On the ignition switch: +12 - pink starter - red ignition - blue/black
We connect to the central locking in the driver's door according to the figure below.
We connect to the tachometer on the small connector of the electric power steering - brown/red wire.
In the left threshold we connect to the door and trunk limit switches , turns , and handbrake .
We connect to the hood terminal in the harness that goes under the hood behind the mounting block - white/black wire.
To block, you can use the fuel pump - the gray wire on the back of the mounting block.
To remotely unlock the trunk, connect the negative wire to the red/white wire on the trunk release connector.
Finalization of the scheme
Work on modifying the door end elements can be delegated to service station specialists. In this case, the owner will be charged an installation fee. You can do everything yourself, then installing limit switches will require plumbing tools and a device for checking the electrical circuit:
- Tester.
- Soldering iron.
- Phillips screwdriver.
- The wire.
- Solder POS-40.
- Corrugated hose.
- Insulating tape.
- Limit switch.
The owner must decide on a further plan of action based on the features of the layout of his Lada Granta car. It can activate the button in the threshold or the door lock contacts.
Both options involve parallel connection of unused elements to the working terminals of the door on the driver's side. The switches for opening the doorway of a Lada car are powered using a two-wire circuit. To simplify the choice, we will consider both options.
General tips for installing alarms
- To supply power to the alarm unit, you should take energy only from the constant positive, which goes directly to the battery, bypassing fuse protection.
- It is best to attach the light indicator not to the dimensions (as recommended by the instructions), but to the turn signal network.
- If possible, the alarm antenna should be connected as close to metal parts as possible, as this will result in a better signal.
- After connecting all the elements, check and adjust the shock sensor to the optimal values.
vote
Article rating