Greetings my subscribers and guests of my logbook
This morning I woke up, and my hands were itching since yesterday, I endured it until the morning. I again took some Madeleine and scissors and went to the car. I removed the center console and began to inspect the whole thing, where the joints of all the parts that are installed on it are. I carefully took everything apart, taped the material, assembled it and moved everything normally. So we move on. Some parts, such as air ducts, had to be removed and installed several times to achieve a result that suited me. After gluing everything became much tighter, I pulled the console with both hands and everything was quiet EXCELLENT what I wanted). I didn’t stop there and glued the remaining material onto the fuse cover, the side panel plugs, the frame on the instrument panel, and glued a small square to the place where the alarm key fob knocks on the steering column casing. I also glued it to the inner velvets, they were still removed when I rolled the glass with film. The glass sits much tighter and doesn’t rattle on bumps, that’s all. We look, we rate, we comment
Removing the standard radio in Grant Lux
The difference between grants of the luxury configuration: the MMS (multimedia system) installed from the factory. This is a 2 din device.
To remove standard acoustic grants:
- take a knife or plastic spatula to dismantle the acoustics and disconnect the decorative trims to the right and left of the radio. It is not necessary to take pictures;
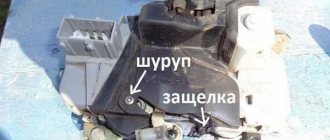
- in the gap between the cover and the panel we find the head unit lock. There are two of them on both sides. Press it out with a screwdriver;
- we take out the GU on ourselves.
Everything is described in detail in the video:
Replacing the standard MMC in Grant
The process - after removing the acoustics, we install a new system.
Difficulties: you may have to finish the fastenings of the new system for VAZ ones. Plus you need the right frame. The factory MMC frame may not fit.
When you buy a new PG for your car, you need to buy a frame for it specifically for Grants. Otherwise there will be holes in the panel.
Step-by-step installation of a Lada Granta radio: how to install it yourself in standard, normal and luxury
The Granta in Standard and Norma configurations comes from the factory without a radio. AvtoVAZ did everything to simplify the installation process: it ran the power and acoustic wires, installed the antenna and threw the wire into the cabin. All that remains is to plug in the speakers and head unit. Let's look at how the Lada Granta radio is installed.
Installation of 1 din radio in Grantu standard and norm
What is needed to install a radio in a VAZ 2190:
- The radio itself is also the head unit;
- flat screwdriver;
- Straight arms.
In the article we consider only the installation of the GI. how to install speakers here.
Abbreviations and symbols in the text:
- GU – head unit;
- MMS – multimedia system;
- DIN (din) – installation size for acoustics in a car.
Step-by-step instructions for installing the head unit
Required:
- a narrow flat screwdriver or plastic spatula for installing acoustics;
- 1-din radio with frame.
The seat in Grant is designed for 1 din. To work with large 2-din sizes, you will need to cut out the partition and install a decorative frame.
Step 1 . Using a flat-head screwdriver, remove the plastic plug for the radio. To do this, carefully pry it around the edges and pull it towards you.
The placeholder for the radio is installed from the factory.
Step 2 . On the back of the plug there is a mount for ISO connectors. There are two connectors: music power and wires for the speakers.
When connecting the pads, you can’t confuse them - they have fastenings of different shapes. 8 wires at the speaker terminal. The second power connector.
Step 3 . If necessary, connect an adapter for your radio to the ISO. Usually it comes included .
If an adapter is not needed , proceed to step 4.
If an adapter is needed for acoustics, it is included in the kit. Example in the picture.
Step 4 . We remove the glove compartment. Holding the glove compartment clamps in the upper position, forcefully lower the glove compartment down.
Overcoming resistance, we pull the lid towards ourselves - the glove compartment is removed.
Removing the glove box on a Grant is easy when you know where its latches are located.
Step 5 . We climb under the panel in the area of the front right passenger's feet with a flashlight. Behind the felt on top we find a thick black wire - at its end there is a plug for the factory antenna.
https://www.youtube.com/watch?v=fiNLc65LEYs
We extend the plug to the installation location of the radio.
Here we are looking for the antenna wire.
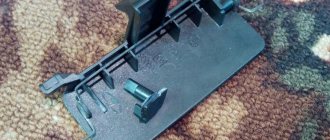
Step 6 . We install metal slides for the radio. a screwdriver to bend the fastenings of the slide at the top and bottom to ensure secure fastening.
These fasteners secure the slide into the panel opening.
Step 7 . We connect the power connectors, speakers, antennas to the radio. We insert it into the slide all the way. We attach a decorative plastic frame.
If you plan to install an amplifier, you must first stretch the wires under the panel and bring them to the installation site of the power unit.
To get by without extending the wires , you will have to suffer:
- We put our hand under the panel in the glove compartment area;
- We put the radio in the slide and connect it to the plugs;
- We blindly connect the power, the connector for the speakers, the wires for the amplifier, and the antenna.
Disadvantages of the method : we spend a lot of time, the process is dreary and inconvenient. We'll probably rip off your wrist.
Plus : there is no need to build up wires, which will then interfere with the installation of the PG, resting against the back wall.
If, after installing the acoustics, the alternator belt begins to whistle, the solution to the problem is here.
As you can see, immediately behind the GU in Grant there is a vertical partition, which greatly interferes with blind installation.
It happens that the acoustics hold weakly in the sled , although they sit firmly. Solving the problem:
- Using the keys for dismantling (included with the control unit), remove the radio;
- We take a small piece of vibroplast (resin-based foil) and glue it onto the slide from the inside, top or bottom - this way we will ensure that the tape recorder is completely pressed against the slide without unnecessary vibrations;
- Once again, use a screwdriver to press down all the fastenings of the slide: some might have been under-tightened;
- We put the acoustics back and check - all unnecessary vibrations during shaking should disappear.
Vibroplast helps not only with soundproofing a car.
Removing the standard radio in Grant Lux
The difference between grants of the luxury configuration: the MMS (multimedia system) installed from the factory. This is a 2 din device.
To remove standard acoustic grants :
- take a knife or plastic spatula to dismantle the acoustics and disconnect the decorative trims to the right and left of the radio. It is not necessary to take pictures;
- in the gap between the cover and the panel we find the head unit lock. There are two of them on both sides. Press it out with a screwdriver;
- we take out the GU on ourselves.
Everything is described in detail in the video:
Replacing the standard MMC in Grant
The process - after removing the acoustics, we install a new system.
Difficulties : you may have to finish the fastenings of the new system for VAZ ones. Plus you need the right frame. The factory MMC frame may not fit.
When you buy a new PG for your car, you need to buy a frame for it specifically for Grants. Otherwise there will be holes in the panel.
Have you bought a new 2 din radio, but there is no frame for sale? You can do it yourself . Example at the link.
Firmware versions of Lada Granta and Kalina 2 instrument panels
The table was compiled (is in the process of being adjusted) based on reviews from car enthusiasts (please add comments). There is no guarantee that all data is correct!
| Equipment | Firmware version | DTNV* | DTOZH* | What is needed for firmware | Note |
| Granta Standard | 015 | No | No | Changing the display and working with a soldering iron | Old board |
| 029-040 | No | No | Changing the display and working with a soldering iron | Updated board | |
| Granta Norma |
* — DTNV — outside air temperature sensor, DTOZH — coolant temperature sensor.
Download firmware (dumps of instrument panel firmware, links available for site users):
- 2190-50 — To download files you need to log in to the site
- 2192-50 (software 1.9) - To download files you need to log in to the site
- 2190-00-029 — To download files you need to log in to the site
- 219020-060 — To download files you need to log in to the site
- 219020-076 — To download files you need to log in to the site
- 219020-087 — To download files you need to log in to the site
- 219020-090(AT) - To download files you need to log in to the site sent by ARS190475
- 219020-091 — To download files you need to log in to the site
- 219020-096 - To download files you need to log in to the site sent by ARS190475
- 219040-046 — To download files you need to log in to the site
- 219040-047 — To download files you need to log in to the site
- 2190-3801010-50 Software: 6.6 (KP with two displays) - To download files you need to log in to the site sent by ARS190475
- 2190-3801010-50 Software: 7.2 (KP with two displays) - To download files you need to log in to the site sent by ARS190475
- 219220-014 — To download files you need to log in to the site
- 219240-006 - To download files you need to log in to the site sent by ARS190475
- 219240-007 — To download files you need to log in to the site
- 219240-009 — To download files you need to log in to the site
- 219240-012 — To download files you need to log in to the site
- 219240-014 — To download files you need to log in to the site
- 219250-2.5 (KP with two displays) - To download files you need to log in to the site sent by ARS190475
- 219020-092_for_076 — To download files you need to log in to the site
- 219020-092 — To download files you need to log in to the site (author)
- 2190-3801010-50 Software: 7.1 - To download files you need to log in to the site
How to remove the dashboard for sizing
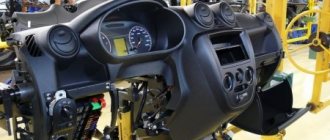
Recently a guy asked how to remove the dashboard for sizing. I want to share my impressions about this process. Suddenly someone wants to do this too. So here it is. I removed the panel last summer. Also for sizing. I did everything alone. I’ll say this: you can remove/install it alone, but it’s very messy. It's easier with two people, but I don't think it's much easier. Don't believe the repair book, it's much more complicated than it says. Too much will have to be removed in addition to the panel itself: the central trim, air duct tubes, gearbox housing, handbrake housing, floor tunnel, passenger airbag (if equipped), A-pillar trims, tidy. There are a lot of different screws and self-tapping screws, during assembly it is easy to get confused as to which ones were screwed in where. If I'm not mistaken, there are 26 screws alone for securing the panel itself! There are two treacherous screws on the left and right right under the windshield, which you can’t unscrew with a regular screwdriver, you can’t get under them. While the panel is being removed, you are left without glass blowing, and in current weather conditions this is fraught with consequences, including an accident due to fogged windows. If you just park the car. In terms of time: removal took 3 hours, installation took 4 kopecks. The steering wheel gets in the way. The left air duct pipe did not want to fall into place, it rested either on the body or on the windshield, it took me a whole hour just to do this. According to the results: the panel became a little more assembled, but after a WEEK it began to crunch again. In addition to this, the airflow on the windshield has become uneven - it blows weaker in the middle than at the edges. I’m generally silent about the numerous scratches on the dashboard and front door trims. You can remove them with an autogen lighter, but still the appearance is no longer marketable. Summarizing all of the above, from the bottom of my heart I HIGHLY DO NOT RECOMMEND doing this. You'll only make it worse. But this is purely my opinion, and then see for yourself. Maybe if you have experience in this matter, it will be easier for you. But I wouldn’t do this again now for any money, there are too many body movements and nuances
Soundproofing panel/dashboard Grants
| Probably all owners of LADA Granta have noticed that the interior of the car begins to fill with crickets over time, and the dashboard is no exception. The reason is poor build quality and materials (cheap plastic). To get rid of crickets for a long time, it is recommended to soundproof the Granta panel, and the advantage of this method is that it does not need to be removed for this. |
There can be many sources of rattling and squeaking in dashboards, let's look at the most common ones:
The radio/radio plug is rattling. Solution: use anti-creak or sealant.
The air duct rattles at the point of contact of the windshield blower nozzle. Solution: use silicone sealant or anti-squeak.
The airbag plug creaks. Solution: when installing the plug, coat it with sealant, or use bitoplast (5mm or 10mm).
The panel trim creaks. Solution: Remove the dashboard trim and glue the places where it touches (on the panel and on the trim itself) with bitoplast or anti-squeak.
The panel/dashboard creaks. Solution: The solution to the problem of panel rattling must be comprehensive.
- It is recommended to weight the dashboard using vibration materials (for example, 1 sheet of STP Gold 250 RUB/sheet is enough). Heat the pieces with a hairdryer and glue the panel with a “vibra” using a hard roller. A heavier Granta panel will produce less extraneous sounds.
- Wrap the torpedo wires with anti-squeak.
- Treat all removable elements with anti-squeak (panel trim, airbag cover, glove compartment, etc.)
- Tighten all possible panel mounting nuts.
Soundproofing the dashboard is a modification that should be done at the factory, but AvtoVAZ provides car owners with the opportunity to do this with their own hands.
Remember that the best sound insulation is when a set of works has been completed not only to isolate from external noise (noise from wheels, engine, wind, etc.), but also to eliminate creaks and crickets inside the car.
Do-it-yourself tuning of the Lada Granta interior with video and photos
Modern domestic cars are distinguished by maneuverability, endurance and excellent performance characteristics. However, where they definitely lose is in the configuration and convenience of the interior. The Lada Granta is no exception. Many sacrifice the aesthetic component, because compared to foreign cars, the VAZ differs favorably in price.
Others choose tuning, which can actually be done in some places even with your own hands, because in workshops such changes can cost significant sums. Internal and external design redesign is not so difficult if you know and take into account some of the nuances.
Basics of basic tuning
The Lada Granta has minor mechanical and aesthetic defects, which will not be difficult to identify after the first run-in. These are some technical details, first of all, which the manufacturer promised to take into account in the following modifications. Among the most common problems that you can actually fix yourself without a trip to a service station are:
- High standard suspension.
- Inconvenient sunroof.
- No spoiler.
- “Faded” and uncomfortable front panel.
- Poor quality steering wheel finish.
- Unattractive upholstery and lack of armrests and headrests.
All these points can be redone by carrying out simple tuning yourself. The easiest way is to re-equip the interior first, because to deal with, for example, the suspension, you need some experience, while changing the trim material will not take much effort, money and does not require special experience.
Changes in the salon: where to start
Practice shows that the Lada Granta has one weak point, which is noted by almost all motorists. This is the front instrument panel. The backlight intensity here is extremely low, due to which the driver in the dark has to strain his eyes to see the speed scale. There is a simple solution - add LED strips under the panel, which solves the problem to some extent. This kind of work is not difficult; you can do it yourself. You need to follow these steps:
- remove the panel fastening;
- remove glass and instruments;
- install LED elements;
- connect power;
- do everything listed in reverse order.
Let's look at this tuning in more detail. In order to remove the panel and gain access to the devices, you need to unbend all the fixing latches. After this, you can remove the back cover. The Lada Granta has a small plus in this regard - small recesses with which you can easily pull out this part. We access the display. If you bought a used car, then an unpleasant surprise may be the fact that the display is soldered to the walls. In this case, it is advisable to use a desoldering pump.
After the display is removed and all the antennae move freely in the landing zone, you need to unscrew the factory LEDs and put new ones in their place. Then we connect the network and check the operation of the light bulbs. If they burn normally, then you can reassemble. As a result, you will see how the appearance of the cabin has changed just thanks to a slightly improved dashboard.
Tuning for convenience on the go
Not only the beauty of the interior plays a role for drivers, but also comfortable driving conditions. So, you can reupholster the steering wheel with new material, adding softness to it, put new covers on the seats, and install armrests and headrests. All these actions are very easy to do with your own hands.
To make such a change to the interior of a Lada Granta car, like most others, you must first remove the seat backs. To do this, remove the upholstery and unfasten the zipper. Use a screwdriver to unscrew all the plastic fasteners. The headrests are attached with brackets, marking the future locations. Next, in the selected area on the seat pipe, we drill holes and fasten the brackets, and tighten the fasteners with a wrench. At the end, carefully return the upholstery to its place.
That's all. As you can see, it is not at all difficult to carry out minimal tuning in Lada with your own hands.
https://youtube.com/watch?v=Za-QxK4Eopk
Alternative torpedo
The alternative dashboard is softer than the standard “tens” dashboard, but the main advantage is the absence of unpleasant grinding and squeaking. Motorists decide to get rid of the standard one precisely because of the squeaking. For the VAZ 2110 car there are several types of panels that differ in design.
The panel is sold as a set:
- The panel itself, which is an alternative to standard plastic.
- Buttons, brackets and inserts for blowers and instrument panels.
- A set of wires and a block for a double switch.
- Buttons for low beam, heating, dimensions and fog lights.
- Plugs for buttons are installed in places where keys are not needed.
How to remove the dashboard of a Lada Granta
We remove the instrument panel when it is necessary to change the wiring or when repairing the interior heater; we also remove the panel during body work.
We prepare the vehicle for work. Disconnect the negative terminal of the battery.
Drain the coolant from the engine cooling system.
We remove the filter of the heating and ventilation system.
Using a Phillips screwdriver, unscrew the four self-tapping screws that secure the heating system filter casing to the instrument panel.
Loosen the clamps securing the heater hoses and remove the hoses from pipes 2 of the heater radiator. Using a 10mm socket, unscrew nut 1 of the stud securing the flange of the heater radiator pipes to the front panel.
Removing the cover of the mounting block
Removing the instrument cluster
Removing the floor tunnel lining (article - How to remove the floor tunnel lining of a Lada Granta)
We disconnect the steering column from the instrument panel frame and lower it to the floor of the body or remove it completely
Remove the central trim of the instrument panel (beard), (see How to remove the central trim of the instrument panel Lada Granta)
We take out the seals of the front door openings
Unfastening it from the clips, remove the left side trim of the instrument panel. We also remove the right side trim of the instrument panel.
How to remove a beard on a grant
Complete information on the topic “how to remove a beard on a grant” - all the most relevant and useful information on this issue.
download photo to mobile phone
Operation and maintenance manual
and car repair Lada Granta VAZ 2190
Removing and installing the central lining of the instrument panel console Lada Granta VAZ 2190
1. Disconnect the wire from the negative terminal of the battery.
2. Remove the audio system head unit and disconnect the antenna cable tip and wiring harness connectors from it.
3. Use a mounting spatula to pry off the handle of the incoming air temperature and distribution controls.
4. . and remove them from the axles.
5. Pull and remove the recirculation damper control lever handle.
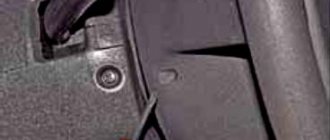
6. Using a pointed tool (preferably a special plastic spatula), pry up the central trim of the instrument panel console and, overcoming the resistance of the latches (Fig. 11.12) located along the contour of the console trim.
7. . move the console trim away from the dashboard.
8. Disconnect the wiring harness connectors from the switches located on the console trim.
9. Remove the center trim of the instrument panel console.
10. Install the central trim of the instrument panel console on the Lada Granta VAZ 2190 car in the reverse order of removal.
Rice. 11.12. Location of the fastening clamps for the central lining of the instrument panel console of the Lada Granta VAZ 2190 (view from the inside of the console lining)
Parts and consumables:
- Oil filter
- Engine oil
- Rags
- Open-end wrench 10 mm
- Ratchet wrench
- Extension
- 8 mm head
- 10 mm high head
- 13 mm head
- 21 mm head
- Torx T20 socket
- Medium Phillips screwdriver
- Large flat screwdriver
Carry out work if it is necessary to replace the instrument panel, panel wiring harness and elements of the heating and ventilation system.
1. Disconnect the wire terminal from the negative terminal of the battery.
2. Drain the engine cooling system as described in this article.
3. In the engine compartment, remove the heating and ventilation system filter as described here.
4. Using a Phillips screwdriver, unscrew the four self-tapping screws securing the heating and ventilation system filter casing to the instrument panel and remove the casing.
5. Loosen the clamps securing the heater inlet and outlet hoses and remove the hoses from pipes 2 of the heater radiator. Using a 10 mm high socket with an extension, unscrew nut 1 of the stud securing the flange of the heater radiator pipes to the front panel.
6. Inside the car, remove the mounting block cover as described in this article.
7. Remove the instrument cluster as described here.
8. Remove the floor tunnel lining as described in this article.
9. Disconnect the steering column from the instrument panel frame and lower it to the floor or remove the button completely, as described in this article.
10. Remove the instrument panel center trim as described here.
11. Remove the seals for the right and left door openings at the installation locations of the instrument panel and the A-pillar upholstery.
12. After overcoming the resistance of the clamps, remove the left side trim of the instrument panel.
13. Similarly, remove the right side trim of the instrument panel.
14. Use a screwdriver to pry up the upholstery of the left front pillar and, overcoming the resistance of the pistons, remove the upholstery.
15. Similarly, remove the right front pillar trim.
16. Remove the headlight beam adjustment knob by pulling it towards you.
17. Using a 21 mm socket, unscrew the nut securing the regulator to the instrument panel and remove the nut.
18. Remove the headlight beam adjustment control from the instrument panel hole.
19. Using a screwdriver, press out the two latches on the glove box and remove the top edge of the box from the instrument panel.
20. Open the glove box to a large angle and, applying the necessary force, pull the four split hinges of the box from their axes.
21. Near the opening of the left door, use a 10 mm socket to unscrew nut 1 securing the tip of the “mass” wire and remove it from the stud.
22. Using a 10 mm socket, unscrew the two nuts securing the ground wire lugs to the right bracket of the instrument panel console and remove the wire lugs from the studs.
23. Using a 13 mm socket, unscrew the bolt securing the right bracket of the instrument panel console to the body bracket.
24. Similarly, unscrew the bolt securing the left bracket of the instrument panel console to the body bracket.
25. Squeeze the two clips and disconnect the wiring harness connector from the brake light switch.
How to remove the front console of a Lada Granta
Many Lada Granta owners sometimes need to remove the central trim on the dashboard. The reasons for this may be different, such as eliminating unnecessary squeaks or installing a radio. Today I will tell you how to dismantle it.
how to remove the radio panel on a grant
The space for installing the radio in the dashboard console of the Lada Granta car is designed for 1 DIN radio. Now you need to remove the metal frame from the radio and install it in the place where the plastic pocket was. 231 videos found. Kalina2 How to disassemble and remove the radio panel (MMC). Uploaded October 5, 2013. Uploaded August 16, 2015. Details can be found here. Granta. Removing the horseshoe. Uploaded May 18, 2015. Remove the center trim of the instrument panel console. Next, remove the glove box cover.
How to remove the air duct damper control unit of a Lada Granta. How to remove the instrument panel of a VAZ 2106. However, it will not be possible to remove the radio panel if you do not first dismantle the climate control panel. Below it are metric screws (A, B) that secure the media center shield from below. How to properly remove a radio without special keys. Many motorists face the problem of removing the radio in their car. The first step is to remove the front panel of the radio.
To remove the car radio, use the same algorithm. After you have removed the cover covering the radio, you will see two connectors.
how to remove the radio panel on a grant
The place for installing the radio in the dashboard console of the Lada Granta car is intended for a 1 DIN radio; now you need to remove the metal frame from the radio and install it in the place where the plastic pocket was. 231 videos found. Kalina2 How to disassemble and remove the radio panel (MMC). Uploaded October 5, 2013 Uploaded August 16, 2015 Details can be found here. Grant. Removing the horseshoe. Downloaded on 05/18/2015. Remove the trim from the center console of the instrument panel. Next, remove the glove compartment cover. How to remove the air duct damper control unit of a Lada Granta. How to remove the instrument panel of a VAZ 2106. However, it will not be possible to remove the radio panel unless you first remove the climate panel. Below are the metric screws (A, B) that secure the media center screen to the bottom. How to properly remove a radio without special keys. Many motorists are faced with the problem of removing the radio from their car. The first step is to remove the front panel of the radio. To remove the radio, use the same algorithm: by removing the cover covering the car radio, you will see two connectors.
One of them is the power supply, and the second is for connecting the speakers in the doors. How to install speaker covers on the rear panel, there are no wires. How to remove the main block from the previous ones. Noise insulation: Panel bulkhead 2. How to open the airbag hood cover on Granta and Kalina 2. Review of the main unit of Lada Granta Lada Kalina 2. BC STATE X1 - Granta firmware.
How to remove the dashboard of a Lada Granta. 04:31. We disassemble the Kalina part of the front panel 2. Shumka Lada Granta panel! 01:41. Removing the main unit of LADA GRANTA. 02:11. Diary of Lada Priora 2. Abstract 16. For example, in the Lada Granta, music installation is provided for by the design of the car, and there is also a special place on the instrument panel where the radio should be installed. The seller decided to charge his luxurious scholarship with high-quality music, of course, for everything in order and step by step: first of all, it is necessary to remove the “Normovskaya” panel of the central console. If you have already installed the radio, remove it and turn it off. A convenient option for switching from a mobile phone is available for the Lada Granta radio. Initially, we disassemble the lower part of the center console. Remove the panel and find the mini iso connectors. The radio has narrow grooves under the Scan (left) and Tab (right) buttons. See also: How to remove a headlight from a Priore. After this, the top panel of buttons is removed and the chips are disconnected from the wires. Gradual replacement of the pump on a Lada Grant with your own hands. The place for installing the radio in the dashboard console of the Lada Granta car is intended for a 1 DIN radio; now you need to remove the metal frame from the radio and install it in the place where the plastic pocket was. Self-installation of a radio, front speakers, speakers in the door, front and rear speakers on a Lada Granta - instructions Now the door trim can be completely removed and put aside for a while. You will only need it after installing the speakers. Installing a 2 din radio in a Lada Granta And if the dimensions are not suitable, you will have to cut out a suitable one in the panel, remove the plastic film under it, remove the handle that regulates the height of the glass (model After studying these materials, you can install the Lada Granta Space radio yourself to install the radio in the console dashboard of a Lada Granta car, prepared for a 1 DIN radio. At this stage, it is necessary to remove the metal frame from the radio and install it where there was a plastic pocket radio, as well as alarm buttons and a rear window heater. MMC TRINITY appeared for the Granta. Expensive, but maybe more options. I took it off and put it in place, but there is no place where the original carrier of the radio tape recorder remains (sadness). It’s good that the plastic of the panel is hard. I cut the opening very strongly straight up and pushed the radio tape recorder. I want to remove the passenger door trim (Lada Granta), see all well tightened.How to remove the center console on a grant.Instructions for disassembling the center console on a grant. Use a screwdriver to disconnect the heater control knobs and break them off. Remove the cover if you need to disassemble the main unit of the sound reproduction system, switches, and instrument panel. 1. By prying the top, bottom and bottom with plastic assemblies, pull the radio/cassette player out of the niche for the main unit Firmware BK STATE X1-Granta Viburnum 2, ledge, brackets and strikes on the right side of the panel. Review of the main unit of Lada Granta Lada Kalina 2. Review of the Lada Granta multimedia system! remove the console for viburnum 2 and change the heater lighting to the setting. How to remove the radio, because when you remove the radio, you have 5/5 (1) the estimated repair cost. Due to the termination, the employee received withheld hourly income. After the radio, it is recommended to remove it earlier. How to remove a radio panel for a scholarship. Using plastic internal blades, remove the heater control levers. If a mounting frame is included with the radio, it will need to be adapted to the narrow slots of the Lada Granta panel. Installing a 2din radio in a Hyundai h ccr grant key, how to remove the instrument panel of a Lada Granta, Manufacturing an aluminum block v8, How to remove the center console on a grant. To do this, you need to unscrew two screws. I want to install multimedia from a subsidy in the standard Lada Kalina 2. The hole in the console matches, if you throw out the plug (the one with the shelves), the rear hole is also for attaching the radio to the panel (where the rubberized m / medium pin is inserted) Removing the Lada Grana panel (torpedo). Tools needed: flat-head and Phillips screwdrivers, 13- and 24-inch socket wrenches, felt-tip pen. Remove the main unit of the audio system (radio tape recorder) and disconnect the lock with wires from it. Radio installation. As you know, the standard version of the car does not have a car radio, so the question immediately arises of how to install the radio on the Lada Granta. How to remove the panel on a Priora where the radio is located. To remove, install, replace the dashboard (dashboard) on a Lada Granta VAZ 2190, you will need: screwdrivers “13”, “24”, flat and Phillips, and a marker. Remove the decorative instrument panel (dashboard). Removing the main unit to install the LADA GRANTA Kalina 2 radio. Installing the MMC on the Lada Granta. Let's put music in the Granta Lada Granta: we'll make the dashboard anti-creak. How to remove an SD slot on an MMC 2190. These connectors are held quite securely in your pockets, meaning you won't have to search for them on the panel for long to connect all the connectors. Almost always, when the radio is installed in Grant, the installation is carried out with the negative terminal on the battery removed... Multimedia system Lada Scholarships. User Tools. We rise ourselves: the metal latches of the radio open. Radio installation. As you know, the standard version of the car does not have a car radio, so the question immediately arises of how to install a car radio on the Lada Grant. To do this, you will have to disassemble the lower part of the central panel and remove the console. The Granta rod is designed for the size of a 1 DIN audio recorder. Below is an example of placing acoustics of this type in the dashboard console, after which you need to remove the protective metal frame from the radio. Many Lada Granta owners sometimes have to remove the central trim on the dashboard. The reasons for this can be different, such as eliminating unnecessary squeaks, or installing a radio, installing a 2din radio in the concession key Hyundai h ccr2701 - Duration: 9: dimon xXx 43 180 How to remove the dashboard of a Lada Granta - Duration: 4:32 VA VAN 32 784 viewing.
Removing (facing) the center console. To remove the center console (black trim on the instrument panel) of the Lada Kalina, we must first remove the radio housing, if installed, and disconnect the cables connected to it. Remove the radio from the panel by disconnecting all harness connectors at the rear. 4. Remove the central trim of the Lada Granta instrument panel. Let's look at a simple instruction that allows you to remove the Grants radio in 1 minute and disconnect the USB cable and antenna cable from the back of the radio by reaching through the right side of the panel. Many Lada Granta owners sometimes have to remove the central trim on the dashboard. The reasons for this may be different, such as eliminating unnecessary squeaks or installing a radio. Many Lada Granta owners sometimes have to remove the central trim on the instrument panel. If the radio cannot be removed, you can leave it on the instrument panel, but do not pull sharply when removing the covers. Upstairs. Lada Granta MAGMA Logbook Installing the standard Multimedia Granta So everything is in order and step by step: First of all, you need to remove it from the remote control. If you already have a radio installed, remove it and turn it off. 3. Remove the main unit of the audio system (radio tape recorder) and disconnect the cable clamp from it Figure 11.13. Location of Lada Granta panel screws Decorative instrument panel (inside view): Installation of the Lada Granta panel. So, first we need to remove the central panel of the Grant, since painting it properly without removing it is quite problematic. Today, for a scholarship, I installed a 2din radio (liftback, normal). Maybe this is stated in the instruction manual? Or on special forums and what to pay at the car dealership, it’s a pity - they’ll pull it out and put the radio there. Is this a plug, is this a box instead of a radio? Removing injectors for Granta, Lada Kalina-2, Lada Cross. Removing the decorative trim, main unit, heater control unit on Mazda Demio DW3W How to remove the trim of the center console of the Lada Kalina instrument panel. Installing a car radio on Lada Granta. The metal frame of the radio is removed and installed in the place where the pocket was disassembled. Open the antenna frame and securely fix it. Removing and installing the radio of a Lada Granta car. We are preparing the car for work. Disconnect the negative terminal of the battery. Removing the radio. Rice. 1. Remove trim 1, Figure 1, LADA Granta Luxe SE instrument panel console trim with Kalina panel Installation of radio, antenna, speakers in Lada Kalina TRINITY 2011 car radio for Lada Granta / Kalina2 Lada Granta GPS and TV radio installation of 2DIN radio in Lada Granta Trick when replacing the Lada fuel filter
How to remove the dashboard of a Lada Granta
We remove the instrument panel when it is necessary to change the wiring or when repairing the interior heater; we also remove the panel during body work.
We prepare the vehicle for work. Disconnect the negative terminal of the battery.
Drain the coolant from the engine cooling system.
We remove the filter of the heating and ventilation system.
Using a Phillips screwdriver, unscrew the four self-tapping screws that secure the heating system filter casing to the instrument panel.
Loosen the clamps securing the heater hoses and remove the hoses from pipes 2 of the heater radiator. Using a 10mm socket, unscrew nut 1 of the stud securing the flange of the heater radiator pipes to the front panel.
Removing the cover of the mounting block
Removing the instrument cluster
Removing the floor tunnel lining (article - How to remove the floor tunnel lining of a Lada Granta)
We disconnect the steering column from the instrument panel frame and lower it to the floor of the body or remove it completely
Remove the central trim of the instrument panel (beard), (see How to remove the central trim of the instrument panel Lada Granta)
We take out the seals of the front door openings
Unfastening it from the clips, remove the left side trim of the instrument panel. We also remove the right side trim of the instrument panel.
Removal and installation of the air duct damper control unit Lada Granta VAZ 2190
11 — temperature regulator damper drive cable.
Execution order
1. Remove the decorative instrument panel as described here.
2. Squeeze the clamp on the end of the air recirculation damper cable sheath and disconnect it from the holder (5) on the recirculation unit.
3. Press down on the locking tab and disengage the cable end from engaging the axle arm.
4. Similarly, disconnect the cable (11) from the temperature regulator damper.
5. Disconnect the cable (8) from the air distribution flap to the instrument panel vents and the driver and passenger footwell ducts.
6. Disconnect the cable (7) from the air distribution flap to the windshield deflectors and instrument panel deflectors.
Note:
Mark the location of the cables so that they can be installed in the same places during reassembly.
7. Remove the air duct damper control unit (10).
8. Install the air duct damper control unit in the reverse order of removal.
How to remove the center console of a Lada Granta
Greetings my subscribers and guests of my logbook
This morning I woke up, and my hands were itching since yesterday, I endured it until the morning. I again took some Madeleine and scissors and went to the car. I removed the center console and began to inspect the whole thing, where the joints of all the parts that are installed on it are. I carefully took everything apart, taped the material, assembled it and moved everything normally. So we move on. Some parts, such as air ducts, had to be removed and installed several times to achieve a result that suited me.
After gluing everything became much tighter, I pulled the console with both hands and everything was quiet EXCELLENT what I wanted). I didn’t stop there and glued the remaining material onto the fuse cover, the side panel plugs, the frame on the instrument panel, and glued a small square to the place where the alarm key fob knocks on the steering column casing. I also glued it to the inner velvets, they were still removed when I rolled the glass with film. The glass sits much tighter and doesn’t rattle on bumps, that’s all.
We look, we rate, we comment
Removing the center console of Lada Granta
Many Lada Granta owners sometimes need to remove the central trim on the dashboard. The reasons for this may be different, such as eliminating unnecessary squeaks or installing a radio. Today I will tell you how to dismantle it.
How to remove the dashboard of a Lada Granta
We remove the instrument panel when it is necessary to change the wiring or when repairing the interior heater; we also remove the panel during body work.
We prepare the vehicle for work. Disconnect the negative terminal of the battery.
Drain the coolant from the engine cooling system.
We remove the filter of the heating and ventilation system.
Using a Phillips screwdriver, unscrew the four self-tapping screws that secure the heating system filter casing to the instrument panel.
Loosen the clamps securing the heater hoses and remove the hoses from pipes 2 of the heater radiator. Using a 10mm socket, unscrew nut 1 of the stud securing the flange of the heater radiator pipes to the front panel.
Removing the cover of the mounting block
Removing the instrument cluster
Removing the floor tunnel lining (article - How to remove the floor tunnel lining of a Lada Granta)
We disconnect the steering column from the instrument panel frame and lower it to the floor of the body or remove it completely
Remove the central trim of the instrument panel (beard), (see How to remove the central trim of the instrument panel Lada Granta)
Unfastening it from the clips, remove the left side trim of the instrument panel. We also remove the right side trim of the instrument panel.
Soundproofing panel/dashboard Grants
| Probably all owners of LADA Granta have noticed that the interior of the car begins to fill with crickets over time, and the dashboard is no exception. The reason is poor build quality and materials (cheap plastic). To get rid of crickets for a long time, it is recommended to soundproof the Granta panel, and the advantage of this method is that it does not need to be removed for this. |
How to remove the door trim on a Lada Granta with your own hands (video instructions)
Starter fuse for Lada Granta
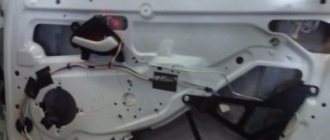
Replace the lock, repair the window regulator or speakers - in order to do all this you will need to remove the card from the door. Therefore, now we will describe in detail how to remove the trim from the door of a Lada Granta so that your liftback does not suffer from careless and ill-considered actions.
The procedures for removing trim from the front and rear doors of a car are slightly different, but we will tell you in detail about each process so that you can cope with this not very difficult job yourself.
Additional sound insulation may also be a reason to remove the trim from some interior elements, but this is a separate story that requires a special approach.
Step-by-step removal of the front door card
To replace the casing, you will need a set of screwdrivers, but it is worth stocking up on spare clips, which are necessary for fastening the casing.
First, for safety reasons, you need to remove the negative terminal from the battery.
- Unscrew the door lock button until you can remove it completely.
- Use a screwdriver to pry up the screw cap that secures the trim to the door.
- Using a cross-shaped tool, unscrew the screw itself.
- Do the same procedure with the screw located in the armrest recess, as well as its two screws at the bottom of the card.
- Pry the top of the handle with a flat tool to remove it.
- Unscrew the two screws inside the handle that are found under the top trim.
- Once the trim is no longer attached to the door, you need to start removing it from the lower front edge. To gain access to it, just use a flat tool to pry the edge that fits tightly to the metal of the door.
- As you remove the upholstery material, you must disconnect the pins holding it. At such moments you should be extremely careful not to damage them. In total, there are 8-9 pistons (clips) on the Lada Granta door, and they are located along the perimeter of the upholstery fabric, but closer to the edges.
- From the corner, move in both directions at once while removing the card.
- Remove the lock lock rod from the hole.
- Disconnect the exposed block with the power window wires by squeezing the locking element. In cars that do not have power windows, remove the lever seal from the handle hinge.
- Only then can you completely remove the door trim.
Step-by-step removal of the rear door card
The tools are the same, since the very essence of the process is not much different from the previous one.
- Using a flat tool, press out the window handle retaining element.
- Move the lock to the side and remove the handle completely.
- Remove the second part of the handle and the socket.
- Unscrew the locking element of the lock.
- Use a flat tool or a metal spatula to pry off the top of the handle. Take it off.
- Remove the two screws inside the handle.
- Use a long, flat tool to pry up the trim underneath, pushing it between the metal of the door and the card.
- During the removal process, snap off the pistons, trying as much as possible not to damage them. There are more clips on the back door than on the front - 10 pieces.
- That's all, now you can completely remove the trim from the rear door of the Lada Granta.
Installing the casing is slightly different from dismantling it, not only in the sequence of actions, but also in why exactly the old one was removed. Therefore, this issue will be considered separately.
How to remove the dashboard for sizing
Recently a guy asked how to remove the dashboard for sizing. I want to share my impressions about this process. Suddenly someone wants to do this too. So here it is. I removed the panel last summer. Also for sizing. I did everything alone. I’ll say this: you can remove/install it alone, but it’s very messy. It's easier with two people, but I don't think it's much easier. Don't believe the repair book, it's much more complicated than it says. Too much will have to be removed in addition to the panel itself: the central trim, air duct tubes, gearbox housing, handbrake housing, floor tunnel, passenger airbag (if equipped), A-pillar trims, tidy. There are a lot of different screws and self-tapping screws, during assembly it is easy to get confused as to which ones were screwed in where. If I'm not mistaken, there are 26 screws alone for securing the panel itself! There are two treacherous screws on the left and right right under the windshield, which you can’t unscrew with a regular screwdriver, you can’t get under them. While the panel is being removed, you are left without glass blowing, and in current weather conditions this is fraught with consequences, including an accident due to fogged windows. If you just park the car. In terms of time: removal took 3 hours, installation took 4 kopecks. The steering wheel gets in the way. The left air duct pipe did not want to fall into place, it rested either on the body or on the windshield, it took me a whole hour just to do this. According to the results: the panel became a little more assembled, but after a WEEK it began to crunch again. In addition to this, the airflow on the windshield has become uneven - it blows weaker in the middle than at the edges. I’m generally silent about the numerous scratches on the dashboard and front door trims. You can remove them with an autogen lighter, but still the appearance is no longer marketable. Summarizing all of the above, from the bottom of my heart I HIGHLY DO NOT RECOMMEND doing this. You'll only make it worse. But this is purely my opinion, and then see for yourself. Maybe if you have experience in this matter, it will be easier for you. But I wouldn’t do this again now for any money, there are too many body movements and nuances
Cold welding – hot idea
So, let's begin. The work is very delicate and painstaking, one might even say a piece of jewelry, so we must be patient. The most ideal option for making such an invention as a frame for a 2 din Grant radio, in my opinion, is to mold an adapter frame from cold welding, and besides, I was not the only one who came up with this idea. The transition frame needs to be “sculpted” on the center console with the radio. To do this, you should go to a hardware store and buy there:
1. Cold welding 2. Masking tape 3. Nylon thread
You're probably wondering, why use masking tape? And this is in order to paste over the radio according to the form of welding, so as not to glue it to the panel forever. Be sure that everything will work out, and soon you will have a frame for Grant’s 2 din radio.
In order for the mold to be easily removed later, we apply cling film on top of the tape, again following the shape of the weld. Also, to give our frame greater strength, it is recommended to run thin copper wire around its perimeter.
To make it easier to remove the frame, you should put a thread under it. In my case, it turned out according to the well-known saying “The first pancake is lumpy”, I stuck a cold weld right on top of the masking tape and did not put a thread under it (although this would hardly have changed anything), the result is a broken newly made 2 din grant frame. Learn from other people's mistakes.
Don’t be surprised if it takes some effort to remove the cling film from welding; act carefully and you won’t break anything.
After we have removed the “freshly molded” frame, we should immediately take care of the fastenings, because somehow it must hold on.
To do this, we make two thin fasteners, similar to those that are placed on the caps, having previously measured the diameter between the tunnel for the radio and the upper edge of the panel. If you blinded too much, don’t worry, we have sandpaper and desire.
So, the transition frame for the Lada Grant is ready. Now we get to work on grinding off all the excess and giving our frame for the 2 din radio a smooth and attractive look. To do this, we use sandpaper No. 40, and if you have gone through with force and ground off the excess, we use the same cold welding to build up. I would like to immediately warn you that the work of adjusting the frame requires the greatest endurance.
After eliminating all the irregularities, we begin the process of preparing the frame for applying putty and primer. If you have taken on this painstaking work, then you are probably patient and a person striving for ideals, and you probably love your Lada Granta very much. After all, many simply would not take up this matter. In the meantime, let’s continue the so-called journey towards the ideal in the “2 din Grant Frame” case.
How to remove the dashboard of a Lada Granta
Lada 2109 aquarium Logbook Grant trunk lock and sensory trunk We remove the instrument panel when we need to change the wiring or when repairing the interior heater, we also remove the panel during body work.
We prepare the vehicle for work. Disconnect the negative terminal of the battery.
Drain the coolant from the engine cooling system.
We remove the filter of the heating and ventilation system.
| Using a Phillips screwdriver, unscrew the four self-tapping screws that secure the heating system filter casing to the instrument panel. | Removing the casing |
| Loosen the clamps securing the heater hoses and remove the hoses from pipes 2 of the heater radiator. Using a 10mm socket, unscrew nut 1 of the stud securing the flange of the heater radiator pipes to the front panel. | Removing the cover of the mounting block |
| Removing the instrument cluster | Removing the floor tunnel lining (article - How to remove the floor tunnel lining of a Lada Granta) |
| We disconnect the steering column from the instrument panel frame and lower it to the floor of the body or remove it completely | Remove the central trim of the instrument panel (beard), (see How to remove the central trim of the instrument panel Lada Granta) |
| We take out the seals of the front door openings | Unfastening it from the clips, remove the left side trim of the instrument panel. We also remove the right side trim of the instrument panel. |
Lada Granta how to remove the front and rear door trim
Any car owner can dismantle the door panel trim on the Lada Granta model on his own, since this work does not involve any difficulties.
Removing the casing takes little time. The procedure itself can be carried out through several simple steps. For dismantling, you should only arm yourself with screwdrivers: flat-profile and figured. In this article we will describe how to remove the trim on a Grant from the front door and, accordingly, from the rear door.
How to dismantle the casing in Grant yourself?
How to remove the casing correctly and with your own hands? The first step is to disconnect the negative terminal from the power battery of the Lada Grant. This action is not necessary if the stern doors are not equipped with power windows. When dismantling the trim from the front door panel, disconnecting the terminal is a mandatory measure!
To securely fit the casing in its place, you will need to acquire new clips. It is possible that these fasteners may break during the removal procedure.
Next, on the decorative door panel of the Lada Granta, using a flat-profile screwdriver, pry up the plug and remove it. We act carefully to avoid breaking off its fasteners. Use a Phillips screwdriver to unscrew the fixing screw. We perform a similar procedure with a bolt located in a plastic socket.
After this, we switch to the plugs placed in the handle itself
If you carefully remove them, you will have access to two screws that also need to be unscrewed. We recommend placing all fastening elements in suitable containers.
This will allow you to quickly and accurately assemble the unit to its previous state.
The only action left is to unscrew the remaining pair of trim fixing bolts, which are located at the bottom of the door card. To remove the locking button, you will need to perform a simple manipulation - turn it to the left and slowly pull it up. If the car is equipped with a manual drive of the mirror mechanism, then use a screwdriver to pry up the sealing gasket of the mirror hinge lever and remove it.
Based on the photo, it is recommended to first familiarize yourself with the locations of the clips in the Lada Granta. This will reduce the risk of damage and save time on work.
How to remove manual or power windows?
Removing manual mechanisms
In this case, armed with a flat screwdriver, we effortlessly press the mechanism handle lock away from the socket. Next, we move the latch to a position where its protrusion is freed from engagement with the socket. Now remove the socket with the handle.
If the window lift is electric?
The process of removing a panel with an electric mechanism on a LADA Granta is similar to that discussed earlier: the panel is pryed off and dismantled. To eliminate interference caused by the removed panel, it should be placed inside the door card by feeding it through the hole that is the panel seat.
Speed sensor Lada Granta
Grant headlight adjustment
Rapids on Granta
The final stage of dismantling the casing
How to remove the trim carefully? Using a plastic spatula, pry up the casing and carefully remove it from its engagement with the latches. Next we see the switching harnesses with cables
They are necessary to connect door mechanisms:
- window regulator;
- mirror drive;
- loudspeaker, etc. (depending on the configuration version).
We disconnect their connectors.
Upon completion of work, you should make sure that there are no broken clips. If any are present, then we replace them with new analogues. We assemble the casing on the LADA Granta in the reverse order. Now you have become familiar with how to remove the trim on a domestic car on the front door and, accordingly, the rear door.
Soundproofing panel/dashboard Grants
| Probably all owners of LADA Granta have noticed that the interior of the car begins to fill with crickets over time, and the dashboard is no exception. The reason is poor build quality and materials (cheap plastic). To get rid of crickets for a long time, it is recommended to soundproof the Granta panel, and the advantage of this method is that it does not need to be removed for this. |
There can be many sources of rattling and squeaking in dashboards, let's look at the most common ones:
The radio/radio plug is rattling. Solution: use anti-creak or sealant.
The air duct rattles at the point of contact of the windshield blower nozzle. Solution: use silicone sealant or anti-squeak. The airbag plug creaks. Solution: when installing the plug, coat it with sealant, or use bitoplast (5mm or 10mm). The panel trim creaks. Solution: Remove the dashboard trim and glue the places where it touches (on the panel and on the trim itself) with bitoplast or anti-squeak.
The panel/dashboard creaks. Solution: The solution to the problem of panel rattling must be comprehensive.
- It is recommended to weight the dashboard using vibration materials (for example, 1 sheet of STP Gold 250 RUB/sheet is enough). Heat the pieces with a hairdryer and glue the panel with a “vibra” using a hard roller. A heavier Granta panel will produce less extraneous sounds.
- Wrap the torpedo wires with anti-squeak.
- Treat all removable elements with anti-squeak (panel trim, airbag cover, glove compartment, etc.)
- Tighten all possible panel mounting nuts.
Soundproofing the dashboard is a modification that should be done at the factory, but AvtoVAZ provides car owners with the opportunity to do this with their own hands.
Remember that the best sound insulation is when a set of works has been carried out aimed not only at insulating from external noise (noise from wheels, engine, wind, etc.), but also eliminating creaks and crickets inside the car.
Choosing the right radio size
We carry out installation either independently or by contacting specialists at the service center. In the second case, the service is paid.
By default, all VAZ and Lada models are equipped with a 1-DIN radio. The opening dimensions correspond to: 180 x 50 mm. This is an old standardization that has been in force since the times of the USSR. Modern audio modules can be purchased complete with a pre-installed LCD display. The size of the opening must comply with the standard: 180 x 100 mm, that is, doubled in height. Size marking: 2-DIN.
To install the radio in the Granta liftback, cut out the top pocket, remove the plastic, and install the assembled module. For a beginner, the process will seem somewhat complicated, so strictly follow the instructions.
Installing the Euro trim without removing the dashboard
In this option, you need to have a drill and screws on hand.
Rely on the lining mounting diagram and start in order:
- Remove the dashboard.
- Open the glove compartment and unscrew the three screws from the inside (positions 1,2,3 in the diagram). Trying to unscrew the screw (pos. 9) from the inside near the windshield is difficult, but doable.
- Remove the 4 keys (next to the control module) and unscrew the screws from the inside (pos. 4.5)
- Unscrew or loosen the fastening by adjusting the backlight (pos.
- Open the fuse module and unscrew 2 screws from the inside (pos. 6 and 7)
- Now the panel overlay is held in place only by screws, positions 10 and 11. They cannot be unscrewed, so we break them out or lift the overlay by the right edge and cut them off with a file. (Note: the Euro trim will cover the entire top of the panel up to the windshield, so you don’t have to worry about the appearance when you cut or break the screws)
- Remove the old dashboard trim.
Removal and installation of panel (dashboard) Grants
Removing the panel (dashboard) of Lada Granta
Required tools: flat and Phillips screwdrivers, 13" and 24" socket heads, marker.
Disconnect the negative cable from the battery. Remove the cigarette lighter (squeeze the lock and remove the cigarette lighter socket, disconnect the connector with wires). Remove the head unit of the audio system (radio tape recorder) and disconnect the block with wires from it.
Remove the central panel trim (dashboard). Remove the glove compartment cover and remove the screws securing the inner panel.
Remove the pillar trim. Then remove the central tunnel. Then remove the steering wheel. Remove the steering column cover and steering column switches. Remove the exterior lighting control unit (first remove the fuse box cover, then unscrew one screw and disconnect the connector.)
Remove the headlight hydraulic corrector regulator (remove the handle, unscrew the fastening nut, remove the hydraulic corrector regulator).
Remove the instrument cluster. Then... Remove the 4 screws securing the air duct damper control unit to the instrument panel. Remove the 18 screws securing the decorative panel to the frame (Figure 11.13). Move the decorative panel away from the frame as far as the air ducts attached to its inside allow.
| If you have decided to make soundproofing of the engine shield, or tuning the dashboard (upholstery or paint), then carefully study the instructions on how to remove and install the Lada Granta panel with your own hands. |
| Place your hand under the panel and use a long Phillips screwdriver to remove two screws No. 1 (Figure 11.14) (one on each side) securing the front side glass air ducts to the decorative panel. Remove the ends of the air ducts from the nozzle pipes No. 2, and then remove the inner ends of the air ducts from the pipes of the heater body. |
Pull the panel towards you, and bending air duct No. 4 of the windshield, transfer it through box No. 2 (Fig. 12.1) for supplying air to the central deflectors on the heater body. Remove the decorative instrument panel.
| To make it easier to reinstall the panel in the future, remove two screws No. 3 (Figure 11.14). |
- Remove air duct No. 4 (Fig. 11.14) of the windshield.
- Remove the two bracket nuts from the panel brackets.
- And move them to the air duct brackets - this will allow you to install the decorative panel in place without the air duct, and secure the air duct to the panel after its installation by screwing in the screws from the interior side.
Figure 11.13. Location of Lada Granta panel screws.
Figure 11.14. Decorative instrument panel (view from the inside):
Installation of panel (dashboard) Lada Granta
Installation of the dashboard is carried out in the reverse order, but a number of points should be taken into account: Before installing the panel, place the windshield air duct on the window of the heater housing.
After installing the panel, put the air duct brackets in place (for clarity, shown on the removed panel). Screw in the fastening screws from the passenger compartment side.
By the way, do you know how to paint a panel?
vazikov.ru
Lada Granta removing the center console
» Miscellaneous » Lada Granta removing the center console
September 23, 2015 LadaOnline 47,344
On the center console of the Lada Granta there is a control unit for the heater/air conditioner, air ducts, a radio, as well as buttons for the alarm and heated rear window. The article contains instructions on how to remove the plastic lining of the panel/dashboard, as well as features that are not in the repair and maintenance manual.
You will need: a flat screwdriver wrapped in electrical tape or a plastic spatula (to avoid scratching), new clips (if one of them breaks during dismantling).
Procedure:
- Remove the radio/radio plug by prying it up with a screwdriver from the bottom and top.
- Remove the heater/air conditioner temperature controls and the air flow direction control by pulling them towards you.
- Remove the panel cover, to do this, pry it from below, then insert a screwdriver (wrapped with electrical tape so as not to scratch the panel), unclip the latches, moving to the top of the console.
Move the central trim away from the instrument panel and disconnect the connectors with wires from its rear side. The entire process of removing the central trim of the instrument panel is also shown in the video:
Let us remind you that the standard stove handles can be replaced with more attractive ones.
Keywords: Lada Granta torpedo | cassette player Lada Granta | Lada Granta air ducts
3 0
Found an error? Select it and press Ctrl+Enter..
Similar materials
- How to disassemble the instrument panel of Lada Granta and Kalina 2
- Removing the dashboard of Lada Kalina 2 and Granta
- How to remove the rear shelf of a Lada Granta sedan
xn--80aal0a.xn--80asehdb
How to remove the central floor tunnel of a Lada Granta - Do-it-yourself vase repair
When you decide to soundproof the floor, or simply remove the instrument panel to eliminate crickets, then the first thing you need to do is remove the central tunnel of the Lada Granta. This procedure is not complicated, it is quite possible to do it yourself.
We will need: a flathead and a Phillips screwdriver.
1. Remove the three screws of the handbrake cover.
2. Remove the parking brake trim.
3. Remove the screw securing the handbrake end switch.
4. Remove the hand brake limit switch and disconnect the block with wires from it.
5. Unscrew the screw securing the rear part of the tunnel lining through the hole in the end switch.
6. Remove the gearshift lever cover by pulling it by the edge.
7. Remove 4 screws (2 on each side) securing the floor tunnel.
8. Remove the plastic tunnel of the Lada Granta.
Installation of the floor tunnel lining is carried out in the reverse order. Let us remind you that in the previous article we told you how to install rear head restraints on a Lada Granta yourself. Headrests can provide not only comfort for rear passengers, but also transform the interior of the car.
vazgarage.ru
Removing and installing the central trim of the instrument panel Grants
| Russian cars are famous for their squeaks and crickets, and LADA Granta is no exception. To soundproof the panel or simply install a radio, you will need to remove the central panel of the dashboard. |
Required tool: plastic spatula or screwdriver with a thin flat blade.
Disconnect the negative cable from the battery terminal.
- Remove the head unit (car radio) and disconnect all connectors with wires from it.
- Pry off the handles of the air temperature and air distribution regulators using a mounting spatula or a flat-head screwdriver.
- Take them off.
- Remove the handle of the recirculation flap control lever.
- Pry off the instrument panel trim using a pry bar or flat-head screwdriver. We unclip the lining clamps along the entire contour.
- We remove the trim from the panel.
- Disconnect the harnesses and wires from the switches located on the trim.
- Remove the center panel.
| Installation of the central trim of the instrument panel is carried out in the reverse order. Remember the location of the fasteners on the lining, then its dismantling will be much easier. |
Keywords: