When the level of coolant in a car engine suddenly begins to drop, the last thing they think about is the walls of the cylinder block, and especially the cylinder head. But when more and more obvious sources of leakage are excluded, and it comes to pressure testing the system, it is discovered that antifreeze is leaking through leaky plugs in the walls of the cooling jackets of these most massive engine parts.
Replacement procedure
First of all, you need to make the area in which the stub is located accessible. To do this, follow these steps (in this order):
- Disconnecting the exhaust pipes of the muffler from the exhaust manifold.
- Removing the bracket on which the pump pipe for supplying coolant is fixed.
- Disconnecting the hoses that provide ventilation to the unit from the carburetor and cylinder head cover. Closing the carburetor with a special cover.
- Removing the air filter.
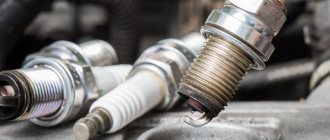
- Disconnecting the wires from the carburetor, ignition distribution sensor, spark plugs.
- Removing the sensor that distributes the ignition.
- Disconnecting hoses from the fuel pump, outlet pipe, vacuum brake booster.
- Disconnecting the air and throttle valve drive cables.
- Removing the toothed belt protective cover.
- Removing the pulley with key.
- Removing the cylinder head.
Direct replacement of the plug includes the following:
- Rotating the plug into the cylinder head using a chisel and hammer.
- Pry the plug with pliers and remove it. If the part is very rusty and does not turn, you need to make a hole, screw a knob into it and pull out the plug.
- Cleaning the edges of the cylinder head hole from corrosion using sandpaper. Lubricating the edges of the new part with a sealing agent.
- Pressing the part into the cylinder head hole using a mandrel and a hammer.
Electrics
Remove the Chevrolet Aveo batteryReplace the battery in the Chevrolet Aveo key fobReplace the battery in the Chevrolet Aveo keyReplace the battery in the Chevrolet Aveo remote controlRepair the Chevrolet Aveo fuse boxReplace the Chevrolet Aveo pull-in relayInstalling the Chevrolet Aveo marker lampReplace the Chevrolet Aveo tail lightRemove the Chevrolet Aveo taillightInstalling the Chevrolet Aveo ignition switchReplace Chevrolet Aveo ignition coilRemove Chevrolet power window button AveoInstalling a low beam lamp in a Chevrolet AveoReplace the lamp in the glove compartment of a Chevrolet Aveo with your own handsHow to replace a lamp in the dimensions of a Chevrolet AveoReplace the lamp in the high beam of a Chevrolet AveoReplace the lamp in the reverse direction of a Chevrolet AveoReplace the lamp in the turn signals of a Chevrolet Aveo with your own handsReplace the lamp in the dashboard of a Chevrolet Aveo with your own handsReplacing lamps in fog lights Chevrolet Aveo with your own handsHow to change the lamp in the PTF of a Chevrolet AveoChange the lamp in the headlights of a Chevrolet Aveo with your own handsHow to replace the interior lighting lamp of a Chevrolet AveoReplace the brake light lamp of a Chevrolet AveoReplacing the tail light lamps of a Chevrolet AveoRemoving the left headlight of a Chevrolet Aveo with your own handsRemoving the window motor of a Chevrolet AveoRemoving the headlight of a Chevrolet AveoRemoving the right headlight of a Chevrolet Aveo olet Do-it-yourself Aveo Replace fuses on a Chevrolet Aveo Replace the cigarette lighter fuse on a Chevrolet Aveo Repairing Chevrolet Aveo fog lamps Do-it-yourself installation of a Chevrolet Aveo turn relay Installation of a Chevrolet Aveo starter relay How to replace the windshield wiper relay on a Chevrolet Aveo How to replace Chevrolet Aveo spark plugs with your own hands Replace the generator brushes on a Chevrolet Aveo Automatic transmission diagram of a Chevrolet Aveo With Chevrolet Aveo speaker system wiring diagramChevrolet Aveo fuel pump wiring diagramChevrolet Aveo wiring diagram DIY Chevrolet Aveo fuse box Diagram of the Chevrolet Aveo engine control unit Diagram of the Chevrolet Aveo cooling fan Wiring diagram for switching on the Chevrolet Aveo fuel pump with your own hands Diagram for switching on the Chevrolet Aveo cooling fan Do-it-yourself wiring diagram for switching on the Chevrolet Aveo air conditioner Wiring diagram for switching on the front axle of Chevrolet Aveo Wiring diagram for switching on the Chevrolet Aveo starter Wiring diagram for switching on the headlights DIY Chevrolet Aveo Generator diagram Chevrolet Aveo do it yourselfChevrolet Aveo oil pressure sensor circuitChevrolet Aveo oxygen sensor circuitChevrolet Aveo coolant sensor circuitChevrolet Aveo speed sensor circuitChevrolet Aveo temperature sensor circuitChevrolet Aveo fuel level sensor circuit DIYChevrolet Aveo engine circuitChevrolet Aveo windshield wiper circuit do it yourselfChevrolet Aveo ignition circuit AveoDo it yourself Chevrolet Aveo ignition switch circuit diagramSound signal circuit Chevrolet AveoDo-it-yourself Chevrolet Aveo injector circuit diagramChevrolet Aveo carburetor diagramChevrolet Aveo headlight range control circuitChevrolet Aveo interior lighting circuitChevrolet Aveo heater circuitChevrolet Aveo engine cooling circuit diagramChevrolet Aveo instrument panel diagramChevrolet Aveo headlights diagramChevrolet Aveo heater diagram do-it-yourselfElectric Chevrolet Aveo dashboard diagramChevrolet Aveo wiring diagramChevrolet Aveo fog light diagramRelay wiring diagram DIY Chevrolet Aveo fuel pump Wiring diagram of the pressure relay Chevrolet Aveo Wiring diagram of the Chevrolet Aveo turn relay with your own hands Regulator relay diagram of the Chevrolet Aveo Do-it-yourself starter relay diagram of the Chevrolet Aveo Wiring diagram of the injection system of the Chevrolet Aveo Wiring diagram of the ignition system of the Chevrolet Aveo Do-it-yourself air conditioning system diagram of the Chevrolet Aveo Electric Chevrolet Aveo cooling system diagram DIY Chevrolet Aveo engine management system diagram Diagram Chevrolet Aveo starter Wiring diagram of a Chevrolet Aveo windshield wiper DIY Wiring diagram of the Chevrolet Aveo windows Brake light diagram of a Chevrolet Aveo Fuel pump diagram of a Chevrolet Aveo Do-it-yourself electrical diagram of the fuel system of a Chevrolet Aveo Wiring diagram of the brake system of a Chevrolet Aveo Central locking diagram of a Chevrolet Aveo Instrument panel diagram of She Do-it-yourself Aveo flying carDo-it-yourself Chevrolet Aveo ecu circuit diagram
How to replace engine plugs
Replacing the VAZ cylinder head gasket
Plugs are plugs that are expanded by the impact of the striker after installation in the hole. Perhaps this information will be useful to you when purchasing.
How to find stubs
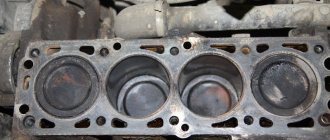
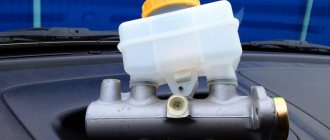
Two cup-shaped plugs are located in the engine block, under the manifold mounting points.
The plugs are located in various places in the cylinder block and cylinder head.
They cover the holes formed during the casting of these parts.
The plug is a weak point that, if overheated or frozen, can be damaged by the pressure of expanded coolant. If there were no plugs, the engine housing would crack at such moments.
Types of Stubs
The dome-shaped plugs are inserted all the way into the collar. Cup-shaped plugs are recessed inside so that the rim extends slightly beyond the recess.
In most cases, the plugs are located: on the side surface of the block, under the manifold; inside the clutch housing or above it, in close proximity to the transverse partition; at the top of the cylinder head, under the overhead camshaft.
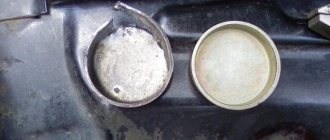
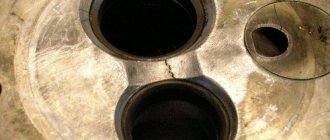
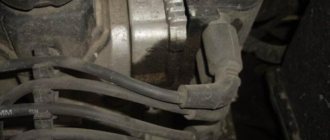
Sometimes the plugs fly out completely, causing a sudden loss of coolant. In addition, liquid may leak little by little through the rusted edges. Small leaks leave marks on the block. Examine the block to find them.
Some plugs are hidden from the naked eye. Use a mirror to look into hard-to-reach places, such as behind a block. Remember that plugs come in different sizes, so measure the holes you need before purchasing.
It is possible that to gain access to the plugs you will have to remove the carburetor.
In some cases, in order to change the plugs on the bulkhead side, it is necessary to remove the entire engine. It is better to entrust this procedure to specialists.
Do not try to make a hole in the partition. This is a load-bearing structure, and if the hole is not repaired, the vehicle's warranty may be void. A simple rivet is unlikely to satisfy the insurance company.
Disconnect the battery and drain the cylinder block. If you plan to reuse the fluid, collect it in a clean container (see How to Flush an Engine Radiator).
Before pouring, strain the liquid through a thin cloth. Check the concentration of the solution (see section Checking and adding antifreeze).
There are two types of plugs - cup-shaped and dome-shaped. The installation methods for such plugs are different.
How to remove the plug
The cup-shaped plug can be pulled out with two pairs of pliers.
Plugs of any type are removed using a thin screwdriver. Use a blade to pierce the center of the plug and pull it out.
Remember that the movement must be uniform. Otherwise, the plug will become skewed and get stuck.
Use a screwdriver to pierce the old plug and pull it out.
In some cases, the edges of the cup-shaped plug stick out quite a bit and can be grabbed with two pairs of pliers. When pulling out the plug, apply equal force on both sides. Do not try to use the screwdriver as a lever and rest it on the block, so as not to damage the groove itself.
Remove any remaining old caulk with a wooden tool.
How to replace the plug
Use the correct size holder to install the cup plug.
Lubricate the plug and hole with sealant.
Insert the dome plug with the dome facing out. Make sure it is not skewed. Tap the center of the plug with a striker to expand it. The plug must fit firmly into the hole.
Use the striker to install the domed plug.
To install the cup plug, find a holder that fits snugly into the cup. Place the plug at right angles to the hole and then hit the holder with a soft hammer.
Make sure that the plug does not bend and remember that its edges should protrude slightly beyond the hole. This will make it easier for you to remove the plug if necessary.
On some older BL series engines, the plugs in the engine base plate are installed using a bolt.
In some designs there is simply no place to swing a hammer to install the plug. For example, on Leyland B engines the dome plugs, hidden by the base plate, are directly opposite the baffle, but there are special holes in the base plate.
Insert a new plug, insert a 50 mm long bolt into the hole, put a nut on it and tighten it a little to press the plug into the groove.
This method is also used for other problem areas.
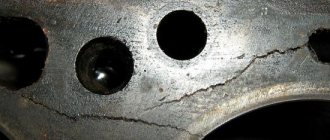
Reasons for tearing off edges
The desire to quickly replace failed parts secured with a threaded connection is not always feasible. Sometimes, when trying to unscrew a bolt from the unit body, the key begins to spin.
This is due to the tearing of the edges on the head of the hardware when exposed to increased load. And the reason for this may be the following factors:
- sticking, which is caused by the diffusion of atoms during a long connection;
- displacement of the parts being connected relative to the axis of the holes, which leads to jamming of the screw;
- tugging during installation (increased load);
- using the wrong tool during assembly (for example, to tighten a bolt whose head size is 14 mm, a 17 mm wrench is used, and a screwdriver is inserted to eliminate the gap);
- corrosion that has eaten away the surface of the head.
Replacing the resonator
Boring and lining of the cylinder block
Resonator VAZ 2110
- The resonator is attached to the muffler using a crimp clamp with an O-ring;
- It is attached to the neutralizer by means of a floating flange (two bolts) and flaring;
- On the opposite side of the neutralizer there is a “fist”;
- It is often problematic to unscrew the knuckle mounting bolts; they are simply cut off with a grinder and replaced with new ones;
- If suddenly you don’t have a tool at hand, we clean the places where the bolts are attached and treat them with a “liquid wrench” (WD-40 or its equivalent);
- Unscrew the bolts and remove the muffler clamp;
- We remove the resonator from the suspension rubber bands, change the rubber bands if necessary;
- Then we hook a new resonator onto rubber bands and attach it to the muffler so that the pipe running from the resonator to the muffler is parallel to the ground;
- When there is wear on the neutralizer fist or there are burrs, grooves or rust on it, it is necessary to lubricate the connection with a special high-temperature sealant;
- Using new bolts and nuts, tighten the flanges of the catalyst and resonator;
- The neutralizer is attached to the resonator by means of a flange connection (two bolts), to the receiving pipe (pants) by means of a spring-loaded connection and a pair of flares, between which there is a graphite or metal-asbestos ring.
Dismantling in difficult cases
In case of various installation errors, the anchor becomes jammed and it is impossible to remove or push the bolt.
The sleeve is completely driven into the wall
This is the most common case. If you need to remove an anchor from a concrete wall, we are usually talking about an indoor space. The best recipe is to break the plaster around so that the pliers catch on the edge of the sleeve.
If you need to remove the anchor without damaging the adjacent surface (primarily tiles or plastic window slope):
- Remove the nut, knock out the bolt or loosen it (for a frame structure).
- Screw a thin self-tapping screw between the bolt and the sleeve until it jams.
- Place something for support (for example, a hammer).
- Grasp both studs and pull out the structure.
If the first option doesn't help:
- Remove the nut and knock out the stud or unscrew the bolt.
- Use a thin nail or self-tapping screw as a wedge to tear and bend the edge of the sleeve.
- Grab the cartridge by the bent edge (it’s convenient to first pull it with narrow- or round-nose pliers; when the edge is released enough, take pliers) and pull it out.
- For a frame anchor, insert it into the concrete passage and screw the bolt into the spacer and remove everything together.
The anchor is rusty
A slightly rusted anchor bolt can be restored with automotive rust converter, machine lubricant, or WD-40 remover.
- Remove the top layer of dirt and, if possible, rust.
- Treat the head and nut, if possible, spray deep into the converter.
- Maintain the time specified in the instructions for the product.
- If necessary, repeat the procedure.
- Try to carefully unscrew the bolt.
Advice On the forums they suggest treating oxidized parts with kerosene or VD-40 and leaving for half a day for the product to take effect.
The slot on the bolt is torn off
Broken splines are a fairly rare occurrence on anchor fasteners. However, if this happens, it is not necessary to dismantle the wall. Try drilling out the head, or the rod if there is no head, to remove the bolt from the threads. An “extractor” for screws and screws copes well with this task. This is an inexpensive device with attachments that are suitable for both a screwdriver and a drill. You can buy it on AliExpress for little money.
How to use the extractor:
- Attach and secure the bit with the drill (curved cross) facing down.
- Drill a hole in the stud or bolt head.
- Turn the extractor over with the wedge-shaped end facing down and screw it into the stud.
- Engage reverse and release the broken bolt using the extractor.
With proper installation and operation, the anchor bolts are removed with force, but quite simply. In rare cases, when it is impossible to hook the sleeve (for example, bad steel, the edge breaks) or the fastener is “stuck” tightly, the only option remains is to cut off the head or cut the anchor itself with a Bulgarian saw. If the anchor was holding a Swedish corner or other weight on the wall, perhaps the best option is to drive in a stud and cover everything with a wooden bobbin or cement and simply put finishing plaster on top.
7.2. Removing and installing cylinder block plugs
| Tighten the cylinder head bolts correctly, basic rules and requirements for performing the work | Rice. 67. Front part of the cylinder block: 1 — spring tension pin; 2 — chain guide support pin; 3 — steel ball with a diameter of 17 mm; 4 - oil spray nozzle; 5 — cylinder block plug; 6 — support pin of the chain tensioner shoe; 7 — support pin of the oil pump drive chain tensioner |
| Rice. 66. Rear part of the cylinder block indicating the location of the steel ball (1) blocking the main oil line and the plug (2) of the cylinder block |
There are hole plugs installed on the sides and ends of the cylinder block, which are squeezed out of the block if the coolant freezes. On the side of the coolant drain plug on the cylinder block there are two plugs with a diameter of 34 mm, and on the opposite side (on the oil filter side) there are two more plugs of the same diameter. On the end side of the crankcase there is one plug 5 (see Fig. 67) with a diameter of 17 mm. Another plug 2 (see Fig. 66) with a diameter of 34 mm is pressed into the front end side of the cylinder block. These plugs can be changed if the coolant freezes without removing the engine, but using a special tool. To do this, you must perform the following operations:
— drain the coolant;
— remove parts and assemblies that may interfere with access to the plugs;
| Rice. 69. Installing a screwdriver or chisel to remove cylinder block plugs |
| Rice. 70. Removing the plug from the block |
— place a narrow chisel or a powerful screwdriver under the edge of the plug (Fig. 69) and use a hammer to turn the plug in the hole 90° around its axis (Fig. 70);
- grab the plug with pipe pliers and pull it out of the cylinder block, as shown in Fig. 70;
— Thoroughly clean the mounting hole of the plug in the cylinder block. There should be no traces of grease left on the sealing surface;
- coat the mounting hole with Loctite fixing agent and insert a new plug using a special mandrel (specification number 00) or another suitable mandrel so that it is flush with the surface of the cylinder block;
— install all the removed parts in their places and after a pause of 45 minutes, pour coolant into the engine if it was not removed from the car;
— after that, start the engine and check it for leaks.
| previous page2.7.1. general description | next page 2.7.3. Measuring the working clearance in the pistons |
Proven Methods for Baked Screws
Are you planning a renovation but have you encountered baked screws causing downtime? Check out how to quickly and efficiently unscrew a baked screw so that you can carry out further work without hindrance, and the result will meet your expectations!
How to remove a screw using penetrating lubricant?
Unfortunately, a socket wrench cannot always handle a baked screw. If in trouble, you can use a pre-made blank, which works by penetrating deeply into the micro-spacing that occurs between the screw and the material - remember that you will enlarge these by gently tapping the head of the screw with a hammer. The drug reduces friction, and the moistened surface makes it easier to remove the screw. The universal solution for loosening baked-on screws is WD-40, but you can also use tools designed for this procedure, such as K2. After using the medications, wait a few minutes to even an hour. If problems arise, the operation can be repeated
The universal solution for loosening baked-on screws is WD-40, but you can also use tools designed for this procedure, such as K2. After using the medications, wait a few minutes to even an hour. If problems arise, the operation can be repeated.
Expert advice
The homemade equivalent of baked auger cleaner is kerosene. It also has anti-friction properties, making it easier to loosen baked screws. This is an attractive solution, but you must take into account the fact that the kerosene takes longer to thoroughly penetrate the gaps between the screw and the material.
Removing Stuck Screws Using an Impact Wrench
You can also remove a baked-on screw using an impact wrench. Place it on the head of the bolt or nut, then hit the shoulder gently and firmly with a hammer. When an impact occurs, vibrations occur, which in turn create torque.
Using an impact wrench is an alternative to simply driving in the head of the screw - it is safer because there is less risk of damaging the core. This brings better results.
How to unscrew a machined screw using heating and cooling?
This method for a baked screw, but also a machined one, involves the use of one of three electric tools: a torch, a heat gun or an induction heater
For this reason, extreme caution should be exercised and work should be carried out in special protective clothing.
Use the tool to heat not the screw, but the material into which it was screwed - their contact point. The results are very fast, but be careful! The method will not work if there are plastic parts when gripping the bolt - they may melt. The varnish, in turn, may chip.
Do you know that …
You can also unscrew the baked screw using the low temperature effect. Drill a small hole in the screw and spray it with compressed air from a can.
Before working with a torch or heat gun, make sure that there are no flammable substances or objects with similar characteristics nearby. Set the tool to 500°C. Heat the point of contact of the screw with the material, then cool quickly, for example by pouring cold water. This makes the connection easier.
How to remove a broken screw?
During repairs, you may also find it necessary to unscrew a screw with a broken head. In this situation, you can drill the remaining threads tightly and unscrew them using special screwdrivers designed for removing broken screws. Screwdrivers are characterized by reverse threading, which means that when screwed into the threads of a screw, it is removed.
Replacing the cylinder block plug of a VAZ 2110
VAZ - Blank plug for VAZ block. Lada Niva Replacement of aluminum head plug for VAZ 21011. Lada Samara Repair of cylinder head for VAZ 2110. etc. Washing injectors (cleaning the injector).
Replacing the VAZ 2110 engine mount. 0 0 443. Do it yourself At home - how to make an arc reactor. Replacing front springs on a VAZ. 0 0 125. Replacement of corrugation for Opel. Saint Petersburg.
https://youtube.com/watch?v=BWUmh342ixY
Replacing cylinder block plugs. Do it yourself! Views: 31487. Remon | VAZ 2109-08 Replacing the cylinder block plug.
Lada 21099 Brunette › Logbook › Replacing the cup plug of the cylinder block. 23 years old I drive a Lada 2110 Zavolzhye, Russia.
Replacement of the plug in the VAZ-21083 cylinder block and modifications based on block 21083. Replacement of the VAZ 2110 heater radiator.
Repair of the VAZ 2110 stove (heater). We eliminate creaks and rattles in the door trims of the VAZ 2110. Eliminate oil leaks from under the cylinder head plug from the my2110.ru forum. Interesting photo reports: Replacing the gearbox ball joint race.
Replacing the oil seals of the 16 valve VAZ 2110 2111 2112 engine. On the VAZ-2111 engine, using a “10” wrench, unscrew the two nuts securing the “mass” wires to the studs of the cylinder head plug
Avto-mechs.ru » Video gallery » Video do-it-yourself auto repair: Leaking cylinder block plugs for VAZ-2109 plugs for Free videos on how to put a timing belt on a scooter. replacement of hub bearing for VAZ 2109. Opel Astra N 1.3 diesel spare parts.
Cylinder head parts: 1 – cylinder head; 2 – intake 1. Remove the cylinder head from the engine (see “Replacing the cylinder head gasket”). Repair, operation and installation of VAZ 2110, 2111, 2112 cars.
replacing engine plugs. VAZ cylinder block 2108-09-10. viburnum. . What will happen if you wash the engine of a VAZ 2110? Many people are afraid to wash the engine of their car, but I do it regularly, so far everything is fine!
Cooling channel plugs in the block? Topic author Arifmon, 3.5.2011, 22:22. What paint should I paint the cylinder block??? Is it some kind of special heat-resistant paint or regular paint over a regular primer???
On the other side of the cylinder head we press in the plugs. We remove the timing belt (see Replacing the timing belt on VAZ-2110, -2111 engines).
How to replace the cylinder head gasket on a VAZ 2110. 5. Disconnect the exhaust pipe of the muffler from the exhaust manifold (Replacing the exhaust pipe of the muffler>>>).
► replacing engine plugs. VAZ 2108-09-10 cylinder block. Kalina. Alexander Skripchenko. It is shown how you can replace plugs (plugs) on a VAZ engine block with your own hands.
They did it, which they regretted later. We had to take it apart again. And the plug that plugs the block where the antifreeze is located rusted. We knocked it out with a chisel and a hammer, then pulled it out with Hyundai pliers. Kia. Lada (VAZ).
You dig it out in any way, you won’t damage the block, then you take the plug (it came from a VAZ-2109) and use a copper adapter without sealant or any nonsense to hammer it in so that it fits in smoothly and that’s it. December 14, 2013
A nice bonus is the presence of a mark on the flywheel, which can be seen under the rubber plug on top of the gearbox, here is a photo. Replacing the VAZ-2110 heater motor. Replacing the wheel bearing.
Install the cylinder head with the bearing housings facing up, placing wooden shims underneath to prevent damage to the valves. Repair and operation of VAZ 2110, 21102.
What to do after replacement
So, the plug has been replaced and is no longer leaking, all that remains is to return the cylinder head to its place. To do this, follow these steps:
- Cleaning the cylinder head from contaminants and formations using diesel or kerosene.
- Removing remaining coolant from threaded holes.
- Cleaning the cylinder head mating surfaces from the old gasket, degreasing them with a solvent.
- Installation of the head on the BC.
- Head fixation. The fastening bolts are immersed with threads in motor oil. When the lubricant drains (about half an hour), the head is fixed.
- Putting the belt on the crankshaft pulley.
- Tension the belt counterclockwise.
- Installation of the belt drive protective cover (the mounting bolts are not tightened). Turn the crankshaft 2 turns (the belt should be tight even when the crankshaft is stopped). Checking the alignment of the mounting marks on the camshaft pulley and the cylinder head cover. Tightening the bolts securing the tension pulley bracket.
- Installation of drive cables for carburetor flaps.
- Connecting the removed hoses.
- Installation of the ignition distribution sensor.
Now you need to set the ignition timing. To do this, do the following:
- Connecting wires to the carburetor, ignition distribution sensor.
- Installing an air filter.
- Filling the cooling complex with antifreeze/water.
- Connecting the negative cable to the battery.
- Checking the functioning of the internal combustion engine.
Preparing for work
It is not always possible to find the necessary equipment for such work on hand, especially at home. You can use improvised tools that almost every owner has.
Before you begin to unscrew the bolt, cover the bolt with a rag soaked in kerosene.
The longer the rag lies on it, the easier it will be to unscrew.
If you don’t have time, you can treat the bolt with pure kerosene or WD-40 lubricant. It is necessary to tap the bolt with a hammer, then spray with WD-40 or kerosene.
After 1-2 minutes, you need to tap the bolt again and start unscrewing it. If there is no grease and kerosene, you can use brake fluid or ordinary vinegar.
Antifreeze or antifreeze flows through the plug; replacing the plug in the engine block with your own hands
Let's start with the fact that the problem of coolant leaking through plugs is most common on older domestic cars. However, this malfunction does not bypass various foreign cars. To restore tightness to the cooling system if it leaks through a plug in the block, the specified plug must be replaced. Let's look at such a replacement using the example of a VAZ car.
So, the plug (cup plug of the engine block) is installed in six places. The five larger plugs are 40mm in diameter, and the slightly smaller one is 25mm in diameter. The plugs must be changed in a certain sequence.
Before replacing, in addition to the new plugs themselves, you need to prepare:
- hammer;
- chisel;
- screwdriver;
- pliers;
- sandpaper;
- sealant;
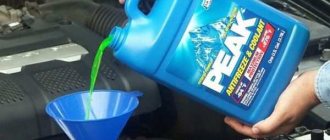
Experts, regardless of engine type and time of year, recommend using only high-quality antifreeze or antifreeze diluted with distilled water in the required proportions, but not running or even distilled water.
You also need to remember that any antifreeze has a limited service life (maximum 4 years), and mixing different types of coolant with each other is also prohibited. Also used to flush the engine cooling system.
Antifreeze or antifreeze in the cylinder block: what to do and how to solve the problem. ... As a result, the permeability of the channels deteriorates, oil circulation is disrupted, and filters quickly become unusable.
As a rule, the color of antifreeze or antifreeze in this case changes to... If you remove the oil filter, then you can also notice sticky deposits inside it. ... How to eliminate an antifreeze leak: causes and possible...
The plugs in the cylinder block are integral elements of the unit. If liquid begins to leak from the cooling system, the root cause may be plugs that have become unusable. The appearance of holes is caused by rust that forms during the operation of the car. Replacing plugs on a VAZ engine can often eliminate such problems, and installing new ones yourself does not take as much time as compared to engine repair.
Composition of the output unit
The exhaust system for a VAZ 2110 car consists of the following elements:
- Exhaust manifold;
- Lambda probe;
- Receiving type pipes;
- Neutralizer;
- Two mufflers: main type and additional.
Not all exhaust components are disassembled; some parts, such as the converter, as well as both mufflers, are replaced entirely.
Description of individual components
To make the structure of such an element as the discharge system clearer, it is necessary to give a detailed description of all components:
- Neutralizer. A unit designed for effective purification and suppression of emissions of harmful substances into the environment. When driving, a car produces substances such as non-combustible hydrocarbons, oxide compounds of nitrogen and carbon. The work of this system is aimed at eliminating them. The design itself is a combination of two ceramic-type components. The surface of these components is coated with special afterburning catalysts, which include rhodium, palladium and platinum. These substances make it possible to purify exhaust gases emitted into the environment by almost 100%;
- Lambda probe. It is a special sensor whose task is to control the composition and amount of fuel that enters the engine. The lambda probe thereby controls the purifier. If the lambda probe does not work properly, then the entire output assembly will quickly become unusable, after which it will have to be replaced;
- Reception pipe. Designed for forced removal of exhaust gases from the cylinders of a power unit. The pipe is made of stainless steel, and its fastening to the collector is carried out using special pins, of which there are four in total. The studs guarantee reliable fastening of the two outlet pipes and the element. In order to combine the exhaust pipe and the neutralizer, as well as an additional muffler, hinged fasteners are used;
- An exhaust manifold. A component that is cast from pure cast iron. The manifold is secured with four studs in the exhaust pipe. Heat-resistant gaskets reinforced with metal are installed between the manifold and cylinder heads.
- Silencers. Necessary for effectively suppressing the exhaust rate of burnt gases. This is necessary in order to significantly reduce the noise level in a type of transport such as the VAZ 2110. The distribution device in this part of the unit is carried out as follows: the additional one is followed by the main one. These two components are connected to each other by clamps and sealing rings and are covered with a special casing on top.
Nuances of operation
There are some points that need to be taken into account when operating the VAZ 2110 system:
- Under no circumstances should the vehicle be refueled with leaded fuel, as this will cause damage. It is very sensitive to lead compounds;
- When operating a VAZ 2110 car, you also need to monitor the proper, precise operation of the ignition, since its poor-quality operation leads to the neutralizing part being removed from its working condition. Fuel that does not burn when a spark passes during ignition enters the converter and burns out there. For this reason, the ceramic coating of the component quickly deteriorates;
- Frequent malfunctions will sooner or later lead to complete or partial blockage of the output system, in turn to the failure of the engine and its repair or replacement will be required.
Troubleshooting
The operation of a machine is always associated with the occurrence of malfunctions in parts and mechanisms. If some parts become unusable, then they need to be replaced or repaired yourself.
To replace the additional muffler in the exhaust unit:
- unscrew the two bolts that secure the clamp, for this you need a 13mm wrench;
- remove the clamp itself;
- remove the ring;
- disconnect the additional suspension cushions;
- remove the unit.
After this, a replacement is made, it is mounted in place in the reverse order. These are basic troubleshooting repair steps.
In addition to replacing standard faulty components with the same ones, but only new ones, you can modify individual components of the exhaust system, or tune the entire assembly.
If you find an error, please select a piece of text and press Ctrl+Enter.
Repair of exhaust system parts
- It is possible to weld parts of the exhaust system only if they have been damaged as a result of mechanical impact
- In the event that a pipe breaks, or a weld seam or tank burns out, you need to replace the entire element, it has already become unusable
- The only part to which this does not apply are metal expansion joints. They change regardless of the exhaust system itself
- The cost of the neutralizer in comparison with other elements of the system is decent. Therefore, many people change it to a stronger (flame arrester)
- The neutralizer is cut off, leaving only the connecting flanges, as well as a fist with flaring, and a flame arrester is welded in
- The cost of a flame arrester is much lower than a neutralizer. However, there is no afterburning of fuel residues. Therefore, its installation is permissible on cars with one lambda sensor. In addition, the flame arrester increases fuel consumption by about 10-15%.
Replacing plugs for VAZ 2110
Car owners often encounter the problem of fluid leaking from the cooling system. Often the reason lies in rusted or squeezed out plugs in the engine cylinder block. To fix the problem, just replace them with new ones.
Plug locations
- There are plugs on the sides and ends of the cylinder block that are squeezed out of the block when the coolant freezes in it.
- Two plugs with a diameter of 34 mm are located on the cylinder block on the side of the coolant drain plug, and two more on the oil filter side
- There is another plug with a diameter of 17 millimeters on the rear end side of the crankcase
- The last plug with a diameter of 34 mm is located at the front end of the cylinder block
These plugs are changed if the coolant in the cylinder block is frozen. The plugs can be changed without removing the engine. On a VAZ 2110, replacing the cylinder block plugs is done using a special tool. To do this you will need:
- beard or chisel
- hammer
- pliers
- durable screwdriver
- telescopic magnetic pointer (purchased at any automotive store)
- new plug
- sealant
- skin
Stages of repair on 8 and 16 valve cars
Eliminating engine fluid leaks
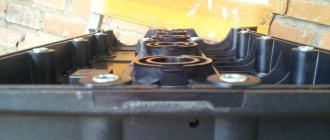
Leaking motor fluid from an internal combustion engine (8 or 16 valves) is an important symptom in which the cylinder head requires repair. Typically, fluid leaks from under the plug. It is located directly on the cylinder head at the rear of the engine. Leakage is usually caused by worn o-rings.
- In order to replace the plug, you need to unscrew three bolts from the studs.
- Having done this, you can remove the sealing rubber from the installation site.
- It is better not to use domestically produced sealing gaskets, since their quality leaves much to be desired. In order to protect yourself from having to replace the ring again, it is better to use a sealant. For greater convenience, the sealant can be filled into a medical syringe.
- Squeeze some sealant into the place where the plug will be installed. Wait five minutes before installing the new gasket in place and then installing the plug.