ABS system and why it is needed
The ABS system has the following components:
- the control unit, which receives signals from sensors, monitors how the valves operate;
- valves installed in the brake system, they dose the amount of brake fluid that flows to them;
- brake sensors, they are mounted on the wheel hubs, they transmit data about the speed of the car.
Video review in which bleeding ABS brakes is quite simple:
This is interesting: Checking the level and replacing fluid in the Lada Granta hydraulic brake reservoir
How to bleed brakes in the field
What if you don’t have the necessary material on hand to modify the brake fluid reservoir cap? We return to the standard method of bleeding the brakes:
- Press the brake pedal several times until it becomes firm;
- We place a pry bar or any other tool of suitable length (for example, a stick) between the seat and the brake pedal;
- We unscrew the brake fitting and watch how the brake fluid comes out along with air bubbles;
- We repeat the process for each wheel starting from point No. 1.
In all cases of bleeding the brakes, monitor the fluid level in the reservoir. If you can’t unscrew the fitting, spray WD-40 on it and wait a couple of minutes for it to dry out.
If the brakes do not bleed, the system is not sealed or one or more components, such as the master cylinder or pipe, are faulty. Also, do not forget to flush your car's brake system on time.
How do you bleed the brakes on your car? Let us remind you that it is convenient to search for other operating and repair instructions by content for each Lada model: Granta, Kalina, Priora, Vesta, Niva, Largus or XRAY.
Keywords: lada xray brakes | Lada Vesta brakes | Lada Largus brakes | Lada Granta brakes | Lada Kalina brakes | Lada Priora brakes | 4x4 brakes | Niva brakes | universal article
3
0
General principle of bleeding the brake system
At the moment, there are many ways and techniques for bleeding the brake system of a car. Each of them is good in its own way, depending on certain circumstances. However, they are all largely based on general principles.
At the first stage, you need to prepare everything you need to bleed the brakes.
This list includes:
- TJ stock;
- flexible hoses for drain valves;
- wrenches of the required size.
Particular attention should be paid to the pumping scheme, which provides for the alternate release of air from underwater lines.
In most cases, bleeding begins with the front left wheel. Then the air is released from the front right and rear right . The last one to bleed is the rear left one .
This sequence is used for most modern cars. But, before pumping, you need to familiarize yourself in detail with the algorithm prescribed by the manufacturer specifically for your type of car.
The principle of bleeding the brakes is that when the brake pedal is applied, air bubbles are pressed towards the cavities of the working brake cylinders. So after 3-4 presses of the brake, the pedal should be held in the depressed position until the air valve on the corresponding working cylinder is opened.
As soon as the valve opens, part of the fuel fluid, along with the air lock, comes out. After this, the valve is closed, and the entire above procedure is repeated again.
Do not also forget that during the process of pumping the brakes, you need to monitor the level of fuel fluid in the master cylinder reservoir. Also, after the entire system has been bled, it is extremely important to ensure that there are no leaks, especially at the connections of the fittings and air valves. We should not forget about the anthers. Once all work is completed, they should be put back in place to avoid clogging of the drain valve channels.
How to fill oil in a Lada Largus gearbox
The procedure for changing the transmission does not seem technologically complex. With certain skills, as well as a lift and a set of keys, almost any car enthusiast can do it. However, official services are also willing to take on this work. Given the long change intervals, in addition to lubricants, it is necessary to purchase an original oil filter. In addition, depending on the type of replacement, this procedure can last from half an hour to 2 hours.
Complete oil change in the box of Lada Largus
A complete fluid change involves a procedure with several stages, during which the used fluid is completely replaced with a new one:
- The unit body is checked for leaks and fogging, and the liquid level is also checked using a dipstick.
- After this, the car is raised on a lift, a container is placed for draining and the drain plug is unscrewed. By gravity, such a substance will completely drain within 1-2 hours.
- A new one is installed in place of the old filter.
- After this, fill in a new product at the level in accordance with the marks on the dipstick.
Then you need to start the engine and change all gears sequentially. In this case, there should be no parasitic vibrations, hum, buzzing and other negative factors during switching and operation of the transmission.
Partial oil change in the Lada Largus gearbox
A partial change of fluid is represented by simply topping up the mark on the dipstick to the required level or by partially changing the substance. When changing, you need to lift the car on a lift, unscrew the drain plug and drain the waste material. After this, use a funnel to pour the required lubricant into the crankcase to the required level.
You should also replace the oil filter even with a partial change. This procedure is carried out when leaks are detected and fogging of the gearbox housing.
Types of ABS systems
Before you take steps to bleed ABS brakes, you should familiarize yourself with it. At the moment, there are two main types of ABS, which differ from each other in the main feature - the order in which the system components are placed.
1) The first type of ABS - the main unit contains the pump itself, a block of hydraulic valves, and a hydraulic accumulator.
The steps for bleeding the brakes occur in a sequence similar to bleeding as in a car with conventional brakes without an anti-lock system.
- It is necessary to find the fuse responsible for the operation of the car’s ABS and remove it, thereby achieving a complete shutdown of the system.
- Find the RTC bleeder fitting and unscrew it. Further bleeding of the ABS brake system should be carried out strictly with the brake pedal depressed.
- Turn on the car ignition, but the ABS fault light should light up. At the same time, the pump starts, expelling air from the brake system. An extinguished brake light means that everything was done correctly.
2) The second type of ABS - all the components (hydraulic accumulator, hydraulic module with valves) of this system are located in different units.
You will need a special scanner that diagnoses the ABS system and retrieves all the necessary information from the electronic control unit of the brake system.
Such a scanner is quite expensive and is rarely found among car owners, which is why bleeding of brakes with ABS is usually carried out in a service station. Most ABS are equipped with activation devices SBC or ESP, just like ABS they are pumped only at service stations.
Some subtleties when bleeding ABS brakes
Each car has its own characteristics, but in general, the design is approximately the same, so bleeding ABS brakes does not cause any difficulties . Let's take a closer look at the system and see if it is possible to bleed the brake system with ABS using your own handles.
- If the valves and the hydraulic accumulator are located far from each other, then in order to service the brakes you need a special scanner for diagnostics, which will read the sensor readings and decipher them. Such a diagnostic scanner can only be found in a service center.
- There are also mechanisms for bleeding the brake system, when valves, a hydraulic accumulator and a pump are located in one housing. In this option, you can carry out the process: bleeding the brakes and bleeding the brake system with your own hands. You need to turn off the ABS system - remove the corresponding fuse, and then bleeding the brake system will be the same as on older cars that did not yet have ABS.
- But there are cars with more complex systems such as ESP and others, then you will have to take such a car to a service center right away. By the way, on the Passat B6, the ABS system itself often fails, this is probably a disease of all Passats, because even on the good old Passat B 3 the same problem also happens.
This is interesting: Removing elements of the Kalina parking brake system
Why did it happen so?
Perhaps the automatic requests do not belong to you, but to another user accessing the network from the same IP address as you. You need to enter the characters into the form once, after which we will remember you and be able to distinguish you from other users exiting from this IP. In this case, the page with the captcha will not bother you for quite a long time.
You may have add-ons installed in your browser that can make automatic search requests. In this case, we recommend that you disable them.
It is also possible that your computer is infected with a virus program that is using it to collect information. Maybe you should check your system for viruses.
If you have any problems or would like our support team, please use the feedback form.
LADA > Largus
Why is replacement needed?
Many people do not know why it is necessary to replace brake fluid on a Renault Logan, because the car works well, and the fluid itself is used in closed circuits. But in fact, the properties of technical fluids change over time.
If water gets into the lines, it can cause corrosion. And in winter, drops of condensate can freeze and break the line. The more water in the working fluid, the lower the boiling point and the higher the viscosity. The permissible water content is 3%. At the same time, the temperature drops to 165 degrees.
If the permissible percentage of water is increased and the boiling point decreases, this will lead to a one-time failure of the brake system. Then it can work quite correctly. It is very dangerous. This symptom indicates that a vapor lock has formed inside the brake line due to heating of the brake fluid. This is the so-called invisible brake failure - at first the car does not want to slow down, and then everything works as expected.
Replacement frequency, what antifreeze to fill
Largus cars are filled with antifreeze designed to operate for 90 thousand kilometers, or 3 years for low mileage. But you always need to pay attention to the color; if it turns red, then it needs to be replaced earlier.
For Renault engines installed on this model, an excellent option would be the branded Renault Glaceol RX Type D concentrate. You can also use ready-made Coolstream NRC or Sintec Unlimited G12 Plus Plus fluids.
Also, many car owners recommend yellow AGA antifreeze, which is developed according to AvtoVAZ technical requirements. But you can also look at fluids that meet RENAULT 41-01-001 or Type D approval.
How much antifreeze is in the cooling system, volume table
| Model | Engine capacity | How many liters of antifreeze are in the system | Original liquid / analogues |
| Lada Largus | gasoline 1.6 | 5.7 | Renault Glaceol RX Type D |
Anti-lock braking system performance
Thanks to the presence of ABS in the braking system, it is possible to significantly reduce the braking distance, which allows the driver to maintain good vehicle control in emergency braking conditions. This allows you to avoid many unforeseen situations and makes it possible to maneuver during braking. These advantages make the anti-lock braking system an important element of the braking system.
The presence of ABS in the car is better for an inexperienced driver in any case; it allows emergency braking even in an intuitive way, applying maximum force to the brake pedal, while maintaining the ability to maneuver.
Among the many advantages of the anti-lock braking system, according to experts, there is only one drawback - braking the car on loose areas (gravel, sand, high snow). The braking distance becomes much longer than when the wheels are completely locked, since the car does not “bury itself” in the loose surface, but continues to move normally. However, today modern ABS already have algorithms that are successfully used when braking even on such surfaces.
Preparing for work
It is good to pump ABS brakes on an overpass or pit . Bleeding brakes with ABS, like bleeding a conventional brake system, is carried out with an assistant, starting the process of bleeding the brake system from the front wheels, then the rear (right and left). Shortly before starting work, it is recommended to inspect the threads of the brake bleeding fitting, for a smooth process: bleeding brakes
But first you need to determine what type of ABS system you have:
- If there is a simple ABS system, when all the components are in one housing, then it is enough to simply find the fuse, which in most cases is located in the system block. If you remove the fuse, the ABS system will be completely disabled. If you turn on the ignition, a light will come on, indicating that the ABS is faulty.
- Next, in the engine compartment, you need to find the cap on the expansion tank of the brake system and unscrew it. Before doing this, it is better to remove the connector from the electrical sensor.
- Then you need to look under the car, and near each wheel, find fittings for bleeding the working cylinders and loosen them. Here you need to make sure that the descenders do not break, because if they break, the work will take a long time. You can pre-treat the fittings with brake fluid or WD-40.
- In order to do the work accurately and at the highest level, you need to stock up on a flexible, clean hose whose internal diameter will be the same as the size of the fitting. And you need to pour about a third of the brake fluid into the bottle. By the way, you can buy brake fluid here: https://chaspik.org.ua/teh-jidkosti/tormoznyie-jidkosti/.
Let us remind you: bleeding of ABS brakes should be done by two people, for convenience and practicality. Pumping the brakes is also the key to successfully avoiding a collision. Bleeding the brakes is not an unimportant cog in this safety system.
Conclusion
After carrying out repair and maintenance work on critical components of the car, before driving, you must first check the tightness of the system and the operability of the vehicle components.
ABS - Anti-lock Braking System is a system against wheel locking during heavy braking. Thanks to the fact that ABS prevents the car from skidding along the road, safety increases in emergency situations. The anti-lock braking system will operate correctly if the system is not air-filled.
Watch this helpful video. Tests show that even a working ABS system turns off at the end of the braking distance, so you still need to modify it with your foot.
Bleeding the Brakes Main Section If there has been a brake fluid leak or if air has entered the system, the system must first be cleared before proceeding further. Place the car on a level surface, start the power unit and engage first gear or reverse gear on models with a manual transmission (on models with an automatic transmission, place the selector lever in the “P” position). After this, place the bars under the wheels and turn off the handbrake. Bleeding air from the brake system If the fault is in only one circuit of the hydraulic system (it has a diagonal branch on samples without ABS and a front and rear branch on samples with ABS), then bleeding will only be necessary in the corresponding circuit. In the case of the main brake cylinder (its disconnection or connection), if the brake fluid level has dropped significantly, it is necessary to remove air from the entire system, observing the following sequence.
For models without ABS system: a) right front brake; b) right rear brake; c) left front brake; d) left rear brake.
Other section materials
| Technical description |
| Vehicle specifications |
| Vehicle registration details |
| Safety precautions during maintenance and repair |
| Location of the main components and assemblies of the car |
| Vehicle technical check |
| Maintenance schedule |
| Checking the condition of wheels and tires |
| Wheel replacement |
| Replacing the windshield and trunk door glass wiper blades |
| Checking the fluid level in the windshield washer reservoir |
| Checking the oil level in the 1.6 (8V) engine |
| Changing the oil and oil filter of the 1.6 (8V) engine |
| Replacing spark plugs for 1.6 (8V) engine |
| Replacing the replacement element of the 1.6(8V) engine air filter |
| Replacing the accessory drive belt |
| Checking the condition and replacing the timing belt of the 1.6 (8V) engine |
| Checking the level and adding engine coolant 1.6(8V) |
| Replacing engine coolant 1.6 (8V) |
| Checking the oil level in the 1.6 (16V) engine |
| Changing the engine oil and oil filter |
| Replacing spark plugs for a 1.6 (16V) engine |
| Replacing the replacement element of the 1.6(16V) engine air filter |
| Replacing the 1.6(16V) engine accessory drive belt |
| Checking the condition and replacing the timing belt of the 1.6 (16V) engine |
| Checking the level and adding engine coolant 1.6(16V) |
| Checking the level and adding oil to the gearbox |
| Checking the fluid level in the master cylinder reservoir |
| Replacing fluid in brake and clutch hydraulic drives |
| Bleeding the hydraulic brake system |
| Checking the fluid level in the power steering reservoir |
| Checking the condition of the brake system |
| Checking the chassis and transmission |
| Checking the steering condition |
| Engine 1.6 (8V) |
| Replacing the cylinder head cover gasket for a 1.6 (8V) engine |
| Checking and adjusting thermal clearances in the valve drive of the 1.6 (8V) engine |
| Replacing the camshaft oil seal of the 1.6 (8V) engine |
| Replacing the exhaust manifold gasket for 1.6 (8V) engine |
| Replacing the exhaust manifold gasket for 1.6 (8V) engine |
| Replacing the rear crankshaft oil seal of a 1.6 (8V) engine |
| Replacing the 1.6 (8V) engine oil pressure warning sensor |
| Replacing the oil pan gasket for 1.6 (8V) engine |
| Removing the 1.6 (8V) engine oil pump |
| Replacement of engine power unit mounts 1.6 (8V) |
| Removal and installation of 1.6 (8V) engine engine |
| Engine 1.6 (16V) |
| Replacing the 1.6 (16V) engine oil pressure warning sensor |
| Removing the fuel rail protection for the 1.6 (16V) engine |
| Removing the oil separator for the engine crankcase ventilation system 1.6 (16V) |
2283-4-24-(Copy)
We bleed, as described above, the brake mechanism of the left front wheel, unscrewing the bleeding fitting with a “8” key.
We bleed, as described above, the brake mechanism of the left front wheel, unscrewing the bleeding fitting with a “8” key.
We bleed, as described above, the brake mechanism of the left front wheel, unscrewing the bleeding fitting with a “8” key.
Similarly, we bleed the brake mechanisms of the other circuit.
When pumping, you need to monitor the fluid level in the tank and add fluid if necessary.
After bleeding the hydraulic brakes, bring the fluid level in the reservoir to normal.
There is an even simpler option for replacing brake fluid. This method does not require the presence of an assistant. With this method, a certain supply of brake fluid is desirable (at least 1 liter).
We place the car on an inspection ditch or overpass and provide free passage between the place where you can refill the brake fluid reservoir in the engine compartment and the brake cylinders of all four wheels.
Use a rubber bulb or syringe to pump out the brake fluid from the reservoir. Add new fluid to the top edge. To speed up the process (to release fluid from all cylinders at once), it is advisable to select four pieces of tubes that fit tightly onto the bleeder fittings of all cylinders. We lower the free ends of the tubes into small transparent bottles.
We unscrew the fittings of all brake cylinders. We make sure that the liquid has flowed through all four tubes. We control the decrease in fluid from the reservoir located on the brake cylinder and immediately replenish the reservoir. We observe an increase in the level of liquid in bottles located near the wheel brake cylinders.
It is necessary to move several times from the position of observing the flow of fluid from the brake cylinder fittings to a position where you can check and replenish the fluid level in the reservoir located on the brake cylinder in order to prevent the reservoir from drying out.
Usually the level rises most quickly in the bottle into which the hose coming from the brake cylinder of the front left wheel is lowered. As soon as there is about 200 ml of liquid in the bottle of the front left wheel, wrap and tighten the fitting of this cylinder. Next, we wait for the same result for the front right wheel cylinder and tighten its bleeder fitting in the same way. The process can be completed after 200–250 ml of liquid comes out through the fitting of each rear wheel.
We make sure that all fittings are tightly tightened. We put on protective caps. Check the fluid level in the master cylinder reservoir.
Lada Largus: changing the fluid in the hydraulic brakes
Level check
You should start by checking the brake fluid level in the expansion tank of the ABS system. To do this, you need to look under the hood of the car, find the tank located on the rear wall of the engine compartment, and check the fluid level in the vacuum tank, which should be approximately in the middle of the MIN and MAX marks located on the side of the tank. If the level is below the minimum, then the fluid is leaking somewhere and you should go to a service station to determine the cause.
You should pay attention to the color of the liquid, which can vary from light yellow to dark brown. Since brake fluid darkens during vehicle operation due to impurities appearing in it, a dark brown fluid indicates that it needs to be completely replaced in the near future. There should also be no burning smell or other foreign odors.
Replacing brake fluid on Kalina
Welcome! Brake fluid - although it is called brake fluid, in some cars, namely in classics and Nivas, it is also used in the clutch mechanism, and all this is because on these cars the clutch mechanism and the brake mechanism work according to the same principle, but on front-wheel drive, the clutch is no longer engaged due to the fluid, but due to the cable that comes from the pedal and is connected to the box, but we are now talking about the brakes and not the clutch, we will try to explain to you why this particular fluid is present in the brake system, that’s all the fact is that this liquid is not compressed and therefore when you press the pedal, the rod, which is located in the main brake cylinder, moves forward and in connection with this the liquid moves and all the pistons on four wheels push the brake pads and thus braking occurs if If you are interested, you can learn more about this from the article entitled: “The principle of operation of the brake caliper and why is it needed?”
Note! To carry out the procedure for changing the fluid on your car, you will need: Firstly, the new brake fluid itself, secondly, a set of wrenches, and also a thin hose will need a suitable diameter, namely one that will fit onto the fitting when bleeding (If you don’t know nothing about this fitting, then don’t change the fluid yet, but at the beginning just read the article in detail and you will understand what we are talking about, then using this fitting you will select a thin hose for bleeding), and the container itself is 1-2 empty liters will be needed in order to drain all the old fluid from the system into it!
Summary:
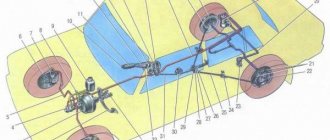
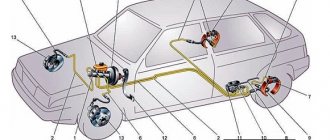
Where is the brake fluid located? This fluid is located in the brake hoses, as well as in the brake master cylinder, the main part of it is located, and the most important part is located in the brake reservoir, which is indicated below in the diagram as number 8, by the way, in the diagram below, arrow number 4 indicates the brake master cylinder, arrows 3 , 7, 18, 11, brake hoses are indicated, and in general, the whole diagram shows the brake system of the car, you can understand a lot from it, and most importantly, if you think a little, you can understand the principle of its operation, remember we said at the beginning that you don’t compress the liquid, so let’s explain in a nutshell, when you press the brake pedal (indicated by the number 10), the rod that is located in the master brake cylinder moves forward, due to the fact that the liquid is not compressible, it presses on the working brake cylinders, which are in the brake the calipers are located (the calipers are indicated by numbers 1 and 5, in the rear there are no calipers, purely working brake cylinders are located there, one of them is clearly visible and is indicated under the number 16) and they, in turn, push out the brake pads, and this is how the car is braked, the fluid By the way, it is constantly in the brake pipes, due to the fact that it is filled into the brake reservoir.
When should you change your brake fluid? From time to time and only from time to time, but although if you are repairing the brake mechanism and this repair will affect the brake fluid, then in this case you will need to buy one new bottle, because as a rule, when work is carried out on the brake system, it itself is affected brake fluid (For example, you disconnect the brake hose from the caliper and then close the hose with a plug so that the fluid does not spill out of it, but in this case it will still be affected) air particles get into it, due to which the fluid begins to shrink (And this is unacceptable, otherwise the car will brake poorly or will not do this at all) and therefore, in order to expel this air from the system, you will have to drain some fluid and fill it with new one, in addition, the fluid must be completely replaced in the case when its expiration date will expire (Each liquid has its own expiration date and it is indicated on the box, so when you buy a new liquid, look at the manufacturing date it has and also pay attention to the expiration date, it is usually about 3, 5 years) and after 2-3 years after filling, because when the fluid is poured into the brake system it begins to slowly absorb moisture, in 2 years it will begin to consist of 3-4 percent moisture, which is very bad and due to with this, the effectiveness of the brakes will disappear and, most importantly, it will boil faster, for example, new brake fluid (let’s take DOT-4, it’s just that everyone boils differently and therefore we will be determined by a specific fluid) boils at a temperature of 230-240 degrees, the old one is 2 years old -3 which and which has absorbed moisture will boil already at a temperature of 160-170 degrees and you can forget about the effectiveness of the braking system while it is boiling for a while (Until it cools down).
We repair the Lada Largus suspension ourselves
The suspension of the Lada Largus ensures comfortable movement. It is recognized by many motorists as unkillable. This is especially true on domestic roads. This detail is completely borrowed from Renault Logan. It is energy-intensive, soft and reliable. But sometimes problems arise with it. You can solve them yourself.
Design and characteristics of suspensions
The front suspension is a simple, comfortable and inexpensive MacPherson strut design, but with some modifications. It is mounted on a subframe. The front arms are attached to it. At the ends of the levers there is a ball joint, through which the lever is connected to the steering knuckle. Vibrations are dampened by shock absorber struts with coil springs. To avoid lateral rolls, a torsion stabilizer is installed.
If in old VAZ models the lever was changed separately from the ball joint, then on Largus the ball joints are changed simultaneously with the lower lever, as on Renault Logan. Largus also differs in that the stabilizer is secured to a lever located below. Due to the simplicity of the design and maintainability, you can find faults yourself at home.
The main part of the rear suspension is a semi-independent beam, in the cavity of which there is a stabilizer, rigidly connected to the lower arms. The rear shock absorbers are attached to the lever at their lower end; its springs rest against the lever bracket through a gasket. The difference between the largus suspension is that the shock absorber and spring are separate parts that are not combined into a single unit. Each lever is attached to the body using silent blocks. The rear suspension is a reliable unit; it rarely breaks, but is easy to repair.
Diagnostics and signs of suspension malfunctions
One of the advantages of the Lada Largus is its reliable and durable suspension. But despite this, over time the elements wear out. If proper maintenance is carried out in a timely manner, faults are identified and corrected, you can extend the life of the suspension and prevent failure of its parts.
The subframe is the main element of the front suspension, so timely diagnostics will avoid problems with the chassis and unit failure. The levers, rear part of the engine and exhaust system cushions are mounted on it. Subframe malfunctions should be looked for in the places where the hanging elements are attached. Typical symptoms of malfunctions are a knocking sound in the front suspension, and wheel alignment changes.
To maintain a smooth ride, dampen road irregularities, ground clearance and level the vehicle while driving, shock absorber struts are installed. They limit body sway. The following signs indicate the presence of malfunctions:
- The body sways when driving on uneven roads;
- oil smudges;
- knocking, vibration and creaking when moving;
- poor handling;
- When hitting even small potholes, impacts and jolts are felt.
When some of the coils of springs break off, the ground clearance decreases, and body roll is noticeable if you place the car on a flat surface.
The function of the anti-roll bar is to prevent the body from swaying and maintain vehicle stability on the road. Problems with the node are determined by the following symptoms:
- when driving on an uneven road, a metallic knock appears;
- if you brake sharply, the body sways strongly;
- On sharp turns there is a noticeable roll.
Using levers, the angle of rotation of the wheels is adjusted. Structurally, the lever is a metal pipe; thanks to a ball joint, it is connected to the steering knuckle. Problems are possible due to wear of the fixing silent blocks.
Malfunctions manifest themselves in the form of a knocking sound that occurs when the car hits an uneven surface, the drive wheels become unbalanced, the vehicle pulls in different directions while driving, and play in the steering wheel is felt. If the hub wears out, the steering knuckles fail. The malfunction can be determined by the uneven wear of the tire tread; when you turn the steering wheel, you can hear a creaking sound, and the car pulls to the right and then to the left.
Diagnostics of suspensions is carried out only on a flat plane. It makes it possible to determine which parts and assemblies need to be replaced. The suspension is checked in stages:
- First, we inspect the shock absorber strut supports. There should be a distance of no more than 1.5 cm between the glass and the top of the support.
- The steering wheel should rotate easily both left and right, and there should be no play or extraneous sounds in the form of crackling or squeaking.
- Check for play by rocking the balls, arms and rods from side to side.
- Try to rock the car. If the shock absorbers are working properly, after a few vibrations the body will return to its previous position.
- Make a visual inspection of the silent blocks. If defects are found on them, they must be replaced.
Front suspension diagnostics.
Most suspension elements, excluding shock absorbers, cannot be repaired. If they are faulty, they must be replaced with new parts.
Restoring the suspension
Suspension repair work includes dismantling and replacing worn and faulty elements.
To do this you will need to prepare the following tools:
- Screwdriver Set:
- a set of keys;
- set of heads;
- jack;
- hammer.
Replacing the anti-roll bar
To restore the performance of the stabilizer, it is necessary to replace worn parts, which is performed according to the following algorithm:
- Place the car on a hill or hang the front part of it.
- First, clean the screw from dirt.
- Next, unscrew the nuts that secure the stabilizer to the lever. To prevent the screw from turning when unscrewing the fasteners, it must be held.
- After this, remove the bushing from below.
- Now remove the screw, bushing and washer.
- Similarly, unscrew the second bolt securing the anti-roll bar and arm.
- We install new parts instead of old ones.
- We reassemble in the reverse order of disassembly.
To replace the rod cushion, use a spanner to unscrew the subframe and bracket mounting bolt. Next, remove the part and install a new element. If a visual inspection of the rod reveals signs of wear in the places where the cushions are attached, it is advisable to replace it.
Replacing levers
Levers are mainly changed when replacing silent blocks and ball joints. To do this, hang the car from the front, remove the crankcase protection, and unscrew the fastener of the rod to the lever. At the next step, we unscrew the fastening bolt, with its help the ball is fixed in the steering knuckle. If you cannot unscrew the bolt, knock it out with a hammer.
Using a flat-head screwdriver, loosen the connection between the ball joint tip and the steering knuckle. At this moment, press the lever down to disconnect the parts. After unscrewing the fastening bolt that secures the bracket to the subframe, remove the subframe. Next, sequentially unscrew the rear and front bolts. Now we dismantle the lever and install a new one in its place. Then we assemble the unit in the reverse order of disassembly.
Changing the ball joint
Despite their long service life, ball joints are replaced more often than other suspension parts. The unit is changed when play appears or rubber parts wear out. Using the algorithm described above, we dismantle the lever together with the ball joint. Then we press the ball out of the assembly body. We clean the seat from dirt and dust. Taking a suitable mandrel, we press the new ball joint into place with a hammer. Next, we assemble the assembly in the reverse order of removal.
Replacing the ball joint.