The appearance of puddles of coolant in the car’s interior makes the owner wonder where the valve for the VAZ-2115 heater is located. In the vast majority of cases, this unpleasant symptom occurs precisely because of the leakage of this part. To replace a faucet, it is absolutely not necessary to go to a car service center - this procedure is quite simple and does not require any special knowledge or skills.
The heater valve in car 2115 is located at the bottom of the dashboard. You can reach it from the passenger seat. At the same time, to replace a part, you do not have to disassemble half of the machine, since access to it is almost completely open.
What is needed to replace the heater valve on a VAZ-2115 car
If a faucet is leaking, it must be replaced as soon as possible. Otherwise, the coolant can seriously flood the entire cabin. In such a situation, you will not only need to make repairs, but also spend quite a lot of time cleaning the car.
What is needed to replace the stove faucet? You only need a few tools and supplies:
- set of socket and socket wrenches;
- Screwdriver Set;
- new part. It is best to choose modern ceramic taps, which are equipped with all the necessary sealing elements;
- WD-40 liquid;
- silicone sealant ensuring reliable sealing of the system;
- any container into which you will drain coolant.
It is best to carry out car repairs in a pit or using a lift - this way you can get free access to all the parts.
List of new spare parts and tools for repair
High-quality parts that will be needed to replace the heater valve on a VAZ 2115 and similar models 2113, 2114 must be certified by the manufacturer and have original part numbers, which guarantees their compatibility and long service life. To fix this problem, the car owner will need the following spare parts:
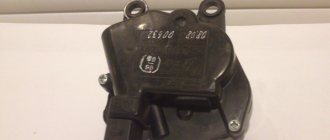
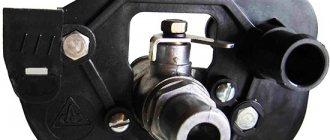
- New heater valve (art. 21080 - 8101150 - 00) Here it is worth giving preference to a ball valve, which has reliable structural elements and greater heat transfer, in contrast to the ceramic and membrane type.
- Two pipes from the tap to the heater radiator (repair kit 237РШ).
- Four metal sealing ties (clamps).
- A can of coolant compatible with what was previously poured into the vehicle's system.
Repair work is carried out using standard tools, the list of which looks like this:
- a set of screwdrivers with a short tip;
- open-end spanners 10 and 13 mm;
- compact-sized coupling heads with a cardan and a knob;
- container for draining old coolant;
- sealant;
- flashlight for a better view under the torpedo space of the vehicle;
- gloves for hand safety.
In official Lada car repair shops, at the end of 2022, the price for replacing a heater valve on a VAZ 2114 is, without taking into account the cost of new parts, from 2000 to 2500 rubles; small, private workshops will ask for about 1500 rubles for the work. The work itself is not difficult and any car owner can do the repairs with his own hands after studying the steps below.
The process of replacing the stove valve on a VAZ-2115
First, completely drain the antifreeze into a previously prepared container to avoid leaks during the process of dismantling a leaky faucet. After completing this procedure, the following steps will be required:
- loosen the clamps securing the pipes that connect the engine to the heater tap;
- We clean the pipes using a metal brush and treat them with WD-40 liquid. This simple step will allow you to unscrew the old part without any problems;
- unscrew the nuts that secure the faucet. To do this you need to use a key of 10;
- We move into the car interior and, slightly pulling the part towards ourselves, remove the special spring retainer;
- disconnect the valve from the control cable and remove it;
- We connect the cable to the new part, install the spring clamp in place and screw the tap to the pipes.
Assembly is carried out in reverse order. When connecting a new faucet, be sure to use silicone sealant that is resistant to coolant, and also screw the drain plug into place. At the last stage, fill in antifreeze and check the operation of the system.
Stages of self-repair
After watching the video on replacing the heater valve on a VAZ 2115, you can familiarize yourself with all the stages of work and begin to carry them out, following the following instructions:
The car is placed indoors, and with a cold engine, the coolant is drained through a special technical plug into a container provided for this purpose. The drain plug is located at the bottom of the crankcase housing on the front side of the machine. The front passenger seat is moved back to the maximum possible distance, then the shelf in the lower part of the dashboard, located under the glove compartment, is dismantled, which will provide access to the fastening of the side decorative trim of the lower part of the center console. By unscrewing the five screws securing the side trim, we gain access to the heating system pipes and to the faucet itself
Having loosened the clamps of the pipes, we proceed to carefully remove them, placing an old rag on the floor, on which the remaining antifreeze may spill. Important! Keep in mind that the seats on the heater radiator are plastic, and when exposed to high temperatures, the pipes may sour a little on them, so their dismantling must be carried out very carefully, otherwise you can break the radiator housing with excessive efforts.
From the engine compartment of the car, we remove the two coolant supply pipes on the heater tap, unscrew, using a 10 mm wrench, the two fastening nuts on its studs, after which we dismantle the old part from the interior, having previously disconnected the damper control cable. A new faucet is installed on the seat, we tighten the fastening nuts, and we treat the seats of the cooling system pipes with sealant, put them on carefully and tighten them with metal ties. We clean the seats on the heater radiator, treat them with sealant, as well as on the faucet itself, install new pipes for supplying antifreeze to the car's heating system, and then tighten the clamps on them. We reinstall the decorative side panel and the additional shelf under the glove compartment, tighten the engine cooling fluid drain plug, and then proceed to remove air from the system. We remove the plug from the expansion tank on the engine intake manifold, disconnect the antifreeze supply pipe and pour new liquid into the cooling system until it begins to flow out of both the manifold and the pipe, which we immediately reattach.
At this point, the do-it-yourself work on replacing the heater valve on a VAZ 2115 is completed, we start the car’s engine, carefully inspect the tightness of the cooling system, check the heat supply to the cabin and the functionality of the damper for switching between summer and winter modes, and if no problems are found, the vehicle can be started to operate . Also watch the video of installing a heater valve on a VAZ 2115 (similar work is carried out on models 2113, 2114):
How to choose the right stove tap
Finally, we would like to give some useful recommendations on choosing a heater tap for your car. The modern market offers several varieties of these devices:
- The simplest option is a crane installed at the car manufacturer. It is built on a membrane element made of rubber, which often cannot withstand elevated temperatures and “sticks.” The solution to this problem is to replace the product. This is why it is better not to buy factory taps;
- a ball valve, which will cost much more than a membrane valve, but will also last much longer;
- ceramic device. The best option, which is deservedly considered the most reliable and durable. To make the body of such a faucet, a metal or polymer material that is resistant to overheating is used, and a pair of ceramic plates is used as a locking element.
Which faucet to choose for the VAZ-2115 stove? We recommend not saving on purchasing this part and choosing the most durable option. This will avoid frequent replacement and save a very decent amount of money.
Which faucet should I buy?
In auto stores you can see three types of cranes:
- Regular factory
- Ceramic
- Ball.
How are they different? An ordinary factory faucet costs about one hundred rubles. There is a rubber membrane installed inside it.
Such a tap is very unreliable and often turns sour. You should not install it in your car.
The ceramic faucet is the most reliable. That is why it is recommended to install it. The body of this faucet is made of plastic, and the locking elements are made of ceramics.
It is worth considering that the throughput of a ceramic faucet is lower than that of a ball faucet. A ball valve is much more reliable than a regular factory one. Instead of a rubber membrane, a ball with holes is installed in it.
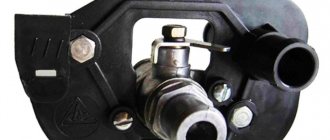
Purpose of the heating valve on the VAZ 2113 and VAZ 2115
First, it should be said that the VAZ 2113 and VAZ 2115 cars are equipped with exactly the same heating valves, the design of which has not changed since the VAZ 2108. The purpose of the stove valve is to regulate the flow of antifreeze entering the small heating radiator. The tap can be switched so that the coolant flows through a large cooling circle (this is done in the cold season) or through a small cooling circle (the tap switches to this mode in the summer).
The VAZ 2113 and VAZ 2115 have exactly the same stove taps
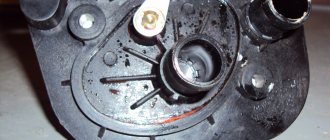
Heating tap location
On almost all VAZ cars, the stove valve is located under the central panel, on the passenger side. To replace this device, the panel will have to be removed by unscrewing several screws. The tap is always connected to a pair of rubber pipes held in place by steel clamps.
On the VAZ 2115 and VAZ 2113, the heating taps are located under the central panel on the passenger side
It should also be noted here that before removing the tap, it is always recommended to completely drain the antifreeze from the system. However, an experienced driver can dismantle the faucet without draining the antifreeze (but for a beginner this option is too complicated, so it will not be discussed below).
Heating tap malfunctions and their causes
There are a number of breakdowns typical of VAZ heating taps. Here they are:
- oxidation. The VAZ heater valve begins to leak due to severe oxidation. It happens like this: in winter the tap is constantly open, antifreeze flows in a large circle, heating the interior. In the spring there is no need for this; the tap is closed and remains in the closed position for 3–5 months. During this time, he manages to literally stick to the pipe. So you can only open it again with the help of pliers. Of course, the tightness of the tap is then broken and a leak occurs;
Antifreeze on a VAZ 2113 flows through the tap directly onto the passenger mat - jamming. The heating valve on a VAZ car, like any other device, can simply exhaust its life and some of its parts will break, making it impossible to close and open the device;
- cracking of pipes and loosening of clamps. The furnace tap pipes are made of rubber, which cracks over time (this happens especially quickly if the machine is constantly operated at low temperatures). The steel clamps that secure the pipes to the faucet gradually weaken due to so-called metal fatigue. All this leads to antifreeze leaks, which are visible both in the cabin, under the passenger’s feet, and on the ground under the car.
Rubber pipes of VAZ stove taps often crack in the cold
Features of choosing a heating valve for VAZ 2113 and VAZ 2115
After a faucet breaks down, the car owner will have to replace it. And here a completely logical question arises: which faucet should I buy as a replacement? Let us list the main types of furnace taps and consider their pros and cons:
- membrane furnace valve. It is this type of valve that is installed at the factory on almost all VAZ cars, including the VAZ 2113 and VAZ 2115. The reliability of membrane valves is extremely low, and as mentioned above, they are highly susceptible to oxidation. For this reason, it is not recommended to buy a replacement membrane faucet, despite its low price, which starts at 200 rubles;
- ball valve It is more expensive than the membrane one (the cost starts from 500 rubles), but its reliability is also higher. At the same time, the ball valve is also made of metal, which means that the problem of oxidation does not disappear anywhere, so sooner or later the car owner will have to open this valve with pliers;
- ceramic faucet. The optimal and most expensive option (a good ceramic faucet can cost 1000–1500 rubles). The liquid in such a faucet is locked using a pair of ceramic plates pressed tightly against each other. The driver can forget about the problem of oxidation, since ceramics are inert. This crane is the best option out of all of the above, so if the car owner’s finances allow it, he should choose it.
The best option for the VAZ 2113 is a ceramic stove faucet
The process of replacing a heating valve on a VAZ 2113 and VAZ 2115
Before starting work, you should decide on the tools and consumables. Here's what we need:
- working heating tap;
- open-end wrenches;
- socket wrenches;
- six-liter container with new antifreeze;
- container for old coolant (the best option is a small basin);
- flat screwdriver;
- Phillips screwdriver;
- pliers;
- rags.
Sequence of operations
- The machine is placed on an inspection hole or on an overpass. The wheels are securely fixed using wheel chocks. Then the plug under the main radiator is unscrewed, and the antifreeze begins to drain into a previously placed basin or bucket. It should be remembered that completely draining the antifreeze takes from 10 to 20 minutes.
It is convenient to pour antifreeze into a basin placed in advance - Under the hood you need to find two heating pipes. The pipes have steel clamps. The screws on the clamps are unscrewed using a Phillips screwdriver, and the pipes are removed from the tubes manually.
The clamps on the external pipes of the VAZ 2113 are loosened with a screwdriver - In the cabin, on the passenger side, the side panel is removed, under which the heating tap pipes are located. To remove this panel, use a flat screwdriver and a 10-mm open-end wrench. After removing the panel, you will have access to the pipes, which are attached to the faucet with steel clamps. You will need a small flathead screwdriver to loosen these clamps.
To loosen the internal clamps on the VAZ 2113 tap pipes, you will have to remove the side panel - The other ends of the heating tap pipes are attached to the stove radiator. There are also two clamps there. They are loosened with a Phillips screwdriver and pulled off the radiator pipes by hand.
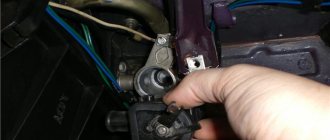
- As soon as the faucet is completely free from the pipes (both from the passenger compartment and from the engine side), you can proceed to unscrewing its fasteners. The stove faucet is held on two studs with nuts set to “10”. It is best to unscrew these nuts using a spanner wrench, since there is little space under the side panel.
It is convenient to unscrew the studs of the VAZ 2113 stove pump with a spanner wrench - After unscrewing both nuts, the valve can be removed from the mounting studs. But this must be done more carefully, because a rod is attached to the tap, which will also have to be disconnected.
- The cable rod of the heating tap is held on a steel clamp. To straighten it, you need to use pliers.
The rod of the VAZ 2113 stove pump is held on a clamp, which is unbent with pliers - Now the stove tap is removed from its niche, replaced with a new one, and then the heating system is assembled in the reverse order.
The VAZ 2113 stove pump is freed from drafts and pipes and can now be removed
Repair process
https://www.youtube.com/watch?v=ytcopyrightru
Please note that replacing the VAZ 2114 stove (that is, the radiator) can be done in 2 ways: with removing the dashboard and without dismantling the dashboard. Professionals prefer the first method
That is, master mechanics of any service station replace the radiator with a 2114, having first disassembled the top down to the screw. Only someone who has already assembled and disassembled the dashboard with their own hands can handle this work. There are a lot of subtleties and nuances.
Speaking for us, we will replace the VAZ 2114 heater radiator without removing the dashboard.
But again, only highly qualified craftsmen can qualitatively change the design of the machine. We won't interfere there, out of harm's way.
For this job we will need:
- Screwdriver Set
- A set of keys
- A pair of new clamps for the diameter of the radiator pipes
- New radiator. By the way, it’s better to take something imported, for example, Fenox RO0004C3 (it costs twice as much as the original)
- New antifreeze for the heating system
Now let's look at the question of how to replace a VAZ 2114 stove without removing the panel (not the entire stove, but only the radiator).
- We turn off the car, open the hood, remove the wires from the battery and place a container under the antifreeze drain from the stove
- We switch the temperature controller to the strongest heating mode
Slowly unscrew the plug for draining the liquid from the heating circuit. If you remove it quickly, antifreeze may splash on the generator. Some also unscrew the cap on the antifreeze tank itself so that the liquid drains faster
We go into the salon and move the seats towards the rear seat, recline the backs, cover the seats with a large piece of oilcloth, and lay an old blanket on top
Unscrew the central pillar. We unscrew the fasteners to the floor (on the right and left sides) the self-tapping screw on top the side fasteners
Please note that some screws are covered with a plug.
We remove the glove compartment (the photo below shows its mounting diagram)
We unscrew the dashboard mount so that the entire dashboard shakes. This point is important for removing the radiator. That is, in order not to remove the entire tidy, we will simply move it away without disassembling it down to the screws. Replacing the VAZ 2114 heater radiator continues
Now we have access to the adjustment cables for the heating tap of the stove. Remove the ends of the cables on the driver's and passenger's seats. They simply fall off the eyes of the adjusting levers
Removing the radiator protective casing
Remove the clamps securing the pipes (can be from the hood or from below)
Now, in order to replace the VAZ 2114 stove without removing the panel (that is, the radiator), you will need a partner. Together with the second pair of hands, we lift the dashboard a little and pull it towards ourselves to take out the old radiator and push the new one in there. You need to be extremely careful at this stage
The torpedo must be moved with the utmost care so as not to damage anything anywhere.
We assemble the new radiator in the reverse order (clamps, cover, cables, etc.)
We recommend: What the markings on rims say: explanation of symbols, overview of parameters, selection tips
Pay attention to one more point. Having put everything back together, you need to fill the circuit with new service fluid.
After refueling, you need to bleed the heater (heat the interior), then turn off the engine and, if necessary, add antifreeze to the tank.
About modernizing the heating tap
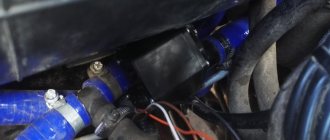
As already mentioned, the stove valve on the VAZ is not very reliable. Therefore, some car enthusiasts take radical measures in order to rid themselves of antifreeze leaks once and for all. The simplest modernization option looks like this: an adapter tube is cut out of the tap, and a simple ceramic water fitting with a ball valve is inserted in its place (and car owners prefer to install branded Italian fittings rather than cheap Chinese ones). The resulting design is shown in the photo below.
Car enthusiasts often install ordinary water fittings on their VAZ stove taps.
The advantages of such a replacement are obvious: high reliability and no leaks. But there is also a significant disadvantage: you have to open and close the tap manually. And to do this you will need to stop and climb under the hood every time.
Installing a stove tap directly in the cabin can hardly be called a successful engineering solution, especially if the reliability of the unit is low. So the VAZ owner will definitely have to change the stove valve, and the best thing he can do in this situation is not to wait for the coolant to flow under the passenger’s feet, but to install a ceramic valve immediately after purchasing the car.
Replacing the heater tap
The heater tap on a VAZ car is replaced if the heater tap leaks. A sign of a leaking heater tap is the formation of puddles of coolant on the carpet at the feet of the front passenger in the car interior.
With the onset of cold weather, all drivers move the heating switch to the “red” zone, and many immediately discover a puddle of “Antifreeze” under the passenger’s feet. The same thing happened to me in the spring when I turned off the “stove”. So you should touch the delicate tap less often. Better - twice a year, the rest of the time regulating the temperature with the “outboard” air supply damper. But the experienced ones keep a spare unit at the ready.
To complete the job of replacing the heater valve, you will need a new heater valve, a worm clamp with a diameter of 16-23 mm and coolant.
We carry out the work of replacing the heater valve on a VAZ car with a cold engine. In the engine compartment, loosen the tightening of the clamps securing the heater inlet and outlet hoses to the faucet nozzles, and remove the hoses from the nozzles. In the cabin, use a Phillips screwdriver to loosen the tightening of the clamps securing the heater radiator hoses to the faucet nozzles and remove the hoses.
We remove the rod bracket and remove the rod from the hole in the valve lever. In the engine compartment, using a “10” wrench, unscrew the two nuts securing the valve body to the front panel. In the cabin, remove the valve. We assemble everything in reverse order... The faucet was installed in ceramic...
Checking the functionality of the heater tap
If the cold or hot air supply modes do not switch, the cause may be a loose damper control cable or souring of the mechanism itself. How to open the tap of the VAZ-2109 stove in this situation?
To do this, you need to remove the side panel of the dashboard on the passenger side. Then check the condition of the cable and if this is the reason, then connect it back into place. You can also, without removing the panel, put your hand under the dashboard, where the VAZ-2109 heater tap is located, and move the VAZ-2109 heater damper lever to the desired position. If the lever does not give in, then most likely it has gone sour and must be replaced.
Removing and replacing the heater valve
To replace the VAZ-2109 heater tap, you need a set of tools available to most drivers:
- a set of Phillips and slotted screwdrivers;
- a set of open-end wrenches No. 10 and No. 13 or socket heads of these sizes, as well as a wrench with a ratchet mechanism and a cardan;
- silicone sealant;
- container for draining coolant;
- metal brush;
- universal penetrating lubricant WD-40 or its equivalent;
- inspection hole, overpass or lift;
- rags to protect the interior flooring from antifreeze.
Ceramic, ball, and electric valves for the VAZ-2109 stove are available for sale. Which heater valves for the VAZ-2109 are better than those listed? With rare use, ball mechanisms are more susceptible to souring, and the electronic automatic heating control system “SAUO” is much more difficult to install. Ceramic mechanisms produced in Russia or “LUZAR” are free of these shortcomings.
Many experienced drivers advise simply replacing the heater taps with water taps. The benefit of this solution is not only in cost, but also in reliability - the coolant either constantly circulates or is easily closed manually at the pipe. Another way to make it easier to change the heater faucet of a VAZ-2109 is to abandon it altogether; the cabin temperature in this case is regulated by air dampers.
Instructions on how to change the heater tap of a VAZ-2109:
- Before replacing the valve of the VAZ-2109 heater, place the car on an overpass and, unscrewing the cap on the radiator, drain the coolant into a container prepared in advance.
- When the radiator is empty, use a screwdriver to loosen the clamps on the pipes going from the engine to the heater, then use WD-40 and a metal brush to clean the threads on the studs securing the part to be replaced. When finished, completely unscrew the clamps.
- Carefully remove the hoses one by one; they may contain residual antifreeze that needs to be drained.
Important! Do not skip this step, because it will not be possible to remove the valve of the VAZ-2109 stove with the hoses connected
- Having removed the side trim of the torpedo from inside the cabin, check the condition of the pipes and change them if necessary.
- Then, under the car, using a socket wrench No. 10, unscrew the nuts securing the part to be replaced on the VAZ stove
- Returning to the car interior, pull the faucet towards you (where the right passenger seat is), remove the spring clamp and disconnect the control cable from the part being replaced.
- We take a new spare part and reassemble it in the reverse order.
Important! To prevent future leakage of coolant at the joints of the pipes, it is necessary to treat it with silicone sealant, and also to increase the service life, install rubber seals where the heater faucet is located on the VAZ-2109. We make sure that the radiator plug is in place and fill it with coolant to the required level
Then we start the engine and, having gotten rid of air pockets, check the proper operation of the heater modes. This completes the replacement of the VAZ-2109 heater valve
We make sure that the radiator plug is in place and fill it with coolant to the required level. Then we start the engine and, having gotten rid of air pockets, check the proper operation of the heater modes. This completes the replacement of the VAZ-2109 heater valve.
Having learned how to replace the heater tap, you can repair your car yourself, without visiting a service station and avoiding unnecessary repair costs.
Heating system design
The valve in question allows you to close or, on the contrary, give unlimited access to the engine-heated coolant (coolant) to the heater radiator. To enhance convection, the circuit also uses an electric fan. The latter pumps air, heat exchange occurs, and the temperature in the cabin rises.
The heater tap is located under the dashboard. You can access it by removing the side trim from the front passenger seat.
In the summer, there is no need for a heater, and therefore the damper remains closed, and, accordingly, antifreeze stops flowing into the heater. In this case, the system performs the function of ventilation, and unnecessary coolant circulates through a small circuit and cools in the main radiator.
The tap begins to be actively used in the fall, when the need for a stove arises. It is driven by a special lever mounted on the instrument panel. A drive cable comes from it, which, in turn, is connected to the locking valve mentioned above.
Possible problems
According to unofficial statistics, car owners of the VAZ-2115 family identify two main problems that may arise with the heater tap. The first is oxidation of the regulator lever, caused by long periods of inactivity during the summer. The components of the constipation mechanism simply “stick together”, forcing you to use brute physical force in an attempt to eliminate this problem, which, in turn, can lead to breakdown.
The second - much more serious - problem can be a leaking faucet. This already promises you not only trouble with coolant getting inside the car, but also complete overheating of the engine, caused by the fact that the entire system will be left without antifreeze.
Unfortunately, the heater valve is a one-piece, non-separable part, which, in the event of a malfunction, can only be completely replaced.
However, your expenses will not be so high - the price range for the VAZ-2115 ranges from two hundred to five hundred rubles, depending on the brand of manufacturer and crane model you choose. Those with a ceramic regulator are considered the most durable, since they are practically indifferent to oxidation processes, but the heat transfer when used is slightly lower than that of other options.
Causes of failure
Replacing the tap, in the case of a VAZ, is usually required if it stops working. This happens when it gets jammed. This happens due to the sedimentation of solid particles contained in antifreeze and metal corrosion on its elements.
The second reason is the appearance of a leak. It occurs after the membrane loses its tightness.
In both situations there is no choice - you have to start repairing. It is almost impossible to repair the faucet itself - it is simply replaced with a working one. The procedure is not complicated, but it is advisable to carry out all the work together with an assistant.
A leaking stove tap needs to be eliminated as quickly as possible, as it can cause many problems. The leakage of antifreeze directly into the cabin is the most insignificant of them.
More trouble will be caused by a lack of coolant in the engine cooling system - because of this, it can easily fail.
So, if the cabin suddenly smells of antifreeze, and a wet spot appears under the rug, then, first of all, it is the faucet that needs to be checked. Arm yourself with a flashlight and, having removed the side panel from the center console (passenger side), look into the opened niche. Please note that there may be a leak from the radiator, as well as from the pipes, which means it wouldn’t hurt to inspect them. However, more often than not it is the faucet that is to blame.
Preparing for replacement
First of all, buy a new faucet. Experienced car mechanics recommend not using the standard product installed on the VAZ-2115 by the manufacturer. Buy a ceramic element and an additional set of gaskets for it.
You will also need:
- can of VD-40;
- keys for 13 millimeters and 10;
- Phillips and flathead screwdrivers;
- a bucket or basin with a capacity of at least 8 liters;
- sealing compound (neutral silicone).
If the antifreeze has not been changed for a long time, then purchase it in sufficient quantities, because in order to replace the faucet, the old one will have to be completely drained from the system. And finally, install the VAZ-2115 on a pit (ramp or lift) - you need access to its bottom.
Replacement procedure
First, make sure that the car engine has completely cooled down, since working with hot coolant is not only difficult, but also dangerous.
If the engine is cold, then immediately go under the vehicle with an empty container. Initially place it under the radiator. Unscrew the plug from the last one. Next, in the engine compartment, slowly unscrew the distributor tank cap. When the coolant drains, move the bucket under the cylinder block - it also has a drain. Its location: directly behind the ignition module.
When there is no antifreeze left in the system, tighten all the plugs and the distribution tank cap and begin removing the pipes. They are held in place with clamps. To loosen the bolts on the latter, you should use WD-40 and a flat-head screwdriver.
Remove the freed hoses from the hood side with great care - there is usually some coolant left in them. Drain it into a container.
Now go directly to the salon. Remove the screws securing the side insert of the center console on the passenger side. Having gained access to the tap, disconnect the pipes from it, also being careful (put a rag on the floor in case of antifreeze leakage).
At the bottom, unscrew the nuts securing the faucet - they require a 10 mm socket wrench. After this, return to the VAZ salon and carefully pull the heater tap towards you. Next, disconnect the cable drive from it by first removing the spring clamp. When installing a new device, do not forget to install fresh gaskets, as well as the seal located at the junction of the part with the body.
Before fixing the stove tap, connect a cable to it, since this will be inconvenient to do later. Replace the pipes, treating their ends with a sealant, and tighten the clamps thoroughly, but do not overdo it - the plastic body of the faucet may crack. The hoses are fixed in the engine compartment in a similar way.
After replacement, fill in with fresh coolant, close the hood, turn on the engine and check if the heater is working and if antifreeze is leaking somewhere.
Work algorithm
To change the heater valve on a VAZ 2114 you will need the following tools:
- Pliers,
- Double-sided screwdriver (straight and curved),
- Socket or socket wrenches No. 10 and 13.
However, it is possible to change the faucet of the VAZ-2114 stove yourself and this will require not so many tools and spare parts:
- replacement valve (diaphragm, ceramic or ball);
- new clamps;
- pipes (if those installed on the car have lost their elasticity);
- antifreeze;
- container for collecting coolant;
- wrenches for 10 and 13 (heads with extensions are possible);
- screwdrivers (phillips, flat);
- rags.
For ease of work, you will need an inspection hole or overpass, since during the removal and installation process you will have to climb under the car.
The faucet can be replaced in two ways - with full or partial drainage of antifreeze.
The first option is suitable for those who decide to simultaneously replace the antifreeze. Before starting work, unscrew the drain plugs and wait for the coolant to drain into the container, after which we proceed to remove the assembly.
Replacement with partial drainage is suitable for those who have a supply of antifreeze for refilling. We place a container under the car at the junction of the cooling system pipe with the tap and disconnect this pipe, after which we lift its end up and fix it in this position.
- We place the car on a pit or overpass and wait until the engine cools down (not completely, but so that it remains warm).
- Drain the antifreeze (partially or completely).
- We disconnect the coolant supply and drain from the faucet on the side of the engine compartment.
- In the passenger compartment, remove the side decorative trim of the console on the passenger side.
- We loosen the clamps securing the pipes to the faucet fittings in the cabin and disconnect the pipes, having first placed a rag under them. If you plan to replace the pipes, you can disconnect them from the heater radiator and remove the faucet along with the pipes.
- Disconnect the control mechanism cable from the locking diaphragm axis lever. If it is not possible to separate them from the passenger side, then you can get to them from the driver’s side (after first removing the plastic trim).
- We climb under the car. We find two nuts securing the faucet body to the engine shield and unscrew them and remove the washers from the studs.
- We move into the cabin and remove the unit.
Assembly is performed in the same sequence as dismantling.
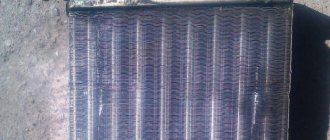
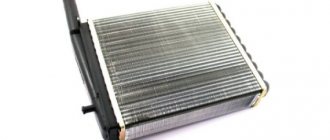
Replacing the stove radiator
It would also be useful to talk about this procedure. It is not very difficult, but it takes a lot of time.
The procedure is as follows:
- disconnect the negative cable from the battery;
- remove the dashboard and steering column trim;
- also remove the glove box, the plastic from the center console, the ECU, the air duct, the casing that covers the heater and the air conditioner evaporator (if there is one).
After this, direct access to the radiator opens. It is inspected for leaks, and if any are found, the element is replaced with a new one or repaired.