According to the maintenance regulations on the Lada Priora , replacement of the timing belt is provided for every 200,000 km , and checking the condition of the belt and its tension must be done every 105,000 km . But, according to reviews from car owners, such mileage is only possible with a belt installed from the factory .
After the first replacement of the timing belt and rollers VAZ 217030 (Lada Priora) 1.6 16 valves , it is necessary to reduce this regulation by 3 times . It is recommended to change the timing belt and rollers at a mileage of 50,000 km - 60,000 km , and inspect the belt every 25,000 km - 30,000 km .
If you detect even the slightest cracks on the belt or a hum in the roller bearings, it is necessary to urgently replace the rollers and toothed belt, since if the timing belt breaks, there are 16 valves on the 1.6 , the valves will bend and it will be necessary to repair the engine.
What is timing belt
The abbreviation GRM stands for Gas Distribution Mechanism. This mechanism distributes the air-fuel mixture among the cylinders through the valves.
The timing structure includes:
- Camshaft
- valves
- Valve adjustment washers or expansion joints
Timing belt side view
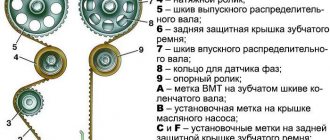
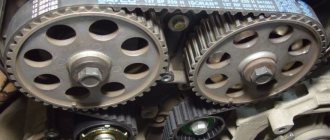
Gas distribution mechanism (GRM): 1 — timing marks on the rear cover; 2 — rear timing cover; 3 — intake camshaft gear; 4 — phase sensor ring; 5 — mark on the intake camshaft gear; 6 — exhaust camshaft gear; 7 — deflection roller; 8 — tension roller; 9 — timing belt; 10 — coolant pump; 11 — mark on the oil pump body; 12 — mark on the crankshaft gear; 13 — crankshaft gear;
Checking and adjusting the tension of the timing belt.
If you want your belt to last long and trouble-free, it is important to maintain its tension in the correct position. To do this, periodically test the tension. Pay special attention to the first tension of the new belt. If the belt is loose, the lateral load on the teeth increases, which greatly accelerates their wear. In some cases, if the belt is very loose, there is a high probability of the belt teeth moving relative to the pulleys. This can lead, at best, to engine instability and loss of power. In the worst case, it will lead to expensive repairs. To check the tension, perform the following steps:
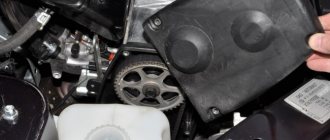
1. Unscrew the 5 bolts securing the protective timing cover and move the cover to the side.
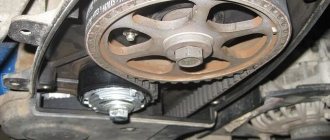
2. Press the timing belt exactly in the center between the camshaft pulleys with a force of 100 Newtons (10 kgf). The belt deflection from the horizontal position should be no more than 7 millimeters. Modern tension rollers are also provided with a tension control mechanism. To check the quality of the tension, make sure that mark A on the outer part of the roller coincides with protrusion B.
3. To adjust the tension, slightly unscrew the roller mounting bolt and, rotating the roller, achieve complete alignment of the marks described above (see figure)
4. Secure the tension by tightening the roller mounting bolt.
5. Reassemble all remaining parts in the opposite order of removal.
Source
When to change
The manufacturer provides a 100,000 km warranty on a new belt. But the quality of the tension and deflection rollers leaves much to be desired. Therefore, based on life experience, the timing belt along with the support rollers should be changed every 50,000 km. This will help avoid tragic consequences resulting from a timing belt break or failure of one of the rollers.
Also, after 50,000 km, it is necessary to check the coolant pump (pump) for leaks, play and squeaks. If necessary, the pump must be replaced. When a vehicle travels more than 100,000 km, the coolant pump must be replaced.
Alternative manufacturers
Not all vehicle owners can choose the right spare part for their car. This is due to the wide variety of products, including timing belts. The main supplier of rubber products for VAZ cars is the RTI plant in Balakovo. In addition to this, sellers can offer buyers Bosch products, which have high quality workmanship and reliability. Also on display you can see products from] Daiko[/anchor], Kontitek, Lynx. Their cost ranges from 700 to 1500 rubles.
Reviews
Sergey. Moscow city. I decided to tidy up the timing drive mechanism on my Priora. Experts suggested trying a product from Contitech. I don’t know why they chose this belt, but it has been working for more than 30 thousand km without any complaints.
Nikolai. Tambov. On the engine of my car, the timing belt broke and two valves were bent. The engine was repaired by specialists who chose a belt from Bosch. After a run of 10 thousand km, we checked the condition and tension in the timing drive, there were no comments.
To oppress or not to oppress
In most cases, if you have an 8-valve engine installed, then the valves on your car will not bend if the timing belt breaks. The exception is the 8-valve engine with a volume of 1.3 liters; such an engine was installed on the VAZ 2108 in the early 90s.
If your car is equipped with a 16-valve engine, then most likely if the timing belt breaks, the valves on the car will bend. An exception is the 21124 engine, this engine has pistons with grooves for the valve, which is why the valves do not bend if the valve belt breaks, but such an engine was not installed on the Lada Priora.
Preparatory operations
First, disconnect the negative battery terminal, remove the engine protection and drain the antifreeze.
Engine 16 valves Priora.
Remove the protective cover, not forgetting to disconnect the absorber purge valve.
Consequences of a cliff
Broken timing belt
As a result of a broken timing belt, the valves are the first to suffer. When it breaks, the camshafts stop rotating, therefore, the valves freeze in place.
Bent valves
The crankshaft has more mass and continues its rotation by inertia, pushing the pistons along the cylinders. When the piston reaches TDC (top dead center) and the valve remains open, the piston hits it with such force that it bends the valve and in some cases breaks itself.
Broken piston
A piston break can lead to scuffing of the block mirror, which will lead to quite expensive repairs. Consequently, after the belt breaks, the car will no longer be able to move under its own power. The cost of repairs reaches 50,000 rubles.
About engines
The car was produced from 2007 to 2015, it replaced the VAZ 2110. The first Priors were equipped with engines from the previous model with some modifications, they had the index 21116. There were 8 valves in the cylinder head, the timing drive was with a toothed belt. Experts note that this engine has good environmental performance, reduced operating noise, and increased power. The engine is of in-line type, the power system uses an injector. As a disadvantage, a decrease in the engine life compared to the indicators declared by the manufacturer was noted.
After further modernization of the engine, version 21126 appeared, which is based on the previous cylinder block from the VAZ 21083, it received a twin-shaft cylinder head. The new Priora power unit with 16 valves has become a little more complex, but has received an increase in power and has become even more economical. The valve mechanism of this engine received a modified drive design; it was still belt driven. The length of the drive has become longer, so an automatic toothed belt tensioning system has been introduced. Somewhat later, the car was equipped with engines such as VAZ 21127, VAZ 21128, which were a modernized version of the VAZ 21126.
Are the valves bending?
Gasoline internal combustion engines of modern cars run on high-quality gasoline with an octane rating of 95 and higher. These types of fuel require a high compression ratio at the end of the piston stroke. Designers achieve this by reducing the combustion chamber in the cylinder head. This feature of the engine design carries the risk of damage to the valves, in some cases, pistons, and connecting rods in the engine. This can happen when the belt breaks or its teeth are cut off.
VAZ 21083 engines did not have such a problem since recesses for the valve heads were cast in the pistons. Therefore, their meeting with the pistons was not dangerous. On the engines of the new series, this was abandoned in order to increase efficiency, power, and other engine indicators. The designers believe that if the timing mechanism drive parts on the Priora are replaced in a timely manner, there will be no such problems. Every owner of a 16-valve Priora must remember that when the timing belt breaks, the valves are damaged. To the question of whether the valves on the 16 valve Priora are bent, the answer will only be in the affirmative, yes.
Causes of breaks
There are a large number of consequences of a broken belt, from the most banal and ridiculous to defective products.
It happens that the timing belt breaks due to debris getting into the teeth, for example, a stone getting between the belt and the gear can break the timing belt.
A break can occur due to weak or excessive belt tension, failure of the pump bearings or rollers and their wedge.
Sometimes it happens that neither the belt nor the rollers are to blame for the valves being bent, but the crankshaft pulley key may be the cause. There are cases when the key is cut off and the pulley rotates on the seat of the crankshaft, which leads to inevitable bending of the valves.
Weak links on the Priora: roller, belt, pump
Full operation of the timing mechanism is ensured thanks to the drive tension design. Two shafts regulating the operation of the valves require an additional support roller, taking into account the increase in the length of the drive. The roller, turning on an axis, regulates the proper belt tension. And the supporting roller fixes the direction of the belt.
The tension roller guides the belt
These parts can grind down, creating play during movement and unnecessary noise. The pump may jam when the engine is running. In this case, the consequences of such work may be cut teeth. Loss of seal in this design can result in unnecessary loss of coolant. To change the pump, the camshaft pulleys and the back of the casing are removed.
At the same time, the protection mounts and the generator support roller mounts are removed. After removing the casing, the bolts of the pump itself are unscrewed. To avoid additional faults in the future.
It is necessary to replace the timing belt with teeth at the same time as the rollers and pump.
Belt selection
Most owners of VAZ cars recommend installing Gates belts; such a belt is installed by the manufacturer on Lada cars. This company has proven itself well in the market, making high-quality and reliable products. The cost of the set is 4-5 thousand rubles. The kit includes: a belt and two rollers.
Gates timing belt
Also, along with Gates, good belts are produced by Dayco; a nice bonus of such a belt kit includes a key for tensioning the timing belt tensioner pulley. The cost of this kit is approximately 4-5 thousand rubles. The kit includes: a belt, two rollers and a key.
Dayco timing belt
Tensioning the alternator belt in a Priora car - nuances of implementation
Any car enthusiast knows that there will definitely come a time when you need to tighten the Priora alternator belt. It is known that the belt drive of this car is quite durable, but during operation there is a slight stretching of the belt itself, as well as a decrease in the adhesion of its surface to the pulley and roller.
Literally as soon as you notice a whistling alternator belt on a Priora, you need to start tightening it at the same moment, especially since this is not difficult to do.
Before tensioning the Priora generator belt, you need to prepare an open-end or socket wrench for 19 and a special two-end tension wrench directly for the roller. This key is similar to the one used to change discs on an angle grinder.
Diagnostics
The belt must be checked every 20,000 km to prevent it from breaking. The essence of belt diagnostics is to prematurely detect aging and wear of timing components.
When checking, you need to pay attention to the operation of the belt, special attention should be paid to its alignment, that is, it should run exactly in the center of the gears, there should be no creaks or lifts.
Timing belt slipping to the outside
The following diagnostics must be carried out when replacing it. With the belt removed, you need to check the play in the tension and idler rollers, as well as in the coolant pump. If play, squeaks, leaks or snags are noticed in the rollers or pump, they need to be replaced.
Necessary tool
From the tools we will need: a standard set of keys, hexagons for 5 and 6, a set of heads and a special key for the Priora tension roller, it is slightly different in size from the usual one (the pins that are inserted into the roller are thinner), the price is 100 rubles. But also the Gates timing kit itself. Gates belts are, in my opinion, some of the best timing belts out there.
The procedure for replacing the timing belt on a Priora takes approximately two hours with a lunch break.
Replacing the timing belt
Tool you will need:
- Ratchet with two extensions
- Head on "17" and "15"
- Hexagon "6" or Torx T30 (asterisk)
- Wrench for tensioning timing belt and alternator belt
- Open-end wrenches "13"
- Timing belt and rollers
Work process
- Prepare the car, fix it in its original position, jack up the front right wheel, placing stops under the rear wheels.
- Remove the wheel and protective covers of the engine compartment
- We remove the generator belt; to do this, you need to use a key to “17” to loosen the tension roller and dismantle the roller; the belt will remain hanging on the cushion because To dismantle it you need to remove the engine mount.
- Remove the decorative engine cover by pulling it upward on each edge.
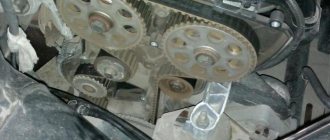
- We unscrew the 5 bolts of the upper timing belt protective casing using a hexagon “6” or Torx T30, depending on the year of manufacture of the car, and remove it.
- We unscrew the 2 bolts of the lower timing belt protective cover using a hexagon “6” or Torx T30, depending on the year of manufacture of the car, and remove it.
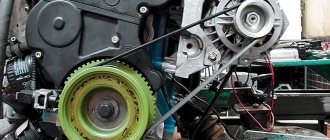
- Next, you need to unscrew the crankshaft pulley; to do this, you will need a ratchet with two extensions and a socket set to “17”.
- To unscrew the bolt securing the generator pulley, you need to put the car in gear and insert a screwdriver into the vent hole of the brake disc.
Attention:
Unscrew the generator pulley bolt counterclockwise.
- Remove the generator pulley and washer.
- Before you remove the alternator belt from the gear, you need to set the marks. The marks on the camshafts must be set as in the picture.
- Not all car modifications have a mark on the crankshaft gear, so it is best to find the mark on the flywheel, it is located under the rubber plug, under the thermostat.
Mark on the flywheel
Mark on the crankshaft pulley
- Next, use a 15mm wrench to unscrew the tension roller and remove the timing belt.
- Using a 15mm wrench, unscrew and remove the deflection roller.
Installing a new belt
- We install the new rollers in place, tighten only the idler roller.
- We set the timing marks and put the belt on the pulleys.
- Next, when the belt is put on and the marks are set, you need to tighten the belt.
- The timing belt is tensioned automatically by the roller itself, but initially the roller needs to be given spring tension; to do this, you need to align the marks on the rollers, as shown in the picture.
- After tensioning the belt, you need to check the timing marks; to do this, screw in the bolt securing the pulley and turn the crankshaft clockwise 2-3 turns and check the marks again.
- Next, the assembly and installation process occurs in the reverse order of removing the timing belt.
- Let's start the engine.
The process of replacing the timing belt has been completed, as you can see there is nothing complicated about it.
What are the consequences of untimely replacement?
Questionable savings on the purchase of consumables for the timing mechanism can lead to significant costs for the restoration of the power unit. On the Lada Priora, the cylinder head has 16 valves, 4 for each working cylinder. If for some reason there is a mismatch in the operation of the timing belt and the crank mechanism, there will inevitably be a “meeting” of pistons and valves. In the best case, you will have to replace the damaged valve, but there can be more significant damage to the engine.
Check and replace worn timing drive parts in a timely manner; the machine will delight you for a long time with the flawless operation of the power unit.
The timing belt of any modern engine is usually designed for a short service life. On average, it operates for 50-100 thousand kilometers, after which it requires replacement along with the tension rollers, and often also the water pump and pulleys. The timing of replacement of this important part is strictly regulated and specified in the operating instructions for each specific vehicle. However, by blindly following the manufacturer’s recommendations, you may not notice the impending disaster and run into serious and expensive engine repairs. There are several signs that the timing belt urgently needs to be replaced with a new one.
Why do you need to change the timing belt?
First, let's figure out what a timing belt is and why it needs to be changed. This inexpensive and uncomplicated, at first glance, part is needed in order to synchronize the operation of the ignition system with the stroke of the pistons and valves. The timing belt rotates on the crankshaft and camshaft (or camshaft) pulleys, simultaneously driving the water pump. It has a multi-layer reinforced structure and consists of rubber and nylon base. The correct belt tension is set by a special roller. When the timing belt breaks on most modern cars, the intake and exhaust valves meet the pistons. A serious breakdown occurs that is incompatible with further movement and requires complex, expensive repairs.
The timing of replacement of rubber products and related components depends not only on the make and model of a particular car, but also on operating conditions, which in our country are very harsh. However, this does not prevent some brands from installing prohibitive timing belt service life on their products. For example, on domestic Ladas this operation should be carried out once every 180 thousand km. This figure looks, to put it mildly, too high. For comparison, on Renault cars, even the highest quality belts from the world’s best manufacturers last 60 thousand km in Russia and 120 thousand km in Europe. Experiments with non-compliance with this regulation are fraught with big troubles.
Signs of timing belt wear
The main problem that prevents you from noticing impending trouble in a timely manner and preventing the timing drive from breaking is difficult access to the part: unlike the belt of mounted units, this belt is carefully covered with all kinds of casings. To perform an inspection, partial disassembly of the engine is often required, which most car owners are not able to perform. However, in addition to tears and cracks that are visible visually, there are other symptoms of impending disaster. We will try to list the most common ones.
1. Belt is old
Basically, the service life of a timing belt is determined by the mileage of the vehicle. After several tens of thousands of kilometers, it must be replaced. However, there is one “but”: age is also critical for this part - on average, the belt retains its properties for no more than five years, after which it begins to lose elasticity and crack, regardless of mileage. Drivers who drive a car relatively rarely should pay close attention to this point. The belt consists of materials that are subject to rapid aging, which means you shouldn’t joke with its age. For the same reason, we recommend that you change the timing belt on purchased used cars without fail - no one guarantees that the previous owner complied with the regulations and used high-quality components.
2. Uncertain engine start and loss of power
Cylinder head repair
We mark all hydraulic compensators with numbers using an ordinary clerical touch and put them away. An ordinary magnet will help you pull them out. We dry out the valves and remove the oil seals (valve seals), the valves into scrap metal, the oil seals into the trash. We clean all channels. We take the head for grinding, just in case. After washing it again with kerosene after sanding and blowing it with air, we begin to assemble it.
We arrange the freshly purchased valves in the sequence in which they will stand in the cylinder head and begin to grind in one by one. Lubricate the valve stem with clean oil and apply lapping paste to the edge.
We insert the valve into place and put a valve grinding tool on the valve stem. The stores sell a device for manual lapping, but since this is the twenty-first century, we are mechanizing the process. We take the old valve and cut off the rod from it, select a rubber tube for it of such a diameter that it fits tightly. The rod is in a reversible drill, one end of the tube is on it, the other is on the valve being ground in. At low speeds we begin to grind the valve, constantly change the direction of rotation and periodically press it to the seat or weaken the force. On average, the valve takes about twenty seconds. We take it out and wipe it. The valve is considered ground in if a uniform gray strip of at least 1.5 mm wide appears on the chamfer.
The same stripe should appear on the valve seat.
Video of manually grinding valves
For a sixteen valve head, everything is the same, only there are twice as many valves.
After lapping, all valves and seats are thoroughly wiped and washed with kerosene to remove any remaining lapping paste. We check for leaks. We tighten the old spark plugs and put all the valves in place. Pour kerosene and wait three minutes, if the kerosene does not run away all is well, otherwise we grind the valves on this cylinder.
We had to grind four valves again, after which the kerosene stopped flowing.
We stuff new valve seals.
We put the valves in place and dry them. Before doing this, lubricate the valve stems with clean oil. After lubricating it with clean oil, we put the hydraulic compensators in place and, covering them with a clean cloth, remove the head out of sight. We're done with the cylinder head.
About the belt PRIOR, KALINA, GRANTS
Replacing the timing belt Lada Largus
Okay, with foreign cars we understand that if you install original belts, you can drive for at least 100,000 km, but what about our cars?
Everything is not so charming here. The belts on our VAZs also last a long time, but the rollers are just some kind of scourge, personally, on a working VAZ 2111, we changed the timing belt - probably every 30,000, the rollers didn’t run anymore, they just “stuck”! True, they took “non-originals”, after the last time we stopped by the VAZ dealer, he installed his own belt, which is installed on the conveyor belt (his words). It ran for about 45,000 kilometers, but then I quit my job and don’t know the future of the car.
I asked the same guy at the station a question - in general, for our cars, what is the timing life? And this is what he answered me:
And you know, I believe him - I would generally change it after 50,000 if I had a PRIORA. Damn, can’t they really make sane belts and rollers! The question hangs... But it needs to be changed, otherwise there will be a break, and what they say is “you’ll get caught”!
Now I remember how I tested DATSUN ON-DO, the first thing the Japanese changed and added to the design was the timing system! Worth thinking about!
Now there is a useful video, watch it
That's probably all, I think the information was informative, read our AUTOBLOG.
How to check a belt transmission on a VAZ 2170
Ford Fusion timing belt replacement
The part is a rubber product with teeth located on its inner part. The outer rim shows:
- motor type for which the car part is intended;
- indicating number of teeth – 137;
- marking indicating the width of the product is 22 mm.
This data will be useful if the owner does not yet know which belt to buy for the VAZ 2170. All that remains is to prepare the necessary tool for checking:
- hexagon socket (key) to “5”;
- key to “10”;
- jack.
The condition check is carried out on the drive when the motor is cold and consists of the following: When:
- Using the hexagon, unscrew the five fastening bolts of the front upper cover of the gas distribution mechanism drive and remove it.
- Inspect the part and determine whether the Lada Priora needs a replacement drive belt, then turn on the fifth gear, lift the right front wheel and rotate it clockwise. The product must be free of peeling, cracks and undercuts exposing the cord threads. If defects are detected, the part must be replaced.
- condition Inspect the tension roller - there should be no damage to it.
- Check the belt tension by pressing a force of 10 kg on the belt between the camshaft gears and measuring its deflection - it should no longer be 5-7 mm. You can also carry out control by position mark 1 on the outer race of the self-tensioning roller, ideally which should be opposite protrusion 2. Deviations within 3-4 mm are acceptable - they are adjustable, but exceeding these values means the need to replace the belt drive and rollers.
