The engine power system ensures an uninterrupted supply of fuel from the gas tank to the running car engine. One of the elements of the supply system is fuel pipes, flexible hoses, fuel supply and removal lines, as well as main fuel pipes.
Replacing fuel pipes on a Chevrolet Niva is not the easiest task. While replacing flexible hoses is quite simple, repairing or replacing steel tubes is a labor-intensive process. It is complicated by limited access - work can be carried out under the bottom of the car, so replacement may require a lift or inspection hole. An additional complication is that the fuel supply system is always under pressure, so before carrying out work it is necessary to remove all gasoline from the system.
Design features of the product
So, the main purpose of a gas tank is to store fuel, which is consumed directly by the vehicle for movement. The Chevrolet Niva belongs to the class of SUVs, which means that its fuel consumption is quite high, and it also has all-wheel drive, which increases fuel consumption, so you should definitely pay attention to such a parameter as volume. Based on this, the manufacturer of the domestic car model considered this remark and the Chevrolet Niva is equipped with a gas tank with a volume of 58 liters. The actual capacity is larger - about 63 liters. This amount of fuel ensures the “non-refueling” movement of the Chevrolet Niva up to approximately 400-600 km, depending on the type of roads.
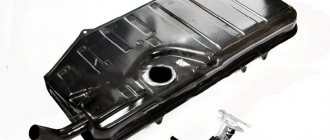
The gas tank of a Chevrolet Niva SUV is made of sheet steel, connected using welding seams. The steel structure of the tank has its pros and cons, so it’s worth highlighting them:
Pros:
- structural strength;
- storage security;
- Possibility of repair for minor damage.
Minuses:
- rust is likely to form inside, which should not get into the engine, which means additional cleaning is required;
- impossibility of carrying out repairs in case of shocks or severe breakdowns of the container.
The gas tank is located in the rear of the car under the seat. This placement feature is not accidental, because according to statistics, emergency situations often lead to a head-on collision with the car.
Filler neck, cap and lock
The neck is a structure in the form of a steel tube into which fuel is poured. The neck is connected to the gas tank by welding, and its second side is placed on the side of the Chevrolet Niva car. This is necessary in order to be able to conveniently refuel the vehicle. The neck is sealed using a special cap. The lid has a corresponding thread, through which it is fixed to the neck of the tank.
The standard equipment of a Chevrolet car is equipped with covers that do not have such a useful element as a lock. The cap is quite easily removed from the neck, thereby opening access to the fuel, which is often used by villains. Thus, it is very important to protect yourself from unnecessary fuel costs and replace the standard cover with one that has a lock.
A lid with a lock is a fairly effective means of protecting the tank from draining gasoline. For this purpose, there are special models of lids with a lock that can be locked with a key. The lock in the lid design is strong enough and it is impossible to break it by applying physical force. Below in the photo you can see what a gas tank lock for a Chevrolet Niva is. When the key is turned, the thread is blocked, causing the cap to rotate idle on the neck. When the key is turned back, the lock unlocks the latches, thereby making it possible to unscrew the tank cap.
Lock built into the gas tank cap
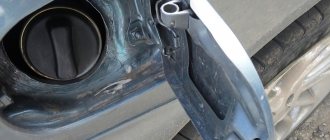
Fuel filler flap
In the design of the gas tank, or more precisely, the body of a Chevrolet Niva car, there is such an element as a hatch. Thanks to its presence, the tank neck is hidden, thereby not disturbing the design of the car’s exterior. The hatch is called the outer cover, which is made mainly of sheet steel. The hatch is attached to the body structure using curtains, which ensure smooth opening and automatic slamming of the lid.
The gas tank flap is a weak point, as the curtains of the structure periodically fail. In some cases, repairs can be done, but this will require removing the hatch. But in most situations, a new device is purchased by choosing the appropriate color.
The hatch is removed in the following sequence:
- Initially, the hatch itself opens directly;
- Using a Phillips screwdriver, you need to unscrew the two screws that hold the cover structure in place;
- Remove the product;
- Repair or replacement is carried out, after which the procedure for installing the cover is the reverse of removal.
To improve functionality, the hatch must be lubricated with WD-40.
Gas tank pressure and valve or ventilation system
It is known that gasoline is a secondary petroleum product that tends to evaporate. But since the gas tank is a closed structure, and it is opened quite infrequently, there is a risk of pressure developing inside the tank. The tank is designed for low pressure, so if it increases, there is a risk of rupture. But in addition to this, not only excess pressure can arise in the container, but also vacuum, which can cause:
- reducing the volume of the container;
- cessation of fuel supply;
- damage to the pump or fuel lines.
To prevent this from happening or to reduce the pressure, the tank has a special adsorber valve. This valve is a small plug through which excess gasoline vapor is released.
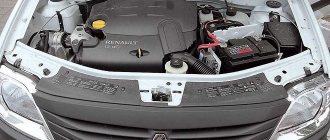
This valve is located directly in the engine compartment and is installed in a separate fuel line circuit coming from the gas tank. Thus, when excess pressure occurs in the tank, the adsorber purge system is turned on. The accumulated vapors are passed through the adsorber filter and enter directly into the cylinder, where they are mixed with the main fuel mixture and burned. In addition to removing excess pressure, the adsorber valve is also a ventilation system. This system is necessary to avoid creating a vapor lock in the tank. The gas tank ventilation system helps prevent problems with vapor accumulation in the tank.
If, when you open the tank lid, you hear the characteristic sound of air in the tank, this means that there is pressure in the tank. The ventilation system does not cope with its task due to the canister valve being clogged with small particles (a vapor lock has occurred). In such a situation, in order to stabilize the pressure in the tank, it is necessary to remove the adsorber valve and clean it. The valve is removed in the following order:
- The hood opens;
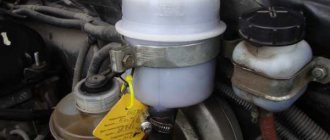
- We find a valve on the fuel line that looks like the photo below;
- The tubes are removed from both sides and the valve is removed.
Now the product is purged and cleaned, after which the valve is installed in the reverse order of removal.
Removal and replacement
The tank is removed if defects occur on it in order to carry out subsequent repairs. If it is not possible to repair the tank, then it is replaced. To do this, perform the following actions:
- Fuel is drained;
- Disconnect the ground terminal from the battery;
- The rear seat is removed;
- The fuel pump cover is unscrewed and the power plug is disconnected;
- The fuel hoses are removed, having first loosened their clamps;
- The ventilation hoses are also disconnected;
- The gas tank flap is unscrewed;
- Using a wrench, you need to unscrew the bolts securing the tape holders, and then slowly loosen the tank;
- A control check is made to disconnect all pipelines and the gas tank is removed through the vehicle interior.
Thus, the tank is removed from the Niva Chevrolet car and repaired or replaced. The most preferable option is to replace the product, but it all depends on the budget.
Additional gas tank
An additional tank is an excellent solution for those who are used to traveling not only in cities, but also off-road. To avoid the problem of running out of gasoline, many owners install an additional tank. This additional tank is an optional device and is installed only when necessary. The best place to install it is the trunk of a Chevrolet Niva SUV.
Based on this, it is worth noting that, first of all, it is necessary to monitor the adsorber sensor, which directly affects the pressure in the gas tank. Happy work!
This is interesting: Schematic diagram of the airbag system Chevrolet Lacetti 2004 - 2013
What is the essence of this system
Kalina's automatic fault diagnosis system includes several devices.
The display displays information that is processed by all devices. To prevent car owners from having to independently service their cars, manufacturers do not try to talk about the location of the devices and their decoding. It should also be borne in mind that the information received from the automatic diagnostic system is processed by the on-board computer, which simplifies the repair of the automotive unit, since the owners have the opportunity to visually find out where the defect is detected.
Since the Lada Kalina does not have an on-board computer, the owner will only be able to visually familiarize himself with the code number, and he will have to guess the location of the breakdown on his own. In order to avoid mistakes when repairing your car, experts recommend knowing each code by heart in order to promptly eliminate any type of malfunction.
Design and principle of operation
The Chevrolet Niva fuel system consists of several elements, which include fuel lines of various devices and purposes:
- metal pipe for supplying gasoline to the fuel rail;
- steel pipe for discharging gasoline from the ramp;
- flexible high pressure hoses connected to the fuel filter;
- steel pipelines coming from the gas tank and located under the bottom of the car.
Steel pipelines extend from the fuel tank and are responsible for the supply and removal of gasoline. The gasoline supply pipe is connected to the fuel filter using a flexible rubberized or nylon hose. Gasoline passes through a fuel filter, which cleans gasoline from foreign impurities. On the other side of the filter comes another rubberized hose that connects to the fuel supply pipeline to the ramp.
If excess gasoline enters the ramp, it is removed from it through a steel fuel outlet pipe. Its end is connected to a flexible hose that leads to a fuel line for returning gasoline back to the gas tank. In this way, excess gasoline not used by the engine is returned to the gas tank.
What dangers can await a motorist while driving?
As practice shows, even such a device as a subframe does not guarantee 100% protection for the transfer case and other components of the car while driving off-road. Therefore, if you often operate the Niva in rural areas, where there is a danger of “picking up” a stump or some other object that is difficult to notice in uncut grass, install the special protection on the subframe that we talked about in the previous paragraph. Then the risk of transfer case deformation will be reduced to zero. If there is no such protection, both the subframe and the box itself will deteriorate.
So, we found out how to make a transfer case subframe for a Niva with our own hands. Whether you need it or not - decide for yourself.
So, we found out how to make a transfer case subframe for a Niva with our own hands. Whether you need it or not - decide for yourself.
Symptoms of a problem
Understanding that fuel pipes need replacing is quite simple. If, when examining the underbody of the car, it is clear that the metal tubes are rusted, then they need to be replaced. Damage to the highways is also indicated by gasoline leaks remaining at the parking lot. Another sign of a malfunction is the smell of gasoline in the car interior.
The pipelines of the gasoline supply system to the engine cylinders may have various malfunctions.
- The most common failure is loosening or destruction of the O-rings at the joints of hoses and pipelines. O-rings are classic consumables, so they quickly fail.
- The integrity of the fasteners themselves may also be compromised. In this case, a violation of the connection leads to a gasoline leak.
- Rubber or nylon hoses last for several years. A hose rupture also compromises the integrity of the system.
- Steel fuel supply pipes can last for many years. Their main enemy is rust - under its influence, leaks can form in pipelines.
The reasons for wear of the connecting elements of the fuel system are the effects of rust (relevant for main gas pipelines), chemical or physical effects, or simple wear.
What to do if the cigarette lighter in a Chevrolet Niva does not work and how to determine the malfunction
Niva Chevrolet: VAZ 2123 filling tanks
Characteristics of the new Chevrolet Niva and official release date
When to change the seal
Replacing the axle seal is not tied to a specific mileage, but is done in connection with the following defects:
- Transmission oil leakage from the rear axle of a Chevrolet Niva. It is characterized by the appearance of oil stains on the brake casing and the “stocking” on the side where the axle shaft seal has lost its seal.
- In case of accidental damage to the seal when replacing the axle bearing. Happens when a part is pulled out of its socket.
A distinction should be made between transmission oil leakage from the axle seal on either side of the rear beam and from the gearbox shank where the driveshaft is secured. In the second case, greasy stains and dirt cover the rear axle gear housing, located in the middle.
- outer diameter - 57 mm;
- width - 9 mm;
- The diameter of the hole along the protruding rubber (or silicone) edge is 35 mm.
Chevrolet Niva
Having released the block retainer, disconnect the wiring block from the fuel module.
Having released the block retainer, disconnect the wiring block from the fuel module.
We start the engine and let it idle until it stops due to fuel exhaustion. Then turn on the starter for 2-3 seconds. After this, the pressure in the fuel system will be released.
Design modification.
To strengthen the subframe and reduce the profile height (up to 2 times), it is possible to additionally equip the side shelves of the channel with 4 corners at the level of the hole under the transfer case, followed by cutting off the sidewalls to the corner flange.
Finer tuning is provided by connecting the spar and subframe through couplings/bushings.
Replacing the fuel tank and its filling pipe chevrolet niva
05/24/2019 Niva
| Niva Chevrolet repair manual | spare parts catalog |
| This is interesting: Replacing the rear crankshaft oil seal of a Chevrolet Niva | ||
Axle shaft seal
Axle shaft seal
Post by plantain » 04 Jun 2011, 16:48
Re: Axle shaft seal
Post by rv3dll » 05 Jun 2011, 11:11
Re: Axle shaft seal
Post by plantain » 05 Jun 2011, 16:59
Re: Axle shaft seal
Post by Spiteful critic » 05 Jun 2011, 19:48
Re: Axle shaft seal
Post by plantain » Jun 06, 2011, 12:24 pm
Re: Axle shaft seal
Post by Spiteful critic » Jun 06, 2011, 2:01 p.m.
Re: Axle shaft seal
Post by smbmax » May 31, 2012, 08:13
Re: Axle shaft seal
Post by Anton » May 31, 2012, 08:38
Most likely your bridge stocking is bent. Or wear of the axle shaft in the part of contact with the oil seal.
Re: Axle shaft seal
Posted by doc Brown » 31 May 2012, 09:09
Re: Axle shaft seal
Post by Pavl0 » 02 Jul 2013, 17:08
Re: Axle shaft seal
Post by Vovchik » 02 Jul 2013, 17:23
Re: Axle shaft seal
Post by doc Brown » 02 Jul 2013, 17:58
Re: Axle shaft seal
Posted by ayax » Mar 12, 2014 2:03 pm
Re: Axle shaft seal
Post by Serg548 » Apr 06, 2014, 07:02
Good day everyone! I also changed the axle shaft seals on my NIVKA a week ago. On the right it was leaking, it was an infection, the disk was already covered in fuel oil. I changed both. The next day the right side started leaking again. I didn’t take it apart right away, I drove it for a couple of days and it calmed down. So far everything is dry.
Added after 13 minutes 57 seconds: Maxim, the breather is very easy to clean, you can press it, twist its cap, you can remove it (unscrew it) and blow it out with a pump. Or just buy and install a new one. I don't think it's worth much.
Hissing when opening the Niva gas tank
Chevrolet Niva solving the problem of expansion tank plugs ch1
Therefore, for pumping, it is better to use a special hose with a bulb or a device for pumping out toxic liquids. Do you still think that diagnosing a car is difficult? The gas tank ventilation system helps prevent problems with vapor accumulation in the tank.
To prevent the tank from deforming due to the influence of changes in pressure, valves are installed in the filler plug. ...
When the key is turned back, the lock unlocks the latches, thereby making it possible to unscrew the tank cap. Removal and replacement The tank is removed if defects occur in it in order to carry out subsequent repairs.
However, sometimes situations arise when it is impossible to do without flushing and completely removing fuel from the system.
The valve is removed in the following order: Open the hood; We find a valve on the fuel line that looks like the photo below; The tubes are removed from both sides and the valve is removed.
Now the product is purged and cleaned, after which the valve is installed in the reverse order of removal. Removal and replacement The tank is removed if defects occur in it in order to carry out subsequent repairs.
If it is not possible to repair the tank, then it is replaced.
To do this, the following actions are performed: Drain the fuel; Disconnect the ground terminal from the battery; The rear seat is removed; The fuel pump cover is unscrewed and the power plug is disconnected; The fuel hoses are removed after loosening their clamps; The ventilation hoses are also disconnected; Using a wrench, you need to unscrew the bolts securing the tape holders, and then slowly loosen the tank; A control check is made to disconnect all pipelines and the gas tank is removed through the vehicle interior.
Thus, the tank is removed from the Niva Chevrolet car and repaired or replaced.
The most preferable option is to replace the product, but it all depends on the budget. Additional gas tank An additional tank is an excellent solution for those who are used to traveling not only in cities, but also off-road. To avoid the problem of running out of gasoline, many owners install an additional tank.
This additional tank is an optional device and is installed only when necessary. The best place to install it is the trunk of a Chevrolet Niva SUV.
Tools:
Based on this, it is worth noting that, first of all, it is necessary to monitor the adsorber sensor, which directly affects the pressure in the gas tank.
Three ways to drain gasoline In other cases, when it is necessary to drain some of the gasoline, for example, for roadside assistance, refilling a blowtorch or kerosene stove, you can use one of three methods: Draining gasoline through the filler neck.
Removing fuel through the drain hole in the tank. Drain using a standard fuel pump. Depending on the amount of fuel that needs to be removed from the tank, we choose one of three methods.
Installation
For ease of installation, the car is fixed on a lift or above a pit. Pre-preservation of surfaces (attachment points, subframe) is carried out using protective agents, for example, Movil.
The finished product is tried on site individually for each vehicle. 4 holes are drilled along the perimeter of the structure, symmetrical relative to the center line. Having previously loosened the transfer case fasteners.
Having placed the plates on the interior side, as in the photo, the subframe is attached to the side members with M12x1.25 bolts.
The RK brackets are sequentially removed, turned over and freely fixed to the subframe. The position of the shaft flanges is adjusted until minimal gaps are formed by moving the entire structure. Alignment is performed at 3000 rpm with the machine standing.
The bolts are thoroughly tightened.
What to do if gasoline is drained on Niva 4x (VAZ 2121, 2131)
Drain using a standard fuel pump. Depending on the amount of fuel that needs to be removed from the tank, we choose one of three methods. Through the neck Drain gasoline through the neck. Despite the fact that this method is quite troublesome, it can be used when you need to drain all or almost all of the gasoline.
It is important to remember that drain the gasoline drain from a Chevrolet field if it is clean and does not require washing under any circumstances. The fact is that the gas pump, located inside the gas tank, uses gasoline both as a lubricant and as a coolant.
The bastards got into the habit of draining gasoline from the Sh/Niva
If you run the pump dry, there is a high probability of burning it, so after draining gasoline from a Chevrolet Niva, in any case, some of the gasoline must remain in the tank to ensure cooling and lubrication of the electric fuel pump. In old VAZ models, as in most carburetor cars, the tank was located right next to the filler neck.
Therefore, it was easier to pour gasoline with a hose. That is why to pump out fuel you will need a hose at least one and a half meters long, or even more.
At the same time, using the primitive method of pumping by mouth is strictly not recommended. Hose with bulb.
The fact is that modern gasolines that meet Euro-5 and Euro-6 standards contain very toxic additives, and old fuel can be considered healthy. Therefore, for pumping, it is better to use a special hose with a bulb or a device for draining gasoline from a Chevrolet field for pumping toxic liquids.
It is a hand pump with hoses connected to both ends - pumping out and draining.
Such a pump costs a penny and is sold in any auto store.
- Related Posts
- Where is the VIN code on a Chevrolet Cruze, vin cruze
- Disassembling the gear selection mechanism control drive Niva Chevrolet
- Radios for Chevrolet Cruze: standard 2 din,
Installation of subframe step by step video
Video 2 off-road rides
For what? You ask. I will answer - to reduce noise, resonance and vibration, and in the end - to protect the Niva 2131 transfer case itself. In the serial Niva, the transfer case supports are attached directly to the floor, which accelerates fatigue damage to the body. There are often cases when, in the fifth or seventh year of operation, the floor in the places where the supports are attached collapses and rots through. However, it is possible to reduce the effect of vibrations on the body by integrating the unit into the power component of the body. In addition, in the places where the transfer case is attached, the floor will be unloaded - due to this, it will rot and collapse less. Regardless of the driving mode, the gearbox and transfer case control levers do not dance, and the level of vibration and noise is close to that of a classic Zhiguli. The transfer case supports are installed in such a way as to ensure a minimum moment of inertia during its oscillations and a maximum resistance to movement due to bending moments.
The subframe for the VAZ 2121 not only increases the load-bearing capacity of the body, but also protects the transfer case from below. At the same time, the ground clearance remains the same, only the ramp angle has changed slightly.
- The subframe for alternative mounting of the Niva 2121 transfer case has a number of advantages:
- monolithic frame;
- reduces all kinds of vibrations and noise to a minimum;
- unloads the floor;
- increases the possibilities of adjustment along the axes;
- is a natural protection for the transfer case.
Features of DIY replacement
Before you begin replacing or repairing fuel lines, you must relieve the pressure in the gasoline supply system to the engine. To do this you will have to perform the following steps.
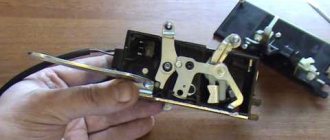
- It is necessary to de-energize the fuel pump, which supplies gasoline to the engine injectors. The fuel pump power relay is located in the passenger compartment on the driver's side. When you remove the front dashboard cover, a block consisting of four relays opens. The fuel pump relay is the third in a row.
- After turning off the fuel pump, you need to “burn” the fuel remaining in the system. To do this, you need to start the engine and leave it running until it stalls due to lack of gasoline.
- For a final check, try to start the engine again by turning the starter for a few seconds.
Then they proceed to dismantling and replacing faulty elements of the fuel system. Before this, you need to de-energize the car by disconnecting the negative terminal of the battery.
Removal of flexible hoses is carried out from the engine compartment.
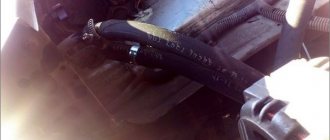
- The location where the hoses are attached to the inlet tube is indicated by a yellow warning mark. You need to remove the hose from the tube by disconnecting the plastic clip and pulling the hose in the opposite direction.
- The second end of the hose is connected to the fuel filter with a fastening nut. You can unscrew it with a 10 key.
- After inspecting the fastening points, they begin installing a new hose. It is attached in a similar way - the end connected to the fuel line is attached to the fixing nut, the other end is attached to the plastic retainer.
In the same way, change the hose connecting the outlet tube and the fuel line of the gas tank.
Replacing metal elements may require the use of a lift or inspection pit. The fuel lines are located underneath the vehicle, so you will need a flashlight to inspect for damage.
As already mentioned, if the damaged area is small (no more than 15 cm), then it can be cut off with a grinder and replaced with a hose. Only reinforced hoses made of petrol-resistant rubber, marked Fluroelastomer (fluoroelastomer), are suitable. The hose fits over the fuel line, so its inner diameter must be equal to the outer diameter of the pipe.
Important. The length of the hose should be 10 centimeters longer than the length of the remote section, thereby ensuring that the hose extends onto the tube at the rate of 5 centimeters on each side.
If the size of the removed damaged area exceeds 15 cm, a metal tube is used for replacement. The connecting elements are pieces of reinforced hose, which are placed on the metal ends of the pipeline and connecting tube. The length of each hose section should not exceed 10 cm.
If the damage to the fuel pipes of the Chevrolet Niva is larger, then their repair is impractical. In this case, you will have to replace the fuel lines with new ones.
Attention. Only seamless steel pipe can be used as a replacement. Copper or aluminum pipes are subject to rapid wear due to the vibrations that occur during vehicle operation. It's even better to use original spare parts.
The outlet and inlet pipes of the fuel line are removed quite simply. To do this, you do not need to use a lift or inspection hole - all work is performed from the engine compartment.
- De-energize the vehicle by disconnecting the negative terminal of the battery.
- Disconnect the rubber hose attached to the tube with a clamp.
- Unscrew the second end of the tube from the fuel filter using a 10 mm wrench.
The main fuel lines connecting the gas tank to the fuel filter are removed after installing the Chevy Niva on the inspection hole.
- Lower the gas tank slightly so that it does not interfere with dismantling. To do this, use a mounting tool, which is used to press the gas tank until it comes slightly off the mounting hinges.
- Disconnect the flexible hose connecting the line to the fuel filter. If the outlet line is changed, disconnect the hose connecting it to the outlet pipe.
- The line is connected to the gas tank using spring clamps. To disconnect, pull the tube in the opposite direction. After the clamp has been released, pull the line out by hand.
- Install a new handset. If the fuel supply line is changed, then its long end is inserted into the engine compartment and attached to the connection hose with the fuel filter. The other end is connected to the gas tank using spring clips.
- When replacing the outlet line, one end of it is attached to the gas tank with clamps, the other is screwed to the hose connecting the line to the gasoline outlet tube.
Important. When replacing lines, carefully monitor the presence and condition of the O-rings. If necessary, replace the rings with new ones.
Deciphering codes, checking devices
https://www.youtube.com/watch?v=3C757Ur_C8k
Mistake No. 2. Overvoltage.
Error No. 3. An error has been detected in the fuel sensor level; it occurs if the circuit is broken.
Error No. 4. Coolant temperature sensor error.
Error No. 5. The outside temperature sensor has failed.
Error No. 6. The motor has overheated. This happens if the engine overheating alarm is triggered.
Mistake No. 7. Oil pressure is in poor condition. Happens if the alert bell is triggered.
Mistake No. 8. Problems with the brakes. Happens if the alert bell is triggered.
Mistake #9: The battery is dead. Happens when the alert bell is triggered.
To reset all types of errors, press and hold the reset button until all data on the display is cleared.
Testing of devices and their combinations is carried out in accordance with technical specifications using special equipment (pulse generator, from a stable power source, etc.).
If a short circuit suddenly occurs in existing devices (less than 40-50 Ohms), the maximum temperature indication must prevail.
The devices operate from an electronic module, which receives signals from various sensors. The tachometer and speedometer are powered by stepper electric motors. The electrical instrument cluster cannot be repaired. The daily mileage of the car can be set on the 0 key, which is located on the right. The meter and its readings are saved when the battery is disconnected. That's all. Good luck!
- We have collected a huge selection of videos about repair, tuning and maintenance of VAZ cars
- Share photos and rate photos of other users
Also interesting: Chevrolet Niva temperature sensor: where is it located, replacement
Is it possible to drain gasoline from a Chevrolet Niva?
Chevrolet
Niva ›Logbook› Drained gasoline
Last night there was l in the tank. thirty-. We relaxed, parked the car and went to bed. In the morning I got into the car and didn’t even realize that the needle was almost zero and the lamp was on. He looked, the tank was closed, there were no traces. Well, that hasn't happened in our backyard in 100 years. I thought about the sensor failure, did a careful test, turned it on several times, turned off the ignition, our client seems to be normal, the needle is moving. I went to the gas station, flooded the 30s, the boom went up, which means that in practice they leaked. I would catch these pioneers and sell them to my ass. I ordered a Foltz lid with a lock for our hack, hope this one is of better quality
Over the weekend, I probably confused the reed switch with the alarm hatch.
Chevrolet Niva 2012, petrol engine 1.7 liters, 80 liters, all-wheel drive, manual transmission. other
48
I also ask here. I ordered it for myself, now they are 1000 rubles each. I checked in the store how it works. As a result, the hand holds, the lid slides tightly closed position
. In the open air it stops, as it should. It also behaves in the neck of the tank, in both positions of the key it comes out of the tank freely, and only the lid must move, rotate with the key closed. You had it all wrong, and actually how does the lid work, is it easy or difficult to turn, perhaps how did it work?
READ How to Change a Light Bulb in a Niva Chevrolet Headlight
He didn't do anything. In the closed position only the lid rotates, in the open position
and it turns out
It's pointless to catch these morons, I wanted a Peugeot 406 to leak . I stood on the balcony with a woman at night, I clicked, they started shooting in the air, roofs on the roofs of boots, I didn't know about the horror, I was lucky that they didn't shoot at me, I ran on the porch faster than scary, after that the car sleeps only in the parking lot, so it’s easier to sleep.
Gas tank mesh. We protect Shniva from the pioneers.
The main channel for men I'm in Wonderland.
as a fusion gas from the injector?
The method is shown as a simple fusion gas
from the injection machine. Great, although gasoline
, At night the mechanics of God, of course, separates the semi-automatic
I thought it wasn't easy with Cevik. flow
petrol. Although one night in my house 50 got angry, the plug was open, after which I tried to drain it myself, and only swallowed the gasoline heartily, but I didn’t.
READ How to Drain Gasoline From Prado 120
Now I also merged it, bought it from 2108 with a key, I’m also thinking about how to update the branch. As a result, I refueled, the gun did not come off, the valve was damaged by sand
I took off the cap (gas tank and RB), and the workmanship is a quiet nightmare. Well, the existentialist tried to open the left lid. not a phobia, but a cheaper analogue.
Because phobias. cheap packager, they should present something under their article. I had no complaints about the quality of the saunas, apparently due to the difference in cost.
Don't know. However, out of interest, I decided to find reviews and write that the quality of the phobia is not at all.
I'll take the lid off tomorrow. And I will process the order
grope. And at the same time I will process the order for the cover of RB Svag (and ordered conservation FEBI 02269) But how are they different?
Just now I saw that in the lid itself, as if there was a recess =)) However, I saw your topic late and ordered a case from Hans Pries 102 746 755, I liked the price of 150 rubles against a swimmer for 500, I sit and think that I had to order it myself.
READ What kind of lamps are in the foglights of a Chevrolet Cruze
I think that the difference is not big, I just at least somehow trust it, it’s interesting to see how they differ.
And it's tight against the seal (and which is on the body) I'm guessing if it's tight against the seal where it will suck in air to balance the pressure in the tank
fits tightly to the throat, to the body, there is little space, you can see through the valve and air from there
Is it possible to insert a mesh somewhere so that the hose does not press into the gas tank?)
if necessary, but it’s more difficult, and the weather doesn’t force you to play only outside for a long time)
And how does the lid behave? I think this is necessary for myself because DAAZ is poop.
ok, unscrew, twist
Standard tool:
• Calipers and ruler;
An alternative tuning option is permissible using not corners, but a square profile with a section of 60x30 or 40x25.
There are ideas of placing the RC and the checkpoint on the same “frame”.
Chevrolet Niva
The arrow on the filter housing should be directed in the direction of fuel flow (towards the front of the car).
The arrow on the filter housing should be directed in the direction of fuel flow (towards the front of the car).
We put the tips of the fuel pipes onto the filter fittings until the clamps snap into place. After installing the filter, turn on the ignition and check the tightness of the connections.
Features of driving a car with a subframe on the transfer case
Many years of experience in trouble-free operation of the machine suggests that even such a reliable and durable device does not guarantee absolute protection for components and assemblies when driving off-road. When driving the Niva in extreme conditions, remember that installing a subframe reduces the vehicle's ground clearance or ground clearance by at least 20–30 mm.
Fines for crossing the stop line and speeding will no longer bother you!
You should not relax and rely entirely on the protective properties of the structure - be careful when overcoming obstacles, try to avoid accidental “encounters” with large stones, stumps sticking out of the ground or pipe cuttings. Take care of your car, protect your health, nerves and wallet!
The unpretentious and reliable Niva car was specially created for use in Russia, a country of vast expanses and widespread off-road conditions. Experts have long come to the conclusion that a subframe on the transfer case makes the car more comfortable and safe. Now we can install this structure by making it ourselves.
Replacing the fuel tank
If a fuel leak is detected from the tank, it is recommended to replace the tank. If the fuel pump screen frequently becomes clogged, remove and wash the tank.
If a leak is detected along the junction line of the upper and lower parts of the tank, you can solder these places (it is recommended to do this in specialized workshops). To do this, pour out the remaining gasoline, thoroughly rinse and dry the tank. Then seal the leak with soft solder.
You can solder only a thoroughly washed and dried tank that does not contain gasoline vapors, otherwise the vapors may ignite during soldering. To wash the fuel tank, use detergents: Lobomid, MS or ML. Then, to remove any remaining detergent, rinse and steam the tank with hot water. Dry the tank thoroughly.
1. Reduce the pressure in the power system (see “Reducing pressure in the power system”).
2. Disconnect the wire from the “–” terminal of the battery.
3. Fold both sides of the rear seat cushion forward.
| 4. Remove the trunk mat. | 5. Move the rear seat belt buckles into the trunk, running them under the back of the rear seat. |
| 6. Unscrew the six nuts securing the rear seat backrests and... |
| 8. Remove the screws securing the rear trim trims on both sides and remove the trims. |
| 9. Remove the decorative trims of the side bolts securing the rear seat belts,... | 10. ...unscrew the bolts and move the belts to the side. |
| NOTE Please note: the bolts are equipped with spacer and noise washers. Don't lose them. |
| 11. Remove the mounting pins for the right trunk trim,... | 12. ...unscrew the screws securing it and... |
| 14. Unscrew the six nuts securing the cross member of the rear seat back, remove the washers and... |
| 16. Remove the soundproofing trunk floor mat. |
| 17. Unscrew the nuts securing the fuel tank compartment cover. | 18. Remove the decorative caps of the rear seat belt center mounting bolts... |
| 19. ...unscrew the bolts and remove the fuel tank compartment cover. | 20. Remove the bolts securing the rear seat cushions. |
| 21. Move the floor mat aside and remove the bolts securing the front fuel tank supports. | 22. Unscrew the nuts securing the rear fuel tank supports. |
| 23. Disconnect the wires and hoses from the fuel pump (see “Replacing the fuel pump”). | 24. Loosen the clamps securing the supply and air outlet hoses of the filling pipe,... |
| 25. ...the fuel vapor recovery system hose, remove the hoses from the fuel tank pipes and remove the tank. |
26. Install the fuel tank and all removed parts in the reverse order of removal.
Engine design Engine problems Engine operation Removing the upper engine casing Removing the crankcase protection and mudguard Replacing the coolant Replacing the engine oil Cleaning the crankcase ventilation system Replacing the power unit supports Installing the 4th piston at TDC Setting the valve timing Replacing the timing chain tensioner Timing chain tensioner Timing chain tensioner shoe Replacement of timing chain (camshaft chain) Replacement of hydraulic bearings of valve levers Replacement of flywheel Gearbox input shaft bearing Replacement of cylinder head cover gasket Replacement of receiver gasket Replacement of cylinder head gasket Replacement of oil sump gasket Replacement of oil seals Replacement of front. crankshaft oil seal Replacement of the rear crankshaft oil seal Replacement of the gasket of the intake pipe and exhaust manifold Replacement of the camshaft Disassembly of the cylinder head Inspection and repair of cylinder head parts Replacement of e.g. Valve bushings Grinding in valves Removing the engine Disassembling the engine Repairing the engine Engine assembly Engine lubrication system Replacement of the oil pump Repair of the oil pump Replacing the oil pump gear Cooling system Replacement of the pump and generator belt Replacement of the radiator and fans Replacement of the pump (water pump) Replacement of the thermostat Exhaust system Replacement of muffler pads Replacement main muffler Replacement of the neutralizer and additional muffler Replacement of the exhaust pipe Replacement of thermal shields Engine power system Reducing pressure in the system Replacement of the air filter Replacement of the air filter housing Replacement of the fuel filter Replacement of the fuel pump Replacement of the fuel tank Replacement of the fuel pressure regulator Removing the fuel rail Checking the fuel injectors Replacement of the fuel injectors Replacement of the cable throttle valve Removing the throttle assembly Replacing the idle speed control Replacing the canister, canister purge valve and other valvesTags:
bakkniyouremove chevrolet
Benefits of use
A device such as a subframe has many advantages, the main one of which, as we have already noted, is the reduction of noise and vibrations in the cabin.
In addition, this device is the only protection for the lower part of the transfer case. By the way, on the conveyor the Niva is already equipped with special fastenings to the floor, which allow mounting supports on the transfer case. Thus, installing a transfer case subframe on a Niva will take the car enthusiast no more than 30 minutes. Another thing is to make this part yourself (in this case, the work can take several days).
Chevrolet Niva tank design
The gas tank is a welded structure made of sheet steel. This provides it with sufficient strength and safety. Steel is well welded and soldered. This makes it possible to eliminate minor damage to the walls. However, when condensation forms, the internal surface becomes corroded, creating the risk of rust entering the fuel system. Initially, the Niva Chevrolet was equipped with gas tanks manufactured by General Motors. Their factory part number is GM 212301101011000.
Advice: on the spare parts market, tanks made at AvtoVAZ are more often found. Their quality is not inferior to the original ones, and the price starts from 8,000 rubles.
Manufacturing according to the scheme
Although the market has no shortage of offers, it is possible to save money by making a subframe for Niva 2121 with your own hands according to the drawings.
In the creation process, you will need a 4 mm sheet of cold-rolled steel 0.525x0.350 m, angles 35x35, 70x50, 70x70 with a length of 0.7 m, 0.4 and 0.4 m, respectively, as well as a 0.73 meter channel 16. Used as fasteners bolts M8, M10, M12x1.25 and M12x1.5. In the creation process you will need a 4 mm sheet of cold-rolled steel 0.525x0.350 m, angles 35x35, 70x50, 70x70 with a length of 0.7 m, 0.4 and 0.4 m, respectively, as well as a 0.73 meter channel 16. M8, M10, M12x1.25 and M12x1.5 bolts are used as fasteners.
Three ways to drain gasoline
In other cases, when it is necessary to drain some of the gasoline, for example, for roadside assistance, refueling a blowtorch or kerosene stove, you can use one of three methods:
- Draining gasoline through the filler neck.
- Removing fuel through the drain hole in the tank.
- Drain using a standard fuel pump.
Depending on the amount of fuel that needs to be removed from the tank, we choose one of three methods.
Through the neck
Draining gasoline through the filler neck.
Despite the fact that this method is quite troublesome, it can be used when you need to drain all or almost all of the gasoline.
It is important to remember that under no circumstances should you drain the tank (if it is clean and does not require flushing) . The fact is that the gas pump, located inside the gas tank, uses gasoline both as a lubricant and as a coolant.
If you run the pump dry, there is a high probability of burning it, so in any case, some of the gasoline should remain in the tank to ensure cooling and lubrication of the electric fuel pump.
In old VAZ models, as in most carburetor cars, the tank was located right next to the filler neck. Therefore, it was easiest to pour gasoline with a hose. In the Niva Chevrolet, the tank is located about a meter from the neck, and the filler pipe has a rather complicated configuration. That is why to pump out fuel you will need a hose at least one and a half meters long, or even more .
Flaws
The main disadvantage of the subframe is the reduction in the vehicle's ground clearance (by several centimeters). But still, this upgrade has virtually no effect on the cross-country ability of the SUV.
The main disadvantage of the subframe is the reduction in the vehicle's ground clearance (by several centimeters). But still, this upgrade has virtually no effect on the cross-country ability of the SUV.
Most likely, the absence of the element in question in the car’s factory configuration is explained by complex production technology (a special
However, no matter how many reasons we name, the fact remains: the transfer case subframe is installed on the Niva only through the efforts of the car owners themselves. Even at service stations, not everyone undertakes their manufacture or installation.
How to replace the drive gear seal of the front axle VAZ-21213
We disconnect the driveshaft from the front axle gearbox (article – “Removing the driveshaft”).
We remove the housings of the internal hinges of the front wheel drives from engagement with the gears of the front axle reducer drives.
Using a dynamometer, we turn the drive gear clockwise by the flange mounting nut and determine the moment of its resistance to rotation.
We insert bolts into the flange holes and screw nuts onto them in order to create a stop.
Use a spanner wrench or a 24mm socket to unscrew the flange nut, holding it from turning with a suitable mounting blade
There is a washer under the nut, remove it
Remove the flange from the drive gear
If there is particular difficulty, you can compress it with a puller
Use a screwdriver to pry off the seal
Lubricate the working surface of the oil seal and press it in with a suitable head or piece of pipe.
Install the flange and washer on the drive gear.
Holding the flange, we tighten the nut of its fastening to a torque of 118-255 Nm (12-26 kgf.m), periodically checking the moment of resistance to rotation of the drive gear (by turning the gear clockwise with a dynamometer).
If the initially measured moment of resistance to rotation was not lower than 59.0 Nm (6 kgf m), then the new moment should be 9.8–19.6 Nm (1–2 kgf m) greater than this value.
If the initial torque was less than 59.0 Nm (6 kgf m), then tighten the flange mounting nut until a torque resistance to rotation of 59.0–88.0 Nm (6–9 kgf m) is reached, without exceeding the tightening torque 118–255 Nm (12–26 kgf.m).
If, when tightening the nut, the moment of resistance to rotation of the drive gear exceeds 88.0 Nm (9 kgf m), which indicates an excessive preload of the bearings, replace the gearbox spacer and carry out the adjustment again.
We carry out further assembly and installation of units in the reverse order.
According to the catalog, the main gear drive gear oil seal is No. 2121-2302052