The safety of the driver and passengers depends on the proper operation of the optics. If the headlights on a VAZ 2106 car do not light up, then it is better not to drive the car anywhere, especially at night. The article discusses the design of optics, possible lighting malfunctions, and what tuning can be done.
Tags: light, high beam
Comments 24
I replaced the block from GAZ with a Euro one, the left side does not light up in the far range, maybe it was connected incorrectly?
it looked like it was. I did everything without difficulty
For me, the low beam works almost like this, but as soon as you turn on the high beam, everything goes out, nothing lights up, what’s the problem? The fuses are all intact, the switch seems to be the same
solved the problems? I discovered this crap the other day.
Thanks everyone, simplest fuse replacement.
clean the left headlight masses
Either my safety light is on. or you have to go out and hit the headlights. and everything works
It was like this, the fuses are probably an old block. Or contacts.
Check the ground on the headlights and be sure to change the fuse box! This is the only thing that solved my problem.
Are your fuses blowing?
How to turn on the high beam on a Renault Logan: let's look at it step by step
this is the eternal problem of shoh and triples, the reason lies in the fact that the distant one has 2 headlights per side and there is a standard 8 ampere, and for it this load is too large and especially if the contact is worthless it heats up and sometimes begins to melt and become as if shorter due to which there is no contact
The treatment is very simple: put ceramic pres in sockets 3 and 4 (it’s true that they are hard to find, because they don’t seem to be released anymore, ask the old people, maybe someone has them lying around from Soviet times) or put pres at a higher amperage)
I bought ceramic ones last week) there was such a problem on the right side, the fuse melted and the headlight was either shining or not)
Check the fuses or clean the contacts in the fuse block
I'll be blunt - this is a fuse. There was something similar. Shake them in place, if it doesn’t help, change them, fortunately they cost pennies
change the fuse box - it's a problem 06
Low beam problems
- The driver does not switch from high beam to low beam when entering a lit street, in the dark.
- The driver does not switch from high beam to low beam when an oncoming car is moving at night.
- Not turning on the low beam on a car with daytime running lights on at night.
- The low beam lamp has burned out. Solved by replacing it with a new lamp.
- The contacts of the negative wire going to the low beam (ground) have oxidized. It is necessary to clean all contacts of the negative wires coming out of the headlight unit.
- The low beam fuse has blown. It is necessary to replace the fuse with a new one of the appropriate rating. If, after replacement, the fuse blows again when the light is turned on, it means that there is a short circuit in the on-board network and you need to contact an auto electrician to troubleshoot the problem.
- The low beam relay is faulty. The malfunction is eliminated by replacing the relay with a new one.
- Faulty high/low beam switch lever (tube).
Also read: Why They Don’t Give You a Rehabilitation Ticket to a Sanatorium After a Lacunar Stroke
What to do if the headlights blink at idle
Based on the principle of operation of electrical devices in a car, it is concluded that the light blinks at idle speed of the engine when the generator malfunctions. But this needs to be checked accurately, for which the following is done:
- The engine starts and the headlights turn on. The car should run like this for up to 20 minutes.
- The measuring procedure is performed using probes connected between ground and terminal “B+”.
- The values that you received must be written down on a piece of paper, and then checked with the numbers indicated in the technical documentation of the vehicle.
Experts say that for most cars the normal voltage is 14-16 Volts. Even with minor deviations, there is a possibility of the voltage regulator breaking down. To solve this problem, it needs to be replaced.
The low beam on 2106 has gone out, what should I do?
Important! Following basic safety rules when checking your generator will protect you from negative consequences for your health. Therefore, it is prohibited to check by short circuit, connecting terminals “B+” and “D+”, etc.
d.
Based on the test results, you can get the following indicators:
- The voltage is below normal - a possible solution is to tighten the belt drive that goes from the motor pulley to the generator.
- Voltage higher than normal usually indicates loss of generator functionality.
Why the low beam of the VAZ 2106 does not work
Immediately both low beam headlights failed. Is the problem with the relay or is there something else to look at?
- The right headlight is dim on a VAZ classic – 3 answers
- Is a bi-xenon lamp repairable? – 3 answers
- When you turn on the high beams, the right headlight goes out completely - 2 answers
- Low and high beams gone - 2 answers
Relay, most likely.
Relays, fuses, steering column switch.
Subscribe
to our channel in Yandex.Zen
Even more useful tips in a convenient format
Low beam on VAZ-2112 does not work
Today we will talk about such a malfunction as the high beam not working on a VAZ-2106 car. A special feature of the headlight structure of this car is that the high and low beam lamps are located in different headlight housings, which simplifies solving the problem. High beam headlights are not vital and are used in exceptional cases, so their malfunction does not require urgent repair.
Sometimes it happens that switching to high beam causes the low beam to turn off or one of the sides to turn off completely (high and low beam at the same time). Most often this is due to acidification of the mass of one of the headlights. Also the cause may be fuses and relays, which can be easily checked.
Replacing the headlight switch relay for a VAZ 2106 Zhiguli
- Repair manuals
- Repair manual for VAZ 2106 (Zhiguli) 1976-2005.
- Replacing the headlight relay
↓ Comments ↓
1. General information
1.0 General information 1.1 Safety precautions
2. Diagnosis of faults
2.0 Diagnostics of faults 2.1 diagnostics of faults in the engine and its systems 2.2 Diagnostics of faults in the clutch 2.3 diagnostics of faults in the gearbox 2.4 Diagnostics of faults in the driveline, rear axle, chassis, steering and braking system 2.5 Diagnosis of faults in the body 2.6. Diagnosis of electrical equipment faults
3. Engine
3.0 Engine 3.1 Cylinder head and timing mechanism 3.2 Lubrication system 3.3 Oil change 3.4 Replacing the camshaft drive chain guide 3.5 Replacing the camshaft and valve levers 3.6 Replacing the valve stem seals 3.7 Replacing the intake and exhaust manifold gaskets 3.8 Replacing the cylinder head gasket ov 3.9 Disassembling the head cylinder block, valve grinding
4. Engine power system
4.0 Engine power system 4.1 Replacing the air filter element 4.2 Replacing the fuel pump 4.3 Repairing the fuel pump 4.4 Replacing the fuel tank and its hatch cover
5. Carburetor
5.0 General information about the carburetor 5.1 Cleaning the fuel filter 5.2 Replacing the idle air system solenoid valve 5.3. Adjusting the carburetor 5.4 Replacing the carburetor 5.5. Carburetor repair
6. Engine cooling system
Replaceable tips
Speaking about replacing faulty components of an electrical circuit, it is worth saying a few words about the correct replacement of light bulbs.
This must be done in the following order:
Turn off the ignition and remove the key from the lock. Open the hood. Unscrew the headlight (to do this, unscrew the bolts on both sides) and remove it. Remove the contact group by disconnecting it from the reflector (this procedure should be performed very carefully). When you find the spring clips, undo them. Remove the faulty light bulb. Insert the new bulb into the empty cartridge.
Rearranging and installing the headlight unit is carried out in the same sequence, but in reverse order. If necessary, a similar procedure can be performed with the second block. It is worth noting that it is highly advisable to replace lamps not with bare hands, but with light gloves. The glass of the flask is quite thin, and under high pressure it can burst right in your hands.
Low beam on VAZ 2114 went out
The low beam headlights don't come on, but the high beams do? Ways to solve the problem
It’s paradoxical, but true: every third car owner encounters a situation where the low beam headlights are not on, but the high beam is on. Straightforward logic on the topic that if the optics are covered, then there should be no light at all does not work here. This also happens, for example, to many VAZ owners: on Tolyatti models, for some reason, the right headlight is susceptible to the disease described, even on almost new cars; with the left, this incident happens much less often.
However, you should not blame exclusively domestic, so much-maligned, manufacturers: optics can sooner or later start to act up on any car. And here the point is no longer about the reliability of this or that brand, but rather about the deterioration or fatigue of some parts.
The easiest way, without a doubt, is to entrust everything to the reliable hands of a trusted auto electrician, but it is not too difficult to cope with some problems on your own - if you have the smallest amount of free time and a primitive acquaintance with the basics of electrical circuits.
The low beam of the headlights does not light up, but the high beam is on - this phenomenon can be due to several reasons. And most of them are quite easy to fix. Moreover, this can happen to your car at a completely inopportune moment: on the highway, for example, when you need to switch to low beam so as not to blind oncoming drivers with headlights
Let's try to deal with all the flaws one by one, and consider: what may be the most common options for repairing and troubleshooting such an important segment as low beam
Lamp burned out
Naturally, if any light source does not turn on, the first thing that comes to mind is that the light bulb has burned out. The design of car lamps is such that the low beam may indeed be absent, but the high beam remains available. Halogen lamps have two filaments. It is quite possible for one of them to rupture - in this case, the light for which it is responsible will be absent.
To replace the bulb, the services of an auto electrician are not required. It is enough to open the hood with the ignition off, remove the protective box on both sides of the headlight, pull out the contact group, disconnect the spring clips, remove the burnt out bulb and install a new one.
A small detail: the flask should be wiped with alcohol before installation, otherwise it will instantly burn. It is also not recommended to handle the bulb with unprotected hands: there is always some greasy and damp secretions on them, which can damage the light bulb. The best way to do this (replace the lighting) is with a dry cloth or rag.
Tags: light, high beam
Comments 24
I replaced the block from GAZ with a Euro one, the left side does not light up in the far range, maybe it was connected incorrectly?
it looked like it was. I did everything without difficulty
For me, the low beam works almost like this, but as soon as you turn on the high beam, everything goes out, nothing lights up, what’s the problem? The fuses are all intact, the switch seems to be the same
solved the problems? I discovered this crap the other day.
Thanks everyone, simplest fuse replacement.
clean the left headlight masses
Either my safety light is on. or you have to go out and hit the headlights. and everything works
It was like this, the fuses are probably an old block. Or contacts.
Check the ground on the headlights and be sure to change the fuse box! This is the only thing that solved my problem.
Are your fuses blowing?
this is the eternal problem of shoh and triples, the reason lies in the fact that the distant one has 2 headlights per side and there is a standard 8 ampere, and for it this load is too large and especially if the contact is worthless it heats up and sometimes begins to melt and become as if shorter due to which there is no contact
The left high beam headlight on the VAZ 2106 does not light, both on the low beam are on, what is the reason?
circuit breakers. may have oxidized. rotate the fuses in their sockets.
A intact fuse differs from a blown fuse by the presence of a jumper between the contacts (inside the fuse)
Is the high beam indicator light on the dash lit? So it's not a fuse. Look at the lamp and the wiring to it.
Well, it’s easy to sniff a two-ruble coin instead... But the burnt-out light bulb doesn’t ring, it’s black and you can see a break inside….
look at the wires, I had this happen, the wires melted next to the fuses
A light bulb with wiring will help you.
another car will help you
I have a VAZ 2106 and this is the reason why none of the high beams are on, but both low beams are on, what could be the reason. help me please
Glass
When converting factory headlight units, acrylic or polycarbonate elements are used instead of tempered, heavy glass. When choosing, you should take into account the diameter of the new glass, adjusting it to the size of the standard blocks.
Acrylic headlights are made by heat shrinking using old glass as a matrix. The minimum thickness of a new plexiglass headlight is 4 mm. The advantages of an acrylic block are low cost and the ability to be manufactured in a workshop. The disadvantages include rapid wear of the part. Acrylic quickly becomes covered with microcracks after being hit by gravel thrown out from under the wheels of a vehicle in front, and loses transparency after overheating. It is recommended to additionally protect the headlights with armored film.
Polycarbonate headlights are two times lighter than glass and are characterized by increased resistance to mechanical damage. Compared to acrylic glass, polycarbonate glass does not become cloudy over time, does not lose light transmission, and is resistant to temperature changes.
Smoke from under the hood and smell in the car interior
One of the high beam lamps has burned out
With such a malfunction, the high beam does not fail completely - as a rule, only one lamp turns off. Almost every car owner knows the solution to the problem in this case, but we will still remind you how to make a replacement:
- Unscrew the bolts securing the rim of the faulty headlight
- Turn the glass clockwise and pull the headlight out of the housing
- Disconnect wires from contacts
- Press the latch and carefully remove the light bulb
You can verify that the lamp is faulty by examining the filament (as is the case with ordinary household lamps). If the lamp is faulty, you need to purchase a new lamp and install it in place of the old one, without touching the glass with your hands. After that, reassemble everything in reverse order and make sure the high beam is working.
The “six” light acquires special importance when a motorist has to drive in conditions of poor visibility, in difficult weather conditions and at night. However, any driver must remember that defects in the vehicle’s electrical equipment system, one way or another, affect the functionality of the power plant. And this is despite the fact that the main electrical circuits are protected by relay elements, just as the lighting of the “six” is protected, the safety devices of which are routed to the vehicle’s fuse box.
On the VAZ 2106, the headlight relays, along with other main electrical equipment of this vehicle with high current consumption and high voltage, are connected via relay elements. The main purpose of the VAZ 2106 light relays, whose price is low, is to protect the switch contacts from energy overload.
Car enthusiasts often ask where the high and low beam relays are located on the “six” and what they look like. Let us explain that almost all relay devices, as well as the relay - voltage regulator, are located in the power plant compartment. The exception is the turn signal and hazard warning relays, which are located under the instrument cluster in the car interior, covered by a front panel. Both relays are identical in appearance (they can be easily found on the mudguard on the right as the car moves) and are located next to the battery charging indicator relay.
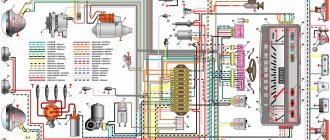
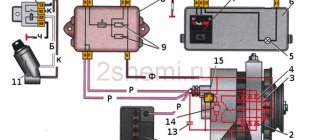
The electrical diagram of the light relay is located below:
On the general diagram of the electrical equipment of the “six” you can see at number 5 the VAZ 2106 low beam relay, and at number 6 the VAZ 2106 high beam relay, which are interchangeable elements. Also here you can see the integration of the main electronic devices of the vehicle into the general electrical supply circuit of the vehicle of this modification.
Relay for high and low beam "six"
As already mentioned, the standard high and low beam relays of the VAZ 2106 are absolutely identical, have similar catalog numbers (90.3747-10 or 113.3747-10), are of the same type as the initiation relay for the radiator fan device of the cooling complex of the power plant and can be replaced with each other friend.
To connect the light relay to the VAZ 2106, devices with item number 113.3747 are used, which are installed in a mounting-type block device. Similar devices are installed in the system to turn on the EDC fan device, heat the stern glass and produce alarm sounds.
The initiation voltage of the device at an average temperature of about 23 °C is within 8 V, and the resistance of the device winding at a temperature of 20 °C is 85 ± 8.5 Ohms.
Instead of products under catalog number 113.3747, it is allowed to use updated high and low beam relays VAZ 2106 90.3747-11 in a plastic case and with increased dimensions. It is also allowed to replace products 113.3747-10 with a mounting bracket with gadgets with fasteners under the nomenclature value 90.3747-10 with the same characteristics.
The automotive industry practices the production of light relays for the VAZ 2106 under the nomenclature numbers 902.3747 (version 11 - without fasteners and 10 - with fasteners), used on injection "sixes", because The device integrates an additional resistance to suppress interference, connected in parallel to the relay winding. For such high and low beam relays, the resistance between connectors “85” and “86” is 65 - 80 Ohms. They are interchangeable with the VAZ 2106 light relay
with the numbers 113.3747.
Replacing the "six" light relay
Russian car enthusiasts driving Zhiguli “classics” ask the question of how to connect a light relay to a VAZ 2106 so that it can function without problems in the future. Similar work is carried out when replacing the “six” light relay.
The work is carried out in the following sequence:
- We unscrew the fasteners and dismantle the headlight relay for subsequent replacement;
- We remember the frequency of connecting electrical wiring or mark them with a marker. Remove the wiring from the device connectors;
- We install the updated device in the reverse order.
We install and connect fog lights on a VAZ-2114 with our own hands (video inside)
After 30 years of production, in 2006, the last copy of the popular VAZ 2106 car rolled off the assembly line in 2006. The Six, like previous Zhiguli models, was created on the basis of Fiat; the car had a similar optics design, which was located in an updated block. Standard VAZ 2106 headlights are no longer available today; they have been replaced by alternative light sources, new light bulbs and glass.
Rear lights
The rear light on a Zhiguli consists of four lamps located in one housing:
- turn indicator;
- size;
- reverse light;
- stop signal.
The block is covered with glass or plastic with separate cells for each headlight. It is necessary to change the lamps in the rear headlights after the trunk trim has been removed, since the lens fastening nut is located in the passenger compartment. The license plate lamp socket is located near the rear headlights. The process of replacing light bulbs in the rear unit goes through stages.
- Holding the diffuser with one hand, unscrew the nut located in the trunk.
- Remove the diffuser.
- Lightly press the lamp.
- Turn counterclockwise.
- The protrusions on the base must match the gaps in the cartridge.
- Pull out the light bulb.
- Replace in reverse order.
The diffuser, before it is tightened with a nut, is always installed into the headlight unit from below and only then pressed by hand over the entire area.
Headlight faults and repairs
During operation, the owner of a VAZ 2106 does not always notice that the headlights are gradually becoming paler, forcing the driver to look closely at the road. The reason is the inevitable clouding of the lamp bulb after a certain time, so experts recommend getting into the habit of regularly replacing the lamps of the front lighting devices. If individual lamps or lights in the car do not light up, this may be due to:
- failure of one of the fuses;
- lamp burnout;
- mechanical damage to the wiring, oxidation of the tips or loosening of the electrical wires.
If the high or low beam does not switch, then most likely the high or low beam relay has failed or the contacts of the steering column switch have oxidized. In both cases, as a rule, replacement is required - respectively, a relay or a switch. It is also necessary to replace the three-lever switch if its levers do not lock or switch.
Experts recommend getting into the habit of regularly replacing headlight bulbs on your VAZ 2106
How to disassemble a headlight
To disassemble a VAZ 2106 headlight (for example, to replace the glass), you need to heat the sealant around its perimeter with a hairdryer, then remove the glass with a thin screwdriver or knife. A hairdryer is a convenient tool in this case, but not necessary: some people heat the headlight in a steam bath or in the oven, although this risks overheating the glass. The headlight is assembled in the reverse order - a layer of sealant is applied and the glass is carefully installed in place.
Replacing light bulbs
To replace a VAZ 2106 headlight bulb, you must:
- Remove the plastic cover using a flat-head screwdriver.
- Use a Phillips screwdriver to loosen the fastening screws of the rim holding the headlight.
- Turn the rim until the screws come out of the grooves.
- Remove the rim and lens.
- Remove the headlight from the niche and disconnect the power cable plug.
- Remove the clamp.
- Remove the lamp from the headlight.
Reassembling the structure after replacing the lamp is performed in the reverse order.
Headlights corrector
A device such as a headlight range control is not used every day, but it can be useful, for example, when driving at night with an overloaded trunk. At the same time, the front part of the car “lifts up”, and the low beam is more like high beam. In this case, the driver can use the corrector to lower the beam of light down. In the opposite situation, when the corrector is configured for a loaded trunk and the car is empty, you can perform the opposite manipulation.
If the car is not equipped with a corrector, you can install this device yourself. Based on the type of drive, correctors are divided into hydraulic and electromechanical. The hydraulic one consists of the main cylinder and headlight drive cylinders, as well as a pipe system and a manual regulator, which is installed on the instrument panel. Electromechanical - consisting of a servo drive, wires and a regulator. The headlights are adjusted using a hydraulic corrector by changing the pressure of the working fluid (which must be non-freezing) in the cylinders. The electric corrector changes the position of the headlights using a servo drive, which consists of an electric motor and a worm gear: after applying voltage to the electric motor, the rotational movement is converted into translational motion, and the rod connected to the headlight by a ball joint changes its angle.
Video: operation of the electromechanical headlight range control on a VAZ 2106
electric corrector for headlights on a VAZ 2106, demonstration of the headlight unit
Periodic cleaning is required not only on the outside, but also on the inside of the VAZ 2106 headlights. If you need to get rid of dirt and dust accumulated during operation, you can use one of the many special cleaning products
It is important that the product does not contain alcohol, which can damage the coating of the reflector and the optics will have to be changed. In some cases, toothpaste or cosmetic micellar nail polish remover may be sufficient to clean the surface of the headlight.
To wash the inside surface of the headlight without removing the glass, you need to remove the lamp from the headlight, pour water diluted with a cleaning agent inside and shake well several times, then rinse the container with clean water and dry.
Lighting repair
Possible causes of malfunction
So, if the low beam on a VAZ 2106 in one of the headlights has disappeared, then, as mentioned above, most likely the light bulb has burned out.
If replacing the lamp does not produce results, then the following malfunctions may occur:
- The contacts in the block are oxidized or burnt;
- The fuse has blown;
- The relay has failed;
- The switch is faulty;
- There is a break in the circuit.
Below we will take a closer look at how to diagnose and fix the problem.
Replacing a light bulb
First of all, it should be said that the low beam lamp on the VAZ 2106 complies with the H4 standard, i.e. it has two threads, which allows the headlight to operate in two modes. Currently, such light bulbs are produced by different companies, both well-known brands and little-known companies.
It should be noted that domestic light bulbs are very popular among car owners. Their price is significantly lower than their imported counterparts, but at the same time they are not inferior in quality.
Advice! It is advisable to change the bulbs in two headlights at the same time, since their service life is approximately the same. In addition, different lamp models may differ in glow.
Instructions for doing this work look like this:
First of all, you need to use a flat-head screwdriver to dismantle the plastic panel that frames the headlights.
- Then use a Phillips screwdriver to loosen the clamps that hold the headlight.
- Next, you need to slightly turn the metal hoop and dismantle it.
Now you can pull out the headlight with your own hands and disconnect it from the block
At this stage, you need to pay attention to the connector contacts. If necessary, they need to be cleaned. Then you need to unfasten the lock and remove the light bulb. Next, the work is performed in the reverse order - a new lamp is installed, which is pressed with a clamp, and the block is connected to the contacts
The headlight assembly must be installed in place and secured with a hoop. To complete the work, a plastic panel is inserted, on which you need to press lightly until you hear a characteristic click.
Note! When replacing a lamp, do not touch its glass bulb with your fingers, otherwise it may quickly burn out. If you do touch glass, you should wipe the surface with a cotton swab soaked in alcohol.
This completes the process of replacing the light bulb.
Replacing fuses
If after replacing the light bulb the low beam headlight on 2106 still does not light, you should check the fuses. They are located under the instrument panel.
In this case, you need to pay attention to two fuses:
- No. 5 – protects the left headlight from short circuit;
- No. 6 – protects the right headlight.
It must be said that the low beam on the VAZ 2106 often does not work due to the fuse contacts being bent or oxidized. In this case, they need to be bent and cleaned. If the protective element has melted, it must be replaced.
Note! The contacts in the fuse box cannot be closed directly, since the protective element could burn out due to the failure of electrical equipment; accordingly, this could lead to more serious damage or even a fire in the VAZ wiring
Troubleshooting other problems
If the low beam on a VAZ 2106 does not light up, then to detect a malfunction you will need a multimeter to test the wiring, or at least a test light. The circuit and equipment should be checked according to the diagram below.
It must be said that the high and low beam relays on the VAZ 2106, which are indicated in the diagram as numbers 6 and 4, often fail.
Therefore, you can start checking with them.
Note! The relay for turning on the low beam headlights for the VAZ 2106 is interchangeable with the high beam relay, since these devices are of the same type
- If there is no voltage supplied to the relays and fuses, you should check the wiring section from switch No. 5 to terminal No. 86 on the relay, as well as the section from the switch to the external lighting switch No. 8. If the machine's wiring is normal, then the switch has failed.
- If voltage is supplied to the fuses, then an open circuit must be looked for in the area from the block to the headlights. Often the breakdown is due to poor ground contact. In this case, you just need to clean the contact.
These, in fact, are all the reasons why external lighting may not work on the “six”.
Advice! Many car owners are interested in how to improve the low beam on a VAZ 2106, which few people are happy with? The problem can be solved quite simply - connect low beam lighting in the second headlight. The fact is that this device also has a double-filament lamp, however, the third contact is not connected to the circuit.
Problem with fuses, switches and relays
If you notice that your high beam has completely disappeared, then the problem is unlikely to be incandescent lamps. Such simultaneous failure of both lamps is practically impossible and can only occur if the voltage relay regulator on the generator breaks down, but in this case the problem would affect not only the headlights, but also all automotive electrical equipment.
First of all, we advise you to start your search with fuses - look in the instruction manual for information on fuses, namely the exact location of the fuses responsible for the operation of the high-beam lamps. Take them out and check their condition, they may have burned out. The next step is to check the condition of the steering column switch. Note that this problem is quite common in VAZ cars. If the switch and fuses are good, all you have to do is check the status of the high beam relay. You will need a multimeter for this test.
VAZ turn signal relay - do-it-yourself diagnostics and replacement
Turn signals are perhaps a very important part of any vehicle. Carrying out maneuvers on the road becomes quite a dangerous task if the turn signals do not work.
The VAZ 2107 turn signal and hazard warning relay is responsible for the correct operation of the direction indicators. This device is used on all cars of the classic family. Let's consider why a turn signal relay is needed, how is a relay malfunction determined and how is it replaced?
Purpose of the turn signal and hazard warning relays
Everyone knows that direction indicators and hazard warning lights blink during operation.
This is necessary in order to attract the attention of other traffic participants. The flickering of lamps cannot be confused with any other signal supplied by lighting devices
A small device called a turn signal relay is responsible for this phenomenon. In addition to the blinking of the turn signals, the relay provides another function - creating the necessary sound signal (click), which indicates that the turn signals are in operation.
The Zhiguli used two types of relays, which differ both in their design and in their operating principle.
- The first type is an electromagnetic type relay, which is mounted in the engine compartment of the car. The basis for the operation of the electromagnetic thermal relay is a special nichrome string, which, when heated and cooled, closes and opens the direction indicator circuit. These types of relays were used on early models of the “classic” family: VAZ 2101-2102 and VAZ 2103.
- The second type of relay began to be used on VAZ 2106 and higher vehicles. It is an electronic circuit built on semiconductor circuit elements. In addition to semiconductors, the relay also includes an electromagnet, which performs the functions of closing and opening. The frequency of operation of the electromagnet (or flickering of lamps) is achieved using a “key”, or a special electronic circuit.
Diagnostics of malfunction of the direction indicator relay VAZ 2107
If one day the turn signals stopped working. It's time to check what happened and, if possible, replace the faulty part of the circuit. Malfunctions of the turn signal relay can be recognized by several signs:
- The turn signals light up but do not flicker. This directly indicates a breakdown of the relay, or rather, its electromagnetic part. In this case, the electromagnet has closed in one of the positions and cannot return to its original state.
- The turn signals blink too quickly or too slowly. This can happen, but not only due to the fault of the turn signal relay. Sometimes the flickering speed of lamps can change if the turn signals use lamps that are not of the same power as those specified by the manufacturer. However, it wouldn't hurt to install a new relay as a test.
- The turn signals don't work at all. This means that the turn signal lamps and the lamp on the dashboard do not blink and there are no corresponding relay clicks. However, as in the second case, the malfunction does not always concern the turn signal relay. Sometimes the reason is a faulty hazard warning button.
Electronic ignition device VAZ 2106
The contactless system (abbreviated as BSZ) of the Zhiguli includes six devices and parts:
- the main distributor of ignition pulses is a distributor;
- a coil that produces high voltage for a spark;
- switch;
- connecting cable with connectors;
- high voltage cables with reinforced insulation;
- spark plug.
The secondary winding of the coil acts as a source of high voltage pulses directed to the spark plugs
The coil operating as part of a contactless circuit differs in the number of turns of the primary and secondary windings. Simply put, it is more powerful than the old version, since it is designed to create pulses of 22-24 thousand volts. The predecessor supplied a maximum of 18 kV to the spark plug electrodes.
Trying to save money on installing an electronic ignition, one of my friends replaced the distributor, but connected the switch to the old “six” coil. The experiment ended in failure - the windings burned out. As a result, I still had to buy a new type of coil.
The cable with connectors is used for reliable connection of the terminals of the ignition distributor and the switch. The structure of these two elements should be considered separately.
To accurately connect the BSZ elements, a ready-made wiring harness with blocks is used
Contactless distributor
The following parts are located inside the distributor housing:
- a shaft with a platform and a runner at the end;
- support plate rotating on a bearing;
- Hall magnetic sensor;
- A metal screen with gaps is fixed on the shaft, rotating inside the sensor gap.
The contactless distributor still has a vacuum corrector connected by a vacuum tube to the carburetor
A vacuum ignition timing unit is installed externally on the side wall, connected to the support platform by means of a rod. A cover is attached to the top with latches, where the cables from the spark plugs are connected.
The main difference between this distributor is the absence of a mechanical contact group. The role of the breaker here is played by an electromagnetic Hall sensor, which reacts to the passage through the gap of the metal screen.
When the plate blocks the magnetic field between the two elements, the device is inactive, but as soon as a gap opens in the gap, the sensor generates a direct current. How the distributor works as part of an electronic ignition, read below.
The Hall sensor consists of two elements, between which an iron screen with slots rotates
Control switch
The element is a control board protected by a plastic cover and attached to an aluminum cooling radiator. The latter has 2 holes for mounting the part to the car body. On a VAZ 2106, the switch is located inside the engine compartment on the right side member (in the direction of travel of the car), next to the coolant expansion tank.
The switch is placed on the left side member of the “six” not far from the expansion tank, the coil is located below
The main functional parts of the electronic circuit are a powerful transistor and a controller. The first one solves 2 problems: it amplifies the signal coming from the distributor and controls the operation of the primary winding of the coil. The microcircuit performs the following functions:
- gives commands to the transistor to break the coil circuit;
- creates a reference voltage in the electromagnetic sensor circuit;
- counts engine speed;
- protects the circuit from high-voltage pulses (over 24 V);
- adjusts the ignition timing.
The switch electronics are attached to an aluminum heatsink to cool the operating transistor
Setting up automatic headlight switching
The Lada Six is not provided with daytime running lights. Since 2010, every car in the Russian Federation can only be driven with DRLs on or low beam headlights if they are not present. If the DRL turns on automatically when you start the engine, then you need to turn on the low beam yourself. Many motorists carry out minimal re-equipment of the electrical circuit so that the low beam turns on automatically after starting the engine and turns off when the engine is running after the handbrake is raised.
There are several ways to automate low beams. You can include a low beam relay in the electrical circuit of the generator; for this, additional relays are used that open and close the circuit depending on the operation of the generator. There is an option to install an additional connector that is triggered by the oil sensor.
Car headlights - a guarantee of your safety
Safety behind the wheel plays an important role for every motorist.
In this regard, drivers should remember some factors that ensure their safety. However, the most important thing is that, while driving, you need to clearly see the road along which the car is moving. This is why driving lights are so important. They provide the driver with good visibility in cloudy weather or at night.
Today, the auto parts market offers several types of headlights.
All of them can be divided into several categories.
- Of course, something needs to be said about the fog lights. As the name suggests, fog lights are designed to provide additional illumination of the road during thick fog. Most cars come with a set of fog lights from the factory. Typically, this type of headlight is installed on the front bumper. However, to increase the illumination area, you can purchase an additional set of headlights yourself. Some car brands provide wide lighting angles initially.
- When traveling on unfamiliar roads, the driver must have good visibility in front of him. For this you need a powerful high beam. Here, car spotlights produced by some companies come to the driver's aid. But it is necessary to keep in mind that such headlights are not intended for city roads, since their light can blind other drivers. But for country roads this type of lighting will come in handy.
- On the one hand, we can talk about the uniqueness of high beam headlights. They are typically placed lower than off-road headlights. However, their purpose is to improve road illumination in addition to low-beam headlights. For natural reasons, their light is directed forward, unlike fog lights. Before using high beam headlights, you need to remember that its brightness can blind drivers of cars in front. Therefore, it is better to turn it on when the track is empty.
- An auxiliary lighting system offers several benefits. First of all, it's a great way to stand out. Also, auxiliary lights will help others easily spot your vehicle at night. And finally, they help the driver to navigate well in the dark.
There are other types of headlights on a car. For example, xenon headlights or high intensity discharge lamps. The most important thing is to have a proper headlight leveling and cleaning system to get the most out of your vehicle.
Vote, did you like the article?
How to change optics
Currently, many car enthusiasts install alternative optics on the VAZ 2106 as front lights, but this does not always bring an equivalent solution to the problem. Thus, many motorists are replacing halogen lamps on their front headlights with xenon lighting elements, which significantly increases the vehicle’s aggression and luminous intensity, especially in the evening and at night.
However, you should know that updated optics, the price of which is quite high, is by no means a cheap pleasure. Instructions for replacing the front optics with a new one:
- Remove factory optics.
- Try on new products and make holes of the required diameter at the fastening points using a drill.
- Strengthen the updated product, first install mounting springs for installation, which will be required for subsequent adjustment of the luminous flux.
- Adjust the light beam.
However, only the low-beam optics of the VAZ 2106 will operate, and the high beam will be absent, although this drawback in the city and the illuminated highway does not seem to be a big problem. It is much worse if you have to travel long distances, where this disadvantage will cause serious inconvenience.
Bulb replacement procedure
Using a Phillips screwdriver, unscrew the bolts that are located around the entire circumference of the rim. In total, you need to unscrew three of them (if my memory serves me correctly), namely those that perform the function of a lock:
Now we turn the ring slightly clockwise and after that you can remove the reflector along with the glass, as shown in the photo below:
Next, everything is done very simply. You must first disconnect the wires leading to the lamp contacts:
And then squeeze the light bulb retainer (the ends of the thin metal latch) with two fingers:
Then we tilt it up and calmly remove the light bulb:
If necessary, we replace burnt out light bulbs, install new ones and reassemble everything in the reverse order. If you decide to completely change the headlight assembly, you will have to take a few more steps:
Fuses, switches and relays
If your high beam has completely disappeared, then it is unlikely that the problem is incandescent lamps - the simultaneous failure of two lamps is only possible if the generator voltage relay-regulator is faulty, which will most likely affect not only the headlights.
First, check the fuses - find the fuses corresponding to the high beam lamps in the owner's manual, remove them and make sure that they have not blown.
The next step will be to check the functionality of the steering column switch - this malfunction occurs quite often on rear-wheel drive VAZ cars.
After making sure that the relays and switches are working properly, check the functionality of the high beam relay - use a multimeter to do this. If you do not know how to use a multimeter, we recommend that you read the descriptions, photos and videos on the Internet.
Thanks for subscribing!
Fuse box
The fuse box in Grant is located to the left of the steering column, near the light switches. To remove the cover and access the fuses and relays, pull the top left side of the cover towards you. It’s made conveniently, everything is at hand and you don’t have to climb anywhere when getting up from the driver’s seat. Maybe this is a hint that they will often have to be changed, or maybe just convenience - the developers know better.
F1 (15 A) - engine control unit, injectors, ignition coil, cooling fan relay, short circuit 2x2.
If you have problems with electronics, and replacing this fuse does not help, in the worst case scenario, you will have to reflash the ECU or replace it. Also, if this fuse blows, the injectors and ignition coil stop working, which makes engine operation impossible. Therefore, if the Grant does not start, check this fuse first.
F2 (30 A) - electric windows.
If they do not work and replacing the fuse does not help, try unplugging it completely or removing the terminal from the battery for a couple of minutes, then connect it again. In this way, all temporary errors should be reset and if this is the case, the power windows will work again.
F3 (15 A) - alarm. If it doesn’t work, check this fuse, as well as the emergency light button, its contacts and the functionality of the lamps.
F4 (20 A) - windshield wiper, airbag. If the airbag warning light on the instrument panel comes on, check this fuse. The problem could be either in it, or in the electronic unit, or in the pillows themselves.
If the windshield wiper does not work and this fuse is intact, also check relay K6, the power handle, the reliability of the connectors connected to it, as well as the electric wiper drive itself.
F5 (7.5 A) - terminal 15 of the ignition switch. If you have problems turning on the ignition, check this fuse, as well as the reliability of the wire connections to the lock terminals.
F6 (7.5 A) - reverse lamp. If it does not work, but this fuse is intact, check the lamp itself, as well as the contacts connecting the connectors to the headlight.
F7 (7.5 A) - Mass air flow sensor, adsorber valve, oxygen sensor, speed sensor. If the engine runs erratically, does not idle, or stalls spontaneously, the problem may be this fuse or the corresponding sensor. We already had an article on how to check the mass air flow sensor.
F8 (30 A) - heated rear window. If it does not work, check this fuse, the terminals connecting the wires to the heater, and the integrity of its elements.
F9 (5 A) - right side lamps
F10 (5 A) - left side lamps. If the dimensions do not light up, the problem may be in these fuses or in the lamps themselves, as well as their connectors. It wouldn't hurt to check the headlight switch on the dashboard.
F11 (5 A) - rear fog lights. If they do not work, but this fuse is intact, the problem may be in the switch on the dashboard or in the lamps themselves, as well as their connectors
F12 (7.5 A) - right low beam lamp F13 (7.5 A) - left low beam lamp. If the low beam does not work in two headlights at the same time, the problem may be in the K9 relay, or in the low beam switch and its contacts. If only one lamp does not light, it is most likely the fuse or the lamp itself that needs to be replaced.
F14 (10 A) - right high beam lamp F15 (10 A) - left high beam lamp. If both high beam headlights do not work, the problem may be in relay K7. If there is only one, replace the fuse and/or lamp.
Electrical wiring
Electrical wiring is designed to supply electrical current to the consumer, in this case the high beam lamps. Problems with electrical wiring, partial lack of insulation, overheating of the wiring due to incorrectly installed fuses can cause a fire in the car, and you need to monitor the serviceability of the wiring as carefully as other mechanisms and devices of the car.
Important! A non-functioning high beam in conditions of insufficient visibility does not allow the driver to drive a car safely, and if problems arise with the high beam headlights on a VAZ car, knowledge of repair and diagnostics will help to quickly and effectively eliminate the problems that have arisen
Burnt out filament in a lamp
If you notice that one headlight in your car has failed, then the problem may lie in the light bulb. The device of this element includes two filament coils, one of them is responsible for the operation of the low beam, and the second for the high beam. One of these threads can easily burn out, which is why the high or low beam will not work.
In this case, it is impossible to repair the failed spiral and the only way out is to replace the light bulb. You can do this yourself.
This is interesting: Choosing auto refrigerators for cars
Healthy! When replacing a lamp on a car, do not touch it with your bare hands, as if there is grease or dirt on the bulb, it may burn out immediately. It is also recommended to wipe the light bulb with alcohol before installation.
Fuses, switches and relays
If your high beam has completely disappeared, then it is unlikely that the problem is incandescent lamps - the simultaneous failure of two lamps is only possible if the generator voltage relay-regulator is faulty, which will most likely affect not only the headlights.
First, check the fuses - find the fuses corresponding to the high beam lamps in the owner's manual, remove them and make sure that they have not blown.
The next step will be to check the functionality of the steering column switch - this malfunction occurs quite often on rear-wheel drive VAZ cars.
Typical headlight malfunctions
The main malfunction of the light on the VAZ 2106 is most often a burnt out light bulb.
If the light does not come on after replacing the lamps, the reason may be the following:
- fuse is blown;
- the contacts in the block are burnt or oxidized;
- relay is faulty;
- the switch is broken;
- a break in the electrical network;
- loss of mass.
If the headlights of the VAZ 2106 do not light up, the turn signals do not work, or the light suddenly goes out, then you need to check one by one all the elements included in the lighting system, starting with the fuse box.
Common causes of failure
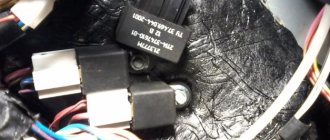
In the photo: VAZ 2106 headlight high beam relay Most often, the low and high beam headlight relay on a VAZ 2106 car fails for the following reasons:
- When the battery is working properly, there is no charging current, which is why it does not charge. This happens when the wires are poorly connected to the relay terminals or when the circuit from the generator to the battery is broken. Eliminated by fixing the wire in the circuit, checking and adjusting the voltage regulator and relay regulator.
- Insufficient charging current with a discharged battery or high current with a fully charged battery is caused by a malfunction of the voltage regulator. It can be eliminated by adjusting the device or replacing it.
- Burning and burnout of lamps with excessive heat occurs when the adjustment of the relay regulator is violated or the contacts are closed. Eliminated by disconnecting and cleaning the closed contacts, adjusting or replacing the voltage regulator.
- High discharge current after stopping the motor. Occurs when the relay-regulator contacts close (contacts sintering, armature spring breaks) or the electrical wire short circuits. It is repaired by finding and eliminating a short circuit with the battery disconnected, checking and adjusting the current limiter, opening and cleaning the contacts, replacing the spring and adjusting its clearance and tension.
External signs of a breakdown of the VAZ 2106 light relay include the following aspects:
- The low and high beam headlights stopped working.
- Dimensions and turn signals stopped working
And there may be several reasons for its failure:
- failure (burnout) of the contact plates inside the relay (popularly called “nickels”), reduction in their contact area, “sticking”;
- breakage (burning) of the retracting and/or holding winding;
- deformation or weakening of the return spring;
- short circuit in the pull-in or holding winding.
If you find at least one of the listed signs, then the next step to fix the problem is to conduct a detailed diagnosis.
Common problems
Other, more common problems that may cause low beam headlight bulbs to not light even after replacement include the following:
- Damaged fuses - contacts are oxidized or the protective element is melted. In the VAZ 2106 they are located under the dashboard.
- The low beam relay has failed. A continuity check of the electrical circuit with a multimeter is required.
- Poor ground contact on the path from the fuse block to the optics module. It is necessary to clean the oxidized joint.
Recommendation! To double the degree of illumination from the low beam in the VAZ 2106, you can connect the third contact in the high beam module - since a lamp with two filaments is also installed there.
Replacing the high beam bulb:
Note! As you already noticed, the title was again written in a simple way, so to speak, in fact, replacing the light bulb in this article will be carried out on the internal headlight, and the internal headlights, as you already understood, are located closer to the radiator grille, for greater clarity they are shown in the photo below:
To replace the high beam lamp you will need to stock up on: A screwdriver, as well as the 3H412V 55WH1 light bulb itself. (What this lamp looks like, see below)
Even before you start changing this headlight, be sure to look at the section “Replacing the low beam bulb”, it will describe how to properly remove and install the headlight trim, so be sure to remove it and only after that proceed to the operation described below!