03/03/2022 5,679 Transmission
Author: Victor
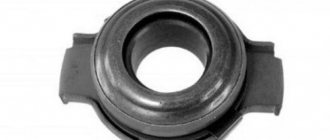
The release bearing is one of the main clutch elements in a car. Its wear and tear will lead to system malfunctions, resulting in the need to replace the device. In this article we will talk about what signs of malfunction are typical for a release bearing and what the failure of this part can mean for the car.
[Hide]
Types of release bearings
Before we find out the reasons for the failure and what problems the wear of the bearing device will bring for an Accent car or another model, let’s look at the types of parts.
Today, two types of devices are used in clutch and gear shift systems:
- Ball or roller. Mechanical parts during operation of which force is transmitted through a rigid bunch of rods.
- Hydraulic elements. In such devices, force is transmitted via hydraulics. This allows the driver to depress the clutch pedal more easily. Almost all new cars are equipped with hydraulic bearings.
- Mechanical. Practically not used. Previously, Russian-made cars were equipped with such parts.
Posts 1 to 20 of 73
1 Topic by Slag 2015-10-08 16:44:39 (2015-10-08 16:45:08 edited by Slag)
- Slag
- Participant
- Inactive
- From: Dnepropetrovsk
- Registration: 2014-04-23
- Messages: 146 Thanks : 43
- Car: 2111 1.5 16kl. 2002
Topic: Noise from the engine/gearbox when the clutch is depressed - disappears.
Good afternoon. In the morning I start the car, I hear some additional quiet noise from the engine, the noise is more like rustling or friction... idk. I press the clutch and it goes away. The clutch was completely changed about 50 thousand ago. The pedal is pressed easily (I recently changed the cable), the gears are engaged normally. The oil in the box has been running for about 45 thousand. When the engine is warm, the noise seems to disappear.. Tell me what it could be?
2 Reply from iliaBkmz 2015-10-08 16:52:30
- iliaBkmz
- Forum legend
- Inactive
- Registration: 2012-11-12
- Posts: 2,042 Thanks : 584
- Car: outlander and 2104
Re: Noise from the engine/gearbox when the clutch is depressed - disappears.
3 Reply from Slag 2015-10-08 17:50:40
- Slag
- Participant
- Inactive
- From: Dnepropetrovsk
- Registration: 2014-04-23
- Messages: 146 Thanks : 43
- Car: 2111 1.5 16kl. 2002
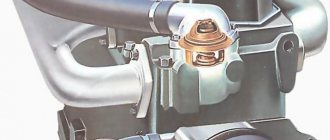
Operating principle
The purpose of the device is to ensure uninterrupted connection and disconnection of the clutch discs when the driver presses the pedal.
The operating principle is as follows:
- Through the action of the pressure plate, the driven shaft is pressed against the clutch flywheel.
- The system generates pressure, which is applied to the pressure shaft; this is ensured through the use of a diaphragm spring. Its inner petals are affected by a bearing device.
- The part moves, resulting in separation of the shafts through the action of the fork.
User Alexey Romanov published a video that will help you understand the principle of operation of the clutch system and release bearing.
Where is it used?
Automakers use this element on systems with two disks - a slave and a master. The first element receives torque from the second and transmits it to the transmission. Further, through the cardan transmission, the force is transmitted to the gearbox, and then to the wheels. The drive disc is tightly secured to the crankshaft. In order for the driver to move from one gear to another (no matter whether it is high or low), it is necessary to separate these two elements. This operation is carried out precisely thanks to the bearing. The force is controlled by pressing the clutch pedal. When it is pressed to the floor, the transmission of torque stops - the bearing rotates at the same speed as the flywheel. As it is released, the two disks are connected to each other. At this time, high loads are observed on the clutch release bearing. Malfunctions of these elements arise precisely because of heavy loads.
It is worth noting that while driving, when the car is in gear, this element is in a calm state. But as soon as you need to switch to the next or previous speed, it immediately starts working. Despite its small size, this element performs an important function. In the event of any malfunction, further operation of the vehicle will be impossible or difficult. Therefore, at the first symptoms you should pay attention to it. What signs of malfunction does the clutch release bearing have (Kalina included), we will consider further.
Causes and signs of failure
If the bearing has fallen apart or is just failing, this will lead to problems with the clutch system.
If a bearing fails, it is usually because the unit has worn out from constant use under high loads. Often the cause of a worn and broken unit is holding the clutch pedal in gear for a long time. When a driver makes such a mistake while idling in traffic jams, heavy loads are placed on the device, which leads to its breakdown. Why other parts fail is due to natural wear and tear. If the bearing element is faulty, this can be determined by certain symptoms.
What are the typical signs of failure for a release bearing?
- The main sign of a failed component is the appearance of extraneous sound. This is usually a noise or knocking noise that can be heard when you depress the clutch pedal of your car. The type of sound may vary. Sometimes the device makes a quiet noise, crunches, crackles or knocks loudly. The louder the sound, the more likely it is that the device has worn out and fallen apart.
- If the part does not squeak, signs may manifest itself in difficulties in operating the machine. Sometimes the driver fails to reach a certain speed. In some cases, when the car starts moving, it jerks uncharacteristically.
- Slipping or incomplete disengagement of the clutch. When the driver releases the pedal, slippage occurs and a burning smell appears.
- The pedal free play has increased. The dynamics of the vehicle deteriorate, the car moves unevenly.
- Sometimes the failure of the release bearing leads to increased fuel consumption and even overheating of the engine.
The channel “VAZ 2101-2107 REPAIR AND MAINTENANCE” published a video from which you can learn about malfunctions, as well as diagnostics of the release bearing device.
Why is the box noisy?
Gearbox noise is one of the unpleasant moments in operation, which is associated with design features. Owners note noise in the Kalina Cross, Sport, hatchback, and station wagon gearboxes when using box 2181. However, Kalina noise can also appear on an automatic transmission.
Oil too thick
If the gearbox on a Lada Kalina makes noise immediately after starting the engine, but the noise decreases while driving, the reason may be that the oil is too thick. However, fluids such as 85w90, for example, may be better than 75w80 precisely because of their increased viscosity, since they better fill the gaps between parts.
The thickness of the oil affects the occurrence of noise in the box.
Meanwhile, too thick oil makes it difficult for the gearbox to operate, especially when starting the engine.
Low oil level
One of the reasons for noise in the Kalina Cross, Sport, hatchback, and station wagon gearboxes, both with manual and automatic transmissions, is a low oil level. At the same time, “kicks” occur in the automatic transmission when changing gears.
To fix this, you can try adding oil to the box. However, it is difficult to check its level, since some models do not have a dipstick (on 2181). By unscrewing the oil filler plug, you can roughly determine the sufficiency of oil in the transmission - if it leaks, then there is enough oil, if not, then it is better to top it up.
In other models (2180, “Robot”, automatic transmission), the oil level can be checked with a dipstick and topped up to the required level, while only on the first two the procedure is carried out “cold”.
Worn bearings
On Kalina 1st and 2nd generations, noise in the gearbox may be from worn bearings of the primary and secondary shafts. When parts are replaced, the noise may decrease.
Checking the box bearings
It is possible to determine that the cause of the noise is a bearing without diagnostics, especially when it comes to the input shaft bearing. If the universal gearbox on a Kalina (2180) or another manual transmission makes noise when the selector is in neutral, then most likely it is the input shaft bearing.
But in neutral, the release bearing can also make noise. If this is the case, then when you press the clutch pedal (on a manual transmission), knocking, rattling, or other similar sounds begin to appear. If the input shaft bearing is faulty, if you depress the clutch pedal, the gearbox noise disappears, but when driving at speed (1st and 2nd gear), that is, at increased speeds, on the contrary, the noise turns into a howl.
The same applies to automatic transmission.
Hull damaged
The hum in the box appears due to damage to the housing. If the box on the 1st and 2nd generation Kalina is noisy when gears are freely changed (but with the possibility of some gears falling out) and there is virtually no oil in the box, then the likelihood of damage to the body increases. And if you drive with a “dry” gearbox, the risk of damage to the unit and the appearance of chatter (from faulty bearings) increases.
Dirt got into the oil
Automatic transmission noise on Kalina can also appear when dirt gets into the gearbox oil. When the gears are engaged, the clutches slip. This in most cases means a clogged filter mesh or insufficient oil level.
If water gets into the oil, then the automatic transmission noise is associated with slipping. This occurs due to foaming of oil and water, and the resulting emulsion clogs the filter. This can be corrected by eliminating the leak (identifying where the water is leaking from), washing the disassembled gearbox and using new oil.
Changing the release bearing
More information on how to remove and dismantle the bearing device from the coupling:
- Remove the gearbox. This will provide free access to all components and elements of the transmission and clutch system.
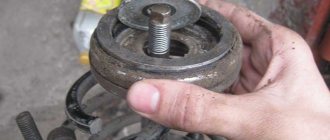
- Disengage the spring fastening from the coupling. To do this, use a screwdriver or other available tool.
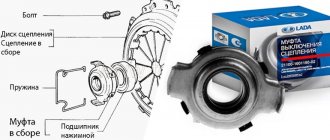
- Dismantle the failed release bearing from the guide bushing. To do this, you will need to press out the 4 latches of the spring fastening and remove it. After removing the device from the coupling, carefully inspect the device for any defects or malfunctions. Make sure that the part has failed and needs to be replaced.
- Before changing and installing a new bearing, it must be checked. Delays during rotation of the device are not allowed, as are gaps. If the part is operational, then replace the coupling. When installing, make sure that the inner protruding part of the ring is directed to the side. After installation, the element must be secured with a fastener.
- Lubricant is applied to the guide, after which the bearing device is installed. The part is secured using a holder.
- The removed gearbox is installed and the functionality of the device is checked.
1. Remove the gearbox from the car
2. Disconnect the fastener from the coupling
3. Squeeze out the four fasteners and change the part
Removing the gearbox
The procedure for dismantling the gearbox can be performed differently depending on the design features of the machine. Removal of the unit should be carried out with an assistant. Before dismantling, the vehicle battery is disconnected and removed, as well as the transmission fluid is drained.
How to remove the gearbox:
- Disconnect the clutch pedal cable. Remove it from the bracket.
- Disconnect the block with wires from the speed sensor installed on the box. Be careful not to damage the connector. To turn it off, press the latches.
- Using a wrench, unscrew the bolts that secure the ignition module bracket to the gearbox. Also unscrew the screws securing the transmission to the power unit.
- You will see connectors on the bottom of the gearbox; they need to be disconnected.
- Remove all screws that secure the torque rod bracket to the transmission housing. It is necessary to loosen the clamp of the rod clamp, which is designed to change gears. Disconnect this element from the hinge.
- Dismantle the wheel drives. Remove another nut that secures the transmission to the engine.
- Unscrew the three screws and remove the gearbox housing cover. It remains to unscrew one more bolt that secures the unit to the engine.
- Under the bottom of the car, find the nuts that secure the left and rear engine support of the car. After this, the gearbox must be carefully moved along the guides. Dismantling the gearbox is carried out with the help of a partner. Replace the release bearing and reinstall the gearbox. Fill with new oil.
1. Disconnect the plug and wire from the speed control sensor
2. Use a wrench to unscrew the screws securing the bracket
3. Remove the screw securing the gearbox to the engine
4. Dismantle the vehicle wheel drives
Replacing the clutch in the field
Immediately after the new year, on January 7, I finally changed the clutch in the field, and at the same time changed the clutch master and slave cylinders.
Replacing the clutch on a field and on a single-wheel drive is a completely different task in terms of labor intensity. I changed my clutch for two days, although I did a lot of other things along the way. It is highly advisable to call a friend for help.
I managed to do everything alone, but next time I will try to do it with an assistant.
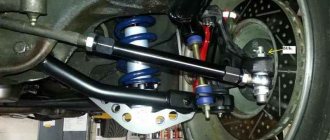
So, let's begin our difficult journey. Replacing a clutch in a field is one and a half times more troublesome than on a conventional front-wheel drive. The Niva also has a transfer case and two cardan drives, all of which are bolted together and to the gearbox. The photo shows that the front driveshaft has already been removed.
A picturesque view of the razdatka, then RK. In principle, there is no point in completely unscrewing the rear driveshaft. Simply unscrew the RK from the flange and put it aside. As in the photo.
I remember that year I wrote a little about the intermediate shaft. He became the reason for leaving the trophy raid on the first jersey. In the photo, the new shaft for 21213 is a CV joint, one part of it is essentially a standard “grenade”. The old-style crosspiece cannot be found in stores, which is sad.
There are some being analyzed and I think I heard that they are making non-original ones. I didn’t buy it right away, I needed to drive it, so I took the standard one again. Its peculiarity is that if damaged, the car is immobilized.
On the old cross shaft, according to people’s stories, you can somehow slowly get to the repair site.
In order to remove the steering wheel, it is necessary to release the locking and downshift levers from above. To do this, the entire manual transmission cover is removed. The casing is on large self-tapping screws, for a Phillips screwdriver. Under the casing, right from the cabin, we can see the donut of the washout.
Then we go down under the car and unscrew the transfer case supports. But before doing this, using an awl, scissors, or something sharp, we outline the position of the supports relative to the bottom. In the photo you can see a mark around the studs - that's what it is - marks. We need to put the transfer case in the same position when we put it back.
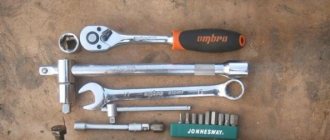
Using a 13mm ratchet with a long head, unscrew the nuts from the studs, 4 of them, two for each support. Next you will need an assistant or your own stupidity. We grab the transfer case and carefully remove it so as not to damage the studs. One of the most annoying problems with old fields is the transfer case studs.
If it breaks off, rots, or the threads come off, it will be difficult to secure the transfer case properly. There will be noise and vibration. You can change the stud by drilling it out from inside. I had to do just that, but now the inserted bolt must be unscrewed while holding it both in the cabin and under the bottom of the car.
Well, yes - it needs to be welded, I agree. I'll finish it in the spring.
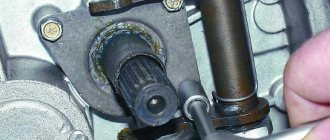
Next we will remove the gearbox. In the photo we are looking at the gearbox shaft flange, to which the intermediate shaft between the gearbox and the gearbox is screwed. I didn’t film the filming process itself, since I was filming alone and getting my hands dirty, and it was inconvenient to photograph.
The gearbox bell is bolted to the engine block with four bolts
Like 17 or 19 - I don’t remember, and it doesn’t really matter. The main thing is that you need heads with extensions, you can’t get to them that easily
It seems difficult the first time, but in reality you just need a ratchet with a good extension cord.
And this is the transfer case removed, placed closer to the rear axle so that it doesn’t get in the way
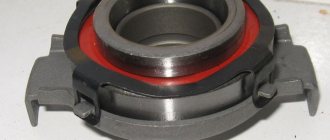
Having removed the gearbox, I try on a bearing on it.
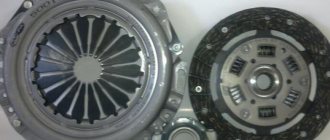
Clutch disc from original kit. Of course, it would be more correct to install a clutch from a Chevy Niva. The original clutch 21213 is a mutant from classic and eight spare parts. The clutch from 2123 has undeniable advantages - it is two or three times more durable, softer, the disc is larger in diameter and area. But the price is twice as expensive.
And this is a new basket
It's time to install everything on the flywheel. In the photo everything is already screwed on. Those who change the clutch themselves for the first time need to know that to center the disc and basket it is necessary to use the gearbox input shaft. It can be taken from the gearbox by disassembling it and sawing it off with a grinder. The end of the input shaft protrudes from the bell housing, where the bearing fits.
Also interesting: Tuning a Niva 4x4 with your own hands: updating the interior of the Lada VAZ-2121
How to extend the resource?
To increase the service life of the device, you must drive on smooth roads. In our country, it is problematic to comply with this condition. Keep in mind that uneven roads destroy not only the vehicle’s chassis, but also the clutch system. Therefore, regular off-road driving is also dangerous for bearings. Don't make mistakes when operating your car. When the car is stopped at a traffic light, there is no need to depress the clutch pedal and engage first gear if you do not plan to move. This should only be done at the beginning of movement, since the part operates under high load conditions. Regular lubrication will increase the service life of the device.
Why does noise appear in the gearbox on a Lada Kalina - when you squeeze the clutch, the noise disappears
Car: Lada Kalina. Asks: Makar. The essence of the question: the problem is noise in the clutch, what should I do?
When starting the car when it is cold, a noise is noticeable. As it warms up the noise disappears. But if you immediately depress the clutch pedal, the noise disappears. What is this? I'm afraid that I might get in the way. They told me it was a release.
The problem is relevant not only for Kalin, but also for the tenth family, Prior, Grant.
Causes of noise in the gearbox
- The most important thing is the release bearing.
A damaged release bearing with traces of rust and no traces of lubricant.
The gearbox input shaft bearing can be replaced only after dismantling the gearbox itself.
To avoid unnecessary problems, you should get into the habit of checking the oil level in the gearbox a couple of times a year.
When inspecting the dipstick, pay attention to its integrity. The trouble is that when you engage second gear, an incorrectly inserted dipstick (inserted crookedly) may rub
A typical breakdown of the clutch fork at the point where the lever attaches to the shaft.
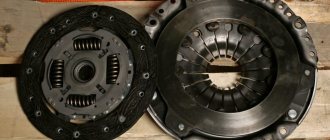
The release bearing is usually replaced along with the clutch disc and basket.
You can drive with a buzzing release for quite a long time, but eventually the bearing will still crumble or jam.
The hum appears because the bearing rotates when the engine is running. But no effort affects it. Therefore, even a slight play can cause extraneous sound. It is not possible to lubricate the bearing - it is a closed type and access to it is problematic. Only a complete replacement will help.
When the clutch is depressed, a load is applied to the bearing, therefore, the backlash decreases. For this reason, the sound may disappear.
- But this can be observed only in the early stages of the destruction of the part. Subsequently, a metallic crunch appears. Often the bearing falls apart into several parts.
All that's left of the release. By the way, these fragments can seriously damage the clutch basket.
Replacing the release bearing
To replace the release bearing, at a minimum, you will have to be patient and drive the car into the inspection hole.
To replace the release bearing, you will need to remove the gearbox.
The drives are disconnected one by one, and the differential mechanism is fixed using any guide. After this, the gearbox fastenings to the engine block are unscrewed and the box is removed.
Other
A humming sound due to a broken bearing on the input shaft can only be eliminated after removing the box and replacing the element. Adjustment will be required. But in practice, extraneous sound rarely appears for this reason; more often it is the fault of the release. Also, a hum can be observed from the gearbox due to low oil level or quality. In this case, it must either be topped up or replaced.
Video “Guide to replacing and lubricating parts”
Channel “Engine Repair! And interesting!” offers to familiarize yourself with the procedure for replacing the release bearing device and its lubrication in its roller.
Do you have any questions? Specialists and readers of the AUTODVIG website will help you ask a question
Was this article helpful?
Thank you for your opinion!
The article was useful. Please share the information with your friends.
Yes (83.33%)
No (16.67%)
X
Please write what is wrong and leave recommendations on the article
Cancel reply
Rate this article: ( 6 votes, average: 4.83 out of 5)
Discuss the article: