03/02/2022 1,933 Alarms
Author: Victor
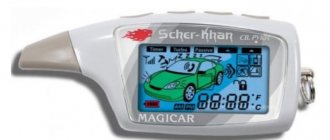
The system for protecting a vehicle from theft Sherkhan Magikar 10 has a two-way communication function that allows you to monitor the condition of the car. To transmit data, the alarm system has the option of connecting to the vehicle’s CAN bus, and all information about the operation is displayed on the display of the main key fob.
[Hide]
Technical characteristics of Sherkhan Magikar 10
Overview of the basic data of the “alarm” for the Scher-Khan Magicar 10 car:
- the duration of audible alarm signals is 30 seconds, the pulses are supplied continuously;
- the range of action of the main communicator when setting up and using the anti-theft system is up to 2000 meters, provided there is no interference;
- the duration of the car's light signals is 30 s, but the pulses are transmitted intermittently with a flickering frequency of 1 Hz;
- The battery life in the main key fob is about 4 months;
- for a power supply used in a spare communicator, this parameter is approximately 3 years;
- the duration of signals coming from the remote control is 4 seconds;
- sending data between the key fob and the transceiver is carried out via a radio channel with a frequency of 433.92 MHz;
- to control the capabilities and options of the anti-theft system, a remote control, a plug-in digital interface, as well as readings from sensitivity and temperature sensors can be used;
- protection of the power lines through which the connection is made is carried out by safety devices, resistors, diodes and varistors;
- a 12-volt power supply is required to power the anti-theft system;
- the microprocessor module, when the security mode is turned on, should consume from 30 to 40 mA;
- the weight of the control unit is 190 g;
- The main communicator uses AAA class power supplies, the secondary one uses CR2025.
The KotoPhoto channel briefly talked about the technical features of the Sherkhan Magikar 10 car alarm.
Equipment
Description of the delivery kit for the Scher-Khan Magicar 10 car alarm:
- Technical manual that allows you to correctly install and connect the anti-theft system. The manual indicates all the parameters, as well as the nuances of using and maintaining Magikar 10.
- Alarm control unit supplied in a plastic case.
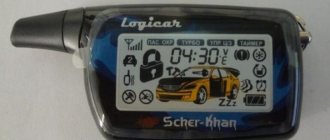
- The main remote control is equipped with a liquid crystal screen.
- Spare communicator. It does not have a display; the range of the device is significantly lower compared to the main key fob.
- Shock and sensitivity sensor, equipped with a wire and connector for connecting the on-board network.
- Controller for calling the car owner from inside the vehicle, equipped with a cable.
- Transceiver module.
- Temperature sensor.
- Car engine blocking relay. Equipped with a wire and connector for connecting to the control module.
- Siren.
- Limit switch for installation on the hood.
- A set of cables and connectors for connecting all elements of the anti-theft system.
- Two stickers - for attaching the call sensor and antenna adapter.
The Sherkhan Magikar 10 alarm system includes one limit switch, so other door devices must be purchased separately.
Elements of the Scher-Khan Magicar 10 anti-theft system
The engine started, but it doesn’t show on the key fob
If the car was started not from an additional key fob, but from the main one, and incorrect information is displayed on it, then you should look for an error made when installing the alarm system.
Check that each connector on the main module is connected correctly. If there is no malfunction, contact a specialist.
Author of the material: Dumchenkov Mikhail
Have questions about car repairs? Ask them in the consultation section, to do this, click on the link below.
auto mechanic
- New cars 2020
- New cars 2021
- Test drives
- Jeeps
- Crossovers
- Repair and maintenance Engine
- Chassis
- Electrical equipment
- Alarms
- Cigarette lighters
- Car Reviews
- Photo and video galleries
- News
- Tires
- Celebrity cars
2020 Daciaclubmd.ru. If you do not agree with any provision of this Disclaimer, do not use this Site. Please read Disclaimer and Privacy Policy before use.
Source
Key Features
Car alarm Sherkhan Magikar 10 has the ability to connect to both external and standard car digital interfaces.
List of features and functions of the Scher-Khan Magicar 10 security complex:
- Sound and melodic accompaniment when setting up and enabling options on an installed car alarm.
- Availability of vibration mode. When activated, the communicator will not emit signals, but only vibrate.
- Ability to determine the state of charge of the main battery of the car. Thanks to standard sensors, the system monitors the voltage level in the electrical network. The remote control display also displays information about the battery charge in the communicator.
- The ability to determine the temperature level in the vehicle interior.
- Availability of an individual password to control the anti-theft system. Using the code, the user can enter the service mode to configure basic parameters. Using a password is important if the communicator is lost or damaged.
- Using the protection function in the key fob from binding third-party remote controls.
- Ability to start security mode automatically.
- Using the false alarm protection function. Information about them is sent only to the remote control; the siren does not play alarm signals.
- The presence of a button lock function on the communicator.
- Possibility of operation of the anti-theft complex in the “Slave” mode. This allows you to control the car alarm using the remote control from the standard central locking system. To implement this function, the system must be connected to a digital interface.
- The presence of several additional channels that allow you to control the electrical equipment of the car.
- Possibility to turn on protection when the engine is running, as well as silent protection. In the latter case, when an alarm is triggered, the siren does not turn on. Information about this is transmitted only to the communicator with a display.
- Using the "Hands Free" option. Its use will allow you to automatically turn on and off the security mode when the car owner moves away or approaches the car.
- Warning the user about open doors or activated optics through external lighting devices.
- The use of separate power outputs to control the light alarm, as well as the luggage compartment lock.
- The presence of an option for automatically locking and unlocking the doors when the ignition is turned on and off.
- Ability to select the duration and number of door lock control signals.
- Automatic activation and deactivation of protection mode.
Setting up autorun UNIVERSE
The UNIVERSE car security system is more modern than the previous version. It has voice control and a remote control system via GSM communication. To enable autorun:
- With the engine running and the parking brake raised, press and hold the # button.
- When the ignition support mode turns on, you should remove the keys from the lock and get out of the car.
- Put the car in security mode and press #, holding the button for at least 2 seconds.
This way you can start the car remotely.
It is more convenient to make all settings, including setting the engine operating time, through a mobile application, which is very easy to understand. There is also a function to disable autostart of the car.
Advantages and disadvantages
Advantages of Sherkhan Magikar 10:
- Great alarm functionality at an affordable price. Thanks to the many options, the process of managing not only the anti-theft system, but also the standard electrical equipment of the car is simplified.
- Effective vehicle protection. Signal encoding is based on dynamic technology. This is a more advanced and reliable option compared to interactive pulse coding.
- Detailed manual included in the package.
- Possibility of alarm functioning with additional modules. For example, the user can implement automatic engine start, where the engine starts without the need to install the key in the ignition. However, for this the user must additionally install a special unit. You won't be able to enable autorun using standard tools.
Disadvantages characteristic of this model:
- Reduced range of the key fob, which does not coincide with that declared by the manufacturer. According to reviews, the alarm will not be able to receive impulses if the user is at a distance of two kilometers from the car. The maximum actual range is 1.5 km, provided the terrain is clear of interference. In large cities this figure is even lower - about 300 meters.
- Poor quality of the communicator. Over time, the buttons on the remote control begin to “stick,” especially if the user has not installed the key fob in a protective case. This problem can lead to device failure or, at a minimum, incorrect operation.
- The probability of hacking, although low, is still there. Dialogue encoding allows you to protect the alarm from interception of pulses by scanners. An experienced hijacker, using a special grabber code, will be able to hack the system. Professionals in this field usually steal expensive vehicles, so installing a security system on premium brands of cars is not recommended.
How to install Sherkhan Magikar 10?
Before installing the Scher-Khan Magicar 10 alarm system, the user must disconnect the battery to avoid possible failure of electrical equipment.
Alarm Installation Guide:
- Before installing the system, it is recommended to assemble it separately from the car and connect it to the battery. This will ensure that the security system is in good working order.
- The control unit is installed inside the car and secured with plastic ties or double-sided tape. The module is supplied in a non-sealed housing, so its installation in the engine compartment is not allowed. It is possible to install the device behind the instrument panel, but there should be no electronic equipment near the unit, as it will cause interference.
- The transceiver module is mounted in the corner of the windshield or rear window, on the sun visor, or directly on the instrument panel. It is important that there are no metal parts or electronic elements near the antenna. The temperature of the glass surface during installation should be at least 10 degrees Celsius. It is recommended that the transceiver module be oriented vertically to ensure maximum signal reception quality. The cable is laid under the decorative lining of the interior.
- The car owner's call controller is also installed in the area of the windshield, the surface of which is cleaned and degreased. After installation, the device body should not come into contact with plastic panels or the body. The cable is laid under the cladding, since it cannot be squeezed. The sensor is equipped with a special regulator, changing the position of which allows you to reduce or increase the level of sensitivity.
- The siren is installed under the hood of the vehicle; the installation site must be protected from access from under the bottom of the car. Do not place the device near the engine or other quickly heating components. The siren horn turns downward to prevent moisture from accumulating in it. Wires from the device are routed into the passenger compartment through a technological hole in the partition separating the engine compartment. It is not recommended to solder connections under the hood, since the contacts will quickly oxidize at high air humidity.
- Limit switches are installed on the metal surfaces of the doors, hood and luggage compartment. Placement of devices is not allowed on drains. Installed controllers should not interfere with loading and unloading luggage, as well as engine maintenance and repair.
- The shock sensor is installed on a strong, flat surface and secured with two bolts. During installation, it must be taken into account that the user must have free access to the device if necessary to adjust the sensitivity parameters.
- The engine lock relay is installed under the trim around the ignition switch and connected to the switch.
The channel “2012SHERKHAN” talked about the features of self-installation and connection of elements of the Sherkhan Magikar 10 anti-theft system.
Alarm connection
Features of connecting Scher-Khan Magicar 10 connectors:
| Color | Description |
| 8-pin header CN1 | |
| Black | Ground or ground, connects directly to the battery or to the car body |
| Gray-white | Output for connecting the electric drive of the luggage compartment lock. It must be connected to pin 87 of the internal relay. |
| Grey | The trunk lock input is connected to contact element 30 on the relay. Must be connected to ground or power. The electrical circuit must be protected with a 10 amp fuse. |
| Brown | Output for connecting a siren. When it is triggered, a 12-volt voltage should appear on the line |
| Violet | Contact element for connecting light signaling. The output must be connected to the left electrical circuit of the emergency lights, where a 12-volt voltage appears when a left turn is activated. |
| Violet | Another contact for connecting a light alarm. This power line ensures the system operates from the microprocessor module. Connects to the right light circuit. |
| Red-white | Contact element number 30 on the internal hazard warning relay must be connected to the negative terminal of the battery or ground |
| Red | Designed to supply voltage to the microprocessor module, controllers, and transceiver. The wire must be connected to the positive terminal of the battery directly. |
| 6-pin CN2 connector | |
| White-green | Normally open contact number 87 of the internal relay for closing the standard central lock. The electrical circuit must be protected with a 15 ampere fuse element. |
| Green | Switching contact component 30 of the central locking (CL) relay. The power line is protected by a 15 amp fuse. |
| Black-green | Normally closed element number 87 of the central locking relay. The circuit must be equipped with a 15 amp fuse device. |
| Yellow-white | Normally open contact element 87 of the relay. Protected by a 15 A fuse. |
| Yellow | Switching output number 30 on the same device. A 15 amp fuse will be required. |
| Black and yellow | Normally closed contact element 87 of the internal relay |
| 11-pin header CN3 | |
| Black and yellow | Input for connecting a tachometer sensor. It must be connected to the contact element on the dashboard, where the signal from the device is supplied. |
| Green | Output for connecting a positive ignition activation controller. The conductor is connected directly to the lock. There should be 12 volts on the line when the switch is in the On position. |
| Black-gray | Negative hood or trunk controller |
| Orange | Positive sensor for turning on car headlights. Must be connected to the parking light activation button. When the optics are triggered, a 12-volt voltage is generated on the line. |
| Black-orange | Negative side headlight controller. Must be connected to the cable where ground appears when the optics are activated. |
| Red | Positive door sensor. It must be connected to the power line to which the limit switches or the interior lighting bulb are connected. |
| Black-red | Negative door lock controller. Connects to the same electrical circuit as the previous contact. |
| Purple-white | Negative output for connecting the interior lighting system |
| Blue | Negative contact for controlling the opening of door locks |
| Blue-white | Minus for connecting a normally closed (NC) relay for blocking the starter mechanism or ignition system |
| Blue | Negative contact for controlling the NC device. |
Main connection card for the Scher-Khan Magicar 10 module:
1 part of the wiring diagram
Part 2 of the connection map
User manual
Before use, working batteries are installed in the Scher-Khan Magicar 10 remote control. Power supplies are included in the package - they are inserted into the device in accordance with the polarity. Installation is carried out in the free compartment of the communicator under the back cover.
Control key fob
Correspondence of keys on the main and additional remote controls:
Description of buttons on Scher-Khan Magicar 10 devices
Designation of symbols on the key fob
Purpose of controls for the Scher-Khan Magicar 10 anti-theft system:
| Key number | Click time (seconds) | Description |
| 1 | 0,5 | Is used for:
|
| 2 | 0,5 | It is applied for:
|
| 3 | 0,5 | Activating the backlight on the display of the main communicator |
| 4 | 0,5 | Monitoring the state of the anti-theft complex |
| 1 | 2 | Activating or disabling the Panic function |
| 2 | 2 | Turning the Turbo option on and off |
| 3 | 2 | Opening the luggage compartment lock |
| 4 | 2 | Entering the control menu for the first additional channel |
| 1+2 | 0,5 | Activating and deactivating siren alarm pulses |
| 1+3 | 0,5 | Enabling and deactivating the alarm service mode |
| 1+4 | 0,5 | Activating or disabling the sensitivity controller or auxiliary sensors |
| 2+3 | 0,5 | Entering the control menu for the second additional channel |
| 2+4 | 0,5 | Activation and deactivation of channel 1 according to the timer |
| 3+4 | 0,5 | Combination for working with the button locking system on the communicator |
| 1+2 | 2 | Entering the control menu for the second car. This option can be implemented if a similar model of anti-theft system is installed on another vehicle. |
| 1+3 | 2 | Entering the remote control options settings |
| 1+4 | 2 | Activating the first programming menu |
| 2+3 | 2 | Turn Hands-Free on or off |
| 2+4 | 2 | Command to enter the second programming menu |
| 3+4 | 2 | Combination for setting a password |
| 3 twice | Less than 0.5 | Activating or deactivating the parking timer |
Designation of indicators on the Scher-Khan Magicar 10 pager equipped with a display:
Description of symbols on the key fob screen, part 1
Description of symbols on the key fob screen, part 2
Description of symbols on the key fob screen, part 3
How to program the key fob?
Linking the new Scher-Khan Magicar 10 communicator is done as follows:
- While the security function is turned off, the user must insert the key into the lock and turn it to activate the ignition. Press any button on the remote control and hold it for two seconds. The vehicle's headlights must turn on.
- Within 5 seconds the user presses another button on the communicator. The lighting devices will blink twice provided that a password is not used to control the alarm.
- After 5 seconds the LED will turn on and stop flickering. This indicates the readiness of the microprocessor module to bind communicators.
- Within 5 seconds the user must press the key on the main remote control. Programming of other devices to the control unit is also carried out. After pairing each new communicator, the vehicle's headlights will flicker.
- To exit the setup menu, the user must take no action for 4 seconds.
Programming
The procedure for changing the parameters of the Scher-Khan Magicar 10 options is as follows:
- To enter the setup menu, the user simultaneously presses buttons 1 and 3, they must be held for two seconds. An indicator labeled “Pro9” will appear on the device’s display. The communicator will also emit a melodic signal.
- The menu for setting the current time will open on the pager. Using key 1, the user can change the clock parameters, and using button 2 - minutes.
- Control element number 4 is “clicked” briefly. The key fob will enter the alarm clock settings menu. The first key changes the hours, the second – minutes.
- Button 4 is pressed again, this will allow the user to activate or deactivate the alarm. The current state of the option is changed by applying the first key.
- Button 4 is pressed briefly, this will lead to entering the settings menu for calling the car owner from the salon. Parameters are changed using the first key.
- The next time you click on the fourth button, the communicator will go to the menu for activating or disabling the vibration alert function. The corresponding indicator will light up on the display, as well as the current status of the option. To adjust parameters, use button 1.
- Control element 4 is pressed, which will allow you to enter the menu for changing the temperature display format - in degrees Celsius or Kelvin. The transition is carried out with the first key.
- To exit the programming menu, the user simultaneously presses buttons 1 and 3. They must be held for two seconds.
Security mode
Features of controlling the protective function of Scher-Khan Magicar 10:
- To activate, use the first button on the remote control. All doors, trunk and hood must be locked and the ignition must be turned off. When the security system is turned on, the starter device will be blocked and the light alarm will work once. The communicator will emit a short pulse and a locked lock indicator will appear on its screen.
- If activation of security is required when the engine is running, then the first button is pressed with the ignition on. All door locks, hood and trunk must also be locked.
- To disable the protective mode, use the second key. When the command is sent, the locks will open and the starter mechanism will unlock. The siren will sound twice and the LED will stop blinking. The communicator will play a double signal, provided that the alarm mode was not activated during security. If this happened, the key fob will emit four sound pulses.
MAGIGAR 5 INSTALLATION ON ENGINE WARMING UP KEY FOB, MORE THAN 5 MINUTES
I downloaded the manual, it’s 80 pages long, but I couldn’t figure it out.
Thanks in advance to anyone who can provide information on this issue.
Setting up Sher Khan 5 autorun
Button pressing modes (not to be confused!):
- A short press
is a single press lasting no more than 0.5 seconds, accompanied by a short sound signal. - A long press
is holding the button pressed for more than 2 seconds. - until a beep appears, then you can release the button.
You only need to change 3 functions:
- 1-12 engine operating time (5min/15min/25min/45min)
- 1-13 start frequency (24h/8h/4h/2h)
- 1-21 start temperature threshold (no/-15/-25/+60)
Before programming, you need to remove the car from the alarm and open/close the driver's door (so that the alarm doesn't go back on during programming), and you also need to be in or near the car. An example of programming the engine operating time (function 1-12) for 25 minutes:
- Entering programming mode No. 1: press buttons I and II simultaneously - hold until the remote control emits a signal. The alarm will go into programming mode.
- We successively perform short presses of the IV button as many times as required for the selected program. In our case, we need to press 12 times. Each press will be confirmed by signals from the key fob and the car. After you press the IV button the required number of times, you need to pause for 2-4 seconds, after which the alarm will sound sequentially, confirming the number of the programming item (12 times).
- Then you need to press the button once in accordance with the required value: (example: I - 5min, II - 15min, III - 25min, IV - 45min)
After this, the alarm will exit the programming mode. If you make a mistake at any step, you will have to repeat everything from the beginning. So, to configure Sherkhan 5 to autorun every 2 hours
or
when the temperature in the cabin drops to -15
and with
a warm-up time of 25 minutes,
you need to perform the following steps:
- function 1-12 - set to 25 min (III). (I+II)—; IV(12 times); III
- Function 1-13 is set to 2 hours (IV). (I+II)—; IV(13 times); IV
- function 1-21 is set to the value -15?С (II) (I+II)—; IV(21 times); II
and thanks again to everyone who helped solve the problem.
Typical faults
Problems that may occur in the operation of the Scher-Khan Magicar 10 car alarm:
- Fuse failure. If a part on one of the power lines burns out, this will lead to a malfunction of the structural elements of the anti-theft system. We are talking about a siren, a control unit, and a central locking system. A damaged safety component must be replaced. In this case, it is necessary to take into account the rating of the failed part.
- The buttons on the remote control stick. If this problem occurs, you will need to resolder the communicator keys. Most often, sticking is caused by damage to the contact between the button and the board. If the key itself is intact, then it does not need to be replaced, but if the plastic base is damaged, the element must be replaced. The device casing will need to be disassembled.
- The low range of the key fob is usually associated with a low power source. You will need to check the battery operation and change it if necessary. You must use batteries of the appropriate standard.
- Communicator failure. Only a specialist can solve a software problem, but sometimes malfunctions in the key fob can be fixed on your own. You will need to disassemble the device case and assess the condition of its board. If the cause of the malfunction is related to the effect of moisture on the circuit, then it must be dried to remove any remaining condensation. It is recommended to resolder all damaged contacts.
- Damage to the control unit. This device can also be affected by moisture, so its housing must be disassembled and dried. Sometimes the malfunction consists of oxidation of the contacts on the block or their damage. To eliminate the problem, the elements are resoldered or the connector is cleaned. Perhaps the reason is related to incorrect operation of the software, then you will need to reflash the microprocessor module.
- Damage to electrical circuits or deterioration of insulation. To find a failed line, you will need a multimeter; using the tester, you can test all cables. Wear of the insulating layer will lead to incorrect operation of the anti-theft system. Damaged conductors must be replaced with new ones and additionally wrapped with electrical tape to increase their service life. When replacing cables, it is recommended to use the soldering method rather than twisting, so the connection will be as reliable as possible.
- Damage to the limit switches or poor contact with the network. With prolonged use, the contact elements on the “limit switches” tend to oxidize. This leads to the fact that one or more car doors do not close when the security mode is turned on. It is necessary to clean the connector through which the device is connected to the control unit.
Malfunctions in the operation of the Scherhan Magicar 10 car alarm in practice are most often caused by a low battery in the remote control.
Video
The L1DER channel showed the process of hacking the Scher-Khan Magicar 10 anti-theft system with a personal password.
Do you have any questions? Specialists and readers of the AUTODVIG website will help you ask a question
Was this article helpful?
Thank you for your opinion!
The article was useful. Please share the information with your friends.
Yes (33.33%)
No (66.67%)
X
Please write what is wrong and leave recommendations on the article
Cancel reply
Rate this article: ( 3 votes, average: 4.33 out of 5)
Discuss the article:
Setting up an alarm with auto start Scher Khan Magicar 5
Of the entire range of alarms with auto-start from Scher-Khan, the most unsuccessful is definitely Magicar 5. This is due not only and not so much to the vulnerability to hacking common to all Scher-Khan systems of these years, but also to the extremely illogical implementation of auto-start. Even the classic and most convenient “software neutral” for raising the handbrake cannot be physically implemented here; there is no input for the handbrake.
In the same way, the most accurate analog method of monitoring engine operation using a tachometer signal is not provided. Therefore, the best recommendation for owners of such systems would be to replace them with more modern ones that work adequately with autostart and code grabbers that are resistant to hacking.
However, many motorists continue to use previously installed (usually in car dealerships) Magicar 5, and during operation, questions inevitably arise - from how to set up the Sherkhan Magicar 5 key fob to how to disable autostart on Magicar 5 (by the way, the correct reading is “magikar”).
