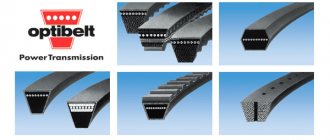
VAZ drive belt sizes
We check the belt tension by its deflection between the pulleys of the units.
1. With normal belt tension, its deflection under a force of 98N (10 kgf) should be 10–15 mm between the pump pulleys and the generator
2. or 12–17 mm between the pump and crankshaft . We adjust the belt tension by moving the generator (with its fastening nuts loosened): from the engine to increase the tension or to the engine to decrease the tension.
3. To replace the belt, loosen the nut securing the generator to the tension bar with the “17” head on the carburetor engine.
4. or a “13” head – on an injection engine. We move the generator towards the cylinder block to loosen the belt tension.
5. Move the generator, acting on it with a screwdriver as a lever in the slot of the tension bar:
on a carburetor engine;
6. on a VAZ-21214 engine.
Install the belt in reverse order. Turn the crankshaft clockwise two turns and check the belt tension. Excessive belt tension causes increased loads on the generator and pump bearings.
Transfer process for VAZ 21214 with power steering, injector (power steering)
In this option, you will need an upper adjustment bar. The author of the drawing decided to borrow
. The upper adjustment bar must be cut in place, and then a new hole for fasteners must be drilled, its diameter should be 8.5 mm.
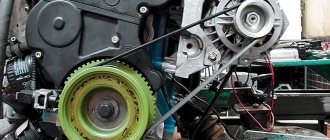
As you can see in the photo, the standard fan is installed on a pump pulley from GAZ 3110, we also take a crankshaft pin from 2110 and a 6RK1290 brand belt. The generator should be located on the top left side. It must be attached to the top using an M8 cylinder head bolt; at the front, a standard bolt and studs are used. For fixation, the bracket must be secured with an additional lock nut.
Second option
This generator transfer drawing differs from the first one in that it uses a belt with a size of 1375 mm. There are fewer steps here, but you will have to work with a grinder - you need to reduce the plane on the head located in the area of the M8 bolt.
The front cover will need new bolts and studs. This drawing of a bracket for mounting a generator is also suitable for other models, for example, for 21213.
Also interesting: Niva VAZ 21213 engine: characteristics, malfunctions and tuning
Replacing the alternator belt on the Niva 21214 injector
the belt tension by its deflection between the pulleys of the units.
With normal belt tension, its deflection under a force of 98N (10 kgf) should be:
. 10–15 mm . between the pump pulleys and the generator.
. or 12–17 mm between the pump and crankshaft pulleys.
We adjust the belt tension by moving the generator (with its fastening nuts loosened): from the engine to increase the tension or to the engine to decrease the tension.
To replace the belt , loosen the nut securing the generator to the tension bar.
. head “17” on a carburetor engine.
. or a “13” head - on an injection engine.
We move the generator towards the cylinder block to loosen the belt tension. We move the generator, acting on it with a screwdriver as a lever in the slot of the tension bar:
on a carburetor engine;
on an injection engine.
On engine 21214, remove the crankshaft position sensor (see here). We remove the belt.
On a carburetor engine it has to be removed through the gap between the radiator and the casing.
We install a new belt (width 10.7 mm, length 944 mm) in the reverse order. Turn the crankshaft clockwise two turns and check the belt tension. Excessive belt tension causes increased loads on the generator and pump bearings.
In winter, the generator belt began to whistle from time to time. And the further, the stronger and more often. I was going to tighten everything up, but I couldn’t get around to it. And then I decided to replace both the alternator belt and the power steering belt. So to speak, for prevention. I don’t know if the previous owner changed it, and if so, when. And yesterday I decided to go for a ride and play Ingress, the belt whistled loudly. I started monitoring the voltage level in the network using the dashboard. The level was low, sometimes dropping to 12.5 V. I thought it was time to go home, but after warming up the engine everything became more or less so. I decided not to tighten it, buy belts and change them. This is what I did today.
Chevrolet Niva
Important. If the car is equipped with air conditioning, you will first have to remove the compressor drive belt by loosening the corresponding tension roller.
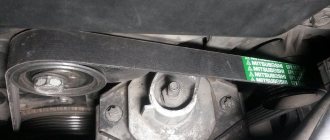
Replacing the alternator belt is not difficult if you start installing it from the crankshaft pulley and finish at the tension roller. The final step of the manipulation is to check the tension. Between the generator and pump pulleys, press the belt with a force of 80 N. In this case, the deflection (h) should be equal to 12 mm. After 2 - 3 engine revolutions, it is imperative to check the tension.
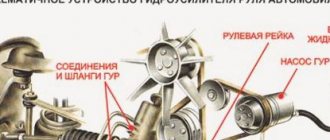
1. crankshaft pulley 2. pump pulley 3. tension roller4. tension bar5. bolt6. generator pulley7. belt8. support roller9. power steering pulley
1. De-energize the car by disconnecting the terminals from the battery.
2. Pull out the connector from the crankshaft sensor; this can be done by unscrewing the mounting bolt with a Phillips screwdriver. Then remove the sensor.
3. Lightly unscrew the device that is secured with a nut and move it towards the block.
4. Remove the belt that is worn out; this is easy to do since the device is loose.
5. The right side should be jacked up, placing emphasis on the wheels in advance. We put the field in fourth speed, since we will rotate the right wheel.
Also interesting: Niva Chevrolet alarm connection points
6. We pull it gradually, removing it from the pump pulley, we turn the wheel, gradually pulling out the belt from the pulley.
The belt that you have removed, as a rule, cannot be repaired, so after removing the old one, we immediately proceed to installing a new one.
1. First we throw it on the crankshaft pulley, and only then on everything else.
2. It is best when the procedure ends by putting it on the generator pulley. The wheel rotates all the time until it is completely dressed.
3. After the device is installed in its seat, it should be secured with a bolt.
· Then the right lower pulley.
· A roller that is located under the generator.
· And at the end is the generator pulley.
After all this, it should be tightened well. Since if the tension is weak, then the battery will not be provided with the charge it needs.
4. Install the sensor in its place.
On Chevys, LUZAR belts have proven themselves to be the best.
The only easy repair option is to replace it or you can tighten it; other problems that arise are usually eliminated only by removing it.
There will be 2 wires on the back of the gene - one is plug-in, and the second is screwed with a nut and washer to the bolt.
Among the tools, the person carrying out the adjustment will need: A universal device for diagnosing any car. Then you should slightly loosen the nut that secures the generator to the tension bar.
It is enough to turn this nut just one turn. Adjustment is carried out by moving the generator relative to the engine.
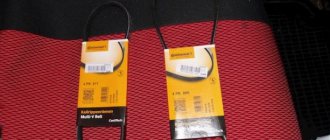
You should definitely carry spare belts with you, especially on a long trip. Let's look at some options and technology for replacing belts.
Insufficient belt tension impairs fluid circulation in the cooling system, which leads to engine overheating. In addition, recharging the battery worsens and the belt itself wears out more. If the tension is too strong, the bearings of the water pump and generator may fail.
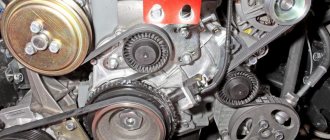
Check the tension of the drive belt of the water pump and generator from above in the engine compartment.
Tension is characterized by the amount of belt deflection between the pump and crankshaft pulleys (deflection “B”) (Fig. 1) or the generator and pump pulleys (deflection A) when a force of 98.1 N (10 kgf) is applied in the middle of the distance between the pulleys.
Deflection A should be 10 - 15 mm, deflection B - 12 - 17 mm.
It is more convenient to check the deflection “A”.
To check the tension, you can use a spring balance scale by hooking a belt branch with its hook and pulling it up.
Adjust the belt tension with the car mounted on a lift or inspection ditch.
The adjustment is carried out by moving the generator relative to the engine.
You will need: a 13" wrench, a mounting blade.
1. Remove the oil sump protection and engine splash guard.
2. Loosen the nut securing the generator to the tension bar by about one turn
3. Loosen the nut of the lower mounting of the generator.
4. To increase belt tension, move the generator away from the engine.
When moving the generator to increase belt tension, apply force only to the generator housing. placing the mounting blade between the housing and the engine.
5. To reduce belt tension, move the generator towards the engine by hand.
6. Without changing the position of the generator, tighten the nut securing the generator to the tension bar and the nut of the lower mounting of the generator.
nuts securing the generator to the tension bar 28.08-45.3 N m (2.9-4.6 kgcm);
nuts for the lower mounting of the generator 57.3-72 N m (5.95-7.35 kgcm).
7. Install the oil pan protection and engine splash guard in the reverse order of removal.
8. To replace the belt, unscrew the crankshaft position sensor screw and remove the sensor from the bracket socket without disconnecting the wires.
9. Remove the power steering pump drive belt.
10. Perform steps 2 and 3 for adjusting the belt tension and push the generator towards the engine until it stops.
11. Remove the belt first from the pump pulley, then from the generator and crankshaft pulleys.
12. Place the new belt first on the crankshaft pulley, then on the generator pulley, and then on the pump pulley.
If the new belt is tight on the pump pulley, and the generator is pushed all the way towards the engine, carefully turn the pump pulley by hand or slowly turn the crankshaft until the belt is completely seated on the pulley. Have an assistant turn the crankshaft.
13. Perform steps 2-6 for adjusting belt tension.
14. Reinstall the crankshaft position sensor.
As an option, one serpentine belt can be installed on the vehicle, which drives all auxiliary units (water pump, generator and power steering pump). In this case, the generator is installed to the left of the engine at the top.
In this case, the belt tension is checked by deflecting it between the generator and water pump pulleys. With normal belt tension, the deflection “h” under the action of a concentrated load “P” of 75 N (7.6 kgf) should be equal to (12 ± 1) mm.
The belt tension is adjusted by moving the tension roller 3, rotating the tensioner bolt 5 while the nuts 8 securing the tensioner bracket 4 are loosened. After adjustment, turn the engine crankshaft two turns and check the belt tension again.
In this case, the belt tension is checked by deflecting it between the generator and water pump pulleys. With normal belt tension, the deflection “h” (Fig. 11) under the action of a concentrated load “P” of 75 N (7.6 kgf) should be equal to (12 ± 1) mm.
To do this, we drive the car into a pit or overpass and remove the engine protection.
Also interesting: Chevrolet Niva suspension: front, rear, device and tuning
Perform steps 2 through 6 for adjusting belt tension. Reinstall the crankshaft position sensor.
Replacing the VAZ 2121 Niva alternator belt. Photos, instructions on how to change the alternator belt on a Niva
This photo report shows in detail how to replace the alternator belt on a VAZ 2121 Niva . On average, the original alternator belt runs about 100 thousand kilometers, which is known from the reviews of many owners of this car.
It is important to understand that after replacing the belt with a new one, its lifespan may be slightly shortened, since a good belt is difficult to find.
Of the necessary tools, we only need a regular 17mm wrench, or you can take a ratchet wrench and a 17mm socket for it.
You can also check out our photo report on replacing the generator on a VAZ Niva
for repair of VAZ (Lada) 2121 (4x4)
Adjustment
To start adjusting the Niva Chevrolet alternator belt, you need to loosen 3 nuts. They don't unscrew completely. 1-2 turns are enough to begin further work.
The adjustment assembly fastener is indicated in the image above and marked with an arrow. To carry out this procedure you will need a key number 13.
The adjustment is made with the same key set to 13. By rotating the screw in the direction of unscrewing, loosening occurs; if you rotate it in the other direction, tightening, then tension occurs.
Replacing the alternator belt on Niva
The alternator belt on a Niva can easily last 100,000 km, which has been tested by many car owners from personal experience. But with subsequent installation, its service life may be reduced, since choosing a real original belt can be very difficult. If you decide to replace it, then to perform this maintenance you will need a 17-mm open-end wrench or a socket with a ratchet and extension, as well as a universal joint.
So, the first thing you need to do is loosen the belt tensioner nut, as clearly shown in the photo below:
After the nut is loosened, you need to move the generator to the side so that the belt is free. Shown in more detail schematically in the picture:
And at this moment, when the belt is as loose as possible, you can remove it from the pump pulley:
And then from the generator drive, since it will already be completely free:
Drive tension
The ignition must be turned off. After this, open the hood and remove the plastic trim. Then loosen the air duct clamp. You can use a regular screwdriver for this.
Then use a 10 mm socket wrench to unscrew the screw holding the air filter. After this, remove the air duct from the filter housing. At this point the preparation stage can be considered complete.
Alternator belt tightening sequence
Using a “17” wrench, slightly unscrew the upper fastening nut connecting the generator to the bracket.
Loosen the fastening nut at the bottom (just unscrew it a few turns).
If you need to loosen the belt, grab the generator and pull it towards you (if you need to tighten the belt, pull it away from you). After which it is necessary to tighten the nuts and check the operation of the generator.
Before starting the engine, turn on several main consumers, for example, the stove, high beams and heating. If the whistle disappears and the charging level remains at a normal level, then the work can be considered successful.
At the same time, remember that over-tightening is also unacceptable (this can lead to increased wear on the pulleys and belt).
There are situations when the alternator belt whistles from time to time, for example, when the temperature drops or humidity increases outside.
In this case, you can use special additives (sold in standard cans). The method of application is very simple.
It is necessary to spray the composition on the inside of the belt and pulleys. The cost of such products is from 500 to 1500 rubles.
If your car's alternator belt squeaks, you shouldn't immediately rush to the service station and make expensive repairs.
In most cases, the problem can be solved much easier and in a few minutes. And now you know how it's done. Good luck on the roads and of course no breakdowns.
Adjusting the tension and replacing the coolant pump drive belt Niva 2121, VAZ 2131, Lada 4×4 We check the belt tension by its deflection between the pulleys of the VAZ 2121 units. With normal belt tension, its deflection under a force of 98N (10 kgf) should be 1015 mm. between the pump pulleys and the generator. or 1217 mm between the pump and crankshaft pulleys. We adjust the belt tension by moving the generator (with its fastening nuts loosened): from the engine to increase the tension or to the engine to decrease the tension. To replace the Niva 2121 belt, loosen the nut securing the generator to the tension bar. head 17 on a carburetor engine. or a 13 head on an injection engine. We move the generator towards the cylinder block to loosen the tension of the Niva 2131 belt.
We move the generator, acting on it with a screwdriver as a lever in the slot of the tension bar Niva 2131: on an injection engine. On engine 21214, remove the crankshaft position sensor (see Removing the crankshaft position sensor). We remove the VAZ 2131 belt. On a carburetor engine, it has to be removed through the gap between the radiator and the casing. Install the belt in reverse order. Turn the crankshaft clockwise two turns and check the belt tension. Excessive belt tension causes increased loads on the bearings of the generator and pump of the Niva 2121. The original generator belt on the VAZ 2121 can serve the driver for about 100 thousand kilometers on domestic roads, such messages came from many owners of the people's favorite.
This instruction is suitable for both beginners and experienced drivers of the VAZ 2121. Replacing the alternator belt on a Niva 1. The image shows how to correctly loosen the alternator belt tensioner nut. 2. When the nut is slightly loosened, you need to move the car's alternator to the side to have good access to the belt. The arrow in which direction you need to move the generator is shown in the photo. 3. Remove the belt from the pump pulley, see the image for more details. 4. The alternator belt has been completely removed, now you can begin installing a new one. The cost of a new belt is about 100 rubles. We carry out the installation in the reverse order, also do not forget about tensioning the alternator belt, you can watch the video above about this operation.
Source
Examination.
The correctly tensioned alternator belt on a Chevrolet Niva can be checked by pressing on it at point P indicated in the figure. With a force of 75N, the permissible deflection should be 1-1.2 centimeters.
It is possible to more accurately measure the tension level only in a service station that has the necessary equipment for this. The same applies to tightening the nuts. The manufacturer recommends tightening with a force of 20-25 N*m. A special torque wrench is used for this.
The need for periodic inspection.
The main feature of the Chevrolet Niva engine is that in addition to the generator, this belt also drives the cooling system pump. If it is weakened, then over time it may slip and, in addition to insufficient voltage supplied by the generator, there is a risk of engine overheating as a result of the pump stopping. The risk of higher wear and tear on the pulleys it drives also increases due to increased vibration.
An overtightened belt also leads to severe wear of the bearings. In addition, you may notice a whistling sound when the engine is running, which indicates that it is experiencing strong friction and as a result is overheating.
Do-it-yourself replacement and tensioning of the alternator belt
The service life of a belt in a field is 50,000 - 100,000 thousand kilometers , then it is recommended to replace it with a new one to avoid breakage and rattling, of course there is nothing terrible in this when it whistles, but it is slightly annoying, and the generator works worse. The most important thing is to supply an original, high-quality belt, which is not so easy to find now. But there are good imported manufacturers Bosh and Gates size 940x10.
Possible causes of whistling:
Next, you need to remove the engine protective sheet and unscrew the lower nut.
Now it is weakened and you can try to move it. The arrow shows the direction of movement.
The belt is free and can now be removed.
We put the new “belt” on the rollers, and by hand, do not tighten too much and fix the top nut, check that the belt has tension and does not dangle, then you need to tighten the nut from below. Now you need to check the correct operation of the generator, to do this, start the field and turn on all electrical appliances, there should be nothing whistling or making any sounds, the battery should produce at least 13 volts, if everything matches, then you have done everything correctly.
How to replace the air conditioner belt
In order to replace the air conditioning belt on a Chevrolet Niva, you need to use only one 12 key. There are no difficulties in carrying out repairs; it is enough to install the car on an inspection hole or overpass. This makes it much easier to make repairs, because the belt is located at the bottom. To remove it, you will need to loosen the roller mount. This will release the tension on the belt itself. Pay attention to the condition of the roller - it must rotate without jamming, otherwise it will also need to be replaced.
After installing the new belt, simply tighten it using the bolt installed on the roller. Please note that when replacing all belts in a comprehensive manner, this should be installed last. First replace the timing belt, then the generator, and lastly the air conditioner.
Removing the timing belt
The manipulations that we will discuss below should be carried out only on cars equipped with Opel engines.
When replacing the timing belt on a Chevrolet Niva, follow these steps.
- Remove the air conditioning and cooling radiators completely. Before this, of course, you will have to drain the liquid from the cooling system and bleed off the freon. There is no need to remove the fans from them.
- Remove the A/C compressor and alternator drive belts. Be sure to remove the tension mechanisms as well.
- Remove the upper part of the timing housing.
- Place marks on the shaft gears. They must definitely match. There is a notch on the engine crankcase that should match the mark on the pulley.
Remove the air purification filter housing.