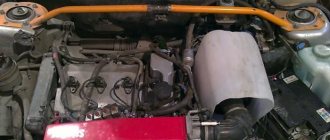
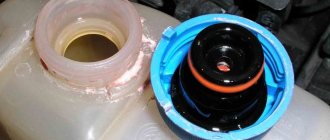
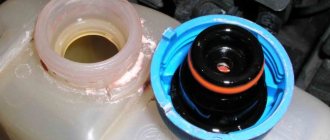
This unit is a plastic container equipped with a lid, a built-in coolant level sensor, a valve for relieving pressure in the system, and places for connecting pipes and hoses. The cooling system of any car includes an expansion tank.
Like other mechanisms, the tank, when it fails, needs to be repaired or replaced. The expansion tank is replaced with a new sample if the valves break or the seal of the housing is compromised.
Purpose of the expansion tank
The expansion tank performs an important function: to absorb excess coolant when its volume increases in cases of increased temperature and pressure in the cooling system.
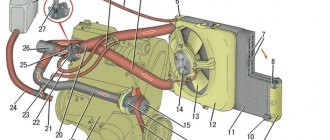
When the engine stops running, the pressure in the cooling system drops. In this case, air pockets may appear in the lines due to the absorption of air from the atmosphere through the radiator valve. Thanks to the valves located on the tank lid, it is possible to avoid the occurrence of air locks.
About additional capacities
Manufacturers equip wall-mounted heat generators with built-in tanks that absorb excess heated coolant. The dimensions of the tank do not always correspond to the house heating wiring; sometimes the capacity is not enough. To ensure that the coolant pressure during heating is within normal limits, the displacement is calculated and an additional expansion tank is installed for the wall-mounted boiler.
For example, you converted an open gravity system into a closed one without replacing the mains. The new heating unit was selected according to the heat load. The built-in boiler tank is not enough to expand such an amount of water.
Another example: heated floor heating of all rooms of a two- or three-story house plus a radiator network. Here, the volume of coolant will also be impressive; a small tank will not be able to cope with its increase, and the pressure inside the system will increase. A second expansion tank for the boiler is needed.
Note. The second tank to help the boiler is also a closed membrane container, located in the furnace room.
When the hot water supply at home is provided by an indirect heating boiler, a similar problem arises - where to put the excess sanitary water from the storage tank? A simple solution is to install a relief valve, as is done on electric water heaters. But an indirect heating boiler with a volume of 200...300 liters will lose too much hot water through the valve. The right solution is to select and install an expansion tank for the boiler.
Reference. Buffer tanks (heat accumulators) from some manufacturers also provide the ability to connect a compensating tank. Moreover, experts recommend installing it even on large-capacity electric boilers, as shown in the video:
Tank defects leading to system malfunction
Malfunctions of the container often cause antifreeze or antifreeze to squeeze out through the lid. Failures of the tank that require its replacement include the following defects:
- The presence of burrs and burrs on the threads and inlet of the cover.
- Failure of the pressure regulating valve.
- Damage to the sensor indicating the coolant level.
- Rupture of the walls of the container, leading to intense leakage of coolant.
- Wear and aging of container elements leading to malfunctions.
- Mechanical damage to the body due to impacts received during an accident.
Irregularities on the thread create difficulties when tightening the plug and do not allow the connection to be sealed.
Plastic walls often crack due to prolonged exposure to boiling liquid, high pressure, or due to insufficient thickness of the plastic. When purchasing a new tank, you need to make sure that the materials from which this unit is made are of good quality.
Connection methods
It is correct to connect the tank hydraulically at a point located on the return line in front of the boiler and circulation pump (if viewed in the direction of water flow). The tank can also be installed on the supply side, but under one condition: the pump must be located on the supply line and still stand in front of the compensating tank.
The best place to connect a membrane tank is the heating return in the boiler room, but always before the pump, and not after it
Point two: when a solid fuel boiler overheats, the tank connected to the supply will begin to fill with steam. Air and steam are compressible media, in which case the rubber “bulb” will no longer compensate for the expansion of water.
The correct connection of the expansion tank to the heating system is always carried out through a shut-off ball valve with an American connection. Then the tank can be taken out of service at any time and quickly replaced without waiting for the coolant to cool down. If you install a tee and a second tap on the supply line, as shown in the connection diagram, then the container can be emptied first:
Recommendation. When connecting an indirect heating boiler with a boiler and DHW, connect the expansion tank to the cold water supply line at the inlet to the storage tank. Here a special tank is used that can withstand the pressure of the water supply network. A heating tank or hydraulic accumulator is not suitable. How to distinguish them, watch the video:
Algorithm of actions when replacing an expansion tank
Many car owners are interested in how to replace the expansion tank. The accompanying documents for the plastic container contain complete information on how to remove the old one and install a new one.
After diagnosing the cooling system and making a decision to replace it, the following measures must be taken:
- Prepare the necessary equipment, tools and auxiliary materials.
- Before removing the cover, you need to make sure that the car engine has completely cooled down after turning it off.
- Disconnect the antifreeze level sensor.
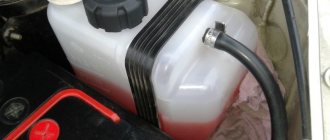
- Loosen the clamps and disconnect the steam outlet pipe and the filling hose.
- Disconnect the rubber belt and remove the expansion tank.
- Mounting a new container is done in the reverse order.
- Filling a new container with coolant.
- Identification and removal of air pockets in the cooling system lines.
The work of replacing the coolant container is not difficult, does not require special education and can be done with your own hands.
The normal operation of the cooling system depends on the quality of the new unit and the correctness of the actions taken during its installation.
When purchasing a new copy, you must ensure that it is original. The use of analogues affects the service life of the tank towards its reduction.
Expansion tank for closed heating: installation
When planning to create a water heating system in your own home, the owner is faced with a choice of several options. The list of the most important questions includes the type of system (will it be open or closed), and what principle will be used to transfer coolant through pipes (natural circulation due to gravitational forces, or forced, requiring the installation of a special pump).
Expansion tank for heating closed type installation
Each of the schemes has its own advantages and disadvantages. But still, nowadays preference is increasingly given to a closed system with forced circulation. This scheme is more compact, easier and faster to install, and has a number of other operational advantages. One of the main distinctive features is a completely sealed expansion tank for closed-type heating, the installation of which will be discussed in this publication.
But before purchasing an expansion tank and proceeding with its installation, you need to at least become familiar with its structure, operating principle, as well as which model will be optimal for a particular heating system.
What are the advantages of a closed heating system
Despite the fact that many modern devices and systems for space heating have appeared recently, the principle of heat transfer through a liquid with high heat capacity circulating through pipes undoubtedly remains the most common. Water is most often used as a carrier of thermal energy, although in some circumstances it is necessary to use other liquids with a low freezing point (antifreeze).
Water heating is the leader in prevalence
The coolant receives heat from the boiler (furnace with a water circuit) and transfers heat to heating devices (radiators, convectors, “warm floor” circuits) installed in the premises in the required quantity.
How to decide on the type and number of heating radiators?
Even the most powerful boiler will not be able to create a comfortable atmosphere in the premises if the parameters of the heat exchange points do not correspond to the conditions of a particular room. How to correctly calculate the required number of heating radiators is in a special publication on our portal.
But any liquid has general physical properties. Firstly, when heated, it increases significantly in volume. And secondly, unlike gases, this is an incompressible substance; its thermal expansion must be compensated in some way by providing free volume for this. And at the same time, it is necessary to ensure that as it cools and decreases in volume, air does not enter the pipe contours from the outside, which will create a “plug” that prevents the normal circulation of the coolant.
These are the functions that the expansion tank performs.
Not yet in private construction, there was no particular alternative - an open expansion tank was installed at the highest point of the system, which completely coped with the tasks.
Schematic diagram of an open type system
1 – heating boiler;
2 – supply riser;
3 – open expansion tank;
4 – heating radiator;
5 – optional – circulation pump. In this case, a pumping unit with a bypass loop and a valve system is shown. If desired or if the need arises, you can switch forced circulation to natural circulation, and vice versa.
You may be interested in information about how to properly install heating radiators
Prices for circulation pumps
circulation pumps
A closed system is completely isolated from the atmosphere. A certain pressure is maintained in it, and the thermal expansion of the liquid is compensated by installing a sealed tank of a special design.
Differences between a closed heating system
The tank in the diagram is shown pos. 6, embedded in the return pipe (item 7).
It would seem - why “fence the garden”? A regular open expansion tank, if it fully copes with its functions, seems to be a simpler and less expensive solution. It probably doesn’t cost much, and besides, with certain skills, it’s easy to make it yourself - weld it from steel sheets, use an unnecessary metal container, for example, an old can, etc. Moreover, you can find examples of using old plastic canisters.
Open expansion tank
Does it make sense to spend money on purchasing a sealed expansion tank? It turns out that there is, since a closed heating system has many advantages:
- Complete tightness absolutely eliminates the process of evaporation of the coolant. This opens up the possibility of using, in addition to water, special antifreezes. The measure is more than necessary if the country house is not used constantly in the winter, but only occasionally, from time to time.
- In an open heating system, the expansion tank, as already mentioned, must be mounted at the highest point. Very often, an unheated attic becomes such a place. And this entails additional efforts to thermally insulate the container so that even in the most severe frosts the coolant in it does not freeze.
The expansion tank can be placed in an inconspicuous corner
And in a closed system, the expansion tank can be installed in almost any area. The most appropriate installation location is the return pipe directly in front of the boiler entrance - here the tank parts will be less exposed to temperature effects from the heated coolant. But this is by no means a dogma, and it can be mounted in such a way that it does not create interference or disharmonize its appearance with the interior of the room, if, say, the system uses a wall-mounted boiler installed in the hallway or in the kitchen.
- In an open expansion tank, the coolant is always in contact with the atmosphere. This leads to constant saturation of the liquid with dissolved air, which causes increased corrosion in the circuit pipes and radiators, and increased gas formation during the heating process. Aluminum radiators are especially intolerant of this.
- A closed heating system with forced circulation is less inert - it warms up much faster when starting up, and is much more sensitive to adjustments. Completely unjustified losses in the area of the open expansion tank are eliminated.
- The temperature difference in the supply and return pipes in the connection currents with the boiler is less than in an open system. This is important for the safety and longevity of heating equipment.
- A closed circuit with forced circulation to create circuits will require pipes of a smaller diameter - there is a benefit both in the cost of materials and in simplifying installation work.
- An open-type expansion tank requires control to prevent overflow when filling, and to prevent the liquid level in it from falling below a critical level during operation. Of course, all this can be solved by installing additional devices, for example, float valves, overflow pipes, etc., but these are unnecessary complications. In a closed heating system, such problems do not arise.
- And finally, such a system is the most universal, as it is suitable for any type of battery and allows you to connect underfloor heating circuits, convectors, and heat curtains. In addition, if desired, you can organize hot heat supply by installing an indirect heating boiler into the system.
Of the serious shortcomings, only one can be mentioned. This is a requirement of the “safety group”, which includes control and measuring instruments (pressure gauge, thermometer), a safety valve and an automatic air vent. However, this is most likely not a disadvantage, but a technological cost that ensures the safe operation of the heating system.
In a word, the advantages of a closed system clearly outweigh, and spending on a special sealed expansion tank looks completely justified.
How does an expansion tank for closed heating work and how does it work?
The design of an expansion tank for a closed type system is not very complicated:
Diagram of the device and operation of a sealed expansion tank
Usually the entire structure is housed in a stamped steel body (item 1) of a cylindrical shape (there are tanks in the shape of a “tablet”). For production, high-quality metal with an anti-corrosion coating is used. The outside of the tank is covered with enamel. Products with a red body are used for heating. (There are blue tanks - but these are water batteries for the water supply system. They are not designed for elevated temperatures, and all their parts are subject to increased sanitary and hygienic requirements).
On one side of the tank there is a threaded pipe (item 2) for insertion into the heating system. Sometimes fittings are included in the package to facilitate installation work.
On the opposite side there is a nipple valve (item 3), which serves to pre-create the required pressure in the air chamber.
Inside, the entire cavity of the tank is divided by a membrane (item 6) into two chambers. On the side of the pipe there is a chamber for coolant (item 4), on the opposite side there is an air chamber (item 5)
The membrane is made of elastic material with a low diffusion rate. It is given a special shape, which ensures “orderly” deformation when the pressure in the chambers changes.
The principle of operation is simple.
- In the initial position, when the tank is connected to the system and filled with coolant, a certain volume of liquid enters the water chamber through the pipe. The pressure in the chambers is equalized, and this closed system acquires a static position.
- As the temperature rises, the volume of coolant in the heating system expands, accompanied by an increase in pressure. Excess fluid enters the expansion tank (red arrow), and its pressure bends the membrane (yellow arrow). In this case, the volume of the coolant chamber increases, and the air chamber correspondingly decreases, and the air pressure in it increases.
- As the temperature decreases and the total volume of the coolant decreases, excess pressure in the air chamber causes the membrane to move backward (green arrow), and the coolant moves back into the pipes of the heating system (blue arrow).
If the pressure in the heating system reaches a critical threshold, then the valve in the “safety group” should operate, which will release excess liquid. Some expansion tank models have their own safety valve.
Expansion tank on a special bracket
Different tank models may have their own design features. So, they can be non-separable or with the ability to replace the membrane (a special flange is provided for this). The kit may include brackets or clamps for mounting the tank on the wall, or it can be provided with stands - legs for placing it on the floor.
In addition, they may differ in the design of the membrane itself.
Differences in the design of expansion tanks with diaphragm (left) and balloon type membranes
On the left is an expansion tank with a membrane diaphragm (it has already been discussed above). As a rule, these are non-separable models. A balloon-type membrane (picture on the right), made of elastic material, is often used. In fact, it itself is a water chamber. As pressure increases, such a membrane stretches, increasing in volume. It is these tanks that are equipped with a collapsible flange, which allows you to independently replace the membrane in the event of its failure. But this does not change the basic principle of operation.
Video: installation of expansion tanks brand "Flexcon FLAMCO"
Prices for expansion tanks Flexcon FLAMCO
Flexcon expansion tanks
How to calculate the required parameters of the expansion tank?
When choosing an expansion tank for a specific heating system, the fundamental point should be its working volume.
Calculation using formulas
You can find recommendations to install a tank, the volume of which is approximately 10% of the total volume of coolant circulating through the system circuits. However, a more accurate calculation can be made - there is a special formula for this:
V b = V c × k / D
The symbols in the formula indicate:
Vb – required working volume of the expansion tank;
Vс – total volume of coolant in the heating system;
k – coefficient taking into account the volumetric expansion of the coolant during heating;
D is the efficiency coefficient of the expansion tank.
Where to get the initial values? Let's look at it in order:
- The total volume of the system ( V s ) can be determined in several ways:
- You can use a water meter to determine how much total volume will fit when filling the system with water.
- The most accurate method used when calculating a heating system is the summation of the total volume of pipes of all circuits, the capacity of the heat exchanger of the existing boiler (it is indicated in the passport data), and the volume of all heat exchange devices in the premises - radiators, convectors, etc.
- The simplest method gives a completely acceptable error. It is based on the fact that to provide 1 kW of heating power, 15 liters of coolant are required. Thus, the rated power of the boiler is simply multiplied by 15.
2. The value of the coefficient of thermal expansion ( k ) is a tabular value. It varies nonlinearly depending on the heating temperature of the liquid and the percentage of antifreeze ethylene glycol additives in it. The values are shown in the table below. The heating value line is taken from the calculation of the planned operating temperature of the heating system. For water, the percentage value of ethylene glycol is taken as 0. For antifreeze - based on the specific concentration.
| Coolant heating temperature, °C | Glycol content, % of total volume | |||||||
| 0 | 10 | 20 | 30 | 40 | 50 | 70 | 90 | |
| 0 | 0.00013 | 0.0032 | 0.0064 | 0.0096 | 0.0128 | 0.016 | 0.0224 | 0.0288 |
| 10 | 0.00027 | 0.0034 | 0.0066 | 0.0098 | 0.013 | 0.0162 | 0.0226 | 0.029 |
| 20 | 0.00177 | 0.0048 | 0.008 | 0.0112 | 0.0144 | 0.0176 | 0.024 | 0.0304 |
| 30 | 0.00435 | 0.0074 | 0.0106 | 0.0138 | 0.017 | 0.0202 | 0.0266 | 0.033 |
| 40 | 0.0078 | 0.0109 | 0.0141 | 0.0173 | 0.0205 | 0.0237 | 0.0301 | 0.0365 |
| 50 | 0.0121 | 0.0151 | 0.0183 | 0.0215 | 0.0247 | 0.0279 | 0.0343 | 0.0407 |
| 60 | 0.0171 | 0.0201 | 0.0232 | 0.0263 | 0.0294 | 0.0325 | 0.0387 | 0.0449 |
| 70 | 0.0227 | 0.0258 | 0.0288 | 0.0318 | 0.0348 | 0.0378 | 0.0438 | 0.0498 |
| 80 | 0.029 | 0.032 | 0.0349 | 0.0378 | 0.0407 | 0.0436 | 0.0494 | 0.0552 |
| 90 | 0.0359 | 0.0389 | 0.0417 | 0.0445 | 0.0473 | 0.0501 | 0.0557 | 0.0613 |
| 100 | 0.0434 | 0.0465 | 0.0491 | 0.0517 | 0.0543 | 0.0569 | 0.0621 | 0.0729 |
3. The value of the expansion tank efficiency coefficient ( D ) will have to be calculated using a separate formula:
D = ( Qm – Q b) / ( Qm + 1)
Where:
Qm is the maximum permissible pressure in the heating system. It will be determined by the response threshold of the safety valve in the “safety group”, which must be indicated in the product passport.
Q b - pre-pumping pressure of the air chamber of the expansion tank. It may also be indicated on the packaging and in the product documentation. It is possible to change it - pumping it up using a car pump or, conversely, bleeding it through a nipple. It is usually recommended to set this pressure within 1.0 – 1.5 atmospheres.
Calculator for calculating the required volume of the expansion tank
To simplify the calculation procedure for the reader, the article contains a special calculator in which the indicated dependencies are included. Enter the requested values, and after pressing the “CALCULATE” button you will receive the required volume of the expansion tank.
Go to calculations
The obtained value is minimal - a model with the closest indicators is selected based on it. In this case, rounding is carried out only upward - additional volume will not be superfluous.
And finally, from the model range of calculated volumes presented for sale, it will be possible to choose the most optimal option, based on the intended location of the expansion tank - wall-mounted or placed on the floor.
There is one more nuance. Some heating boilers have their own built-in expansion tank. This does not mean that there is no need to carry out calculations - it happens that the volume of the built-in tank is clearly not enough. In this case, you will have to purchase and install an additional one, with a working volume equal to the difference between the calculated indicators for the entire system and the parameters of the built-in capacity.
Prices for expansion tanks Gilex
Expansion tank Gileks
And one more note. If the heating system operates on the principle of forced circulation, then, even with small volumes of coolant, an expansion tank with a capacity of at least 15 liters should be installed.
You may be interested in information on how to choose an electric boiler for heating a private home
Expansion tank for closed heating: do-it-yourself installation
For a person who has skills in plumbing work, installing an expansion tank yourself will not be difficult. The principle of its insertion into the system is shown in the diagram:
Recommended scheme for inserting an expansion tank into a closed heating system
On the return pipe (item 1), in the area as close as possible to the entrance to the heating boiler (item 2), but usually in front of the circulation pump (item 3), a cut is made into which the tee (item 4) is packed. The installation method may be different - it all depends on the type of pipes used - metal, polypropylene or metal-plastic.
A ball valve (pos. 7) is packed onto the branch pipe (pos. 6) of the expansion tank itself (pos. 5). It is necessary to ensure the possibility of turning off the expansion tank in case of need for repair or maintenance work. For the same purposes, it makes sense to place a connection with a union nut - “American” (pos. 8) between the tap and the tank. In the operating position, the valve must be constantly open.
From the tap there is a connecting section of the pipe (item 9) to the tee. Its length and configuration (number of bends or turns) do not matter much - but it is usually done along the shortest and most convenient path from the location of the tank to the return pipe.
Now let's see what needs to be done on the tank itself.
| Illustration | Brief description of the operation performed |
| The tank was taken out of its original packaging and the necessary tools and accessories were prepared for work. | |
| If necessary, an adapter is packed onto the threaded pipe of the expansion tank. It is important to achieve extremely reliable sealing of the connections. It is best to pack tow using Unipack paste or using a special thread-sealing thread (cord) impregnated with a sealing compound (as shown in the figure).. | |
| The adapter is tightened, and you can proceed to installing the tap. It is worth noting right away that in the example shown there was a flaw - the master did not install a detachable connection - “American” between the tap and the tank. That is, if it is necessary to dismantle the tank with the tap closed, this will be very difficult to do. A recommendation to all installers is not to forget about this point. | |
| The thread is wound to wrap the tap,... | |
| ... the tap is put in place and tightened tightly. You should immediately ensure that the “lamb” is in a position convenient for use after placing the tank on the wall. | |
| A transition is mounted from the tap to a pipe of the required configuration, in accordance with the drawn up diagram of the general installation of the expansion tank. Essentially, this part of the work is finished. | |
| Now you can check the pressure in the air chamber of the expansion tank. On its opposite side there is a nipple - almost exactly the same as on car wheels. In many models it is covered with a special plastic cap, which, if necessary, access to the valve is simply unscrewed. | |
| You can check the pressure with a car pressure gauge. If it exceeds the values that were used when calculating the system, then it can be released to the required level by pressing the valve stem. If there is insufficient supply, you will have to pump it up - a car pump is quite suitable for this. | |
| In the variant under consideration, the tank already has devices for its placement, even in two versions - legs for installation on a horizontal surface (blue arrows) and a mounting panel for hanging on the wall (yellow arrow). The tank is mounted in the chosen location, and then connected by a section of pipe to a tee embedded in the return line. At this point the installation can be considered complete. | |
| Another version of the tank, on the body of which there are no structural elements for fastening at the installation site. But they are usually included as separate parts in the delivery kit. | |
| Usually this is a bracket - a mounting pad for fastening to the wall, and a long screw band clamp. | |
| The collar of the clamp is straightened and threaded through the slots of the mounting area. | |
| All this is done in such a way that the protruding side of the tank falls into a special groove in the mounting platform (shown by arrows), and the clamp is higher than the side. | |
| After installing the tank in the mounting area, the ends of the clamp are connected, first tightened by hand... | |
| .. and then - all the way, using a screwdriver or wrench. | |
| In this form, the tank will be ready to hang on the wall. | |
| Installation of plumbing fittings to the cistern pipe is carried out in the same order as mentioned above. | |
| The nipple can be located openly, only with a dustproof plastic cap. Checking the pressure and pumping, if necessary, is no different from the previously considered option. | |
| By the way, tanks usually come from the factory with a preset pressure in the air chamber, and you can immediately select the required parameter. It is indicated on the packaging and in the technical documentation of the product. Further installation of the tank is carried out in the already known order - installation on the wall in the selected location and connection with a pipe with a tee. |
After final installation, be sure to open the tap and fill the system with coolant. If no leaks are detected in the connecting nodes, the installation of the expansion tank can be considered complete.
Video: inserting an expansion tank into the contour of polypropylene pipes
At the end of the article, it is necessary to emphasize once again that a closed heating system with a sealed expansion tank must necessarily have a reliable “safety group”. If it is located in a place that is not entirely convenient for regular visual monitoring, it makes sense to install an additional pressure gauge in the immediate vicinity of the expansion tank - this will make it much easier to monitor the condition of the entire system. You can find out the expansion tank for heating at the link.
You may be interested in information about what a bimetallic radiator is
List of tools used when replacing containers
To remove the old tank and install a new one efficiently, you need to acquire the following standard tools:
- wrenches (set);
- pliers;
- Screwdriver Set;
- new clamps (the use of old clamps is undesirable);
- sandpaper.
Sandpaper is used to process the inlet holes in the new plastic tank in order to eliminate existing roughness. Smooth surfaces of the holes will ensure tightness, strength and reliability when screwing the plug.
What to choose?
If you still need to replace the tank, you first need to choose what exactly you will replace the old tank with.
Today there are several decent options on the market that are perfect for your VAZ 2110.
| Option | Peculiarities |
| Standard tank for "ten" | Factory version, which is optimal in terms of price and quality. Sometimes you can’t think of anything better than native parts |
| Foreign analogues | If you can find the perfect tank, you're in luck. The quality is up to par and it performs its functions perfectly. But finding such an option is extremely difficult. Plus the price is higher |
| Capacity from Priora | Many consider it an ideal choice for the VAZ 2110. It costs about 300 rubles. You can find it by catalog number 2170-1300060. The walls are thicker, which has a positive effect on reliability. Just keep in mind that there are two types:
|
If you choose to replace the tank from Priora, then you should take the version for a car without air conditioning.
Repair or replace the tank?
Some drivers, having noticed that the expansion tank 2114 is leaking, try to repair the crack with glue or epoxy resin.
It should be noted right away that doing this is absolutely not worth it. After all, such repairs, as a rule, are short-lived, and with active use, even the most reliable adhesive seam can leak.
In addition, as already mentioned, the appearance of cracks in the tank is a sign of aging of the plastic caused by depolymerization - the volatilization of a number of fractions from the material that give it plasticity.
Thus, a plastic container that has already cracked can always crack again. That is why replacing the expansion tank of a VAZ 2114 is the most preferable option rather than repairing it.
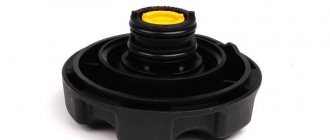
New tank VAZ 2114
As for the cover, it is also not repairable, and in case of malfunction it should be replaced with a similar one. At the same time, it is highly advisable to purchase the “native” cover for the 2114, and not its various analogues, the quality (and functionality) of which may be much worse.
If you could not find a cover for the 14th model, then instead you can purchase and install a cover for 2199, since they are completely interchangeable.
Expansion tank cap for VAZ 2114