Not all car enthusiasts know how to disassemble the expansion tank cap. And many do not even suspect that this needs to be done. For some, the task at hand will even cause bewilderment: why? There's a plug and a plug, there doesn't seem to be anything to break there, so why bother while everything is working. However, the fact of the matter is that it usually works poorly or stops functioning altogether.
Despite the simplicity and elementary design, the mentioned cover is very important for the normal operation of the entire cooling system. At the same time, it receives significant loads, including from the environment. And if you remember how well some manufacturers work, you begin to understand that the chance of buying an initially unsuitable lid is quite high. Car owners, wise from sad experience, not only check their purchase, but also often modify it.
It’s not enough to know how to disassemble the cap of the expansion tank; you also need to imagine how to check its functionality, and be able to bring the plug back to life.
Why do you need a cover?
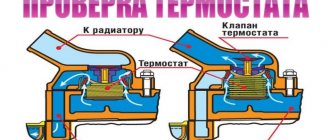
The entire cooling system is extremely primitive: a thermostat, clamps and a reservoir with a lid. Thermostat is a separate matter; All that can be said about the clamps is that they must be intact and tightly tightened. But the plug on the tank is an important thing, although it looks simple. The principle of its operation is that when the pressure inside the tank exceeds (usually when it rises above 1.5 atmospheres), the lid releases the excess.
When the engine cools, the pressure inside the tank drops, and to equalize it, the lid must let air in from the outside. And at the same time, it must be screwed tightly and remain airtight.
Cork as a regulator
There are only two types of expansion tank plug failure:
- No pressure . In a modern (hot engine), the cap JUST MUST contribute to the injection of atmospheres (from 1.1 to 1.4). Otherwise we'll boil! Think for yourself - the engine runs at 110 degrees, but the plug does not hold, and creates atmospheric pressure in the system, the antifreeze will boil very quickly, and it can, at a minimum, be thrown out of the tank. At the most, you will overheat the engine, with all the consequences.
- Excessive pressure . When the plug holds more than 1.4 ATM, for example 2.0 or even higher! This is also dangerous, you can throw off hoses and pipes from the cooling system, rupture the radiators (and they are now made with plastic walls). This again can lead to depressurization of the system and its overheating.
Therefore, it is very important, especially on modern engines, to check the expansion tank plug.
What is wrong with the lid?
The spring that regulates the intake-exhaust operation corrodes quite quickly. After all, the air released is hot, but the air brought in is not dry. As a result, condensation forms, settling inside the plug and eating up the springs. The situation is even worse in winter. The same condensation quickly becomes ice, and the valves stop working until the lid thaws.
Since it does not have time to warm up, it will soon have to repair the radiator, the tank itself, the stove, etc. So it’s never a bad idea to check the tank cap in winter.
Useful video
You can glean additional useful information from the video below:
The modern automobile industry dictates its own rules in the technical component, if previously some component was practically “invisible” (insignificant). Now, almost the performance of the entire power unit as a whole may depend on it. Ask - “what is this, an insignificant part?” YES at least the expansion tank cap. Moreover, on hot engines, it can be the cause of its “wedge”. And most importantly, it needs to be checked correctly! However, everything is in order (from simple to complex), and of course, the video version is at the end...
Now I won’t tell you in detail how the expansion tank plug works ; I already have a whole detailed article about it. In this material I will try to tell you how to check it correctly.
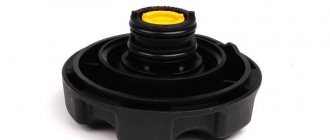
Disassembling the cover
The process itself does not even require accompanying photographs, since, as has already been said, in a structural sense this detail is not anything complicated.
If the plug is not new, but already installed on the tank, to check it, the first step is to unscrew it. It is better to do this when the engine and cooling system have completely cooled down.
- Use a small flat screwdriver to pry it up, after which the rubber seal in the form of a ring is removed;
- The casing located inside is pryed off and removed in the same way. This should be done carefully, holding it so that when the spring is working, the casing does not shoot into your eye;
- The insides are being examined. If the spring itself is alive, both it and the small valve are removed, after which all the dirt accumulated in the cover is cleaned out. Craftsmen advise using simple soapy water and cotton swabs for the ears for these purposes;
- Both a cleaned and a completely new plug need to be checked for functionality, since even just from the factory, the caps may need some work.
The first option for improving the tank
Which lid is better? We purchase a cover of the “FEBI” brand (code – “02269”). Its cost does not exceed 160 rubles. We disassemble the standard product and remove the valve assembly. We carry out the same procedure with the purchased part.
We cut the original mechanism and then remove it together with the side, which allows for the centering of the spring. We grind the mechanism down to 1 mm on the “FEBI” valve element. This manipulation ensures that the valve and rubber seal are seated correctly.
Now we assemble the part and screw it onto the tank of the Lada Kalina. The result is a lid that is not subject to freezing. The refinement process will not take more than an hour of time, but the effectiveness of the product will increase many times over.
Validity check
Since such procedures must be regular, it is better to bother once and build yourself a testing apparatus. For it, the simplest pump with a pressure gauge and an expansion tank are combined into a single whole (you can spend money once so as not to reinvent the wheel from scrap materials). It is necessary to check both valves - both exhaust and intake. For the first, with the lid screwed on, air is pumped into the tank until a characteristic hissing sound appears.
If it was heard at a pressure of no higher than 1.2 atmospheres, the valve is already half alive. To make sure of its second half, wait until the end of the hissing and measure the remaining pressure. Should keep 0.8. At the first pressure above the specified value, the spring is gradually trimmed - and each time checked. When bleeding less than 0.8, the spring is stretched or washers are slipped under it.
Classic lid upgrade method
Upgrading the cover in this embodiment involves removing and disassembling the component. We take out the rubber seal and the internal assembly (a pair of springs with a valve). We use a screwdriver.
Refinement involves trimming two springs. The first of them must be shortened by one turn, and the second by as many as two. We assemble according to a well-known algorithm. After this, we check the functionality of the upgraded node. The valve outlet element will now begin to open when the pressure reaches 1 bar. Previously, this figure was 1.7 bar.
Upon successful completion, the lid can be easily blown through the mouth. This check ensures there is free passage of air in both directions. If the indicated effect is observed, then we can state that the modification is correct. Now the risk of airing the circuit has been reduced many times over.
Cover tasks
The serviceability of the valve cover from the expansion tank directly affects the performance of the entire cooling system of the power unit.
During operation, the engine heats up, which is quite natural and understandable to everyone. When the engine heats up, antifreeze takes away some of this heat so that the internal combustion engine does not overheat. When the coolant itself heats up, it increases in volume, that is, it expands, and at the same time the internal pressure in the system increases. The hotter the engine, the higher the pressure in the cooling system. In order to avoid ruptures of the pipes and the tank itself, the radiator and other components through which antifreeze or antifreeze passes, a valve cover is used.
It is very important not only to tighten the plug correctly, but also to periodically check its functionality. If repairs or replacements are required, they are carried out at the first sign of problems.
The lid serves not only as protection against overpressure. The design provides two valves, or one, but combining both functions. One valve serves to relieve excess pressure, and the other to inject it.
For the motor to work correctly, it must be maintained at operating temperature. Typically it is in the range from 95 to 120 degrees. Depends on the design features of the engine itself. At these temperatures, the expansion of the coolant occurs by approximately 20-30%. This leads to excess pressure. And normal pressure is considered to be 1.1-1.5 atmospheres. The valve cap of the expansion tank, if necessary, removes excess pressure from the system, or pumps it in so that a vacuum does not form inside, the pipes do not compress and the hoses do not stop circulating antifreeze.
If the plug is working correctly, the engine will operate at optimal temperature and normal operating pressure. If not, the consequences of a malfunction can be disastrous for the internal combustion engine. And the culprit is the usual lid.
More serious consequences
- Rupture of low-quality pipes or those that have not been replaced for a long time
- A leak in the main or heating radiator
- Bursts the thermostat housing in some cars
- Broken expansion tank.
The worst consequence will be burnout of the gasket between the cylinder block and the cylinder head. This happens very often and can lead to engine damage.
In most cases, the situation is this: your coolant has boiled. You noticed this on the dashboard and instead of stopping, you decided to go straight to a car service center or garage to fix the problem.
Under no circumstances should you do this! If you see that your temperature has gone beyond the permissible limits, stop immediately and wait until the engine cools down. After this, drive further until the next heating up to operating temperature, after which you also stop and wait.
Cover device
It is important to understand that there is a locking element for expansion tanks on any car that has an internal combustion engine under the hood. And it doesn’t matter whether it’s diesel, gasoline or gas-powered.
Therefore, the problem with the failure of this unit can occur on any car, including such models as:
- Lada Kalina;
- Ford Focus;
- Gazelle Next;
- Daewoo Lanos;
- Volkswagen Passat;
- Lada Priora;
- VAZ 2110;
- Renault Logan;
- Opel Astra;
- VAZ 2114;
- Chevrolet Lacetti, etc.
You already understand that the cap serves not only to prevent coolant from pouring out of the tank. This is also a pressure regulator in the system.
A valve is hidden inside the lid, usually made of plastic. It is he who takes on such responsibility. The valve is immersed inside the expansion tank and, as necessary, pumps or releases excess pressure.
Before buying a new element, if you suspect the old one is broken, you can check it. A similar type of locking mechanism should be selected.
Please note that all modern foreign cars, in the vast majority of cases, have switched to single-valve caps for expansion tanks. That is, only one valve design is physically present. It just can perform two functions at once. While on domestic cars you can still find a pair of valves. Each of them is responsible for performing a corresponding function. Whether this is good or bad is difficult to judge. But the fact remains a fact.
Why did it happen
Communities Lada Priora Lada Priora Club Blog what is affected by the clutch release switch
Perhaps the automatic requests do not belong to you, but to another user accessing the network from the same IP address. You need to enter the characters into the form once, after which we will remember you and be able to distinguish you from other users exiting from this IP. In this case, the page with the captcha will not bother you for quite a long time.
You may have add-ons installed in your browser that can make automatic search requests. In this case, we recommend that you disable them.
It is also possible that your computer is infected with a virus program that is using it to collect information. Maybe you should check your system for viruses.
If you have any problems or would like our support team, please use the feedback form.
Signs of trouble
Before checking the cover, you need to receive a signal that it has potentially failed and is no longer performing its functions.
The symptoms of a breakdown are rather indirect and can manifest themselves in the following form:
- Thick white smoke is pouring out from under the hood;
- the engine overheats, but the stove remains cold;
- breaks the clamps;
- breaks the cooling system pipes;
- the radiator seal is broken;
- ruptures the coolant reservoir;
- the tubes are compressed and do not allow coolant to pass through;
- the circulation of antifreeze through the system is disrupted, etc.
Smoke usually appears when the pressure exceeds the permissible values. But overheating with a cold heater indicates precisely a lack of pressure in the system. Here it will be useful to remind you of the material devoted to eliminating an airlock. I'll leave a link to it. Go ahead and read.
Conclusion
The article turned out to be quite long and I hope informative.
As you can see, one cap does a huge job and always monitors the pressure in your cooling system, so it needs to be changed approximately every six months. Or at least have a spare cover that is known to work if the installed one suddenly fails.
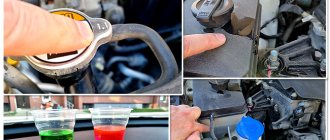
Verification Instructions
Trying to create pressure with your mouth in order to check the functionality of a potentially failed valve cover from the expansion tank is usually in vain. It is better to abandon such an idea. Otherwise, there is a risk of drinking antifreeze. And if he is also hot, then a visit to the hospital cannot be avoided.
The easiest way to check it is at a car service center. There are special pumps to create pressure. They pump the required number of atmospheres, which makes it clear whether the valve operates or not.
But many are interested in self-checking. It is also possible.
Here you need to act according to a certain algorithm.
- First, turn off the engine, let it cool for a while, then carefully unscrew the cap from the tank. Examine its condition visually. Any breaks in the seal, chips or cracks indicate the need for replacement;
- In the absence of mechanical damage, there is still no guarantee that the element is in working order. Screw the plug into place, turn on the engine at idle speed;
- Wait until the engine temperature reaches operating parameters;
- Listen carefully, standing near the tank, to see if there is any hissing in the area of the lid. The sound is reminiscent of opening a can of soda;
- If there is a hissing sound, this directly indicates that the valve is holding excess pressure inside and not releasing it;
- If there is no hissing, check the operation for pressure build-up. To do this, feel the pipes that are accessible without difficult dismantling;
- If they are pressed in and compressed from the inside, then the discharge valve does not work.
A fairly simple but effective way to check yourself. Its advantage is that this method is suitable for any car with a liquid engine cooling system.
There are alternative diagnostic options, but they cannot always be carried out due to the design features of the motor. If you can reach up and reach one of the thick hoses coming from the coolant reservoir. It is compressed, and before that the plug is unscrewed. Squeeze the hose, tighten the plug, and then release the tube. If it returns to its original shape, the valve performs its functions.
Despite such a modest size and external inconspicuousness, such an element of the cooling system has a huge impact on the performance of the entire engine. Therefore, you should definitely remember the reasons, signs and methods for diagnosing the condition of the valve plug on the expansion tank.
Thanks to everyone who reads us and leaves comments! Continue in the same spirit! We look forward to your feedback and pressing questions!
(
1 ratings, average: 5.00 out of 5)
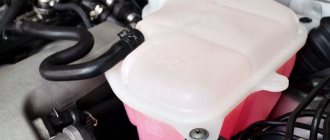
There is not a single unnecessary detail in the design of the car. Each element performs its function, even such a small part as the expansion tank cap. Most car owners do not even suspect that the cap is used not only to close the tank, but also to stabilize the pressure in it. Therefore, repairing the coolant tank cap seems to be one of those procedures that, if necessary, will have to be done with your own hands.
Refinement of a new part - what to do if it does not function?
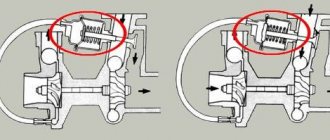
When it turns out that the lid stubbornly refuses to relieve excess pressure and/or is not able to restore air losses in the SOD, it can be modified. For some reason, the most complaints come from owners of VAZ, model 2109, including those who buy new plugs. It is clear that the reason for the incorrect operation of the cover valves lies in the too much rigidity of their springs.
To modify the cover, for example, for a VAZ 2109, it must first be disassembled. This must be done carefully, using pliers and a thin flat-blade screwdriver. We must try to remember where everything stood so that the springs do not fly away to God knows where. After the lid for the VAZ 2109 tank has been disassembled, it’s time for the wire cutters. They need to shorten the springs: the large one, for the safety valve, usually by 1 turn, and the small one by 2.
Shortening the plug spring
For the second, the length of the removed segment is not critical - as long as it generally supports the vacuum valve when it is closed and does not resist the external air pressure of 0.03–0.1 kgf/cm 2 . With a large spring it is more difficult - as if not to overdo it. You need to look at its rigidity and the pressure at which the safety valve opened when checking the tank cap of the VAZ 2109. After shortening the springs, we assemble the cap in the reverse order. Before use, it is advisable to check again how it works.
Repair of expansion tank cap
Without paying due attention to such a seemingly insignificant element as a cover, the driver may face serious engine damage. Few people know, but the expansion tank cap controls the pressure in the cooling system. Special valves inserted into the cavity of the cover relieve excess pressure or release air to increase the volume of antifreeze required for circulation in the system.
The lid reliably seals the cooling system and also serves to stabilize the internal pressure of antifreeze (antifreeze)
Repairing the tank cap includes three stages:
Moreover, even a novice driver can complete all stages.
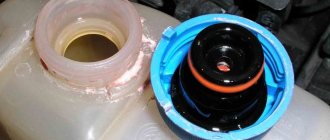
How to disassemble the cover
Repairing the expansion tank cap yourself is the simplest procedure, since the cap has a simple design and does not require special tools for its restoration. All you need is your hands and a screwdriver with a thin flat blade. You need to follow the following algorithm:
Unscrew the cap from the tank.
Remove the product and clean it with a dry cloth to remove any drops of coolant.
A rubber seal is inserted into the cavity of the lid; you need to pry it off with a screwdriver blade and pull it out.
Then remove the spring that is hidden under the rubber.
Immediately under the spring you can see a small valve device - pry it up with a screwdriver and pull it out. The second valve is located next to the first one - it also needs to be removed.
This completes the disassembly of the expansion tank cap. All components have been dismantled - you can start cleaning them.
Photo gallery: procedure for disassembling the cover
How to clean the expansion tank cap
After the lid parts have been removed, you need to thoroughly rinse the cavity of the product itself. In practice, soap solution and cotton swabs are used for washing . The purpose of this procedure is to clean out deposits of dust, dirt, and coolant leaks from the cover cavity.
Dirt settling on the valves significantly reduces their ability to operate, so the cover must be cleaned and washed periodically.
After all hard-to-reach places in the lid cavity have been cleaned with a cotton swab and soap solution, you can install the parts in the reverse order. It is recommended to replace the spring or rubber seal if there is visible damage or deformation.
How to check the cover yourself on Priora, Grant, Kalina
It seems that it is enough to unscrew the cap from the expansion tank and inspect its insides to understand the specifics of the problem. However, it is not. For example, service centers use special pressure pumps that can pump the required number of atmospheres . By creating artificial pressure in the cooling system, the device allows you to calculate the correct operation of the valves.
A device for diagnosing VAZ tank caps has a pressure gauge and a pump
But drivers don't have this expensive equipment, so they have to make do with what they have in a standard garage. Diagnostics of the quality of operation of the tank cap will be less accurate, but it will be possible to identify the main malfunctions of the valves:
- Turn off the engine.
- Unscrew the cap from the tank neck.
- Inspect the product for cracks, dents, and chips. The seal may have ruptured or become severely worn.
- If there is no visible damage, screw the cover back on and start the engine.
- Wait until the engine warms up to its normal temperature.
- Start slowly unscrewing the cap from the tank.
- If, during the process of unscrewing, a whistle of escaping air is heard (this sound can be compared to the release of gases when opening lemonade), then the lid is in working order, since it restrains the pressure in the tank and hoses.
- After this, you need to turn off the engine again.
- Inspect the cooling system pipes. If they are pulled in, the vacuum valve of the lid does not work well, since the pressure in the system is extremely low.
We recommend: How to set the ignition using a strobe?
The expansion tank cap can only be unscrewed after the engine has cooled down. The working cap should not have expansions, cracks or dents. All pipes must have an equal diameter throughout their entire length, without thickening or shrinking. This is interesting: Preliminary diagnostics
This is a typical scheme for checking expansion tank cap valves on all models of AvtoVAZ vehicles.
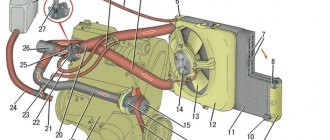
Location of expansion tank
Communities Lada Priora Lada Priora Club Blog Ignition switch wires
A plastic reservoir for excess coolant is installed by the manufacturer in different places depending on the model of the “tenth” family:
- in cars of the VAZ 2110-12 series, the reservoir is located on the left side (in the direction of travel) between the pillar glass and the wall of the interior partition;
- in VAZ 2114-15 cars, the container is also located on the driver’s side, but is placed in front of the pillar glass.
The expansion tank is attached to the body elements with a clamp in the form of a flat rubber belt with a metal hook that hooks onto a protrusion on the side member. There are 3 hoses connected to the tank:
- A large diameter pipe leading from the thermostat is connected to the bottom.
- The upper tube of small diameter goes through the partition to the radiator of the cabin heater.
- The middle small tube connects the tank to the upper fitting of the main cooling radiator.
Each hose performs a separate function. The thick pipe serves to expand the coolant and fill the system while pouring antifreeze through the neck of the tank. Two thin tubes are designed to drain the steam-water mixture from the stove and the main radiator into the tank when heated to the maximum permissible antifreeze temperature of 95 ° C.
The expansion tank (item 1) is located at the highest point of the cooling system at the same level as the throttle valve