And since this usually happens to me, nothing foreshadowed trouble... Having traveled 500 km a day to Stary Drozhzhany, which is near Ulyanovsk, and back. I thought that nothing bad would happen. I took a tablet for my dad to such distant places...
So, when I arrived in Kazan, I decided that I needed to get deflectors on the doors to prevent air from blowing into my ears.
But my hands grow from the “right place”, I can! Somehow my driver's windshield wiper is not tight enough, I need to tighten it, I thought and tore off the fucking pin along with the nut...
Now about the main thing. Replacing the trapezoid. Next there will be a LOT OF LETTERS! AND PICTURES!
Replacing the trapezoid is carried out exactly as described in the vehicle's operating instructions. With one caveat. Guys, don’t change it in the evening after the words of the sales assistant at the auto parts store: “fuck it, it can be easily removed.” This is wrong. I took it off in the evening, installed it (wrongly), then took it off in the morning, installed it (not correctly according to the instructions), then went to the service center and they adjusted it.
To begin with, after removing the trapezoid, do not remove the coupling nut (which is 13). You need to remember the position of the walker and install it exactly as you had it. Now that you haven't made my mistakes, let's go!
Remove the negative terminal!
We remove the wipers, then remove the Jabot (according to the instructions or from memory), and remove the strap from the expansion tank.
Use a 10mm wrench to unscrew the right nut (on the passenger side) so you can’t get under it (my head).
Then carefully remove the motor power plug. Carefully (with swearing and merry dancing) take out the trapeze. She comes out dadada...
Attention, when replacing the trapezoid (only if the motor does not turn!), remember (!take a photo!) the position of the coupling when removing.
And assemble the new trapezoid only in this position.
I assembled it as per the instructions and my wipers made one full stroke and another half stroke... These are the hands...
In general, the second time I got fucked up and went. I went to normal guys with straight arms. To a car service. By the way, besides this, they do a lot more. They adjusted the movement of the wipers for me for 200 rubles, they didn’t even remove the trapezoid, but I put everything back together myself.
Have smooth roads and fewer cameras on them!
Issue price: 700 ₽
Security elements
Since the wiper drive is electric, its circuit is protected by a fuse. It is located in the main mounting block and is designated F-5. If the wipers of the VAZ-2110 do not work, it is better to always start troubleshooting with it.
The frequency of brush strokes in intermittent mode is controlled by a separate relay. It is also located in the main mounting block and is designated K-2. If the frequency of operation of the “tens” wipers is disrupted, it must be replaced. Trying to diagnose or repair the relay is impractical, since it costs a little more than 200 rubles.
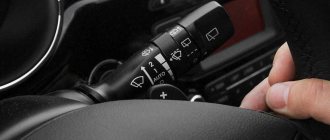
Steering column switch VAZ 2110, VAZ 2111, VAZ 2112
2110, 2111, 2112
repair
electrical equipment
equipment
Steering column switch
Instructions for repairing electrical equipment of Lada 2110, checking and troubleshooting vehicle devices. Replacement of parts for VAZ 2111, VAZ 2112, VAZ 2110. Steering column switch Description of devices and equipment of the VAZ 2110, VAZ 2111, VAZ 2112 electrical equipment repair diagrams, testing and adjustment
It consists of a connector secured with a clamp to the VAZ 2110 steering gear shaft bracket and two switches. The left switch controls the turn signals and headlights, while the right switch controls the washer and windshield wipers. On the connector of the VAZ 2111 steering column switch there are spring-loaded contacts for the sound signal.
Closed contacts of the steering column switch
1 – lever for switching direction indicators and headlights. If, with the ignition on, the lever is in position: I – the direction indicators are off; the low beam of the headlights is on if the headlights are energized by the external lighting switch; II – left turn indicators are on (not fixed position) III – left turn indicators are on (fixed position) IV – right turn indicators are on (not fixed position) V – right turn indicators are on (fixed position) VI – (self) high beam is on headlights on, regardless of the position of the external lighting switch VAZ 2112 (not fixed position) VII – (pull) the high beam headlights are turned on if the external lighting switch energizes the headlights (fixed position)
2 – switch lever for windshield wipers and washers. If the lever is in position: I – the windshield wiper is off II – the intermittent operating mode of the windshield wiper on the VAZ 2110 is switched on (not fixed position) III – the intermittent operating mode of the windshield wiper is switched on (fixed position) IV – the first speed of the windshield wiper is switched on V – the second speed of the windshield wiper is turned on VI – (towards itself, regardless of the position of the lever) the windshield washer is turned on (not a fixed position) VII* – the rear window wiper is turned on (fixed position) VIII* – the rear window washer is additionally turned on (not a fixed position )
Electrical equipment VAZ 2110, VAZ 2111, VAZ 2112
Accumulator battery
Car battery VAZ 2110, VAZ 2111, VAZ 2112
Ignition switch
Ignition switch VAZ 2110, VAZ 2111, VAZ 2112
Replacing the ignition switch
Removal and installation of the ignition switch VAZ 2110, VAZ 2111, VAZ 2112
Steering column switch
Steering column switch VAZ 2110, VAZ 2111, VAZ 2112
Replacing the steering column switch
Removal and installation of the steering column switch VAZ 2110, VAZ 2111, VAZ 2112
Sound signal
Sound signal VAZ 2110, VAZ 2111, VAZ 2112
Removing and installing a sound signal
Replacing the sound signal of a VAZ 2110, VAZ 2111, VAZ 2112 car
Windshield washer
Windshield washer and cleaner for VAZ 2110, VAZ 2111, VAZ 2112
Removing and disassembling the purifier
Assembly and installation of glass cleaner VAZ 2110, VAZ 2111, VAZ 2112
Replacing the electric motor and washer reservoir
Removal and installation of the electric motor and windshield washer reservoir VAZ 2110, VAZ 2111, VAZ 2112
Control devices
Control devices VAZ 2110, VAZ 2111, VAZ 2112
On-board system display unit
Display unit of the on-board control system VAZ 2110, VAZ 2111, VAZ 2112
Checking devices
Checking devices and their sensors VAZ 2110, VAZ 2111, VAZ 2112
Trip computer
Trip computer VAZ 2110, VAZ 2111, VAZ 2112
Removing the instrument cluster
Removal and installation of instrument cluster VAZ 2110, VAZ 2111, VAZ 2112
Removing and installing the on-board system unit
Replacing the clock and display unit of the on-board control system of VAZ 2110, VAZ 2111, VAZ 2112
Units and electrical circuits of VAZ 2110, VAZ 2111, VAZ 2112
Diagnostics of electrical equipment of the Lada 2110 car. Instructions for troubleshooting the lighting system. Repair of the generator and starter of the Lada 2111. Diagram of the Lada 2112 car.
electrical equipment, device and circuits
circuits, testing and configuration
lighting, troubleshooting
starter, repair and replacement
generator, operation and maintenance
Brushes
Standard VAZ-2110 brushes consist of three elements:
The frame of the device is made of metal and has a composite structure, which includes one main rail and two additional ones located on it. The brush is made of soft rubber. In the middle of its working surface there is a longitudinal protrusion (keel), which, in fact, cleans the glass. The brush is attached to two additional frame slats, fitting into their grooves. To ensure that the wiper slides easily across the glass, some manufacturers coat its working part with graphite.
In the center of the main rail there is a fastening mechanism with which it is attached to the leash. It is a guide into which the hook of the leash hooks and a plastic latch that secures the connection.
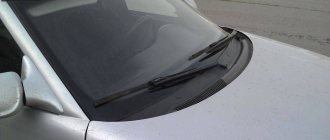
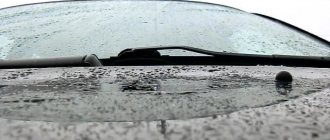
What are wipers and when should they be changed?
Windshield wipers are a device in which a metal arm is connected to a rubber wiper surface . The wiper blade is secured to the lever with a special holder with a plastic plug. They come in two varieties: framed and frameless.
Frame brushes have moving parts called rocker arms. They hold the cleaning surface on the windshield. The fundamental disadvantage of such “wipers” is the presence of hinged joints, which are vulnerable to the ingress of snow and ice, which disables the wipers. In addition, the rubber brush often does not adhere tightly to the glass, which makes its work ineffective.
Wiper frame design
Frameless wipers have a spring instead of rocker arms, which presses the blade to the surface of the windshield. Such windshield wipers look more organic in appearance, clean the glass better and do not wear out so quickly. You can recognize them by the characteristic curve of their shape. Windshield wipers of this type are installed on most modern cars and have the following advantages:
- They look much better.
- Can be used on glass of any curvature;
- They do not impair the aerodynamic properties of the body.
- Less sensitive to icing.
- Does not interfere with visibility when folded
Frameless design wiper
At the same time, it is not possible to replace only the rubber part in such “wipers”; you will have to change the whole thing. Often, a frameless windshield wiper needs to be selected for a specific car model based on the length of the blade and the curvature of the windshield.
When to change wipers
The service life of the “tenth” brushes is 500 thousand work cycles. If you translate those numbers into the area they could clear, that's 50 football fields. But, be that as it may, it is recommended to change wipers once a year. And it is advisable to do this before the onset of cold weather. Naturally, the wipers of the VAZ-2110 may lose their functionality even earlier. The reason for this could be, for example, damage due to freezing to the windshield or deformation caused by constant exposure to the sun. In such cases, the brushes also need to be changed.
Dimensions
Standard "tens" wipers have a standard length of 51 cm, and it is the same for both the blade located on the driver's side and the one located on the passenger side. But it is not necessary to adhere to this standard. On the VAZ-2110 you can install wipers of the following lengths (driver side/passenger side, cm):
- 50/50;
- 51/48;
- 53/50;
- 53/51;
- 53/53;
- 55/45;
- 60/50;
- 63/48.
There is no need to follow any advice when choosing the length of the brushes. If only after installation they do not block the view and do not cling to the protective grille.
Which brushes to choose
Having decided on the size of your wipers, do not rush to buy the first model you come across. The fact is that the auto parts market today is filled with fakes. By skimping on some 100 rubles, you can buy wipers that will work effectively for several days, and after that they will begin to creak and let water through. It is better to give preference to well-known manufacturers and make the purchase in a specialized store. As for the design, it’s up to you to decide whether to purchase “frameless” or regular ones. The main thing is that the fasteners fit.
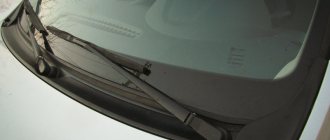
Replacing wipers VAZ-2110
The process of replacing wipers on a “ten”, as well as on any other car, is very simple and will not take you more than five minutes. And you don’t need any tools for this. The work order is as follows:
- cover the windshield with thick cloth to protect it from possible damage;
- bend the wiper arm away from the windshield;
- lift the latch of the fastening mechanism upward, rotate the frame 90 degrees around the guide and slide it down, removing the leash from the hook;
- We insert the guide of the new wiper into the fastening hook and push it into the end of the bend until the latch clicks.
Checking and replacing steering column switches VAZ 2110 1996+
7.8.7. Checking and replacing steering column switches
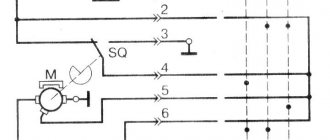
Turn signal and headlight switch type 69.3709
| Turn signal and headlight switch contact numbers |
Windshield wiper and washer switch type 70.3709
| Wiper and washer switch contact numbers |
Steering column switch lever positions
| Bold lines show the initial positions, thin lines - fixed and dotted lines - non-fixed positions of the levers. |
How to care for your wipers to extend their lifespan
To ensure that your wipers last as long as possible, follow these tips:
- Wipe dirt-stained brushes with a clean, damp cloth or sponge. This way you will not only get rid of dirt, but also protect the glass from scratches.
- If the front glass is covered with a layer of dust and the car washer fluid has run out, do not turn on the cleaner. This will also cause scratches on the glass.
- In winter, especially during snowfalls, do not leave the wipers leaning against the windshield - they will freeze. It is better to raise the leashes so that the brushes are suspended.
- If the windshield wipers are still frozen, do not under any circumstances try to tear them off by force. This will only damage the rubber band. Start the engine, turn the heater on to blow the windshield and wait until it defrosts.
- You should also not knock ice off the frame or brush. Gently bend the elastic until it peels off in small pieces.
- When replacing wipers, place some thick cloth on the windshield. This will protect it in case the spring-loaded leash slips out of your hands.
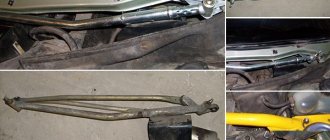
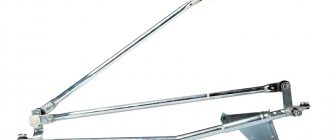
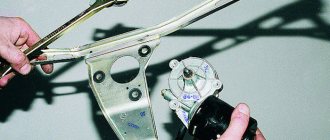
The trapezium of the wipers transmits the force from the engine to the windshield wiper arms. The best quality of windshield cleaning will be only if all elements of the wipers are in working order. If the trapezoid hinges are clogged with dirt or the lubricant has dried out, the motor energy will not be enough for proper cleaning. Therefore, owners of cars of the tenth family are forced to repair the trapezoid once every 5–10 years in order to avoid deterioration in the performance of the wipers.
Replacement
The process of replacing old windshield wiper blades with new ones does not cause serious problems. It is only important to carry out all actions carefully, not to break the plastic fastener included in the kit. The replacement process includes the following steps:
- lift the wiper up, it is fixed in this position - perpendicular to the windshield;
- Next, you need to take the brush body in your hand and squeeze it, then move it down - slight swaying will simplify the procedure;
- then the brush is simply removed from the lever.
The installation process is performed in reverse. Many brush models are supplied with special adapters. They must be used carefully. Plastic is usually fragile. If it is damaged, it will be impossible to install the brush in place. Which will make it impossible to use it. When choosing a brush, it is important to focus on the brand. To date, Bosch, Champion and Denso have proven themselves to be good.
It is important to replace brushes in a timely manner, since road safety directly depends on this. Otherwise, precipitation falling on the windshield simply will not be removed in time.
What affects the condition of the trapezius
The wiper motor and trapezoid are located directly under the glass, so some of the water or washer fluid falls on them. In addition to water, dust, dirt and various small debris get there. All this leads to a change in the properties of the lubricant and deterioration in the performance of the trapezoid. When the lubricant loses its properties, the plastic bushings of the hinges begin to wear out, resulting in backlash and increasing resistance during operation.
Do-it-yourself troubleshooting
When the drive works when the wipers are turned on, but the wipers do not move, repairing the trapezoid in such a situation will come down to replacing the bushings.
To do this, you need to remove the trapezoid, which is located under the plastic decorative trim under the windshield. Windshield wiper repairs are carried out in the following order:
- unscrew and remove the windshield wiper blades along with the leads;
- unscrew and remove the plastic cover, for which you will need a TORX T20, or “star”;
- unscrew the trapezoid, which is attached to the car body with a nut and two bolts;
- disconnect the windshield wiper drive from the battery;
- remove the trapeze together with the drive.
If you do not remove the trapezoid, then when installing the bushings you can bend the hinges, which will lead to improper operation of the wipers. Therefore, it is better to remove the entire trapezoid and replace it not with weight, but with emphasis.
The destroyed bushing is immediately visible. It can be simply removed using wire cutters. To insert a new one, it and the locking ring must be steamed in hot water, otherwise it will not be possible to put it all on the hinge. Before putting on the locking ring, the bushing should be treated with lubricant (for example, lithol). All disassembly and assembly work takes a maximum of 40 minutes.
But if the central bushing “flies”, then most likely the entire windshield wiper mechanism will have to be replaced. Replacing a windshield wiper trapezoid is an even simpler task than the process of removing and installing new bushings. All work is carried out according to the algorithm described above.
Naturally, a complete replacement of the windshield wiper trapezoid will cost more than repairing the windshield wiper. But it will be more reliable. New ones are almost guaranteed to last longer than refurbished ones. Although some Lada owners claim that a rebuilt and repaired Kalina wiper trapezoid can easily last two years. Well, you should always base it on whether you are willing to spend time or money.
How to remove the windshield wiper trapezoid
To remove the trapezoid you will need:
- key to 10;
- thin flat screwdriver;
- crosshead screwdriver.
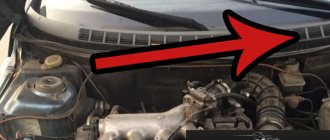
First of all, you need to remove the wipers. To do this, you need to remove the plastic pads and unscrew the nuts with which they are attached to the trapezoid studs. Then unscrew the screws and side fastenings of the protective casing (jabot) and remove it. If the fasteners do not come out, treat with WD-40. Before removing the casing, make sure to remove all screws, bolts and nuts. If the cover does not come off, look for a fastener that you did not remove. Lifting the frill, disconnect the washer fluid supply tube from the tee, and then move the casing to the side.
Remove the belt that supports the radiator tank and move the tank to the side. Then pull out the partition (sound insulation), which is located behind the tank. Don't forget to remove the washer fluid supply tube from it. Disconnect the electric motor power connectors. After this, unscrew the bolts securing the trapezoid and electric motor. To remove the trapezoid, you must either struggle for a long time, coming up with various options, or place a thin flat-head screwdriver under the far end (relative to the motor) of the lower rod of the trapezoid and pull out the entire structure as if on a slide. You can also turn the left edge of the trapezoid clockwise and pull it out, then remove the engine.
Removing steering column switches on VAZ 2110,211 and 2112 cars
1. Remove » — » from the battery.
2. Using a Phillips screwdriver, unscrew the screws connecting the halves of the steering column casing: two near the steering wheel... 3. Two at the bottom.
4. Unscrew one self-tapping screw securing the lower half of the casing to the steering column switch...5. Two, in the steering column bracket.
6. Lower the column adjustment lever and remove the lower part of the casing.7. Having lowered the steering column, remove its upper part8. Disconnect the connector...9. Squeeze the clamps at the bottom and top and remove the steering column switch.
10.Also remove the right steering column switch.11. If you need to dismantle the connector of the steering column switches, then remove the steering wheel (Removing the steering column), using the “8” socket, loosen the pinch bolt...12. After disconnecting the horn wires, remove the connector.
Similar articles
Trapezoid repair
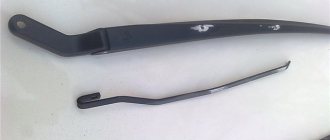
During repairs, it is necessary to clean all elements of the trapezoid from dirt and inspect the studs. If wear is detected on their ribs, the trapezoid will have to be replaced. Repairing a trapezoid involves replacing the plastic caps. To do this you will need a repair kit and boiling water. First, disassemble the trapezoid using a pry bar or a heavy-duty flathead screwdriver as leverage. After this, cut off the old plastic caps. If you can’t cut it, use side cutters and bite off the caps piece by piece until you can pull them out of the trapezoid rods. You can also hold the ends of the trapezoid in boiling water, 2 to 3 minutes is enough, then push the caps out of their seats.
Three types of trapezoids were installed on cars of the “tenth” family - VAZ 2110, 2111 and 2112, which differed in minor details. Therefore, there is a possibility that either the trapezoid rods or the caps will have to be adjusted. Remove the cap and inspect it. If there is a fixing protrusion on top of it, check the recess for it on the rod seat. If there is no notch, you will have to either cut off the protrusion on the cap (does not affect the performance and reliability of the trapezoid) or saw through it in the draft. If there is no protrusion on the cap, no adjustment will be necessary.
Clean the rod and seat, then lower the cap into boiling water for 10 - 15 seconds. After this, it will soften and easily fall into place. Do not install a cold cap as this will destroy it. After the cap has cooled completely (20 minutes), the rod is ready for assembly. Before assembly, lubricate the bushings with graphite grease.
Check the serviceability of the electric motor. To do this, disconnect it from the trapezoid (you need to unscrew the fastening nut) and connect it to the car battery. When working, it should make a low buzzing sound. If you don't know how to connect the motor to the battery, then connect it to the power connector. Turn on various operating modes of the electric motor for 10 - 15 minutes. After that, feel it. If the motor gets hot, it needs to be replaced. An electrical technician can try to repair this device, but regular drivers and car enthusiasts need to replace it.
Removing the steering column switch for a VAZ-2110 car
We remove the steering column switch for repair or replacement, as well as to remove the steering column and instrument panel.
The steering column switch consists of two switches secured with a clamp to the steering column.
The left switch controls the turn signals and headlights, while the right switch controls the washer and windshield wipers. The steering column switch connector has spring-loaded horn contacts.
To remove the steering column switch, disconnect the negative terminal of the battery.
1. Using a Phillips screwdriver, unscrew the screws connecting the steering column casings: two near the steering wheel
3. Unscrew the self-tapping screw securing the lower casing to the steering column switch
4. Unscrew the two screws screwed into the steering column bracket.
5. Lowering the steering column adjustment lever down, remove the lower casing.
6. Lowering the steering column down, remove the upper casing.
7. Disconnect the connector
8. Squeezing the latches (top and bottom) with your fingers, remove the steering column switch.
9. We also remove the right steering column switch.
10. If it is necessary to remove the connector of the steering column switches, then, after dismantling the steering wheel, use the “8” head to loosen the coupling bolt
11. After disconnecting the horn wires, remove the connector.
Install in reverse order
Checking and replacing steering column switches VAZ 2110-11-12
Turn signal and headlight switch type 69.3709
Turn signal and headlight switch contact numbers
Windshield wiper and washer switch type 70.3709
Wiper and washer switch contact numbers
Steering column switch lever positions
Bold lines show the initial positions, thin lines - fixed and dotted lines - non-fixed positions of the levers.
| PROCEDURE FOR REPLACING STEERING POLE SWITCHES |
| 1. Disconnect the wire from the “–” terminal of the battery. | |
| 2. Unscrew the seven screws securing the steering column housings and remove the lower steering column housing. | |
| 3. With the steering column down, remove the upper steering column housing. | |
| 4. Squeeze the two plastic clips and remove the wiper/washer switch from the base of the steering column switches. | |
| 5. Disconnect the block with wires from it. | |
6. Squeezing the two plastic clips, remove the turn signal and headlight switch from the base of the steering column switches and disconnect the block with wires from it.
7. To check the switches, connect a 12 V test lamp to the appropriate contacts shown in the tables above (in this case, checking the left turn signal is turned on). Move the switch lever to the position corresponding to the contacts being tested, the lamp should light up. Otherwise the switch is faulty. The steering column switches are installed in the reverse order.
Contact closure at different positions of the turn signal and headlight switch levers
Putting the trapeze in place
Usually, installing the trapezoid into place does not cause difficulties. Insert it and secure with bolts. Do not overtighten the motor mounting bolt; the motor may need to be turned slightly to get the trapezoid to operate smoothly. After making sure that the trapezoid is working properly, tighten the electric motor mounting bolt, install and secure the sound insulation, frill (do not forget to connect the washer tube), and the expansion tank. Insert the plastic plugs and install them in place, install the arms with brushes and check the operation of the wipers in all modes.
Wipers Lada Kalina
Wipers for Lada Kalina differ in type, as well as in size and mounting method, depending on the year of manufacture. High-quality windshield wiper blades are the key to safety on the road. They guarantee a good overview.
Only two generations of cars were produced. Therefore, choosing the optimal solution for a given car in terms of price-quality ratio will not be difficult. Before purchasing, it is important to ensure that the specific model is suitable for installation.