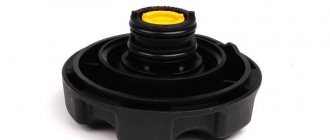
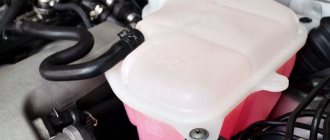
The cap of the expansion tank of a car's engine cooling system, as a rule, does not raise suspicions about its serviceability. This, as many people think, very “modest” in importance part is entrusted with a very important task - to regulate the pressure in the cooling system. When the lid stops coping with this, in the best case, liquid will boil or leak out, and in the worst case, this will lead to the breakdown of some components.
- 2 Design and principle of operation of the expansion tank cap
- 3 Signs and possible consequences of a part malfunction
- 4 How to check the cover and identify problems?
- 5 Refinement of a new part - what to do if it does not function?
What is the main role of the tank cap?
As is known, a running engine creates a pressure in the cooling system that differs from normal atmospheric pressure. This occurs due to the fact that the coolant heats up along with the engine, as a result of which it expands and increases in volume. As a result, the pressure inside the engine cooling system (ECS) increases, but it is not in contact with the external environment, and there is nowhere for it to relieve excess pressure.
Developers of modern cars do not fight the increased pressure in the ODS “radically” - they do not try to completely get rid of it. It is adjusted using the tank cap. Increased pressure in the SOD is used to shift the coolant boiling point. After all, it’s no secret that at normal atmospheric pressure for water it occurs at a temperature of 100 °C, for antifreeze – 105–110 °C, and for antifreeze – 120 °C. The operating temperature of modern car engines is very close to these critical values.
So, for example, for carburetor VAZs it should be in the range of 90–95 °C, and for injection ones – 97–105 °C.
However, under certain engine operating conditions, a short-term increase in its temperature occurs to higher values, which, however, does not lead to failure of a serviceable engine, but causes the same heating of the coolant. For example, on injection VAZ 2109 the liquid at such moments can be 120–125 °C. Obviously, even antifreeze cannot withstand such heat. At the same time, an increase in the pressure of any liquid leads to an increase in its boiling point.
Injection VAZ 2109
Engineers designing engines have long found out that to prevent the coolant from boiling even during short-term critical heating of the engine, it is enough to maintain the pressure in the coolant at the level of 1.1–1.5 kgf/cm 2 (1.1–1.5 bar). A higher temperature is not needed, because the engine is not designed for it, and it will lead to its failure. And it makes no sense to allow a greater spontaneous increase in pressure, which can nevertheless occur, because it will complicate the process of manufacturing and servicing the motor, as well as increase its cost, since it will require a more durable and sealed SOD (more durable pipes and expansion tank, strong clamps).
Therefore, the tank lid must be sealed, but only up to the required pressure limits indicated above, after reaching which it maintains them, connecting the system with the external environment as necessary to release the air compressed inside the expansion tank.
Briefly about replacement
The process of replacing antifreeze on VAZ 2109 engines is carried out either once every three years, or once every 60 thousand km, or (advisable) when carrying out repair work on cooling system units. The operation route looks like this:
- remove the ignition module (on injection models);
- drain the used antifreeze;
- Having disconnected the coolant supply hose to the throttle assembly (injector) or to the carburetor, fill in a new mixture through the expansion tank;
- start the engine for 1-2 minutes;
- check and, if necessary, add antifreeze;
- start and warm up the engine to the fan operating temperature (105-107 degrees);
- turn off the engine, inspect the system for leaks, and if necessary, add antifreeze to the medium level.
The design and principle of operation of the expansion tank cap
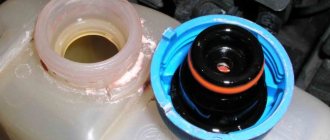
In order for the necessary pressure to be created in the SOD when the engine is running, the lid device ensures a tight, hermetically sealed closure of the tank. A safety valve is provided to relieve excess pressure. It operates (opens) only when the pressure inside the SOD becomes 1.1–1.5 kgf/cm2 (depending on the design of the lid and its manufacturer).
While it is lower, the valve is closed, and immediately after releasing the excess pressure to a value that is less than that indicated above - partial release of the air compressed in the tank - it closes. There is one more valve in the lid - the inlet valve, it is also called a vacuum valve. Its purpose is exactly the opposite of protective. The inlet valve serves to intake (suction) air into the SOD. The fact is that after stopping the engine, as you know, it begins to cool down. The coolant temperature also drops.
So is it possible to mix?
Hypothetically, you CAN mix (but not everything and not always, let’s break it down into subgroups)! First, understand why you need this. I repeat once again, in any case, such a mixture can lead to improper functioning of the car’s cooling system. YOU NEED TO UNDERSTAND THIS! Well, now in more detail:
TOSOL and G11 - the same base, the same additives, you can mix without fear. Will work the same at any load and temperature
TOSOL sG12 – same base, different additives. Mixing is possible, but not advisable. The thing is that G12 works a little differently, it does not envelop the walls inside with a protective film, but fights the outbreaks (as I wrote above). As a result, in such a cocktail you get two types of additives, protective and anti-corrosion; how they will work together is not entirely clear. However, based on my experience, I can say that it is unlikely that sediment will form
TOSOL and G13 – mixing is not recommended at all. Firstly, G13 is a very expensive liquid (if you take the original one, say, produced by VOLKSWAGEN, it can cost up to 300 - 400 rubles a liter, and not that “badyaga”, which is produced I don’t understand where, and I don’t understand how, usually yellow) and pour in it TOSOL (or vice versa) is simply a crime, you are downgrading the class many times. Secondly, G13 uses propylene glycol instead of ethylene glycol (both are monohydric alcohols), but how they will interact with each other, and even at high temperatures, is UNCLEAR! Third, the additives here are different, G13 has a hybrid package of both anti-corrosion and protective additives, but antifreeze is only protective, in the end it’s also not clear what will happen. In such a mixture, there is a big possibility that sediment will form and the characteristics of this cocktail as a whole will drop (especially temperature), and this is bad - all the pipes and channels can become clogged, and boiling may already occur at temperatures less than 100 degrees, which is realistic is fraught with overheating.
Here is your answer, you can mix, BUT NOT EVERYTHING AND NOT ALWAYS!
Signs and possible consequences of a part malfunction
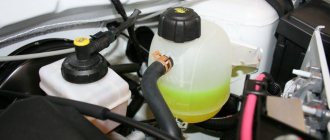
Most often, the consequence of a malfunction of the cap is boiling of the coolant, sometimes accompanied by the ejection of the coolant from the expansion tank - a common occurrence for VAZ cars. If this happens at engine operating temperatures, then most likely the plug does not hold the required pressure.
Car coolant boiling
Another reason for the same phenomenon is that due to a malfunction of the vacuum valve, air entered the ODS and formed a plug, which disrupts normal circulation, and therefore the cooling of the coolant. In winter, due to an air lock, the stove may not work well. Unpleasant consequences: loss of coolant, which has to be topped up regularly. This happens when, due to increased pressure in the SOD, liquid is “expelled” through the joints between the fittings and pipes put on them, through clamps.
- rupture of low-quality pipes or those that have not been changed for a long time (a picture familiar not only to VAZ owners);
- the appearance of a leak in the main or heating radiator;
- tears the thermostat housing (for Nexia it’s a common thing - into 2 parts);
- burst expansion tank.
A leak appears in the main radiator
All these signs and consequences of a malfunctioning lid are the result of increased pressure in the SOD. The latter is not uncommon for VAZ 2108, 2109 and especially 2110 cars with new-style tanks. Of course, it is obvious that the plastic of these expansion tanks leaves much to be desired, but, nevertheless, this is also due to a malfunction of the plug. So the lid, by regulating the pressure in the SOD, also protects its elements from mechanical damage.
Features of the VAZ injector cooling system
Cooling in cars 21093,2109,21099 is liquid, but you need to understand that the radiator is cooled by the flow of incoming air and a fan, which increases the cooling intensity. Also, part of the heat is removed by the car's interior heater radiator at low temperatures.
The expansion tank is designed to compensate for the volume of liquid when heating, to top up and control the level of antifreeze.
The thermostat system provides temperature control, preheating of the VAZ engine, initial heating of the interior in winter, and only then ensures the inclusion of a large cooling circuit.
The temperature sensor provides control of the cooling system, allows you to monitor the engine temperature and regulate the operation of the fan.
The entire operating cycle of the cooling system is controlled using a power unit control system that takes into account all temperature parameters. It determines the optimal switching conditions and operating time of the structural elements of the system.
How to check the cover and identify problems?
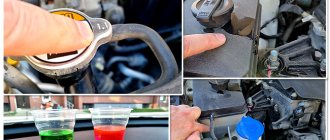
Before checking the expansion tank cap, it must first be inspected to make sure that it is intact and has no mechanical damage in the form of scratches, cracks and severe wear, and is also free of rust, dirt, scale and other defects. Then you should check the functionality of its valves. Several simple diagnostic methods that allow you to only approximately determine their serviceability are given below.
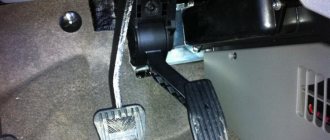
For safety valve. With the engine running and warm, loosen the cap. There should be a hissing sound of compressed air coming out of the tank. This means the valve holds pressure. But not every professional can determine which one exactly.
Refinement of a new part - what to do if it does not function?
When it turns out that the lid stubbornly refuses to relieve excess pressure and/or is not able to restore air losses in the SOD, it can be modified. For some reason, the most complaints come from owners of VAZ, model 2109, including those who buy new plugs. It is clear that the reason for the incorrect operation of the cover valves lies in the too much rigidity of their springs.
To modify the cover, for example, for a VAZ 2109, it must first be disassembled. This must be done carefully, using pliers and a thin flat-blade screwdriver. We must try to remember where everything stood so that the springs do not fly away to God knows where. After the lid for the VAZ 2109 tank has been disassembled, it’s time for the wire cutters. They need to shorten the springs: the large one, for the safety valve, usually by 1 turn, and the small one by 2.
Shortening the plug spring
For the second, the length of the removed segment is not critical - as long as it generally supports the vacuum valve when it is closed and does not resist the external air pressure of 0.03–0.1 kgf/cm 2 . With a large spring it is more difficult - as if not to overdo it. You need to look at its rigidity and the pressure at which the safety valve opened when checking the tank cap of the VAZ 2109. After shortening the springs, we assemble the cap in the reverse order. Before use, it is advisable to check again how it works.
A leak in the expansion tank on VAZ 2109-2108 cars is one of the reasons why it has to be replaced. Of course, such a problem happens quite rarely, and it happens that the original one is enough for the entire life of the car. Previously, when ordinary water was poured into the cooling system instead of antifreeze or antifreeze, the owners often forgot to drain it during the onset of frost, and the expander was the first to suffer. Now, with constant operation on non-freezing liquids in the cooling system, this problem practically does not arise.
But if suddenly you had to change this part for any reason, then this process will be described below with photo descriptions. Personally, on my VAZ 2109 I had to use three screwdrivers, two flat and one Phillips.
Please note that this procedure must only be performed when the engine is cool to avoid getting burned. You should not open the plug so that when you remove the hose, the antifreeze does not escape so quickly. The first step is to unfasten the clamp that holds the tank in place:
Then you can proceed further. Loosen the clamp on the thin hose that approaches the tank from above:
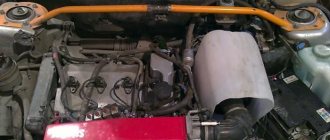
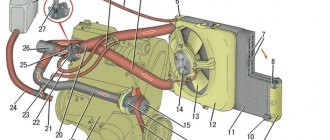
How does the VAZ-2109 cooling system work?
Where does the work of the CO begin?
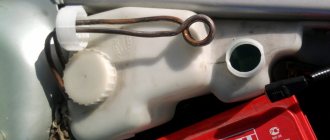
From the expansion tank, which is the main element in the entire system. It contains all the liquid, as well as its excess (boiled antifreeze, which is transferred to a special tank). After it has cooled down, it immediately continues its work. The volume of CO in a VAZ-2109 car is 7.8 liters. The tank has valves that maintain pressure. When the pressure increases, the exhaust valve begins to operate, and when the pressure decreases, the inlet valve begins to operate. The tank is translucent, so checking the fluid level will not bring you any inconvenience.
Special hoses connect the expansion tank and the thermostat.
The stages that the liquid goes through are:
- A sensor is installed in the cylinder block that monitors the temperature. These readings can be seen on the dashboard.
- When the engine starts running, liquid from the jacket flows into the radiator, where it receives heat, or into the thermostat to warm up the engine.
- After this, the cooling liquid passes into the injector. It circulates using pipes and clamps.
- The VAZ-2109 uses a centrifugal pump. The radiator does not have a filler hole; an expansion tank is used for this. It contains a sensor that turns on the fan. If you want to drain the fluid, unscrew the drain plugs on the radiator, tank and cylinder block.
How to replace the expansion tank on a VAZ 2108-VAZ 21099?
Removal: 1) First, completely empty the expansion tank by draining the coolant from the car engine. (How to drain the coolant, see the article: “Replacing the coolant”)
2) Next, disconnect the coolant level sensor wire block from the expansion tank.
3) After disconnecting the block, unscrew the sensor itself by hand, and then remove it from the car’s tank.
4) Then, taking a screwdriver in your hands, use it to loosen the screw of the clamp securing the steam exhaust hose.
5) And then remove the steam removal hose from the fitting.
6) Next, in exactly the same way, using a screwdriver, loosen the retaining screw of the clamp securing the filling hose.
7) And after loosening the screw, disconnect the filling hose from the expansion tank pipe.
Now remove the retaining strap from the tank.
9) And to complete the operation, remove the expansion tank itself from the car.
Installation: 1) First, install the expansion tank in its place, and then secure it with a retaining belt.
2) Next, connect the filling hose to the lower pipe of the tank, and then tighten the clamp screw securing it with a screwdriver.
3) Then, in exactly the same way, connect the steam removal hose, and then tighten the screw securing it with a screwdriver.
4) Now install the coolant level sensor in its place.
5) Next, tighten the cover of its mounting on the expansion tank.
6) And after screwing the cover, connect the wire block to it.
7) And at the end of the operation, fill the coolant into the expansion tank to the mark. (For how to fill coolant correctly, see “here in this article”)
Important! When you get to removing the coolant level sensor, we recommend that you remove the “-” terminal from the battery and do not install it until the sensor is installed again! (How to remove the “-” terminal, see the article: “Replacing the battery”, point “1”)