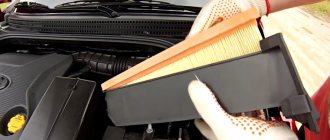
After 45,000 km, it becomes necessary to replace the fuel filter on the Chevrolet Lacetti. So, according to the pattern, most car enthusiasts turn to a car service center to carry out similar types of manipulations. But, in the process of replacing an element there is nothing complicated and you can do the work yourself in your own or a friend’s garage.
Video about replacing the fuel filter on a Chevrolet Lacetti:
The video will show how to replace the fuel filter on a car, and will also tell you about some of the nuances and subtleties of the process.
Everything you need for replacement
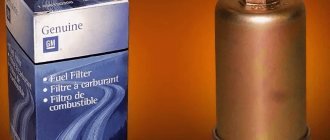
Following the vehicle maintenance regulations, the optimal mileage for replacing the fuel filter is 45,000 km. However, the advice of experienced specialists agrees at a mileage of 15,000-20,000 km due to the low quality of fuel. When approaching this milestone, it is worth acquiring a Chevrolet filter in advance, preferably an original one, marked GM 96335719.
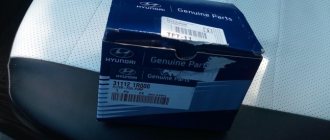
Original fuel filter
And also the necessary tools to replace it:
- wrench or socket wrench;
- pliers;
- flat slotted screwdrivers.
In what cases does the fuel pump grid need to be changed?
fuel pump
To find out what condition the fuel system is in, you need to check its performance. To do this, you need to connect a measuring device to the gasoline supply system. In order to connect the pressure gauge to the fuel system, you must use a special device. Therefore, in this case you will have to contact a specialized workshop. For self-checking, you can use the following:
- Turn on the ignition. If the fuel pump does not work or makes abnormal noise, the gasoline supply unit may be overloaded.
- If engine performance decreases, the acceleration period increases, or the engine idles improperly, excessive clogging of the fuel lines may be the cause.
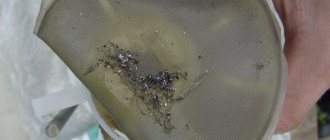
As a rule, a clogged fuel filter leads to such consequences.
In this case, the filter requires mandatory replacement, and the mesh can be cleaned with your own hands. In most cases, cleaning the mesh will give the desired result for a while. However, the price of the part is not that high, and it can be replaced without resorting to the help of workshops.
The replacement process will not take much money and time, but will nevertheless increase the service life of the fuel pump and other elements of the system.
The process of replacing the fuel filter on a Chevrolet Lacetti
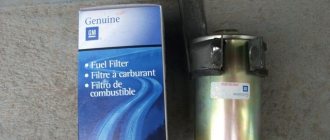
Analogues of the original fuel filter produced by Daewoo.
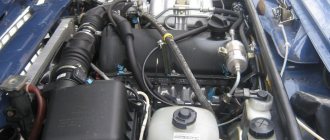
To replace the fuel filter on a Chevrolet Lacetti, you need to know the location of the element.
As a rule, in all cars of this brand, the fuel filter element is located under the rear right wheel.
Replacement algorithm
So, let's consider the sequence of actions aimed at replacing the fuel filter element:
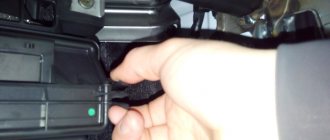
- In order not to remove the negative terminal, you can remove the fuse (Ef18 (15 A)), which is responsible for the fuel pump.
Location of the fuse box under the hood.
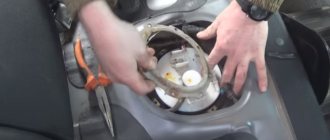
- We climb under the car.
Accordingly, you will need a hole. And disconnect the grounding of the fuel filter. Disconnect the “grounding” wire from the terminal on the fuel filter housing. - On the Lacetti, the fuel filter element is protected by a plastic casing, which is secured with a 10mm bolt. It must be unscrewed.
Using a wrench or a 10mm socket, unscrew the coupling bolt of the mounting clamp.
We remove the wire.
- Remove the protective casing from the filter.
Remove the plastic protection of the fuel filter.Removing the plastic protection.
- Using a small screwdriver, disconnect the fuel pipe clamp from the filter.
Use a screwdriver to remove the retainer from the tip of the fuel pipe.
Remove the tip of the white tube.
- On the second side you need to do the same operation.
We squeeze the “antennae” of the plastic retainer for the tip of the fuel pipe.
- Now you can remove the filter itself.
Remove the filter from its seat.
- Installation is carried out in reverse order.
It is worth remembering that the fuel pump fuse was first removed, so it needs to be put back in place.
Product selection
As with all cars in this series, in addition to the original fuel filter, you can find a fairly large number of analogues, most of which are cheaper and in no way inferior in quality to the original product.
Original
Original fuel filter made by Daewoo.
96444649 is the original catalog number of the fuel filter element for the Chevrolet Lacetti manufactured by Daewoo. It is easily mounted on the car and does not require additional fastenings or effort. The average cost is 500 rubles.
Analogs
Fuel filter manufactured by MANN Filter.
In addition to the original fuel filter, the automotive spare parts market is quite saturated with analogues, which have recently gained great popularity among car enthusiasts.
Conclusion
As you can see from the article, replacing the fuel filter on a Chevrolet Lacetti is quite easy and simple. The greatest difficulty will be the selection of the filter element itself, since the automotive market is filled with a variety of possible options, both high-quality and not so good.
The topic has also been covered far and wide, but still I’ll write a couple of lines here. I've been meaning to replace the filter for a long time and finally got around to it. I bought myself a Bosch fuel filter (so-so quality) and started replacing it.
There is nothing complicated about replacing the filter. All you need to do to do this is release the pressure from the system. How to do it? Pull out the fuse from the block that is located under the hood, it is called IGN1(ef18). Start the car and let it stall so that when you remove the filter, a lot of gasoline does not spill out. Next, remove the protective casing using a size 8 wrench, remove the terminal from the filter and disconnect the white hose and the black one. Disconnect the white hose carefully; there is a chance of breaking the clamp that is inserted into the grooves of the white hose. If the latch does break, it can be replaced with zip ties for a while. The black hose is much easier to disconnect; just press the ears of the clamp inserted into the hose and pull it towards you. Replace the old filter with a new one and reassemble everything in reverse order.
The filter can be changed either in the pit or by jacking up the rear right wheel, I gave preference to the pit, but as they say, taste and color... I climbed into the pit, unscrewed the protective cover and saw such an interesting picture there. So there was a white hose wrapped with electrical tape, probably made from whatever came to hand. I began to unscrew this entire structure, and of course, this was not without incident. Apparently the filter was changed a long time ago and so rarely that they simply forgot about it. The bolt was so badly rusted that when I started unscrewing it, it immediately broke, but I think ok, I won’t despair. I started removing the clamps. The clamp of the white hose was already broken and rewound with electrical tape.
Well, I didn’t despair here, because I knew that most people’s ones break, however, I was ready for this. So, I disconnected the hoses. I will note one point: the clamp that is inserted into the black hose must be removed and put on the new filter.
I put the new filter in its rightful place and attached the hoses. I started the engine and found no leaks.
Old fuel filter.
New fuel filter.
I don’t know how long the old filter lasted, but with it the car jerked very much in first gear, and there were also failures. After installing a new filter, I did not notice these twitchings. I can’t say anything about consumption, since I haven’t measured it, but purely theoretically, if you don’t change the filter for a long time, it increases, and with a new filter it should decrease accordingly and return to normal.
The fuel filter is one of four types of filters that protect the car engine from contamination and, as a result, premature failure. When refueling a car, no one can guarantee that the gasoline entering the gas tank is of excellent quality. And low-quality gasoline has many impurities, and it is these that the fuel cell helps get rid of.
A car engine is the most basic and important part of any car. This is undeniable. And therefore it needs cleanliness and careful treatment. In order to extend the operating life of the engine and maintain it in working condition, it is necessary to replace the Chevrolet Lacetti fuel filter.
Of course, the longevity of the filter element itself depends on the quality of the fuel. Therefore, it is recommended to be careful about the fuel that you pour into the tank of your Chevrolet Lacetti.
Where is the fuel filter located?
Before changing the fuel filter element on a Chevrolet, you need to know about the location of the device. In the Chevrolet Lacetti, the device is located under the bottom of the vehicle. It can be seen under the front of the fuel tank, on the right.
Detailed instructions for changing the filter in photographs are given in the video below and filmed by the Auto Repair channel.
How often should it be changed?
The timing for replacing the fuel filter on a Chevrolet Lacetti is indicated in the service book for the car. In accordance with technical regulations, the device can operate for up to 45 thousand kilometers. Provided that the vehicle is refueled with high-quality fuel. But given the low-quality gasoline supplied to domestic gas stations, the Lacetti fuel filter should be replaced earlier.
In practice, shift times are reduced to 12-20 thousand kilometers.
Consequences of untimely replacement
The following symptoms will indicate the need to repair and service the fuel filter on a Chevrolet Lacetti:
- The vehicle's power unit became difficult to start. It takes longer to turn the starter, and the engine itself starts with difficulty.
- If the condition of the Chevrolet Lacetti fuel filter is critical and it is time to replace it, the engine will not start. At the same time, the problem can sometimes be solved by starting the car with a pusher, but usually this does not help.
- Engine power has decreased. The vehicle takes longer to accelerate. The driver presses on the gas, and the car has difficulty picking up speed. This is especially evident when driving uphill at low speeds. When driving like this, the car may stall completely.
- The power unit began to “triple”. Detonation has appeared, the engine is unstable.
- When you press the gas pedal, dips appear.
- The fuel consumption increases.
Why is it needed?
There is a coarse filter that comes first from the gas tank. After all, first the lid where the fuel tank is located is opened, a gun is inserted there, the magic button is pressed and the fuel flows. Yes, it takes a lot of your money along the way, but what can you do? The location of the tank can be on the left or right, but this does not play a special role. Coarse cleaning, which is a mesh that traps large particles of debris.
This is followed by a fine filter. This is exactly what we will talk about. This element is called a fuel filter. With its help, small particles are retained. But even they can penetrate your diesel engine or gasoline injector.
Dust, dirt, debris, rust elements. All this can penetrate the system, causing a clogged pipe, tube, valve, fuel hose, or fuel pump components. Nothing good will come of this if timely replacement is not made.
To understand how to replace the filter, which element to choose and how to choose an analogue for the device you are going to change, you need to have at least a basic understanding of such an important component of the car.
I suggest starting with varieties.
Kinds
Modern fuel filters installed on Ford Focus, Nissan Almera, Hyundai Solaris, Nexia, Mazda, Opel, BMW e60, Renault Logan and Megane, Kia Rio and many others have at least two degrees of purification.
- First degree. This is a rough cleansing that allows you to get rid of large contaminants. Not to be confused with a regular mesh in the tank, which is not available everywhere.
- Second degree. Fine cleaning. This is the main task that falls on the shoulders of the filter.
And here you probably have the main question - where is the filter device located? I don't know. No, I can answer, but if you tell me specifically what make of your car or what year of manufacture. After all, on the same Chevrolet Niva, different Opel, Toyota, Mazda models, on the Volkswagen Passat B3, as well as on the domestic VAZ 2114, 2112 and 2110, the location may differ.
However, they are always located somewhere between the engine and the gas tank, since the filter's job is to prevent contaminants from entering the engine while the fuel moves from the tank to the engine. What's in the gas tank itself? That's right, a coarse cleaning device. This is an additional filter element so that any unscrupulous gas stations do not spoil your car.
Now let’s talk about the types of filters themselves. What element will be on the car? It depends on the type of engine. There are three of them, as you know. Except for electric motors. Well, there is no need for a fuel filter, as you understand.
Therefore, there are three types of filters:
- carburetor;
- diesel;
- injection.
Location
So you bought yourself a brand new sedan and you think it’s time to change the filter for this engine. Want to choose the best? Well then, take a closer look at Cummins devices. Mann, Hertz. They have proven themselves well, and they cost quite a bit.
You probably know whether your engine is diesel, injection or carburetor
This is important to understand the location of the fine filter, that is, our today's hero
- Carburetor. In these engines, the TF (fuel filter) is placed in front of the carburetor itself, and is often in a transparent housing to control contamination. These are the most basic devices, because the carburetor is the least demanding on the quality of fuel.
- Injector. It uses nozzles and therefore requires high-quality filtration. And the fuel is supplied under high pressure. Therefore, the filters are enclosed in durable metal housings. The TF has to be regularly maintained, cleaned and monitored for its condition. They are placed mainly under the bottom of the car to make it easier to dismantle and replace.
- Diesel. A diesel engine also needs high-quality purified fuel, since the system is quite sensitive. Diesel fuel has a higher moisture content than gasoline. The TF is designed to filter debris and remove accumulated moisture. A separator is provided for this purpose. The location is quite simple - between the engine and the pump that pumps fuel.
Any fuel system must include a TF. They are replaced assembled, that is, there is no point in removing the filter elements themselves (usually special paper), leaving plastic or metal. Be sure to look at the number and article number of the filter that is installed on your machine, and check the operating manual from the factory. This is the only source of truthful information regarding the maintenance of your particular vehicle in this configuration and with this type of engine.
The process of replacing the fuel filter on a Chevrolet Lacetti
Analogues of the original fuel filter produced by Daewoo.
To replace the fuel filter on a Chevrolet Lacetti, you need to know the location of the element.
As a rule, in all cars of this brand, the fuel filter element is located under the rear right wheel.
Replacement algorithm
So, let's consider the sequence of actions aimed at replacing the fuel filter element:
- In order not to remove the negative terminal, you can remove the fuse (Ef18 (15 A)), which is responsible for the fuel pump.
Location of the fuse box under the hood.
- We climb under the car. Accordingly, you will need a hole. And disconnect the grounding of the fuel filter.
Disconnect the “grounding” wire from the terminal on the fuel filter housing.
- On the Lacetti, the fuel filter element is protected by a plastic casing, which is secured with a 10mm bolt. It must be unscrewed.
Using a wrench or a 10mm socket, unscrew the coupling bolt of the mounting clamp.
We remove the wire.
- Remove the protective casing from the filter.
Remove the plastic protection of the fuel filter.Removing the plastic protection.
- Using a small screwdriver, disconnect the fuel pipe clamp from the filter.
Use a screwdriver to remove the retainer from the tip of the fuel pipe.
Remove the tip of the white tube.
- On the second side you need to do the same operation.
We squeeze the “antennae” of the plastic retainer for the tip of the fuel pipe.
- Now you can remove the filter itself.
Remove the filter from its seat.
- Installation is carried out in reverse order.
It is worth remembering that the fuel pump fuse was first removed, so it needs to be put back in place.
Product selection
As with all cars in this series, in addition to the original fuel filter, you can find a fairly large number of analogues, most of which are cheaper and in no way inferior in quality to the original product.
Original
Original fuel filter made by Daewoo.
96444649 – original catalog number of the fuel filter element for the Chevrolet Lacetti manufactured by Daewoo. It is easily mounted on the car and does not require additional fastenings or effort. The average cost is 500 rubles.
Analogs
Fuel filter manufactured by MANN Filter.
In addition to the original fuel filter, the automotive spare parts market is quite saturated with analogues, which have recently gained great popularity among car enthusiasts.
| Manufacturer | vendor code | Cost, in rubles |
| Master-sport | 55/3-KF-PCS-MS | 300 |
| AMC Filters | DF-7744 | 400 |
| Asam | 30524 | 300 |
| Bosch | 0 450 905 969 | 400 |
| Champion | L225/606 | 250 |
| Denckermann | A110001 | 230 |
| Febi | 33467 | 450 |
| Fram | G5540 | 450 |
| Jakoparts | J1330902 | 500 |
| Kamoka | F301501 | 550 |
| Kolbenschmidt | 50013643 | 600 |
| LYNXauto | LF-1050 | 700 |
| MANN-FILTER | WK 55/3 | 700 |
| Mapco | 62212 | 700 |
| Muller filter | FB215 | 700 |
| Profit | 1530-0728 | 750 |
| Valeo | 587028 | 1000 |
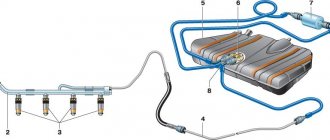
Article number and cost of the original Chevrolet Lacetti fuel pump
The original fuel pump that General Motors equips the Chevrolet Lacetti with from the factory has article number 96495969. Its price is more than 12,000 rubles. The main problem with this branded product is that General Motors does not supply the unit to the domestic market. Therefore, it is difficult to find it on sale.
There are other original General Motors fuel pumps available. Their cost ranges from 9,000 to 10,000 rubles. Article numbers of branded products:
- 9594930;
- 42353011;
- 96447442
Replacing the fuel filter on a Lacetti with your own hands
So, Lacetti - replacing the fuel filter:
1. Relieve the pressure in the fuel line. This operation must always be performed when preparing to repair fuel supply elements.
— Remove fuse Ef 18 from the fuse block,
Fuse and relay box installed in the engine compartment
Press the latch and open the cover of the Lacetti fuse box
Press the latch and open the cover of the Lacetti fuse box
Remove the tweezers to remove the fuses
Remove the tweezers to remove the fuses
We find the fuse responsible for the Lacetti fuel pump circuit...
Fuse responsible for the Lacetti fuel pump circuit
...and extract it
— We start the engine and wait for it to stop due to fuel exhaustion, — After stopping the engine, turn on the starter for 10 seconds, — Reinstall the fuse.
2. As described everywhere: “Use a 10 mm socket wrench to remove the bolt securing the Lacetti fuel filter protection.” And then the “dancing with a tambourine” began. Firstly, an 8mm key is needed, and secondly, this bolt did not want to get out - it was “deadly” rusted.
Lacetti fuel filter protection bolt.
Long manipulations did not lead to anything, so I had to unscrew the other two bolts that secure this entire structure to the body, and remove the Lacetti fuel filter assembly with protection and clamp. There you need a 10mm wrench, preferably a socket wrench. Then, in convenient conditions and with the help of non-standard equipment))) we managed to unscrew that bad bolt and replace it with a new one 3. How to disconnect the pipelines from the Lacetti fuel filter. The fastening methods are different on both sides! The main thing is not to rush, but take a closer look, it’s intuitively clear what and how. At the filter inlet, you need to press the plastic clamp and pull the fuel line off the filter fitting.
Plastic fuel filter retainer
Tip: If you suddenly break the plastic retainer, you can easily replace it with a plastic tie clamp.
By the way, this plastic retainer is not a cheap thing. For a piece of this plastic they demand 50 UAH.
And at the filter output you just need to squeeze these latches...
...and pull the pipeline off the filter fitting.
Note: Be careful, there is quite a lot of gasoline in the filter!
Also note that during installation I had to remove the plastic latch from the incoming fitting of the new filter. From the store, there are latches on both fittings, but it turned out that the latch is only needed on the exiting fitting. This turned out to be the design.
Fuel filter removed from Lacetti
Fuel filter removed from Lacetti
Now remove the protective cover, remove the old filter from the clamp and insert a new one. Tighten the clamp, not forgetting to insert the wires.
Please note that the filter inlet fitting (fuel supply from the fuel tank) is marked “IN” on the fuel filter housing.
Lacetti filter inlet fitting
We connect the pipelines and tighten the two bolts securing it to the body.
Don't rush to leave the overpass. Let the engine run for a while, and then check all connections for leaks.
Step-by-step instruction
- In order not to try to remove the negative terminal, you can simply pull out the fuse responsible for supplying fuel to the pump.
- Then you need to get into the car. In this case, you will need a hole. Then the following actions. It is necessary to disconnect the grounding system of the fuel supply filter.
- On a car of this model, the filtration element is protected by a plastic casing. It is fastened with a ten-point bolt. Next, you will also need to unscrew it.
- When the space is finally freed up, you will need to remove this fuel filter housing.
- Using a small screwdriver of the required shape, you need to disconnect the fixing element of the fuel pipe from this filter itself.
- On the other hand, we need to do everything the same as we did now.
- Then you need to remove the fuel filter.
- Installation of previously removed parts is carried out in the same way, just in a different order, the reverse of this.
Payment via PayPal
After selecting payment via PayPal, the PayPal payment system will launch, where you need to select the payment method: bank card or PayPal account.
If you already have a PayPal account, then you need to log into it and make a payment.
If you do not have a PayPal account and you want to pay using a bank card via PayPal, you need to click on the “Create an Account” button - shown with an arrow in the picture.
PayPal will then prompt you to select your country and provide your credit card information.
After specifying the information required to make the payment, you must click on the “Pay Now” button.