The peculiarity of the Opel Astra H model is that it was supplied to our country with different power units, in which the arrangement of the generator, air conditioner and pump belt rollers is slightly, but slightly different. Moreover, differences in belt length also depend on the vehicle's equipment, so the procedure for removing it, although not difficult, will differ depending on the factors listed above.
Replacing the Opel Astra alternator belt - consider in order
Replacing the timing belt on an Opel Astra H with your own hands: summary, photos, videos
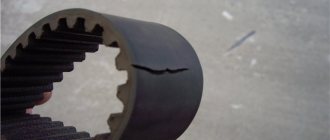
Opel Astra timing belt is one of the important components of a car engine. We reveal the features of its operation, the preconditions for drive failure, its consequences and the method of replacement.
The Astra H timing gear drive is a toothed ring made of rubber, the main part of the gas distribution mechanism. Replacing the front brake discs and pads of the Opel Astra and brake fluid. In addition to its main function, the belt drives the oil pump and, on some Astras, also the pump. It is important to replace the belt in a timely manner, since the consequences of a break are disastrous for the Astra.
According to Opel regulations, replacing the timing drive on an Opel Astra H must be done every 90,000 km, or 6 years of operation. But, it is recommended not to wait until the deadline, and certainly not to over-roll, but to make replacements at intervals of 75,000 - 80,000 km, or 5 years.
Replacement
Gasoline models
1. Remove the air cleaner with inlet air ducts and air flow sensor (see Chapter Power and exhaust systems).
2. If the drive belt is found fit for further use, mark the original direction of its rotation with paint or a marker. Try to remember the order in which the belt is placed around the pulleys.
3. To loosen the belt tension, turn the tensioner counterclockwise by the central bolt. Remove the belt from the pulleys; carefully release the tensioner before removing the belt from the engine.
4. Replace the failed components (see above Check
), — a description of the procedures for removing and installing the tensioner is given in the Engine Electrical Equipment Chapter.
5. Install the belt on the engine (if you are installing a used belt, make sure that the original direction of its rotation is observed) - make sure that the belt ribs are correctly laid in the grooves of the pulleys. Release the tensioner and once again make sure that the belt is installed and routed correctly.
6. Overcoming the resistance of the spring, press the tension roller with a suitable lever and also check that the belt is laid correctly - release the tensioner smoothly.
7. Reinstall the air cleaner with related components (see Chapter Power and exhaust systems).
Diesel models
Models with 1.7 l SOHC engine
1. Remove the air cleaner with air ducts and air flow sensor (see Chapter Power and exhaust systems).
2. If the drive belt is found fit for further use, mark the original direction of its rotation with paint or a marker. Try to remember the order in which the belt is placed around the pulleys.
3. On models equipped with an air conditioning system, use a socket wrench to loosen the tensioner and remove the multi-ribbed belt from the pulleys.
4. Unscrew the mounting bolts and remove the generator support bracket.
5. Loosen the fixing bolt, then, by turning the tensioner nut, loosen the belt tension and remove the belt from the drive pulleys.
6. Install the belt on the engine (if you are installing a used belt, make sure that the original direction of its rotation is observed) - make sure that the belt ribs are correctly laid in the grooves of the pulleys. Applying a force of 450 N (new belt) / 250-400 N (used belt) to the tensioner nut, tighten the fixing bolt.
7. Install the generator support bracket and tighten its mounting bolts.
8. On models equipped with K/V, remove the tensioner using a socket wrench and place the belt on the pulleys - see notes above. Finally, release the tensioner.
9. Reinstall the air cleaner with related components (see Chapter Power and exhaust systems).
Models with 1.7L DOHC engine
1. Remove the air cleaner with air ducts and air flow sensor (see Chapter Power and exhaust systems).
2. If the drive belt is found fit for further use, mark the original direction of its rotation with paint or a marker. Try to remember the order in which the belt is placed around the pulleys.
3. Turn the tensioner counterclockwise by the central bolt, loosen the belt tension and remove it from the drive pulleys.
4. Install a new belt on the engine. Release the tensioner, then check again that the belt is positioned correctly.
5. Reinstall the air cleaner with related components (see Chapter Power and exhaust systems).
Models with 2.0 l engines
Diagram for routing the accessory drive belt on 2.0 l engines
1. Remove the air cleaner along with the air ducts and air flow sensor.
2. Set the parking brake, jack up the front of the car and place it on stands. If equipped accordingly, remove the crankcase protection.
Engine Z22YH
13. The multi-ribbed belt on these models is removed from below; first remove the right engine boot (see Section 5).
14. Turn the tensioner (see accompanying illustration) by the bolt in the direction of the arrow and loosen the multi-rib belt.
15. After installing the multi-rib belt, check the position of the tensioner lever (see accompanying illustration) - when the belt is tensioned, the control mark of the lever should be between the lever position limit marks.
16. Reinstall the boot and lower the car onto the wheels.
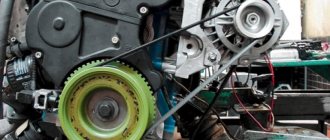
Belt location in Opel Astra h
The main task of this part is to transmit torque to the generator, air conditioning, pump and power steering. This is done by transmitting torque from the cranked vehicle to the pulleys of these devices. In turn, the device pulleys convert the moment into the required type of motion or electricity. It is located on the left (if you stand in front of the hood) side of the engine.
Preparing for replacement
Before replacing the drive belt on an Opel Astra h, you should remove the keys from the ignition and let the car cool down. Never replace the engine while the engine is hot, otherwise you may be seriously burned. In addition, on a hot or warm engine it will not be possible to set the correct tension. This is due to the fact that when heated, the parts expand and shift. Even if you set the correct tension, once the engine cools, the belt will loosen. Immediately before the procedure, you must disconnect the negative terminal of the battery. To replace, you will need a 19 and 14 socket socket.
Replacement process
The replacement procedure for an Opel Astra is as follows:
- We put a jack under the engine.
- Unscrew the mounting bolts and remove the front right wheel.
- Remove the right engine splash guard. To do this, use a 14mm wrench to unscrew the fastenings of the engine compartment tray and remove it. Then unscrew the three bolts of the lower fastening of the mudguard, unclip the side clamp and remove the mudguard.
- Remove the air cleaner. To do this, disconnect the air pipe and unscrew the mounting bolts.
- Remove the engine mount mount.
- We loosen the tension by rotating the tensioner roller counterclockwise.
- Remove the attachment belt.
- We put on a new belt. Then we turn the crankshaft three full turns so that it takes the correct position.
- Tension the belt by rotating the tensioner clockwise.
At this point, the replacement procedure can be considered complete. However, before reassembling, it is worth checking the tension. It is considered that the generator belt is tensioned correctly if it cannot be twisted around its axis by more than 90o in the middle of the generator pulley and the crankshaft. The degree of effort exerted is difficult to describe, but with experience this feeling comes automatically.
Wheel removal;- Unscrewing the fastening bolts;
- Replacing the Opel Astra J roller;
- Install the remaining parts in reverse order.
On the Opel Astra J, replacing the alternator belt is carried out by loosening the mounting bolts, followed by installing and adjusting the tension level of the alternator harness. Despite the ease of replacing parts, their adjustment is an important factor. This can only be done qualitatively in specialized services by experienced specialists.
And to prevent this from happening, carry out a technical inspection of your vehicle in a timely manner. It can also be completed at our car service center. But that's not all. If various malfunctions are detected, you must immediately contact specialists for help.
You should not put off repair work until later, because damage on a larger scale is more expensive and more difficult to eliminate than correcting minor faults. Take care of your car, and then it will serve you long and faithfully.
Step-by-step instruction
First, disconnect the air filter with pipes from the throttle valve.
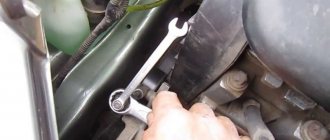
We remove the front right wheel, the side plastic protection and jack up the engine through a plank. We remove the generator belt, using a nineteen key, using a special protrusion, turn the tension roller, thereby loosening the belt. In the photo it has already been removed.
Remove the engine mount.
Remove the upper protective cover of the timing belt.
Remove the middle part of the plastic protection.
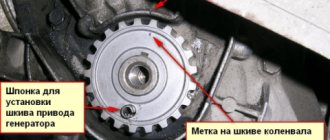
Set the top dead center
We turn the crankshaft by the bolt, always clockwise, until the marks on the crankshaft pulley and the lower protection coincide.
It's not very visible, but it won't be difficult to find them.
The marks on the top of the camshaft couplings should also match.
Unscrew the crankshaft pulley bolt. If the transmission is manual, then this procedure will not pose any special problems. We place stops under the wheels, turn on the fifth wheel, insert a specially trained screwdriver into the brake disc under the caliper and, with a slight movement of the hand, unscrew the bolt. But if the robot is like in our case, then a wrench helps us, but if there is no current one, we make a crankshaft pulley clamp. In the corner we drill two holes by eight and insert two bolts there, tightening them with nuts; we eventually insert these bolts into the holes in the pulley. You will get the dimensions yourself by measuring the distance between the holes. In the photo, the lock is shown schematically with a red rectangle; any holes can be used.
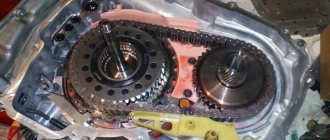
Remove the pulley and lower timing belt protection. On the left we see a tension roller, on the right a bypass roller.
We check the camshaft marks and, if they are gone, we bring them down. The marks on the crankshaft sprockets, in turn, should also match.
We install our Russian clamp on the camshafts and mark the old belt, just in case.
You can purchase special clamps; you can find them on Ali or on Vseinstruments.ru.
It will turn out like this.
Using a hexagon, we turn the timing belt tension roller counterclockwise, thereby loosening the belt and removing the belt and rollers.
Replacing the Opel Astra N alternator belt
To check the belt, it should be inspected and felt along its entire length, determining the presence of cracks and delaminations. Defects such as abrasions or areas polished to a shine are also unacceptable.
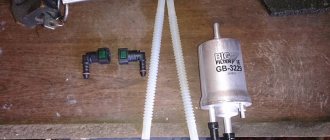
Pull counterclockwise. We remove and install a new rivulet belt, we have it from Bosch, article number. We lower it down and first put it on the pump pulley.
Then it goes under the wheel arch, we pass it through the generator pulley and drive roller. If you have any difficulties with this, it is better to draw a diagram in advance of how the old belt stood.
Replacing the drive belt in Opel Astra J, photo and video instructions
We insert the crankshaft pulley mounting bolt back, take out the mounting flywheel of the tool, and turn the crankshaft key clockwise to the combination of two marks on the gears further along the Opel Astra alternator belt replacement GEARS camshafts and crankshaft The photo shows a homemade fixing element.
Need to fix the gears This is about how you need to install it.
I remember that the material from which the Opel Astra alternator belt replacement lock is made must be strong enough, otherwise the mechanism may bend it and turn around. Now you need to loosen the tension bolt bolt. To do this, install the hexagon, which is inserted into a special hole on the lever, move the roller to the side, and then loosen the timing belt, remove it from the camshafts, rollers, etc.
We remove the two small rollers and place them in place.
At the same time, you can check the check valve pump. And, of course, when replacing the timing belt, it is necessary to replace the tensioner roller with a new one. Now recheck and install the timing belt.
Opel Astra replacing the alternator belt from the crankshaft mechanism, then through small rollers to the pump and tensioner pulley. Pull the belt onto the first gear of the exhaust camshaft circle and finally the intake gear located on the left.
How to change the Alternator Belt on an Opel Astra
Perhaps, when performing this operation, the gear moves one tooth, and then using the key we return it. And now, perhaps, you will have difficulties, because Opel Astra alternator belt replacement the belt cannot adjust, you will have to turn both camshaft gears and leave the small roller on the left uncoated, pressing the belt to the roller, turn the camshaft key a quarter turn clockwise, and then everything should fall into place.
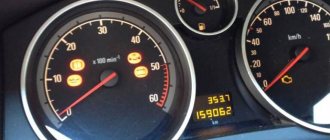
How to check the condition of the drive belt
The generator along with the belt drive is located on the right side of the engine compartment when looking at it in the direction of travel. A visual inspection of the belt should be carried out every 5000 km. During inspection, the presence of serious defects in the inner surface of the belt (cracks and delaminations) is determined. If visual inspection is difficult, it can be supplemented with tactile inspection by feeling the belt. The presence of polished (ideally smooth) areas is also unacceptable, as are abrasions, as well as extensive oil stains.
On models with a gasoline engine, the automatic tensioner lever should be checked at the same intervals. Its tip should be in the interval between the stops on the base platform. If it goes beyond these limits (adjacent to the stop), the belt along with the tensioner must be replaced.
Removal and replacement
- The right front wheel is removed.
- The fastenings of the plastic protection and the protection itself are removed.
- The tension roller is moved away from the belt by turning it clockwise. To do this, use an open-end or socket wrench of 15. The roller is turned until it stops.
- The old belt is removed from the pulleys.
- With the pulley pulled out, a new belt is carefully installed on the pulleys.
- The tensioner roller returns to its place, the belt is tensioned.
- The protection is cleaned of dust and dirt, and then put in place.
- The removed wheel also returns to its place.
Engine Z13DTH
23. The multi-rib belt on these models is removed from below. It is necessary to first remove the right engine boot (see Section 5).
24. Loosen the multi-rib belt by turning the tensioner with a special wrench (see accompanying illustration 7.24a) in the direction of the arrow, and secure the tensioner in this position with the locking rod (see accompanying illustration 7.24b).
Note: At service stations, the KM-6130 device is used for this purpose.
What is needed to replace the timing belt on Astra Z16XER (Z18XER)
Changing the timing belt on an Astra 1.6 is not the easiest task, but an incentive will be the fact that for work at a service station, craftsmen charge at least $100-120 in a poor way. There are no particularly difficult operations, and no special tools are needed. To replace it, it is enough to have:
- standard set of sockets and keys, Torx E and Torx T heads, without them there is nothing to do in Opel;
- penetrating lubricant WD-40, if difficulties arise with the threads;
- torque wrench for proper tightening of bolts;
- poly V-belt driving the generator and additional equipment;
- timing belt;
- belt deflector roller;
- tension roller;
- crankshaft pulley bolt GM 24447224;
- if necessary, a pump.
The most popular timing belts are for Opel Astra J 1.6 GoodYear EP G1592H, Contitech CT1077WP1, Gates 5603XS (aka original GM). , the INA 530045010, Gates, Febi 27819 and Febi 27792 kits SWAG 40 92 8881 or Dayco 6PK1555 serpentine belt . If everything is ready, let's get to work.