In fact, the cooling system pipes on a VAZ 2110 car cannot be called strong, reliable and durable elements. Over time, they can wear out and lose their effectiveness. Therefore, the only thing left for the car owner is to replace them.
Rubber tubes for CO
Today we will tell you how to remove and replace these elements. You must act strictly in accordance with the operating instructions and observe all safety precautions. This will allow you to protect yourself and your car from unnecessary troubles.
VAZ 2110: replacing the stove pipe yourself
Removing the stove pipes for heating the interior
To maintain the desired temperature inside the VAZ 2110 car, there is a device called a heater or stove. The automatic control system allows you to adjust the temperature with an accuracy of two degrees. On a VAZ 2110, the stove in which the pipes can fail can fail.
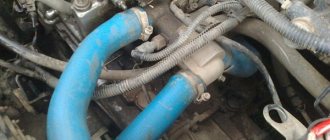
Pipes in the heating system of VAZ 2110
Any car that has liquid in its heating system uses all kinds of pipes to connect all the elements. When operating a VAZ 2110 car, they need to be given special attention. If the defect that appears is not corrected in time and the pipes on the VAZ 2110 stove are not replaced, this can lead to problems with the car’s engine. Attention must be paid not only to them, but also to the clamps that ensure a tight connection. A loose clamp or not tightened in time can lead to unexpected engine overhauls.
Required parts for repair
The kit to replace the VAZ 2110 heater pipes includes four hoses
The photo shows a set of pipes:
- lower pipe for draining fluid from the radiator;
- upper inlet pipe;
- shorts of the water pump and thermostat couplings.
The upper inlet pipe supplies heated fluid to the radiator, and the lower outlet pipe removes cooled engine fluid from the radiator. If leaks are detected from the pipes, it is necessary to urgently replace these elements on the VAZ 2110.
Design and functions of the cooling system
The operation of the VAZ 2110 cooling system is aimed not only at cooling parts and the engine, but also at performing other functions, and, more precisely, at:
- heating the air in the cabin;
- lubricant cooling;
- cooling of working elements in the automatic transmission system;
- cooling the air in the turbocharger.
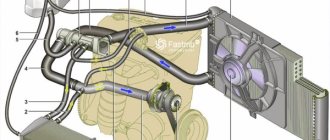
The cooling system diagram of the VAZ 2110 is quite simple if you look into it carefully. It is represented by the following elements:
- Cooling radiator, responsible for cooling heated antifreeze;
- A fan that enhances the cooling of antifreeze in the radiator;
- Heater radiator, responsible for heating the interior;
- An expansion tank into which coolant flows after strong heating;
- A pump that ensures continuous circulation of liquid;
- Thermostat regulating the circulation of antifreeze;
- Temperature sensor;
- The pipes through which the liquid moves, and the fixing clamps.
In the entire system, as in the whole car, it is difficult to identify important details, because its operation depends on the combined actions of all components. Of course, the hoses of the VAZ 2110 cooling system are secondary elements, but the circulation of antifreeze depends on them. All components must be firmly connected with clamps and treated with sealant. The cooling system pipe of the VAZ 2110 must be sealed, otherwise even a small crack can lead to a malfunction of the machine, a coolant leak and subsequent more serious damage.
The VAZ 2110 cooling system heater is the most amazing component, designed not to cool, but to warm the air in the cabin. Its presence implements the main technical task of any device - to make maximum use of available resources to perform basic and related tasks.
Work order
Every slave must have its own consistency. Then it can be done efficiently.
- The wire from “—” is disconnected from the battery.
- The coolant is drained.
Tip: Before draining the coolant, you must allow the engine to cool, otherwise the temperature of the drained liquid will be high.
- The lining, frame trim on the windshield, and sound insulation upholstery are removed.
- The heater fan is removed.
- The vacuum hose clamp is disconnected from the stove body.
- Using a screwdriver, remove the three spring clips that secure the front housing of the heater air collector.
- Remove the screws securing the front housing.
- The front housing is removed.
- The tightening of the clamps is loosened and the hoses are disconnected from the fittings.
Installation of new pipes
When replacing the stove pipes on a VAZ 2110, it is better to replace the clamps connecting all the elements. So:
- Replacement in progress. New pipes have been installed on the VAZ 2110 stove for supplying coolant and draining it from the radiator.
- The remaining parts and assemblies are installed in the reverse order.
- Coolant is poured into the cooling system and the tightness of the pipes and all connections is checked, if necessary they are tightened.
Replacing a tee or outlet hose of a VAZ 2110 heater radiator
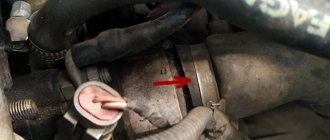
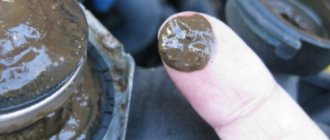
Attention: There are cases when coolant leaks at the junction of the tee with the heater, expansion tank and engine cooling pump.
Sometimes it is enough just to tighten the hoses on the pipes with new clamps.
Tip: Tightening the clamps must be done very carefully so as not to cut through the rubber of the hose, which may lead to the replacement of the hose.
Repairing a hose without removing it from the car
- The damaged end of the element is cut off.
- A piece of the same hose is attached to a metal pipe approximately 60 millimeters long and 20 millimeters in diameter. The price of such an element is low, which saves money and repair time.
- To reduce the tension of the hose, its length should be increased by 8 millimeters.
- If antifreeze leaks from the joint between the hose and the heater radiator, then it is necessary to remove the vacuum booster.
How to replace the stove pipe of a VAZ 2110 is clearly visible in the video presented.
Replacing tee hoses
Instructions and work order:
- The clamp securing the filling hose to the tee branch pipe is loosened.
- Coolant is drained from the expansion tank.
- The clamp connecting the hose of the tee and the branch pipe of the pump supply pipe is loosened, the hose is removed from the branch pipe, and the remaining liquid is drained from it.
- The rubber belt securing it is unfastened from the expansion bull.
- The connector is removed from the sensor that monitors the level of cooling liquid in the tank.
- The hose that removes steam from the tank is disconnected.
- The tank is removed from the niche and moved to the side, along with the second hose that removes steam.
- Unscrew the screws securing the left noise-insulating upholstery of the engine compartment.
- The top screw holding the central upholstery is removed.
- Remove the connector from the sensor in the brake reservoir, which monitors the fluid level in it.
- Unscrew the nuts securing the vacuum booster of the main brake cylinder.
- The cylinder is removed from the studs and, together with the brake pipes, is moved forward. This causes the tubes to bend.
- The hose is removed from the vacuum booster pipe, having first bent the upper corner of the upholstery.
Further work is performed inside the car:
- We move the vacuum booster, bracket and brake pedal assembly to the side and free access to the pipes located on the heater radiator.
- To disconnect the lower hose, you must first remove the upper supply hose.
- The clamp is loosened and the lower hose is removed from the pipe.
Installation of new elements is carried out in reverse order.
Tip: For greater reliability of the connection, before installing the tee on the pipes, it is better to install additional clamps.
A timely inspection and, if necessary, replacement of the hoses of the VAZ 2110 stove and the car’s cooling system, with your own hands, is the key to reliable operation of the car’s engine.
How does CO work?
CO scheme
- On the 8-valve injection VAZ 2110, the cooling system operates due to coolant forcedly circulating through it. When the engine heats up, excess pressure arises, which is released through the exhaust valve.
- For the 16 valve injection VAZ 2110, the cooling system has an optimal operating temperature in the range of 90-95 degrees Celsius. And the valve is activated when pressure occurs with indicators from 1.2 to 1.4 kgf/cm2.
- When the excess pressure is released, the engine returns to normal temperature and the intake valve is turned on. This happens cycle after cycle.
- If the pressure balance is disturbed, overheating occurs, the consequences of which can be various types of breakdowns, including the need to completely replace the power unit.
- Due to the operation of the thermostat and electric fan, the VAZ 2110 maintains the required constant operating temperature. There is a sensor on the cylinder head that transmits information about the current coolant temperature to the control unit.
- A command is sent from the coolant temperature sensor to the cooling system, which begins to work in order to reduce engine heating.
- If there is electronic injection in the car design, it also has a special sensor that sends a message to the electronic control unit about overheating of the power unit.
- The pump supplies coolant, distributed by the thermostat.
- When you turn on the engine, it needs to warm up to operating temperature. To do this, the thermostat directs the coolant through a small circuit, without including circulation through the radiator. The small circuit includes: Heater for warming up the interior;
- Carburetor heating unit (naturally, only on carburetor VAZ 2110);
- Heating of the throttle unit;
- Intake manifold.
- When the engine warms up to approximately 90 degrees Celsius, the thermostat sends some of the coolant to the radiator.
When the engine overheating sensor is triggered, all the cooling liquid circulates through a large circuit. Article on the topic: Fuse for the cigarette lighter VAZ 2114
We are replacing the heater and cooling radiator of a VAZ 2110: don’t forget about the pipes
Cooling and heating radiators are the most important elements of the corresponding vehicle systems. Without a normally functioning cooling radiator, a dozen simply won’t be able to drive in the warm season - the engine will boil, and with a damaged heating radiator you won’t be able to drive in the winter - the stove won’t heat up.
From this article you will learn how to replace the heater radiator on a VAZ 2110, the technology for removing the radiator of the cooling system will also be discussed and recommendations will be given on choosing the best components of this class for the VAZ 2110.
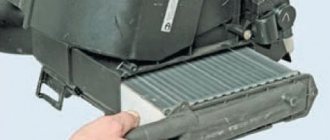
Heater radiator (1) and VAZ 2110 engine cooling radiator (14)
REPLACING THE HEATER RADIATOR
First, let's figure out how to find out if the heater radiator on a VAZ 2110 is leaking. The first evidence that something is wrong with the device is the stove's refusal to produce warm air even when operating at maximum power. You will also feel the characteristic smell of antifreeze in the car interior, which is impossible not to notice, and coolant will disappear from the expansion tank at an accelerated pace.
You can inspect the stove radiator for damage only after dismantling it, so stock up on a few hours of free time and the required tools: a Phillips screwdriver and a set of keys. You also need to purchase clamps, new pipes and antifreeze in advance.
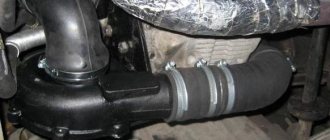
Branch pipes with reinforced clamps
Replacing the heater radiator on a VAZ 2110 is performed in the following sequence:
- Disconnect the battery and drain the antifreeze from the heating system. The drain hole is located on the tens engine; to get to it you will need to remove the ignition module;
- We unscrew the four fixing screws on the “jabot”, dismantle the windshield trim with soundproofing trim and disconnect the hoses located under it;
- Disconnect the fan from the heater radiator housing;
- Remove the clamp securing the vacuum hose;
- We remove the mounting brackets from the heater body;
- Unscrew the fastening screws on the sides and front of the case;
- Remove the heater housing;
- Disconnect the steam exhaust hose from the radiator;
- We dismantle the brackets securing the rear heater casing and remove the unit.
Next, we install a new heater radiator on the VAZ 2110. The cost of the new device varies between 1-2 thousand rubles. Units produced by DAAZ and Luzar companies have proven themselves well.
Replacing the pipes of the VAZ 2110 heater is much more problematic than replacing the pipes in the cooling system, since they are more difficult to access - in order to get to the pipes you will have to dismantle the vacuum pump.
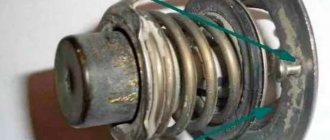
Replacing Thermostat VAZ 2112 16 Valves
Replacing the thermostat on VAZ 2110, VAZ 2111, VAZ 2112
Thanks to the thermostat, the engine can heat up very quickly, and also not actually heat up at all, all this happens for the following reasons, in the thermostat itself there is a so-called valve, this valve is filled with a special substance with the help of which the thermostat determines when it needs to open one hundred percent and when it needs to be locked one hundred percent, we all already know that when the engine is running (Maybe we paid attention), the car heats up very quickly to about 80 degrees, and after 80 degrees the engine heats up a little less, and after 94 c° it actually doesn’t heat up at all unless you are stuck in a traffic jam for many hours, the whole point is that the thermostat valve releases coolant into a large circle when it reaches 80 c°, and after 94 c° the liquid goes out to the same circle but only the circulation of water in a small circle stops altogether and as a result the car heats up less.
In order to change the thermostat to a new one, you will need to stock up on: A screwdriver and one hexagon of approximately “5”!
It is located a little lower than the air filter housing, it is not at all difficult to see it; to do this, open the hood of your car , then look for this same air filter housing in the engine compartment and after finding it, look a little lower, so to speak, under it, and that thermostat will be installed there (More precisely its lid, and this unit itself is located inside the lid), for example, the location of the lid is also shown in the photo just below:
When should you change the thermostat?
It is replaced only in this case if he did not open the valve that releases coolant to a large circle, and also if he left the valve in the open position and this valve is jammed.
In the first case, if the thermostat does not release liquid in a large circle, then the car will begin to heat up very much, under no circumstances allow it to overheat and, if possible, change the thermostat recently, especially if your car’s engine operates at elevated temperatures, then your cylinder head gasket will gradually burn out, and the friction in your car’s engine will also increase, since as we all know from the law of physics, the higher the temperature, then the metal expands accordingly, and the larger the metal becomes, the larger it becomes its friction, so watch the engine overheating very closely.
In the second case, if your valve gets stuck in the open position, although this happens occasionally, you still decide for yourself whether you need to replace the thermostat or not, since if the valve is in the open position, then the engine will actually will not heat up, but if it’s winter outside, it would still be better to replace this unit with a new one!
Replacing the thermostat VAZ 2110-11-12
cover vaz 2112
If you would like to contribute to the Yandex channel, please contact 410013139365069 QIWI 79293953175.
Replacing the thermostat VAZ 2110-12-Priora Do it yourself
A channel on the topic of cars, worthy of attention and useful.
How to check whether the thermostat is working or not?
Preparation
It is necessary to remove the pipes only when the car engine has completely cooled down. Therefore, if you have just stopped by your garage for procedures, do not rush. It is better to leave the car overnight and return to work tomorrow morning.
- Make sure that the pipes are actually damaged and need to be replaced.
- Be sure to drain the coolant from the system. If you recently changed it, there is no need to dispose of the liquid. Just use a clean container to drain so you can refill it later.
- The order in which you perform the work depends on what hoses are used on your vehicle.
Replacing the pump and pump supply pipe — Lada 2109, 1.5 l., 1999 on DRIVE2
Not even after 20 thousand the pump started leaking. I also noticed that antifreeze was leaking at the junction of the pump supply pipe and the block. For those who don’t know, it is located at the rear of the block, in the most inconvenient place in the front-wheel drive family.
At first the pump did not flow much, then a river appeared.
I chose the time and started replacing. I carefully drained the antifreeze and had to come up with a whole system. It was not difficult to remove everything. When I removed the carburetor heating hose, I saw that it was all cracked and dry. It's strange that it hasn't leaked yet.
The oil seal on the pump leaked and a creaking sound appeared when rotating. The gasket on the supply pipe is rotten. In principle, I could have left the old pipe, but I immediately stocked up on a new one.
I bought the pump from Mstart. To be honest, I have never heard of this, but the seller assured me that it was good. I immediately took a roller of some kind, a Continental Contitech belt, I had heard a lot about its quality.
in the photo above, the Finwhale belt is on top - 23 thousand km, in the middle Goodyear - it's unknown how long, but more than 15 thousand km, on the bottom is a new Contitech
I cleaned the seats of old gaskets and spent a long time fiddling with the seat pipes. It was very inconvenient, I had to jack up the car and clean it while lying under it. I wiped off the old traces of antifreeze a little to suddenly see a new leak.
While I was taking pictures of the whole thing, in the light of the flash I saw fogging on the intake manifold. You'll have to change the gasket.
The new pipe laying was sealed with sealant. It is extremely inconvenient to put it in place. While baiting, I reapplied the sealant 2 more times: it had time to dry, and rubbed a callus on my finger. Tightening is also inconvenient; you can’t get anything in there except a spanner.
I assembled everything, installed it, tightened it. Replaced the carburetor heating hose. Filled with antifreeze. Everything is fine. Everything is working.
After that I drove another 1000 km. Everything is dry, you can only see that the belt has eaten a little. Now I'm wondering why he's slipping. Most likely the pump is crooked. We'll watch.
Well, according to tradition - smooth roads to everyone))
Price: 1,500 ₽ Mileage: 200,300 km
Introduction
Replacing a VAZ-2110 stove is a very important and responsible undertaking that will require more than one hour of free time. It is especially important to prepare the heating unit for the upcoming frosts, because a functional stove will be able to provide comfortable movement for all passengers and the driver. As a rule, replacing the VAZ-2110 heater is necessary due to a faulty radiator. True, the malfunction may be hidden in the presence of smudges of antifreeze or antifreeze oozing from the radiator (the pipes have expanded).
Why is the lower radiator hose cold? List of possible problems and how to fix them
- Or they go to the store and buy a new radiator;
- Or you can clean it yourself.
- The radiator must be cleaned when the engine has completely cooled down;
- It is recommended to wear protective gloves and firmly fasten the car hood;
- All coolant is drained from the radiator and checked. If the liquid is perfectly clean and there are no traces of rust or scale in it, the radiator is clean and the reason for the cold pipe is different;
- If the liquid is dirty, then that's it. Pour clean water (necessarily distilled) inside. We start the engine and let it run for 20 minutes.
- We drain the water, check for cleanliness and, if necessary, repeat the procedure several times.
AutoFlit.ru
Standard pipes with union connector
If such hoses are present, dismantling them is carried out as follows:
- Elements of this type are usually mounted using clamps. Just check what kind of clamps they are - disposable twist type or standard worm clamps. If they are disposable, we highly recommend replacing them with worm driven items. They are more practical and reliable;
- Armed with a screwdriver, loosen the clamp slightly and move it along the pipe. This way you can completely release the fitting;
- The hose is carefully, without unnecessary or sudden movements, removed from the receiver, that is, the fitting. Quite new pipes that have not yet worn out are easy to remove, but old ones can “stick”;
- If the element does not want to be removed just like that, twist it on the receiver, pry it with some sharp object, and pull it. You just can’t put in a lot of effort, because the pipes are very fragile. If the situation is really sad, just cut the hose with a knife. It is simpler, easier, although it will require large financial costs;
- When installing new hoses, clamps are first put on and then pulled onto the cooling system receivers;
- If you previously used a twist-type clamp, be sure to remove it. As an alternative, both a screw clamp and a worm clamp are suitable. There is no big difference in price, but the level of reliability is significantly higher;
- If you have difficulty fitting the elastic pipe onto the fitting, slightly wet the latter with soapy water. Another option is to warm the ends of the hoses in warm water;
- To facilitate installation, never use lubricants containing oils;
- Pull the ends of the hoses onto the fitting, check the correct installation and laying in the engine compartment;
- Now move the clamp to the required position and tighten, thereby ensuring a strong fastening of the new element of the cooling system;
- Follow the procedure to fill the system with coolant;
- Turn on the power unit and watch for signs of coolant leakage. It is quite possible that the clamp was not tensioned tightly enough, or there is a defect on the pipe itself. Although such things should be checked before purchasing.
Heater heat exchanger hoses
The other hoses in the VAZ 2110 cooling system are those connected to the heat exchanger of the heater.
When removing them and installing new elements, the O-rings must be replaced. Therefore, we advise you to purchase them in advance. The dismantling procedure itself is as follows.
- Two heater hoses are connected to the heat exchanger using a single connector. Some modifications of the VAZ 2110 may require dismantling the camshaft cover.
- Remove the metal clip that is located on top of the connector.
- Push the plastic tab towards the left side of the connector to release it.
- Remove the heat exchanger connector, remove the old O-rings. It is strongly not recommended to return the same ones to their place.
- An alternative to such connectors can be hoses with a spring clamp made of metal.
Now all that remains is to install a new set of pipes and complete the job. For this:
- Carry out installation by following the reverse sequence of disassembly and dismantling;
- Be sure to put new O-rings in place;
- Fill the cooling system with coolant;
- Start the engine and make sure there are no coolant leaks.
As you can see, replacing the cooling system pipes can easily be done with your own hands. This will require accuracy, consistency of your actions, as well as the use of new, high-quality parts to replace the old ones.
If you cannot or do not want to deal with such issues yourself, contact a good car service center, where they can quickly and efficiently bring your cooling system to normal condition.
First, let's figure out how to find out if the heater radiator on a VAZ 2110 is leaking. The first evidence that something is wrong with the device is the stove's refusal to produce warm air even when operating at maximum power. You will also feel the characteristic smell of antifreeze in the car interior, which is impossible not to notice, and coolant will disappear from the expansion tank at an accelerated pace.
You can inspect the stove radiator for damage only after dismantling it, so stock up on a few hours of free time and the required tools: a Phillips screwdriver and a set of keys. You also need to purchase clamps, new pipes and antifreeze in advance.
Branch pipes with reinforced clamps
Replacing the heater radiator on a VAZ 2110 is performed in the following sequence:
- Disconnect the battery and drain the antifreeze from the heating system. The drain hole is located on the tens engine; to get to it you will need to remove the ignition module;
- We unscrew the four fixing screws on the “jabot”, dismantle the windshield trim with soundproofing trim and disconnect the hoses located under it;
- Disconnect the fan from the heater radiator housing;
- Remove the clamp securing the vacuum hose;
- We remove the mounting brackets from the heater body;
- Unscrew the fastening screws on the sides and front of the case;
- Remove the heater housing;
- Disconnect the steam exhaust hose from the radiator;
- We dismantle the brackets securing the rear heater casing and remove the unit.
Next, we install a new heater radiator on the VAZ 2110. The cost of the new device varies between 1-2 thousand rubles. Units produced by DAAZ and Luzar companies have proven themselves well.
Replacing the pipes of the VAZ 2110 heater is much more problematic than replacing the pipes in the cooling system, since they are more difficult to access - in order to get to the pipes you will have to dismantle the vacuum pump.
Without warmth in the cabin, you won’t go far!
If a motorist does not know how to change the heater on a VAZ-2110, he should start by draining the antifreeze that fills the power unit of the domestic car. After the car is rid of coolant, you should begin removing the rubber seal and lining. Further actions consist of finding the main brake cylinder and unscrewing all fasteners. Then you need to release both clamps that connect to the wires and hoses.
Replacing the supply pipe from the pump to ICE 2111, VAZ 21102 — DRIVE2
Hello everyone. I'm going to change the saxophone on my TORPEDO. I purchased the saxophone itself, everything else is mine. First you need a gasket to install the pipe to the pump. To make it you need: paper cardboard, a pen, scissors, a razor blade, and the saxophone itself.
Repair for removing the pipe: 1 pull out the armored wire from the 4th spark plug to easily unscrew the ignition module. 2 unscrew the clamps on the air filter pipe with the mass air flow sensor, the throttle and on the valve cover. 3 pull out the pipe with the filter and mass air flow sensor. 4 unscrew the ignition module. 5 drain the coolant into container.6 unscrew the clamps on the pipes in the pipe.7 pull the pipes out of the pipe.8 unscrew the nuts securing the pipe from the pump.
9 pull out the pipe from the battery side.
Repair for installing a pipe: 1 smeared the pre-cut gasket on both sides not with sealant but with solid oil. 2 stuck it to the place where it should stand on the pipe. 3 push the pipe to the installation site. 4 jacked up the right front part with a rolling jack. 5 drive up the car. 6 I put a bolt with a regular washer + a lock washer into the lower part of the pipe mount. 7 I baited it, screwed it halfway. 8 I put a bolt with a regular washer + a lock washer into the upper part of the pipe mount. 9 I baited it, and screwed it halfway.
10 Then I tightened everything with a wrench on the right side.
Repair to check what has been done: Tighten the plug on the side of the ignition module, Tighten the ignition module itself, Put the pipes on the supplied pipe, Tighten the clamps, Put the air filter pipe with the mass flow sensor in place, Tighten the clamps, Fill in the missing coolant, Start the engine, Warm it up, Look at the bottom the presence of a leak, Smile at the work done, Be proud of the hands from the right place and that you did it yourself and did not give money to a service center, And drive with confidence in your car until the next repair. All. Not a nail, not a rod.
VAZ 2110: replacing the stove pipe yourself
- 1 Pipes in the heating system of the VAZ 2110 1.1 Necessary parts for repair
- 3.1 Installation of new pipes
Removing the stove pipes for heating the interior
To maintain the desired temperature inside the VAZ 2110 car, there is a device called a heater or stove. The automatic control system allows you to adjust the temperature with an accuracy of two degrees. On a VAZ 2110, the stove in which the pipes can fail can fail.
Electrical diagram of VAZ-2112
Designations: 1 – Headlight, 2 – Klaxon, 3 – Main radiator fan, 4 – Starter, 5 – Battery, 6 – Generator 2112, 7 – Gearbox limit switch (reverse), 8 – Actuator in the front passenger door, 9 – Power window enable relay, 10 – Starter relay, 11 – Heater fan, 12 – Electric heater partition drive, 13 – Main pump, 14 – Washer reservoir sensor, 15 – Driver’s door actuator, 16 – Front passenger window selector, 17 – Unlock button fifth door, 18 – Heater fan resistance unit, 19 – Main wiper motor, 20 – Driver’s window lift selector, 21 – Front passenger’s window lift motor, 22 – Central locking, 23 – Exterior light switch, 24 – Brake fluid leakage sensor, 25 – Pump additional, 26 – Driver's window lift motor, 27 – PTF on indicator, 28 – PTF switch, 29 – Dashboard, 30 – Heated glass on indicator, 31 – Heated glass switch, 32 – Steering column selector switch, 33 – PTF relay, 34 – Ignition switch, 35 – Main fuse block, 36 – Illumination of heater controls, 37 – Hazard warning button, 38 – Heater control controller, 39 – Glove compartment lighting, 40 – Glove compartment lid end cap, 41 – Cigarette lighter, 42 – BSK – display unit, 43 – Ashtray illumination, 44 – 12V socket, 45 – Instrument lighting switch, 46 – Actuator in the right rear door, 47 – Right rear passenger window selector, 48 – Clock, 49 – Right rear passenger window motor, 50 – Brake limit switch (closed – pedal is pressed), 51 – Left rear passenger window motor, 52 – Left rear passenger window selector, 53 – Actuator in the left rear door, 54 – Turn signal, 55 – Handbrake limit switch (closed – handbrake on), 56 – Rear wiper motor , 57 – Navigator's lamp, 58 – Interior lamp, 59 – Temperature sensor in the heater, 60 – Limit switch for the open front door, 61 – Limit switch for the open rear door, 62 – Trunk light, 63 – Rear optics (on the body), 64 – Rear optics (on the fifth door), 65 – License plate illumination.
The letters indicate the terminals to which it is connected: A – Front speaker on the right, B – Radio, C – Injector harness, D – ESD diagnostic connector, D – Front left speaker, E – Diagnostic connector for the heater controller, G – Rear right speaker, W – Rear left speaker, I – BC connector, K – glass heater thread, L – fifth door actuator, M – Additional brake light.
Wiring diagram VAZ-2112 injector 16 valves - full view
Pipes in the heating system of VAZ 2110
Any car that has liquid in its heating system uses all kinds of pipes to connect all the elements. When operating a VAZ 2110 car, they need to be given special attention. If the defect that appears is not corrected in time and the pipes on the VAZ 2110 stove are not replaced, this can lead to problems with the car’s engine. Attention must be paid not only to them, but also to the clamps that ensure a tight connection. A loose clamp or not tightened in time can lead to unexpected engine overhauls.
Required parts for repair
The kit to replace the VAZ 2110 heater pipes includes four hoses
The photo shows a set of pipes:
- lower pipe for draining fluid from the radiator;
- upper inlet pipe;
- shorts of the water pump and thermostat couplings.
The upper inlet pipe supplies heated fluid to the radiator, and the lower outlet pipe removes cooled engine fluid from the radiator. If leaks are detected from the pipes, it is necessary to urgently replace these elements on the VAZ 2110.
Causes of poor coolant circulation
According to the above diagram, the reason that the lower radiator pipe in the VAZ 2110, 2114, 2115 remains cold is the lack of fluid circulation in a large circle of the system. Note that the radiator is the main cooling element. Therefore, the upper pipe through which the liquid enters the heat exchanger will be hotter than the lower one, even if the liquid circulates correctly.
Possible causes of stagnation in the cooling system:
- radiator clogged;
- non-working thermostat;
- airlock;
- pump breakdown.
Any intervention in the engine cooling system requires subsequent flushing of the ODS and replacement of the coolant. Poor quality coolant cannot cope with cooling the engine and can cause a blockage in the system.
Work order
Every slave must have its own consistency. Then it can be done efficiently.
- The wire from “—” is disconnected from the battery.
- The coolant is drained.
Tip: Before draining the coolant, you must allow the engine to cool, otherwise the temperature of the drained liquid will be high.
- The lining, frame trim on the windshield, and sound insulation upholstery are removed.
- The heater fan is removed.
- The vacuum hose clamp is disconnected from the stove body.
- Using a screwdriver, remove the three spring clips that secure the front housing of the heater air collector.
- Remove the screws securing the front housing.
- The front housing is removed.
- The tightening of the clamps is loosened and the hoses are disconnected from the fittings.
Installation of new pipes
When replacing the stove pipes on a VAZ 2110, it is better to replace the clamps connecting all the elements. So:
- Replacement in progress. New pipes have been installed on the VAZ 2110 stove for supplying coolant and draining it from the radiator.
- The remaining parts and assemblies are installed in the reverse order.
- Coolant is poured into the cooling system and the tightness of the pipes and all connections is checked, if necessary they are tightened.
Replacing a tee or outlet hose of a VAZ 2110 heater radiator
Attention: There are cases when coolant leaks at the junction of the tee with the heater, expansion tank and engine cooling pump.
Sometimes it is enough just to tighten the hoses on the pipes with new clamps.
Tip: Tightening the clamps must be done very carefully so as not to cut through the rubber of the hose, which may lead to the replacement of the hose.
Repairing a hose without removing it from the car
- The damaged end of the element is cut off.
- A piece of the same hose is attached to a metal pipe approximately 60 millimeters long and 20 millimeters in diameter. The price of such an element is low, which saves money and repair time.
- To reduce the tension of the hose, its length should be increased by 8 millimeters.
- If antifreeze leaks from the joint between the hose and the heater radiator, then it is necessary to remove the vacuum booster.
How to replace the stove pipe of a VAZ 2110 is clearly visible in the video presented.
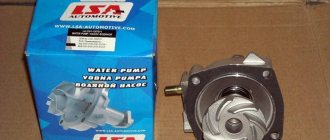
Why do you need a pump in a car?
If we talk about the operation of a car engine, then we immediately touch upon the topic of its cooling. Indeed, without high-quality cooling, the engine will not be able to work for a long time and will definitely “boil”. Thanks to the circulation of coolant, it becomes possible to operate the engine at any time of the year under any external conditions.
The power component on the VAZ of the tenth family has a rather complex structure. During the working cycle, the pistons rub strongly against each other, which invariably leads to strong heating of the surfaces. The only way to prevent engine overheating is to constantly maintain the desired temperature in the friction zone through the circulation of coolant. It is for this purpose that the VAZ design includes a cooling system.
Coolant (antifreeze or antifreeze) is poured by the driver into the expansion tank of the car. From it, the liquid is transferred through pipes to the water pump, and from there it goes to the radiator and cylinder block. The water pump (or pump) is designed to pump antifreeze through the system while the engine is running. That is, the pump starts together with the engine and turns off after the driver turns off the car. Without a pump, the entire cooling system can be considered ineffective, since only the pump can create rapid circulation of liquid throughout all parts of the system.
The pump is designed to create the necessary pressure in the cooling system to move the liquid.