Why are MSCs needed in an engine?
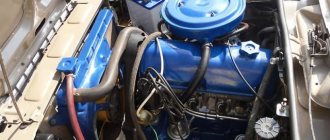
To organize the working process of a four-stroke engine, intake and exhaust valves are needed. Through them, a fresh mixture of fuel and air enters the combustion chamber of the cylinder and exhaust gases escape.
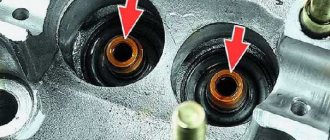
Each valve consists of a plate and a stem. The plate blocks the path of the mixture and gases, fitting tightly into the cylinder head (cylinder head) socket, and the stem ensures the correct geometric location of the plate and its reciprocating movement. To do this, it slides along a guide sleeve made in the body of the head.
The gap between the bushing and the valve stem is very small, but without it the mechanism will not be able to work.
- The valve, especially the exhaust valve, heats up more than the metal of the cylinder head through which the cooling system channels pass. And although the coefficients of thermal expansion of these parts are as close as possible, as the temperature difference increases, the gap between the sleeve and the stem will decrease. If you do not ensure its correct initial value, the valve will jam with catastrophic consequences for the engine.
- To minimize friction between the valve and guide, lubricant must penetrate into the gap. If it is made too small, the stem will work in oil starvation mode, local overheating is possible due to increased friction with the same result - jamming.
But the presence of a gap means a loss of tightness of the crankcase space, because the gas distribution mechanism operates in the same oil as other engine parts, its volume freely communicates with the area under the pistons. The valve plates are located in the area between the combustion chamber and the intake and exhaust manifolds.
On the subject: What is an engine crankcase (purpose and design)
All this implies constant pressure differences that can transfer oil into the cylinders and clog the thermal gaps between the valves and their guides with high-temperature deposits.
Gradually, in automotive technology, the need to install gland-type seals there became established, although there were other ways to solve the issue. The old engines didn’t have any MSCs, but they worked great and didn’t consume buckets of oil. For example, the Moskvich-412 family with engines very similar to BMW.
Device
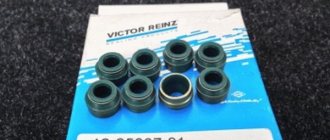
The valve stem seal is a classic annular seal with a working edge reinforced with a steel spring. The lower part is a tin cylinder covered with a thin layer of rubber. During installation, it fits tightly onto the protruding part of the valve guide.
Much depends on the composition of the material from which the working part of the oil seal and its edge are made. On the one hand, it must effectively remove oil from a fast-moving stem, preventing it from going into the gap even with a significant pressure drop. But on the other hand, it is unacceptable to leave the stem without any lubrication. A properly selected oil seal accurately dispenses oil in microscopic quantities.
Intake and exhaust caps operate at radically different temperatures. The intake valve is cooled better when its bevel is seated in its seat, as well as by the flow of fresh air-fuel mixture.
The outlet is worse; hot combustion products fly out through it. But both seals must remain elastic. Therefore, sometimes, in order to save money, they are made from different materials. Otherwise, you would have to spend more money on intake seals, where the regime is much softer.
How is the oil seal constructed?
The modern oil seal is a rubber cap. For reliability, it is reinforced with a steel bushing and spring. The spring allows you to press the edge of the cap more tightly to the working part of the valve.
It is not the design itself that determines the effectiveness of a part. The material from which the seal is made is important. If the cap is made of acrylate rubber or recycled rubber, then we can talk about a good seal.
Engines of older models are equipped with non-reinforced oil seals, which are made of fluoroplastic - efficiency was achieved thanks to a wider lip.
You need to understand that the wear of valve stem seals does not depend at all on the level and class of the car, as well as the technologies used in their production. And for different VAZ and Mercedes models, oil seals can have the same service life.
You need to know exactly which caps are in the engine. After all, the replacement process is a rather expensive operation. This is primarily due to the fact that it is necessary to disassemble the engine. Automakers also advise installing only original parts for a specific engine model.
Reasons for wear of valve stem seals
Over time, oil seals no longer retain oil effectively. There are several reasons for this:
- wear of the working edge from constant friction of the stem;
- high temperature degradation of the material;
- weakening of the additional spring;
- natural aging.
Most often, the oil seal material manages to lose its elasticity even before severe wear of the edge occurs. Therefore, the condition of the caps is assessed by their hardness; if they become “stiff,” it means they no longer work and need to be changed.
This can be noticed when opening the engine, when the oil seals will almost certainly be changed in any case; they do not skimp on them. For targeted repairs, indirect reasons are needed.
What happens if you don’t replace the caps on time?
Some drivers ignore the problem of increased oil consumption, trying only to maintain the minimum permissible volume of the substance in the system by regularly adding a new portion. Such a way out of the situation can lead to negative results for the components and assemblies of the car, and the most likely consequences will be:
- drop in engine power;
- periodically stalling engine;
- floating speed;
- reducing the compression level in the cylinders;
- the appearance of carbon deposits on internal combustion engine parts.
And besides, you will have to regularly buy new oil, which will also cost much more than replacing leaking oil seals. Therefore, it’s definitely not worth delaying repairs.
How to understand that MSCs require replacement
Faulty valve seals cause increased oil consumption due to waste. As a rule, this applies to the intakes, where the pressure drop works in an undesirable direction. But it will be necessary to distinguish the flow through the MSC from all other ways of oil loss.
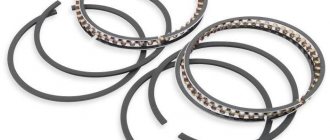
There are three main reasons for oil loss - from above through the valves, from below through the piston rings, simple leaks through the engine seals, in the latter case everything is clearly visible visually by oil puddles and drips.
- burnout due to worn rings causes uniform bluish smoke, depending on load and speed, gas flow through the crankcase ventilation increases, first drops, then compression increases;
- Valve seals allow more oil to pass through when there is maximum vacuum in the intake manifold, that is, there is a significant pressure drop.
Hence the characteristic signs of oil entering through the valve bushings. After ten seconds of engine operation with the throttle closed, especially if this is engine braking mode at high speeds, you need to sharply open the gas. A thick cloud of bluish oil smoke will fly out of the exhaust pipe. Moreover, if the rings are in order, there is no noticeable smoke at stationary speed modes.
How to choose oil seals?
Today there are practically no problems with spare parts. However, there is no need to exclude the situation when you have to trust not the spare parts recommended by the manufacturer, but those that are available in stores.
If we talk about the choice of oil seals, then their main purpose is to seal the valve stems, as well as valve bushings. These seals are supposed to protect the combustion chambers from oil. When oil seals and signs of wear are visible, it’s time to worry about purchasing new ones.
You know how these elements work. As the use of these parts shows, it is this solution that allows you to get good results. Thus, protection is maintained even when the valve stem suddenly becomes distorted.
New models of caps made of fluorine rubber or acrylate rubber are used on modern engines. However, no one anywhere said that they cannot be used on older machines.
If new oil scraper rings are installed on an old engine, signs of wear will appear much later, and the engine itself will greatly benefit from such a move. This is the optimal solution if the cap fits the valve according to the fitting dimensions.
It is also important to consider the profile of the inner part of the oil seal. For example, Japanese engines have caps that have a protrusion on the inside. There is a groove on the guide sleeve in this place. You should not experiment and place such parts on smooth bushings.
A long service life for the caps will be ensured by installing new oil seals on new engines. If you can put new models of caps on an old motor and nothing will happen, then if you put an old model of oil seal on a new model of internal combustion engine, then anything can happen. The whole point here is not even about the design of the valve stem seals, but about the fact that the new power plants operate in extremely harsh conditions. Old models of oil seals simply cannot withstand such loads. Therefore, buying them is pointless.
So, we found out what signs of wear the valve stem seals have.
Source
How to change valve stem seals
If the purpose of the repair intervention is the valve seals, then on many engines it will not be necessary to remove not only the engine, but also the cylinder head.
Without removing the cylinder head
Structurally, the motor can be made according to various schemes; only general points can be highlighted:
- the valve cover is dismantled;
- with direct valve drive, it will be necessary to remove the camshafts; if rocker arms or levers (rockers) are provided, then you can often leave the valve alone;
- to remove the springs from the valves, you will need a device - a desiccant, which can be used to compress the spring in order to pull out the fixing crackers;
- to prevent the valve from falling into the cylinder, various supports are used, inserted through the spark plug holes;
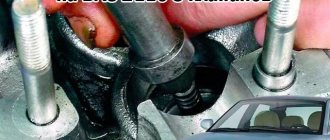
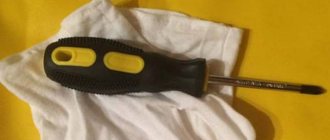
- to remove the old cap, you will need another collet-type device, other methods are unreliable and dangerous, you can break the upper part of the guide, which is often made of metal-ceramic;
- the new oil seal is pressed on using a tubular mandrel, the support is placed strictly on the flange provided for this;
- To avoid damaging the edge, a protective plastic cap is placed on the valve, and the oil seal is immersed in engine oil.
Particular attention is paid to the processes of removing and installing crackers; they are very easy to lose or incorrectly install, which leads to costly consequences.
With cylinder head removed
With the head removed, everything is done in exactly the same way, but much more convenient. You can use a more advanced desiccant and take less risks when working with crackers and springs.
It is quite rare to have to change the MSK without carrying out more complex engine repairs, so usually the seals are changed on the removed cylinder head.
We are replacing
Removing the valve stem seals involves the following steps. First you need to remove the cylinder head cover. Then we turn the crankshaft. It is necessary to turn until the mark on the camshaft sprocket aligns with the same mark on the bearing housing. Next, remove the bearing housing along with the camshaft. Now you can fix the sprocket and chain. Disconnect the wires from the spark plugs and turn the spark plugs out.
At the next stage, press the spring well and remove the valve actuator lever. We take it out from under the locking plate and remove the spring. Turn out the adjusting screw. In place of the screw, you need to screw in a tool that can compress the valve spring. We insert our rod into the hole that was formed by removing the candle. This is required to ensure that the valve remains closed. Now let's release the crackers. To do this, you usually need to compress the valve spring and tighten the depressurizer bolt. We remove the parts and remove the tool.
Now you can see the seals. If you do not know how to change valve stem seals, you should use a collet clamp. This allows you to remove the seals using light blows from the striker. Do not use screwdrivers, pliers or any other similar tools for pressing out. This way you can rip the bushing apart.
The new part must be carefully placed on the valve (and at the same time try not to damage its outer part). The internal surfaces must be lubricated with oil. This will allow you to move the oil seal along the valve to the guide sleeve. Now all that remains is to lightly tap and finally press in the oil seal.
After successful pressing, it's time to put everything back together in reverse order. So you learned how to change valve stem seals.
Do additives help with valve seal leaks?
In the long line of magical products for non-contact engine repair, there are also additives that supposedly eliminate leaks through seals. The principle of operation is clearly explained - they soften the rubber of oil seals or gaskets, restoring their volume and elasticity. If you don’t think any further and buy right away, then that’s enough.
In fact, you have to examine what the deception is in each specific case. If we are talking about MSCs, then their material is such (described above about temperature conditions) that no solvents or ethers that make up the essence of the additives will affect it. Moreover, they will not restore the worn edge and tighten the ring spring.
If you are too lazy to repair it or there are more objective reasons, then there is nothing wrong with stiffened caps. You can drive for a while, especially if the catalyst has been removed from the car.
Then you still have to repair the engine; the valve seal is far from the only part that fails. And when doing repairs, it’s better to buy good products from a reliable manufacturer than to spend the same money on additives, it’s known for whom they were invented.
What is a valve seal?
Valve seals (or valve seals) are designed to prevent excess oil from leaking from the engine. Like most parts in the engine, they are made of rubber of a special composition. Time passes, these parts age, which means they lose their effectiveness. This is characterized by delamination. Old oil seals do not retain excess oil well, and lubricant consumption increases significantly. In addition to the high consumption of lubricant, this can greatly harm the engine. Let's look at the signs of failure of these parts, and also find out how to replace the valve stem seals.
Brand tour
As already indicated in the previous paragraph, often analogues of valve stem seals can surpass the originals in terms of workmanship and service life. For example, factory engine caps for Mercedes-Benz models M110 and M123 (fluoroplastic) can be replaced with more modern rubber analogues. You should choose between products from the following manufacturers:
- Elring (Germany);
- Ajusa (Spain);
- NOK (Japan);
- Goetze (Germany);
- Victor Reinz (Germany-USA).
In fact, these are the same companies that supply their products to car factories. OEM-quality spare parts can be found under the names of these manufacturers' own brands. Unfortunately, valve stem seals from these companies are often counterfeited. Be especially careful when choosing analogues from Ajusa, Elring and Victor Reinz. Practice shows that the Spanish product is counterfeited especially often, as a result of which the manufacturer itself today does not have the best reputation.
Good analogues can be found in the catalogs] Musashi[/anchor] (Japan), Corteco (Germany), Stone (Japan-USA). Let us immediately note that some car enthusiasts note the average quality of valve stem seals from these companies. Of the three listed companies, only Corteco’s reputation is spoiled by the large number of fakes exploiting the name of the German brand. As for analogues from little-known packagers, it will almost certainly be a product from one of the manufacturers from the list above. You should only be wary of low-quality fakes.
To identify valve stem seals, you should purchase a branded product. Fortunately, today it will be enough to have on hand photographs found on the Internet. There are several things to pay attention to. Firstly, on the labeling. For example, on the caps of NOK (Japan) there is a marking with a code and the name of the manufacturer. Secondly, counterfeit caps are often made in the wrong color. For example, in a set with branded products, one cap is completely gray, and the second has a black element. With fakes, everything is simple - both caps will turn out to be gray. Thirdly, counterfeit products are almost always larger than branded ones. Often the outer diameter of fakes is 1.5 millimeters larger than that of the originals. And fourthly, pay attention to the price. Fakes are always cheaper. If the average market price of a cap is $3, and you find the same one, but for $1, then it is highly likely to be fake.
Replacing MSC for Mitsubishi Lancer IX 1.6
Let's consider step by step the process of replacing valve seals on the ninth generation Mitsubishi Lancer 1.6 without removing the cylinder head.
- The ignition coils are dismantled, after which the spark plugs are unscrewed.
- After unscrewing the six bolts, the valve cover is removed. The hoses are disconnected.
- To prevent hydraulic compensators from falling out, they can be secured with wire or plastic clamps.
- It is necessary to unscrew 13 bolts securing the rocker arm axles. The axles are removed as an assembly without turning over (to avoid oil leakage from the compensators).
- To prevent the crackers from falling into the pan, the engine holes are clogged with foam rubber and clean rags.
- Using marks on the pulley and head, TDC is set in the first and fourth cylinders.
- One part of the cracker remover is attached to the valve head body, the other rests against a plate, which allows you to release the crackers and remove them with tweezers.
- After removing the plate with the spring, access to the cap becomes available.
- Ideally, dismantling the cap itself should be done using a special removable device. But in the absence of one, you can get used to working with pliers. However, if you are not careful, you can easily damage the valve guide.
- Before swapping the old and new caps, it doesn’t hurt to check the valve itself for play.
- The oil-lubricated new cap is pressed on using a suitable mandrel - you can use a 10 mm nut head.
- The spring and plate are returned to their place; using tweezers and a puller, the crackers are put back.
- Replacement of the MSK in the remaining two cylinders is carried out after turning the pulley according to the marks and setting TDC.
- It is highly advisable to tighten the rocker arm axle bolts with a torque wrench in compliance with the values recommended by the car manufacturer (50 Nm).
Replace without removing the head: cost of repair kit Ford, Mazda, Nissan
In official service, specialists usually insist on the option of replacing the caps, which involves removing the cylinder head. This makes dismantling/installing oil seals much easier, and all time spent fiddling with the cylinder head is paid for by the client. Thus, a decent amount of money accumulates. But if you don’t go as far as removing the “head,” you will need less nerves and time, and you won’t have to spend money on a cylinder head gasket and new bolts. Once you have access to a desiccant (you don’t have to buy it - you can, for example, temporarily borrow from a friend), the matter remains small. It is necessary to purchase a set of branded or non-original valve stem seals.
Cost of the original repair kit (valve seals):
- Toyota Camry 2.4 – 1300 rubles;
- Ford Focus 1.8 – 1500 rubles;
- Volkswagen Golf 1.6 – 1800 rub.;
- Nissan Qashqai 2.0 – 1500 rub.;
- BMW X3 2.5i – 2200 rub.;
- Mazda 6 1.8 – 1600 rub.
Features of replacing caps on a 16-valve VAZ Priora
To gain access to the caps on the Priora, you will first have to unscrew the spark plugs from the wells, remove the ignition coils, and also remove the throttle assembly. After this, you can unscrew the valve cover bolts to remove the rocker arms and actually replace the MSC using a puller. In general, the situation is the same as in the case of the Lancer: TDC is set in the cylinders, crackers and springs are removed, new seals are installed, and reassembly is underway. As a rule, the entire complex of work takes the performer from 8 to 12 hours.