Print this article Font size 16
Many car owners are well aware that the main role of the camshaft oil seal is to prevent oil leaks through the joints. In other words, the cuff, that is, the oil seal, performs the tasks of a seal. But this is not its only function.
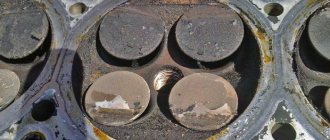
Element appearance
About the oil seal
The oil seal is one of the most common and long-invented sealing devices for moving mechanisms.
This part is widely used due to its simple design. It should be noted that the oil seals used in VAZ cars have a direction and need to be installed only in the designated direction of shaft rotation.
Purpose of oil seals
Valve seals are designed to remove excess oil that gets onto the valve stems. It is the excess, a certain amount of it that should wash the sleeve with the valve. If the valve seals (for some reason) stopped working (became unusable) and oil began to get into the combustion chambers, you need to replace the valve seals on the VAZ 2106.
Device
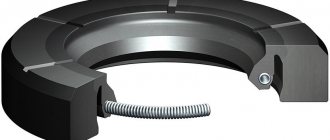
The oil seal is made of special rubber, which does not lose its properties when in contact with oil. This kind of rubber is called oil-resistant .
Structurally, the oil seal is similar to a ring; inside the oil seal there is a so-called “box”. Which, under the influence of oil pressure, is pressed against the working part of the shaft and creates a tight seal.
The oil seal also has a spring that presses its working part against the shaft ensuring tightness.
Dimensions of the oil seal distributed by VAZ
The dimensions of the oil seal installed on the camshaft of VAZ cars are the same only for front-wheel drive Lada cars. It should also be noted that the dimensions of the oil seal do not differ depending on the type of engine, that is, if the engine has 16 valves, then the oil seals for each camshaft will be the same.
Oil seal size: 28*42*7
Where is
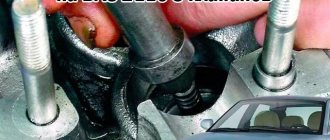
The oil seal is located under the timing belt boot, behind the camshaft gear.
The oil seal must be replaced if engine oil leaks through it. This leak can lead to oil getting onto the timing belt, which is strictly prohibited. Oil can damage the belt and lead to its breakage, which on 16-valve engines can lead to valve bending.
Benefit of the cuff
If the oil seal (cuff) fails or, simply, leaks oil, this significantly affects the operation of the car:
- the most minimal harm is that on the VAZ 2110 the engine and the entire engine compartment will be oily;
- importantly, oil consumption will increase, it will have to be constantly topped up, which the oil level sensor will constantly remind you of;
- when the oil level drops, valve knocking will be heard, and they are more likely to fail;
- oily non-metallic parts in a car are quickly destroyed;
- Oily contacts lead to many problems, starting with poor engine starting;
- Since problems may arise with the quality of camshaft lubrication, its position (phase) sensor may also malfunction. At the same time, fuel consumption increases, since there will be no adjustment of the fuel supply to each individual cylinder, and the load will be the same for all valves.
Signs that the seals have become unusable
In addition to smoke from the exhaust pipe, there are a number of signs:
- Appearance of grease on the spark plug threads
- The car smokes when the engine is cold (this is very noticeable when starting the engine in the morning)
- Dark stripes appear on the camshaft bed in the area of the passing cap
- Increased oil consumption
- Frequent failures of one or more spark plugs
Do not rush to make major repairs right away, knowing that smoking and increased oil consumption may occur due to failure of the piston rings (see Replacing piston rings on your own), and some others. First, let's identify the problem so that the cost of the issue becomes clear:
- To distinguish a malfunction of valve seals from other malfunctions with similar symptoms, use a useful device - a compression meter.
- By measuring the compression in each cylinder, you will know exactly what needs to be repaired.
- Since worn valve caps have virtually no effect on the compression readings (if the compression in all cylinders is within the normal range, it means that the valve stem seals have failed; if the compression is weak in some cylinder, get ready for a major engine overhaul)
Valve seals become unusable during operation for the following reasons:
- Natural production of materials
- Engine overheating
- Use of valve seals made from low-quality materials
- Increased clearance in the valve bushings themselves
- Initially incorrect installation of oil seals
Professionals say that for the VAZ 2106, replacement of valve seals is necessary every 18 - 25 thousand kilometers
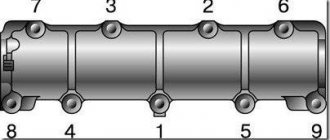
Torque and sequence of tightening the camshaft bed
Camshaft cover tightening sequence
Correct tightening of the camshaft bed, as well as other parts of the cylinder head, determines the normal functioning of all components and assemblies. So, in order to tighten threaded connections, a standard tightening pattern and a torque wrench are used.
Before installing the bolts in place, they must be washed thoroughly and lubricated with silicone grease.
In order to properly tighten the bolts, you need to know the sequence. It starts from the middle part and gradually moves directly to the edges. The detailed sequence can be seen in the photo below.
Tightening diagram for each camshaft bed bolt with numbering
As for the tightening force itself, it is 8.0-10.0 Nm . After the bed is installed on the block head, the connection bolts are tightened by hand or without much force using a ratchet with a head.
We tighten all the bolts by hand, but do not tighten them
When all the bolts are in place, you need to take a torque wrench and tighten them according to the standards in the order indicated above.
Torque wrench for tightening threaded connections
In what cases is it necessary to tighten the camshaft bed?
The bolts are tightened. Marked with arrows
Tightening the camshaft bed will be necessary if it was previously dismantled for restoration and repair work. So, in what cases will you need to remove the bed, let’s look at it in more detail:
- Replacing camshafts, lifters or valve seals.
- Overhaul of the block head.
- Engine repair operations.
- Replacement of individual elements of the cylinder head.
Consequences of improper bed tightening
The consequences of improperly tightening the camshaft bed include the following:
- Oil leakage due to a gap or loose connection.
- Passing air inside the cylinder head.
- Malfunction of the engine or cylinder head.
- Ingress of foreign objects (water, dirt, dust).
All these factors can negatively affect the performance of the cylinder head and main power unit.
Reasons for failure of camshaft seals
There are many reasons why the camshaft oil seal fails:
- Wear . Since the camshafts are constantly in motion, they get very hot, and the oil seal is installed on the outside, there is no proper cooling. Thus, the inner part of the product, although made from resistant material, still wears out, and over time, oil smudges appear in the places where the material is rubbed.
- Damage to the structure from weather conditions . Strong temperature changes can affect the structure of the oil seal itself. So, cracks may appear on it or it will become deformed, which will make it unsuitable for use.
This is interesting: How to replace the ignition switch cylinders
Perhaps these are all the reasons why a part may fail and will require replacement.
Conclusion
Replacing camshaft seals on an 8-valve VAZ-2110 is quite simple and easy. This operation does not require any special skills or abilities. Separately, it is worth noting that the choice of oil seals should be taken seriously, since a low-quality product can affect not only oil loss, but also the wear of the camshafts themselves. If the described operations are too complicated for a car enthusiast, then it is recommended to contact a car service center, where they will do everything quickly and efficiently.
Source
Functionality check
Before you start replacing the cuff, if you find traces of oil on the engine, you need to carry out several checks:
- It is likely that the system responsible for ventilating the oil sump is clogged;
- The hoses in the system may become pinched, causing a malfunction.
If checking these elements shows that everything is in order, you will have to replace the oil seal.
We advise you to pay attention to several important points.
- Start the engine and listen for rattling valves or a loose camshaft making noise. A regular stethoscope will help you here, which will provide more accurate listening. It is likely that you will need to replace the cuffs and camshaft, or its components that are responsible for the knocking.
- In some situations, knocking can be eliminated by simply replacing the timing belt.
- Check the engine at idle speed. If the engine operation is unstable, or it is difficult to start the engine, check the condition of the camshaft position sensor. Sometimes replacing this element returns the motor to its previous operating efficiency.
Dismantling
To replace the problematic oil seal, you will have to perform several disassembly steps. As a result, you will need to do the following:
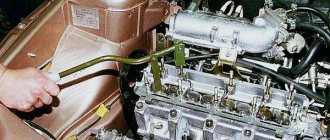
- Remove the front protective cover, and then remove the timing belt;
- Remove the camshaft pulley mounting bolts. To do this, hold the element with a screwdriver to prevent it from turning, and perform the removal procedure itself using a 17 mm wrench;
- Remove the toothed pulley;
- Remove the oil seal. For this operation, you will need a flat-head screwdriver or needle-nose pliers.
This set of measures will allow you to remove and replace the oil seal. But we advise you to check the condition of the camshaft and, if necessary, replace it.
To get to the camshaft you need:
- Remove the oil pressure sensor completely. If you don’t want to dismantle it, then at least disconnect the wires from the device;
- Unscrew the camshaft bearing housing mounting bolts. There are as many as 20 of them there. After this you can easily remove the case;
- Do not forget about the plugs that are located in each technological hole. Take them out;
- Disassemble the potentially problematic camshaft and determine the need for repair or replacement.
Reassembly
When reassembling the assembly, be sure to take into account the position of each dismantled element. Be careful with the plugs. Make sure that each of them is strictly in its place.
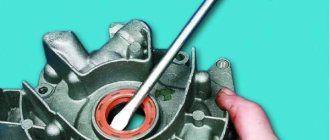
Press-in
Before installing the oil seal and additional elements, do not forget to lubricate them thoroughly. The seal can be pressed into place using a hammer. Just not metal, but rubber or plastic. Make sure the edges are flush with where the component will be installed.
Seal selection
The choice of camshaft oil seal should be taken seriously, since it is this detail that determines how efficiently the camshafts are used. Usually these parts can be adjusted to size.
Thus, the size of the camshaft oil seal for the VAZ-2110 is: 42x28 mm. But, it is recommended to buy parts specifically for cars.
Original
2108-1005034 – original catalog number of the camshaft oil seal. The inlet and outlet versions of the product are interchangeable, unlike the shafts themselves.
2108-1005034 is a fake! The inscriptions are not clear. Be careful when choosing
The average cost is up to 100 rubles per 1 piece, if we are talking about the manufacture of AvtoVAZ.
Substitutes
Of course, it is not always possible to find the original, so there is a list of analogues that can be used. They are certified and the size is correct.
Table of substitutes for the standard camshaft oil seal for the VAZ-2110:
Manufacturer's name Catalog number Cost, in rubles
| Master-sport | 2108-1005034ACM-PCS-MS | 45 |
| Reinz | 80-33653-10 | 55 |
| Elring | 546.968 | 60 |
| Herzog | HL8 5034 | 125 |
| Trialli | PM 155 | 180 |
| Corteco | 16012080B | 210 |
| Trialli | PM 785 | 400 |
Camshaft oil seal manufactured by Erling
As practice shows, camshaft oil seals manufactured by Elring are recommended for use. The company produces a fairly large range of rubber sealing products, the quality of which is noted by car enthusiasts at a high level.
Price list
- Special offers
- KAMAZ spare parts
- Spare parts KAMAZ-5490
- Spare parts MAZ, YaMZ
- ZIL spare parts
- Spare parts ZMZ, for GAZ vehicles
- Spare parts for Volzhanki cars
- Spare parts for Gazelists
- Spare parts for trucks Lawns
- Spare parts for GAZ-71 caterpillar
- Spare parts UAZ, UMZ
- Spare parts KrAZ, BelAZ
- Spare parts URAL
- Spare parts BUSES
- AMAZ spare parts
- IKARUS spare parts
- KAVZ spare parts
- LAZ spare parts
- LIAZ spare parts
- NEFAZ spare parts
- PAZ spare parts
- Other buses
- Tractors, computer equipment, attachments
- Tractors and walk-behind tractors
- Municipal vehicles
- Attachments and trailed equipment
- Spare parts for TRACTORS and SPECIAL EQUIPMENT
- JCB – spare parts for special equipment
- Truck crane (KS-3577, KS-4517, etc.)
- AMZ (A-01, A-41, D-440, D-442, D-447, D-461, D-467)
- Amkodor (TO-18, TO-28, TO-30, etc.)
- ATZ (T-4A, TT-4M)
- VgTZ (DT-75)
- VMTZ (D-120, D-144, D-130, D-145T)
- VTZ (T-25, T30A-80, VTZ-2048)
- LTZ (T-40, LTZ-55, LTZ-60)
- MKSM, UNC, DETVAN
- MTZ – spare parts for tractors
- OTZ (TDT-55)
- PTZ (K-700/701/702/703/704)
- KhTZ (T-150, MT-LB)
- ChTZ (T-130, T-170, B-10, B-12, B-170, T-10M, DET-250)
- YuMZ – spare parts for tractors
- Other special equipment and tractors
- RVD – high pressure hoses and hoses
- MMZ spare parts and engines
Replacing the oil seal
The replacement process is simple, but quite long. To carry out the work, it is necessary to remove the timing belt and camshaft gears, and in models with a 16-valve engine, it is necessary to remove the timing rollers and the rear part of the timing boot cover.
List of tools
To replace the camshaft oil seal on VAZ-2110 and 2112 16 valves, a minimum set of tools is required. These include:
- key to “10”;
- key to "17";
- Slotted screwdriver;
- Mandrel for pressing;
- A small amount of motor oil.
A pit or lift is not required for manipulation. The unit is fully accessible from the engine compartment. On VAZ-2110 cars there are 8 valves and on 16 valve units the oil seal is located under the camshaft pulley, on the right side in the direction of movement of the car.
Step-by-step replacement instructions
- The first thing you need to do is remove the timing belt. How to do this can be studied in detail in our article “Replacing the Timing Belt”. It is first recommended to loosen the camshaft pulley mounting bolt with a 17mm wrench, since this will be much more difficult to do after removing the belt.
This is interesting: Do-it-yourself Dodge Caravan car repair
- Remove the timing belt and unscrew the camshaft pulley. Be careful not to lose the key.
- Then pry up the old oil seal with a screwdriver and remove it.
- We wipe the seat and shaft from debris.
- We install a new oil seal, lubricating the shaft with clean engine oil. This will ensure easier sliding and movement of the oil seal along the shaft.
As a mandrel, you can use the head from the tool kit; you need to select the head in such a way that part of it rests against the metal part of the oil seal, but not against the working part.
- Using a hammer, lightly install the oil seal into its place.
- The replacement is completed, we carry out the assembly process in reverse order.
Removing the cuff
Started:
- the cylinder head cover is removed;
Note. In order for the replacement of camshaft seals on a VAZ 2110 to be successful, it is not necessary to dismantle the engine or the VAZ camshaft.
Camshaft oil seal VAZ 2110 16 valves
The cuff itself is located behind the toothed pulley. To dismantle it, you should arm yourself with a special tool - 2085. If this is not available, a regular hook can help remove the oil seal. So, let's start removing:
- first of all, loosen the clamps of the poly V-belt tensioner;
- remove the belt;
- now you need to dismantle the damper;
- we reach the safety shields - upper and lower;
- disconnect them from the end of the engine;
- Now you need to turn the crankshaft until the cylinder piston reaches top dead center.
Note. When performing the above operation, it is recommended to use the ignition timing mark.
- loosen the toothed belt tensioner;
- we remove it.
Note. This belt can of course be secured accordingly rather than removed. But, as you know, the belt cannot be tightened, otherwise it will become deformed. Therefore, it is still better to remove it.
Camshaft oil seal VAZ 2110 8 valves
From this point on, the crankshaft cannot be turned either, since one of the pistons is already at top dead center. Let's continue:
- block the camshaft pulley accordingly;
- First, use a wrench to unscrew the bolt, and use a pry bar to keep the shaft from turning.
You can also ask an assistant, if you have one, to hold the shaft from turning. In addition, to prevent the shaft from turning, you can pass a 10-mm head with an extension through the hole in the pulley, and then put it on the nut that secures the rear timing belt cover.
- The camshaft pulley is removed.
Note. In order not to lose the key, you should remove it from the camshaft groove.
- Now we should start removing the oil seal that will appear before us;
- take a screwdriver and remove the cuff.
The puller is screwed into the oil seal as far as possible. At the same time, press the slip ratchet.
- you need to loosen the knurled screw and rotate the inner part in the direction of the camshaft until the oil seal comes out.
Installing a new cuff on the camshaft
VAZ 2110 camshaft oil seal
Note. It is recommended to lubricate the new cuff with machine oil. In addition, the threaded head of the tool, which we use along the shaft, is lubricated. Only after this is the cuff pressed inside using a rubber hammer.
To easily install a new cuff, it is recommended to use a bushing of a suitable size instead of a handy tool. You also need to take a long bolt and a large washer.
Note. The bolt that is selected must be the same diameter as the camshaft pulley.
So:
- install the bushing on the outer diameter of the oil seal;
- install them together using a bolt and washer;
- tighten the bolt until the cuff is in place (that is, flush with the cover).
Note. If you don’t have a bushing at hand, the cuff can be pressed in with hammer blows through the bit. We remember that you cannot press the cuff in completely, because this can block the hole from which the oil drains.
Why is timely replacement of the cuff necessary?
Replacing the oil seal
This is interesting: Adjusting doors on a Lada Granta - what to do if the front door does not open from the outside: do-it-yourself repairs
Needless to say, timely replacement of the camshaft cuff will extend the life of the car . When to replace a camshaft oil seal depends on the age of the vehicle, driving style, conditions, and much more. Timely replacement of the cuff reduces the running costs of the car. As you know, the camshaft seal seals the connection, preventing oil leakage.
This is the main task of the oil seal. If the cuff begins to leak oil, it means it has become unusable. If in this case you are late with the replacement, the oil consumption in the engine will increase, and the engine will be constantly dirty, like the engine of a country tractor.
As the oil flows out of the oil seal, it will destroy non-metallic parts, of which there are quite a few in the car. In addition, the contact in the terminals will deteriorate, which will slow down the starting of the machine.
As mentioned above, it is advisable to remove the camshaft cuff and press it in with a special tool. Some even argue that it is necessary to have the oil seal replaced by specialists, but this is not entirely true.
The fact is that either the masters themselves say so, who need a constant flow of clients, or those drivers who are afraid to do something with their own hands. In independent work, detailed videos and photos - instructions will become good advisers, and desire and patience are the key to success.
By carrying out repair or replacement work on your own, you can save your family budget, for which the cost of a car is a significant share. It is no secret that the specialists' price for such a simple operation as replacing the camshaft cuff is relatively high and does not justify itself.
It’s better to learn how to do it yourself, especially since it’s very easy to do.
Assembly
Reassembly is carried out taking into account the position of each part. Make sure that each plug is in place and that all parts, including the seal, are thoroughly lubricated before installation. The cuff is pressed in carefully using a hammer with a plastic or rubber head, and its edges should be flush with the seat.
- Author: ratico19
Rate this article:
- 5
- 4
- 3
- 2
- 1
(2 votes, average: 5 out of 5)
Share with your friends!
Very useful recommendations
We recommend not pouring diesel oil (as amateurs advise) into a gasoline engine; a thick sediment will appear in it, which will lead to blockage of all oil channels of the engine.
This work requires some skills from you, if you are already familiar with the structure of the motor and the tools, and are not afraid to disassemble the engine yourself, then strictly following our useful tips, you will be able to replace the valve seals with your own hands.
To replace, you will need a new set of valve stem seals (see VAZ 2106: replacing valve stem seals on your own), which we recommend ordering from a store specializing in spare parts or purchasing immediately; the caps are in stock.
Ask: Why in a specialty store? Because, having experience, we have made the following conclusion - a specialized store is interested in a good reputation and, in principle, will not sell “inappropriate” or obviously low-quality goods.
In any auto market, the choice of caps is much wider, sometimes sellers have no idea who the manufacturer of the product is, so don’t expect any guarantee of quality in this case. It is reliably known that the bulk of cheap spare parts on the auto market today are imported from China.
In a specialized spare parts store, the seller can determine by computer, by entering the code in your data sheet, the engine model, based on this data, and select the necessary (suitable) valve seals.
Disassembly procedure
- The front protective cover, and then the timing belt of the VAZ 2110;
- Unscrew the camshaft pulley mounting bolt (key 17), holding it from turning with a screwdriver;
- Remove the toothed pulley;
- Use a screwdriver or thin pliers to remove the oil seal.
If you only need to replace the cuff, then the analysis can be considered complete. If we continue further, then we need:
- It is better to remove the oil pressure sensor completely, or at least disconnect the wires from it;
- Unscrew the bolts securing the camshaft bearing housing (there are 20 of them) and remove the housing;
- Please note that there is a plug in each technological hole. They need to be removed;
- Next, disassemble the camshaft and decide whether it can be repaired or whether a complete replacement is needed.
Sports camshafts for VAZ-2110
Daily trips in our universal “basin” did not cause any particular discomfort. The high-speed injection VAZ engine struggled, but accelerated the car quite tolerably. But as if mocking the limited capabilities of the engine and the driver’s constant attempts to get to the next traffic light first, even Russian-assembled pseudo-Korean sedans overtook it.
In the end, we got tired of it, and we decided to do some light tuning of the engine, namely, change the factory camshaft to a sharper one, thereby changing the valve timing and ensuring more efficient filling of the cylinders with the working mixture in the higher speed range. Before this operation, measurements on a power stand showed that the experimental “2111” in its standard version has 80 hp.
At the AT Racing company, in addition to replacing the camshaft with a Master Motor, the VAZ vehicle was given chip tuning by its mechanics - they installed an injection controller reconfigured for the new shaft. I also had to change the throttle pipe (the standard one, with a 46 mm hole, was replaced with a wider one - 52 mm). To top it off, in place of a rather large box, “pregnant” with a standard air filter, there was a direct-flow filter cylinder from “K
DIY pump repair VAZ 2110/2112
The driver does not always have the opportunity to replace a faulty pump. In some cases, it is possible to repair the device by restoring the operating functions of the pump. If the pump has not yet exhausted its service life (50 thousand kilometers), then you can repair it. However, the pump cannot be repaired without using a special repair kit. This is a set of rubber gaskets and parts that most often fail and need to be replaced.
In addition, you will have to thoroughly prepare for repairs: the place for disassembling and repairing the pump must be clean and level.
How to disassemble a water pump
Once the pump is removed from the machine, it will need to be disassembled. Only after disassembly and thorough cleaning will it be possible to replace the leaked parts of the pump.
To disassemble the pump, it is recommended to follow the following diagram:
- Wipe the product with a dry cloth.
- Unscrew the pump pulley.
- Pull out the thrust ring.
- Use a hammer to knock out the bearings from the shaft.
- Pull the shaft itself out of the housing.
- Unfasten the impeller.
- If something remains from the oil seal, then remove the remaining rubber from the housing.
After this, the cavity of the pump itself must be thoroughly cleaned of dirt and old deposits - you can wash the pump with the same gasoline that is usually filled into the VAZ 2110/2112 tank.
A visual inspection of the pump parts will show which element needs to be replaced. Typically, a pump leak is caused by rotting of the oil seal, and a whistle when the engine is running or a grinding noise at high speeds is caused by wear of the shaft.
Nuances
When installing the bearing housing and cylinder head, do not apply sealant that contains silicone. This is due to the fact that the motor heats up, and accordingly the sealant heats up, which releases vapors that can get into the cylinders and further through the system. You should use a sealant whose instructions or packaging indicate that it is safe for the oxygen sensor. When applying sealant to cavities, you should not apply a lot of it, because when tightening the bolts, it can get inside and this will lead to clogging of the oil channels, and therefore there will be no lubrication. The lack of lubricant will lead to increased wear of parts that will quickly fail.
How to tighten the cylinder head bolts
Be sure to tighten according to the diagram given in the article. To tighten the bolts, you need to follow a few simple steps:
- Install a new head gasket and place it on the centering bushings.
- Install the head and tighten its mounting bolts.
- Start tightening with a torque of 20 N*m. If the scale is in “kgf/m”, then divide by 10.
- In the second run, you need to tighten all the bolts according to the diagram by 90 degrees.
- During the third pass they turn another 90 degrees.
Bolts with a length of 95 mm or more cannot be used. In general, the procedure is quite simple, but a torque wrench is required - without it, it will not be possible to maintain the correct tightening torque of the VAZ-2112 cylinder head (16 valves).
Read US on VKontakte
Location
Finding the oil seal is not difficult. To do this, you need to know a basic thing - the location of the camshaft.
The oil seal is located directly behind the camshaft pulley. You can assess its condition by dismantling the pulley or without removing it. In the second case, the assessment will not be so objective.
Location
Why is a second pump needed in a car's design?
On some modern car models, a second pump is already installed from the factory. This equipment allows for the most reliable engine cooling under any load.
An additional pump on the car is required to create better cooling. If we talk about the owners of the tenth family of VAZs, then most often a second pump is installed to optimize the operation of the stove in winter.
Installing an additional water pump
The main advantage of the VAZ 2110/2112 is that the cars have a simple cooling system structure. Therefore, you can install a second pump and organize a small circle of antifreeze circulation without any problems. To work you need to prepare in advance:
- new pump;
- two hoses (one long, the other short);
- sealant;
- fastening elements (depending on where it will be easier to attach the pump: metal clamps, bolts and nuts).
It is necessary to assemble a low circulation unit from a new pump and hoses. To do this, two hoses are connected to the pump fittings and secured with clamps.
It is important to follow the rule: the long pipe is responsible for supplying antifreeze to the pump, and the short pipe is responsible for draining it.
Before installing a new unit on the machine, you need to drain the coolant.
The installation procedure for the assembled unit is as follows:
- Find two hoses near the cooling radiator (one of them supplies antifreeze to the stove, and the other performs a discharge function).
- Disconnect the outlet pipe.
- In its place, attach the assembled unit with the second pump.
- Securely secure the new assembly with metal clamps.
- It is recommended to attach the pump itself to the gearbox housing. You can secure the pump with clamps or bolt it to the bracket.
- Fill with coolant and start the engine.
- Check the second antifreeze circulation circuit for leaks.
It should be noted that the additional pump will be started under the influence of the pressure created in the system by the first pump. Therefore, the second pump will last a long time and ensure thorough cooling of the engine even under the most aggressive operating conditions.
Thus, the whole difficulty of repairing and replacing the water pump on a VAZ 2110/2112 comes down to correctly removing the unit from the car and installing it back. Moreover, installing the pump takes much longer due to changing the timing belt and roller. The services of a specialist will cost approximately 1000–1500 rubles, so if you have doubts about your competence, it is better to pay the service station technicians and be confident that the water pump will be replaced correctly.
Sources
- https://spike.su/index.php/Replacement-pump-VAZ-2110-2111-2112-1.6-l.-16-cl.-without-removing-the-generator-drive.html
- https://vazweb.ru/desyatka/ohlazhdenie/zamena-pompyi-vaz-2110.html
What valve seals to put on the 8 valves. VAZ-2110 engine?
Original number 21011007026, average price per set (8 pieces) is about 118 rubles.
Analogues:
- Goetze 50-306670-50 - for 1 piece 23 rubles.
- ELRING 197378 - for 1 piece 20 rubles.
- Reinz 70-22737-00 - for 1 piece 13 rubles.
1
Remove the ground wires by unscrewing the two nuts “1”. Then unscrew two nuts 2 and bolt 3 securing the rear cover of the cylinder head. Remove the back cover from the block head.
2
Unscrew evenly the four nuts securing the front 1 and six nuts securing the rear 2 camshaft bearing housings and remove the washers. Then remove both housings.
3
If the key in the camshaft groove does not fit tightly, remove it so as not to lose it.
4
Remove the camshaft from the cylinder head.
5
Remove the oil seal from the camshaft.
6
Rotate the crankshaft so that the piston corresponding to the caps being replaced is at TDC. After unscrewing the spark plug, insert a tin rod through the spark plug hole between the piston and the valve (to prevent the valve from falling down).
7
Install the valve spring compressor as shown in the photo. In this case, use a nut without a serrated shoulder. Compress the valve spring with the tool.
8
Use tweezers to remove two crackers. Then remove the fixture.
9
Remove the upper spring retainer and the inner and outer valve springs.
10
Press the oil seal onto the valve guide.
11
To do this, install the collet of the valve stem seal remover onto the cap.
12
Strike the tool bushing sharply with the striker. Then just as sharply hit the striker of the handle of the device, thereby pressing the cap off the sleeve.
13
Remove the cap from the fixture collet. If you do not have a tool for removing caps, use pliers. In this case, the force must be applied strictly upward and not rotate the caps, so as not to damage the valve guides.
14
Before installing new valve stem seals, it is recommended to remove the springs from them, otherwise the caps can be damaged when they pass through the grooves under the cracks on the valves.
15
Dip the valve stem seal in engine oil and insert it into the mandrel.
16
Carefully press the cap all the way into the bottom plate. 17
17
Install the spring on the cap if it was removed. Replace the remaining oil seals in the same way.
18
Install the springs and valve plate in the reverse order of removal. Install the cotters using the tool so that they fit into the grooves of the valve stem. Remove the tin rod from the candle hole.
19
Install the camshaft into the cylinder head supports so that the cams of the 1st cylinder are directed away from the valve tappets.
20
Apply sealant to the cylinder head in the area of the outer camshaft supports.
21
Install the camshaft bearing housings, place the washers on the studs and tighten the nuts securing them in two stages in the order shown: – tighten the nuts until the bearing housings touch the surface of the cylinder head.
22
Make sure that the guide bushings fit into the holes in the bearing housings. Finally tighten the nuts in the specified sequence. Install the camshaft oil seal. Check the clearances in the valve drive and adjust them if necessary. Reassembly follows in reverse order.
How to check the pump on a VAZ 2110/2112
The driver, if there is a suspicion of a malfunction of the water pump, can check this unit without going to a car repair shop. In this case, there is no need to remove the pump from the car; the entire verification procedure is completed within 10 minutes:
- Warm up the engine to normal operating temperature (on a VAZ of the tenth family - 91 degrees).
- Put a glove on your right hand.
- Pinch the fluid supply pipe that comes from the radiator with your hand. If the pump is working normally, you will immediately be able to feel the pressure of the antifreeze inside the pipe. If, when pressed, the hose easily compresses, then the circulation of coolant is severely inhibited, which indicates a breakdown of the pump.
When performing the check, you must be careful, since the antifreeze gets very hot during engine operation: you can get burned on the hot pipes and surfaces of the engine.
Signs of a faulty water pump
On a VAZ of the tenth family, diagnosing problems with the water pump is quite simple: you need to constantly monitor the “behavior” of your car. There are only three signs of a pump malfunction:
- Unusual noise or grinding noise in the timing belt assembly while driving.
- Pump leaking due to loss of tightness.
- Severe damage to the timing belt (asymmetrical wear, delamination or cracking).
The main malfunction of the pump on the VAZ 2110/2112 is considered to be bearing wear - if the bearing is badly worn or the timing belt is not tensioned correctly, then it will not be possible to repair the pump.