The practice of operating a Volkswagen Passat B6 car proves that replacing the transmission fluid in an automatic transmission should be carried out at a mileage interval of 50,000 km. The duration of operation of the automatic transmission directly depends on the regularity of this procedure and the quality of the materials used. The frequency of lubricant changes, the selection of transmission substances, and the technical details of the process are related to the specific model of the Volkswagen Passat line.
Replacement frequency
Volkswagen does not recommend changing the fluid. This is due to the fact that factory lubricant is initially designed for the entire service life of the car. However, the manufacturer does not take into account the harsh Russian conditions, in which the fluid replacement schedule is reduced to 30-40 thousand kilometers. The sooner you change the oil, the better it will be for the gearbox. Under the influence of unfavorable factors, the fluid quickly loses its beneficial properties and is no longer able to cool the automatic transmission components, as well as prevent their premature wear. As a result, the gearbox will sooner or later fail if measures are not taken in a timely manner.
Signs that you need an oil change may include the following:
1. Jerks and unclear gear shifting 2. Drop in engine power 3. Noises, knocks and vibrations in the automatic transmission 4. When checking the condition of the oil, the fluid smells burnt and turns black over time
Let's start changing the oil
- Preheat the engine until the automatic transmission oil reaches operating temperature.
- With the engine on, operate the gearbox in all modes
- Turn off the engine, then place the car on a viewing platform with full access to the bottom of the car. This could be an overpass, an inspection hole, a lift, or, in extreme cases, a jack will do
- The gearbox is switched to park mode P
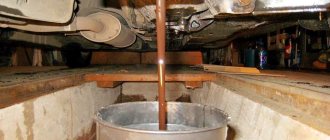
- Removing the pan - this procedure is necessary to gain access to the oil filter, which is disposable and needs to be replaced. So, to remove the pallet, you must first pull out the protection, behind which the pallet itself is hidden. Please note that there is a drain plug on the pan. We place a container under it into which the waste liquid will flow.
- The plug is unscrewed, after which we observe the process of oil flowing out. But in this case, only half of the total volume of liquid will flow out
- So, we continue to remove the pallet. To do this, use a hex wrench to unscrew all the bolts holding the pan. After removing the pallet, pay attention to the magnets located on the inner surface of the pallet. They are designed to attract metal shavings. The surface must be thoroughly washed, cleaned, degreased and wiped dry. We must try to completely clean the magnets if possible, since the presence of chips can cause premature wear of gearbox components
- After dismantling the pan, access to the oil filter opens, remove it and replace it with a new analogue
- The next step is to remove the wire ends coming from the control plate. The wires must be taken to the side, having first freed them from their fixation. At this moment, the gear selector should be in its original position
- We proceed to dismantling the control plate. To do this, you will need Torx tools to remove the 17 bolts holding the control plate in place. In this case, they must be unscrewed in a certain sequence. Each bolt is numbered. So, first remove bolt No. 17, then No. 16, then No. 15 and so on, until bolt No. 1
- You must remove the slab carefully, holding it so that it does not fall off. The plate is removed from the box, after which it is washed and cleaned of oil stains
- Let's pay attention to the design of the control plate. It includes five component units. The stove is equipped with a massive plate with balls and jets, which must be washed and wiped dry
- Disassemble all components of the stove, wipe and dry them
- The next step is to dismantle the plate, which also needs to be thoroughly washed and dried. Balls, jets and springs are removed with thin tweezers. It is advisable to lay them out in such a way as not to get confused when reinstalling them. Each element is washed in gasoline, then wiped with a dry, clean towel
- Wait until all disassembled parts dry, if necessary. Then we move on to the next stage
- Assembling the control plate, then installing it back into place. The plate should be screwed in the reverse order - from No. 1 to No. 17
- Connect and secure the wiring
- Install a new oil filter
- We install the pan, having first replaced the gasket in it. The drain gasket also needs to be replaced.
- After securing the bolts, we begin to fill in new oil.
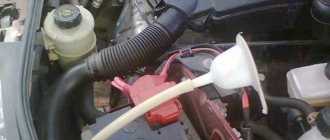
- To do this, unscrew the corresponding hole into which new lubricant will be poured.
- Pour in fresh oil in a certain amount. It is necessary to pour until liquid begins to appear from the hole. At this point, stop pouring and close the plug.
- Start the engine and let it idle for a few minutes. To circulate oil through all automatic transmission channels, you need to operate the gearbox in all modes
- Stop the engine and add fluid if necessary.
- Turn on the engine, make a short trip around the town of 5-10 kilometers, then check the level again. At this point, the process of changing the oil in the automatic transmission of the Volkswagen Passat B6 has been successfully completed.
The procedure for performing work independently
Completely replacing the lubricant in a Passat automatic transmission is not an easy process. It is possible to carry out a partial (incomplete) lubricant change independently and without complex special devices. But even a not completely updated transmission substance can have a beneficial effect on improving the operation of the automatic transmission.
Before starting work, it is recommended to warm up the engine and go through all gear modes at short intervals. Then the car is immobilized in the inspection pit. The shift lever is set to position “P”. And only after this they begin to directly change the oil.
Dismantling the pan and removing the filter
- To access the automatic transmission tray, you need to remove the protection. The drain plug is unscrewed from the bottom of the pan.
- A container is placed under the drain hole to collect waste liquid. Only part of the transmission substance will flow out through this hole.
- Hexagon ( unscrew the fastening bolts to completely remove the pallet. There are magnets on the inside of the pallet. They are designed to catch metal particles that are formed as a result of wear of automatic transmission parts.
- The degree of wear of the mechanism elements is assessed by the amount of metal products. An increased amount of chips indicates a possible serious breakdown. The inside of the tray cover is thoroughly washed and cleaned.
- The filter is removed, secured with 2 bolts.
- The wire tips from the control plate are removed from the connectors. The bundle of wires is released from fixation and taken to the side.
- It is important to remember in what position the automatic transmission selector lever is located. During the assembly process, the link must be installed in its original position (as before removal).
Control plate: removal and further disassembly
- Using torx screws, 17 bolts are unscrewed that secure the control plate. It is important to follow the order. According to the diagram, bolt No. 17 is first unscrewed. Then they move according to the principle of the reverse sequence to bolt No. 1.
- Carefully holding the stove, remove it from the box. The inside of the box is thoroughly cleaned of any remaining liquid.
- The control plate combines 5 components. Additionally, there is a massive plate inside. Underneath there are balls and jets. All these parts will need to be washed and dried.
- The components are disassembled after unscrewing the fastening bolts. They are of different lengths. Therefore, you need to remember or mark the location of each bolt.
- After removing the 4 components, you can approach the plate. It is removed and washed thoroughly. The dried plate should be placed near the stove. Use thin tweezers to carefully remove the balls, jets and springs. It is better to place them on the plate in places corresponding to the installation. All elements are washed in gasoline and wiped dry.
Automatic transmission assembly procedure
After drying or removing gasoline residues, the slab is assembled. It is necessary to strictly follow the order of installing small parts in the appropriate places:
- the control plate is mounted in place, fixed with bolts in the order from No. 1 to No. 17; the selector link is installed in the same place; wiring is connected and fixed; a new filter is installed; the pan gasket is changed (it is advisable to change the drain plug gasket); the pallet is fixed.
Filling the transmission substance
Filling of a new transmission substance is carried out in several stages:
- the bolt of the hole for filling the lubricant is unscrewed;
- prepare a liter container for the new liquid: you can use a plastic bottle with a rubber pipeline attached to the stopper;
- fresh liquid is poured from the prepared container in such an amount that it protrudes over the edge of the hole;
- The Passat starts, the gearbox lever is moved through all modes (no more than 2 seconds in each position);
- the engine is turned off, the fluid is added;
- The procedure is repeated once again to start the engine.
At the final stage, the amount of transmission fluid is brought to the desired level. To do this, the car engine starts and the gearbox lever is switched to parking mode (“P”). The liquid in the box needs to be heated to 35–45°. A low or high temperature will lead to underfilling of the transmission fluid or to its overfilling. The correctness of the work will be confirmed by the elimination of shocks or delays in the operation of the automatic transmission.
Source
Changing automatic transmission oil VW Passat B6 (1.8 TSI BZB)
Reason for replacement: Oil was leaking through the oil seal (after it was replaced), as a result, the volume in the box decreased by 2 liters. This led to an increase in temperature, burning of the clutches and burning of the oil. Photo and description here.
The oil was changed using an automatic transmission 09G of a VW Passat B6 (automatic transmission with the letter designation KGV).
Similarly, replacement is carried out on boxes with a letter designation: for 1.6 l engines - 85 kW FSI together with HXK, JUB, KGS; for 2.0 l engines - 110 kW FSI together with HFT, HVW, HXJ, JUC, KGT; for 1.8 l power units - 118 kW TFSI together with JYY, KGV; for 2.0 l engines - 147 kW FSI together with HHP, HRN, JUD, JZV, KGU).
| Automatic gearbox 09G | ||||
| Letter designation | HXK JUB KGS | HFT HVW HXJ JUC KGT | JYV KGV | HHP HRN JUD JZV KGU |
| Engine | 1.6 l - 85 kW FSI | 2.0 l - 110 kW FSI | 1.8 l - 118 kW TFSI | 2.0 l - 147 kW FSI |
Such automatic transmissions are installed on VW cars - Beetle (since 2006), GOLF and GOLF PLUS (since 2004), Jetta (since 2006), PASSAT (since 2006), PASSAT CC (since 2009), POLO (since 2009), Touran (since 2003) Audi A3 (since 2004). Skoda - Fabia (since 2007), Octavia (since 2004), Rapid (since 2013), Roomster (since 2006), Superb (since 2008) ), Yeti (since 2014), Seat - Altea (since 2004), Ibiza (since 2006), Leon (since 2006), Toledo (since 2005) .).
Regulations for changing automatic transmission oil: According to data from the ELSA program, the oil in these gearboxes is changed only when operating in a hot climate - 60 thousand km. Russia does not belong to hot climate countries and, accordingly, the oil does not need to be changed. We recommend changing it, as for countries with hot climates. Since the oil loses its properties under any operating conditions.
Reason for replacement in our case: About 2 liters of oil left the box through a leaking oil seal. Accordingly, overheating with burning of the clutches and burnt oil in the box.
Procedure for changing oil in a Volkswagen automatic transmission
- Find out what spare parts you will need for replacement here .
- Find out what you need from the tool here .
- The cost of changing the oil in an automatic transmission.
Let's get started with the work:
- Remove the engine crankcase protection.
- Unscrew the drain plug with a 5 mm hexagon.
- About 0.5-0.8 liters of oil will drain, since there is an overflow glass there.
- When the oil stops flowing, use the same 5 mm hexagon to unscrew the overflow cup from the same hole and continue to drain the oil. About 2.5 liters of oil will drain.
- We screw the drain plug back in; there is no need to tighten it.
- Now, along the perimeter of the pallet, unscrew the bolts securing the pallet.
- Remove the oil pan. Attention!Be careful, as not all of the oil has been drained from the pan! There is about 500 ml of oil left there. Don't spill oil on yourself!
- The photo shows how much oil is left in the pan.
- Next, unscrew the oil filter.
- Remove the oil filter. Attention! When removing the filter, be careful, oil will flow out of the hole and a little from the filter!
- Filter compared to new.
- Then remove the old rubber seal from the oil pan.
- Remove the magnets from the tray. We wash and clean them.
- We wash the oil pan of the automatic transmission wv.
- We install the magnets back into the oil pan.
- We install the restrictive bushings into the new seal (new bushings are included with the gasket).
- We install a new rubber seal on the washed oil pan.
- We clean and degrease the adjacent surface of the pan to the automatic transmission.
- We install a new automatic transmission oil filter and tighten the bolts to a torque of 11 Nm.
- We install the oil pan in place and tighten the pan mounting bolts crosswise to a torque of 10 Nm.
- Next, unscrew the drain plug.
- Screw the overflow glass back on. It sets the required oil level.
- We connect the filling device and fill in 3 liters of oil. The total oil filling volume on KGV boxes and similar ones is about 7 liters. With a partial oil change, only 3.6 - 3.8 liters of oil are replaced. If desired, you can perform several stages of partial oil changes.
- As soon as three liters of oil are poured, it begins to flow back without turning off the filling device (we move it to the side). We connect the device and carry out a check plan to set the oil level in the automatic transmission. The automatic transmission oil temperature range for checking should be 35 - 45 degrees.
- We start the engine and heat the automatic transmission oil to 35 degrees. While the oil is heating up, we drive the automatic transmission through all gears, holding each gear for 5 seconds, and then return the selector to the “P” position.
- When the temperature reaches 35 degrees, we continue to add oil. In our case, another 800 ml was included. oil, then it began to flow through the measuring cup.
- While the oil is draining, change the O-ring on the drain plug.
- We are waiting for the moment when the oil begins to flow in a thin stream, which indicates that the level is correctly set.
- We tighten the drain plug and tighten it to 27 Nm.
- We wash away all the oil stains on the pan and the automatic transmission housing.
- We install engine crankcase protection.
- The oil change in the automatic transmission is completed.
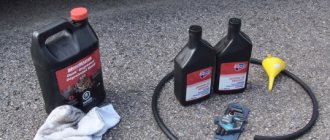
What you will need from materials and spare parts:
| Name | OEM number | Qty. | Price, units |
| Automatic transmission pan gasket | 09G 321 370 | 1 | RUB 3,200 |
| Automatic transmission oil filter | 09G 325 429 A | 1 | 3,400 rub. |
| ATF oil | G 055 025 A2 | 4 | RUB 1,500/per 1 liter. |
| Sealing ring | 09D 321 181 B | 1 | 130 rub. |
Analogue spare parts (high quality spare part data):
Tools
To make your work more convenient, prepare everything you need in advance.
In addition to the tools you will need:
- oil;
- filter;
- sealing ring;
- container for draining oil.
The filter is indicated because when changing the lubricant in an automatic transmission, it is recommended to change the filter as well.
A set of automotive tools in a suitcase
Consumables, tools, accessories
If you will be replacing the transmission lubricant yourself, then you should take care in advance of a complete set of everything necessary for this procedure. Supplies you will need:
- transmission oil;
- pan gasket (catalog number 01V321371);
- sealing ring;
- automatic transmission filter (catalog No. 01V325429);
- gasoline for cleaning.
Tools and accessories you may need:
- set of hex keys;
- screwdriver and removable torx bits;
- torque wrench;
- thin tweezers;
- small diameter rubber pipeline for filling oil;
- container for draining waste substances;
- clean rags.
Other keys may be needed (for example, to remove protection). It is best to carry out work on replacing the transmission fluid in an automatic transmission in an equipped garage with an inspection pit.
Choosing the right oil
In general, to avoid unnecessary troubles, replacement should be done regularly. According to general recommendations, for normal operation of the automatic transmission, this should be done after 100 thousand kilometers for the first time. Then every 50 thousand kilometers. In order to determine exactly how often this procedure needs to be performed in your Volkswagen Passat B6, you should refer to the description.
However, if the automatic transmission begins to operate intermittently, a lubricant change may be required earlier. A signal that the time has come can be the loss of any gear or simply jerking when switching.
Transmission oil ESSO ATF LT 71141 1l
For automatic transmissions, according to general recommendations, you can only use a lubricant that is suitable for automatic transmissions. The best result will be if you fill it with the one recommended by the manufacturer. It is also possible to use universal oils, which work well in some cases. From this series for Volkswagen Passat B6 you can use Vavoline Max Life.
Which lubricant is best to use and how much is needed?
Before a planned or forced replacement is carried out, you need to stock up on transmission fluid. Only the original is strongly recommended for use. Its catalog number is G 052162A2.
However, such oil may not always be at hand, and even in sufficient quantities. Then, with extreme caution and accuracy, you can pour transmission fluid from other manufacturers into the Volkswagen Passat automatic transmission. These may be ESSO ATF LT 71141 or MOBIL LT 71141.
In any case, you can only use the oil that is recommended for automatic transmissions. As a last resort, turn to a series of universal oils. If problems arise with the Passat automatic transmission, Vavoline Max Life helps out.
Changing the lubricant in an automatic transmission is accompanied by the procedure of replacing the old filter with a new one. Taking into account this circumstance, it is better to acquire 9 liters of transmission fluid. The remainder can be used for topping up.
Step-by-step replacement instructions
If a complete oil change in an automatic transmission is a complex process, then a partial one is quite simple. It does not require special complex devices and can be produced independently.
Automatic transmission in Volkswagen Passat
- Before you start, it is recommended to warm up the car engine a little and then turn it off. The shift lever must be set to position “P”. After this, you can proceed directly to changing the oil.
- To gain access to the Passat B6 automatic transmission, you must first remove the engine protection housing.
- Next, unscrew the screw plug.
- We unscrew the drain tube and drain the waste liquid into some container.
- The next thing is to replace the filter. First, we take out the old filter and install a new one.
- Now install the drain tube and clamp it only with your hands for now.
- Fill in about three liters of oil and start the engine. Here you need to change gears, holding each gear for 5-10 seconds. At the same time, do not forget to hold the brake pedal. When all positions have been passed, turn off the engine.
- Now you need to add the remaining oil. In general, it will be necessary to fill the automatic transmission with the same amount as was drained.
- At the end, tighten the screw plug and install the protection.
That's it - it's done. This does not take much time, but can prevent serious car damage and expensive repairs.
Typical problems
Often, during the operation of a car, various breakdowns occur, and the Volkswagen Passat B6 is no exception. When the vehicle travels a certain mileage (approximately 50-60 thousand km), the gearbox begins to malfunction, and malfunctions such as:
- The automatic transmission goes into emergency mode, as indicated by the icon on the dashboard.
- The occurrence of jerks when trying to change gear, as well as impacts and “kicks”.
Also, a fairly common problem in automatic transmissions is oil leakage and failure of the valve body, as well as wear and tear of other structural elements.
In any case, if a malfunction is detected, it is recommended to begin repairs as soon as possible in order to prevent the final failure of the automatic transmission and, as a consequence, its complete replacement.