One of the relatively simple types of repairs on any car can be considered replacing the driveshaft crosspiece. This procedure is performed not only when absolutely necessary, but also as part of scheduled maintenance. If desired, each driver can make a similar replacement in his garage. Next, we will talk about how to determine the need for repairs, what tools you will need, and also in what order to proceed in the process of replacing the universal joint or steering shaft.
We also recommend reading the article on how to replace the fuel pump yourself. From this article you will learn about the main nuances when removing and reinstalling an electric fuel pump, as well as how to correctly connect electrical connectors and fuel lines.
What are the main parts of a cardan drive?
- Parts capable of changing the angle and length of the transmission are a splined coupling (5), as well as rigid hinges (9.7) and elastic (3). It's called a coupling. The role of the coupling is that it reduces the noise of the connection and angular torque is transmitted. Repair of the driveshaft is required if the coupling material is cracked and crumbled. Simply put, the clutch needs to be replaced.
- The cardan coupling consists of 6 rubber parts (30), with metal spacers (31) between them. These parts are tightly connected into a one-piece unit, so in case of failure, the most correct solution is to replace the coupling.
- The coupling is placed between the flanges (4,2). They are attached to it with 35 bolts.
- Intermediate support (6), which serves to reduce vibrations and various types of beating.
- The front shaft of the VAZ 2107 (5) is a pipe with splines installed by welding. There is a tip (40) at the front. One of the coupling flanges is located on it, and the rear splined end is located on the support bearing (6). The bearing itself is well insulated from dirt by seals. Repair of the driveshaft is necessary if the splines are worn out.
- The rubber pad (12) in which the bearing is located dampens vibration well. On it, the front shaft may move slightly.
- The intermediate cardan support is attached to the bracket (15).
- Important is the safety bracket (27), which prevents the shaft from falling out if the coupling fails. If this bracket was not there, then the cars would overturn at full speed, and such cases have happened before. In this case, repairing the driveshaft is impossible; replacement is required.
- The difference between the rear shaft (8) and the front “neighbor” is that it has a hinge fork at the ends.
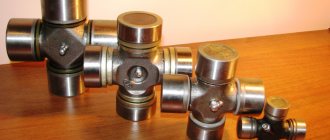
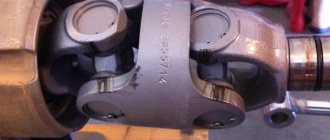
- The hinge itself is an important element of the transmission; it consists of a pair of forks (23), one crosspiece (22) and, in a separate figure above, needle-shaped bearings (20) - there are 4 of them, rings (19) and oil seals (21). The bearings are pressed with a fairly large force of about 800 kg into the fork holes. They are non-separable; if they malfunction, they need to be replaced.
- The cross has the required gap, from 0.1 to 0.4 mm. Only within such limits is the crosspiece correctly centered. There are rings in five sizes and five different colors for proper alignment. Repair of the driveshaft most often consists of correcting these gaps and replacing the rings.
Signs of faulty crosspieces
The VAZ 2106 crosspiece, like any other car part, has a certain service life. Theoretically, the service life of the part is quite long, about 500 thousand km, but the real figures are 10 times less. Therefore, replacement has to be carried out after 50–70 thousand kilometers. This is due not only to the quality of the parts, but also to our roads and the intensity of vehicle operation. Lack of periodic maintenance of crosspieces only brings the need for their replacement closer. The following characteristic signs indicate that there is some problem with the hinge:
- blows and knocks;
- chassis vibrations;
- squeaks when driving or accelerating.
Clicks and bumps
Often problems with crosspieces appear when the seals are damaged and dust, sand, dirt and water get inside the bearings. All these factors negatively affect the service life of the product. When the joints wear out, clicks will be heard when changing gears while moving, impacts at a speed of about 90 km/h, and a crunching or rustling sound will also appear. If metallic sounds occur, it is recommended to twist parts of the cardan, for example, by placing the car on an overpass. If large play is detected, the crosspieces will need to be replaced.
When diagnosing the gap in the crosspieces, the gearbox must be in neutral gear.
Video: play of the cardan cross
If clicks appear in the cardan area on my car, but I am sure that the crosspieces are still in good condition and should move, then, most likely, there is simply not enough lubrication in the hinges, for which they need to be injected. If clicks appear, I advise you not to delay maintenance, since the bearings will break and it will no longer be possible to do without replacing the crosspiece.
Creaks
The cause of squeaks in the area of the driveshaft is usually associated with souring of the crosspieces. The problem is clearly noticeable at the beginning of the movement and when driving at low speed, while the car creaks like an old cart.
The crosspiece may squeak due to lack of lubrication
The malfunction occurs when the hinges are not maintained, when the bearing simply cannot cope with its task. Sometimes, after removing the cardan, it is discovered that the crosspiece does not move in any direction at all.
Video: how the cardan cross creaks
Vibration
Malfunctions in the form of vibration with the universal joints can occur when moving forward or in reverse. The problem can be present with both old bearings and new ones. In the first case, the malfunction is caused by jamming of one of the hinges. If the vibration persists after replacing the crosspiece, then a low-quality part may have been installed or the installation was performed incorrectly. The crosspiece, whether old or new, should move in any of the four directions freely and without jamming. If you have to exert little effort when moving the hinge by hand, you can lightly tap the bearing cup; it may not be seated properly.
Vibrations in the driveshaft may be due to imbalance. The reason may lie in the impact on the cardan with something hard, for example, when hitting a stone. The balancing plate could also fall off the shaft. In such situations, you will have to visit a car service to eliminate the imbalance, and possibly replace the shaft itself.
Cardan vibrations are caused not only by the failure of the crosspiece. From personal experience I can say that the problem also manifests itself when the outboard bearing breaks, when the rubber in which it is held breaks off. The vibration is heard especially clearly when reversing and when starting to move in first gear. Therefore, before you start replacing the crosspiece, it would be useful to check the driveshaft support.
Elastic coupling for cardan shaft
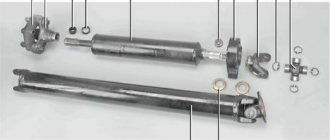
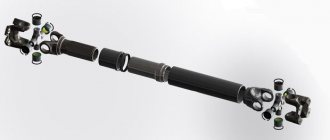
The driveshaft consists of two parts (front and rear), connected to each other by a articulated coupling (cross). This design allows you to avoid loads on the shaft while driving, when the body and chassis of the car begin to “play.”
The end of the rear shaft is connected to the axle gearbox, and the end of the front shaft is connected to the gearbox shaft. The connection to the gearbox is made through an elastic coupling, which is a kind of buffer for leveling shock and dynamic loads on the driveshaft and gearbox shaft.
The elastic coupling acts as a buffer, smoothing out dynamic loads
Flexible coupling location
The elastic coupling is located in the lower front part of the car on the rear side of the gearbox. You can see it if you remove the engine protection and climb under the car. The coupling is easily recognizable due to its hexagonal shape.
Read, it may come in handy: How to independently restore the effectiveness of the handbrake
The clutch is located on the rear side of the gearbox in the lower front part of the car
Coupling design
The basis of the coupling is a cushion made of especially durable rubber. Along its circumference there are six steel bushings fused into rubber, through which the bolts connecting the cardan flanges and the gearbox secondary shaft pass. The coupling kit also includes a special tightening clamp, which is put on it during installation or dismantling.
The elastic coupling consists of a rubber base and six steel bushings located around the circumference
Diagnostics of elastic coupling faults
The coupling may fail as a result of:
- wear of metal bushings;
- body wear;
- rupture of the body.
In each of these cases, the malfunction will manifest itself in the form of body vibration and extraneous sounds coming from the gearbox.
The condition of the coupling can only be checked by inspecting it and assessing the size of the play between the flanges of the gearbox and cardan shafts. This is done as follows.
- The car is driven onto an overpass or inspection hole;
- The engine protection is removed;
- The coupling body is inspected and the condition of the bolted connection is assessed.
- By loosening the cardan, the presence or absence of play is determined.
If signs of wear or mechanical damage are found on the coupling body (the body is partially or completely torn), the part must be replaced. A slight play (provided the body is intact) is eliminated by tightening the nuts of the connecting bolts. If the play is large, the elastic coupling will have to be replaced with a new one.
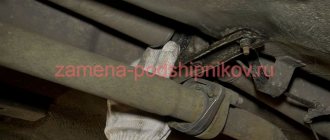
Diagnosis of a breakdown, how to diagnose it yourself
To carry out self-diagnosis, you need to crawl under the car. Secure the shaft with one hand and the drive gear flange with the other. Then turn them towards you.
The presence of even the slightest backlash proves that the matter really is in the cross. Although, if only one bearing is worn out, there may be no play.
In this case, the condition can only be checked visually; to do this, disconnect the drive shaft from the gear flange using the “13” key and check the condition. Marks before disassembly to avoid incorrect assembly.
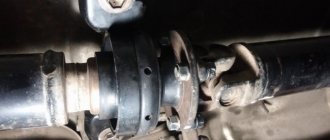
Suspension bearing for propeller shaft VAZ 2107
The suspension bearing (or idler bearing) is designed to ensure uniform rotation of the driveshaft while driving. In addition, it is an additional point for attaching the cardan and is included in the design of the intermediate (suspended) support. In fact, it itself is a support, since it comes complete with a bracket, with which it is attached to the bottom of the car through a transverse bracket.
The bearing design is based on the outer and inner races and seven steel balls
Hanging bearing design
The hanger bearing is an ordinary closed type ball bearing. It consists of an inner and outer race and seven steel balls. For mounting on the bearing housing there is a steel bracket with holes for bolts.
The suspended bearing is equipped with a special bracket for ease of fastening
Outboard bearing location
The bearing is installed in front of the spider at the end of the front of the driveshaft. It can be seen from the inspection hole in the axial recess of the bottom behind the exhaust pipe at its junction.
The VAZ 2107 suspension bearing is located in front of the crosspiece on the front of the driveshaft
How to replace an outboard bearing yourself
- To properly replace the outboard bearing, first apply CV joint grease to the cardan splines, and then install the lower washer on the shaft.
- Now we put on the suspension bearing, orienting the locking element upward (try not to distort).
- Select a socket whose internal diameter is larger than the diameter of the splines. Place the mandrel on the end of the inner race of the bearing, then press the support into the stop until the washer.
- Now we insert the plug onto the seating surface and press it in as described above.
Important to know: We assemble the cardan elements only according to the marks that were placed during disassembly.
- Then we tighten the fork with a locknut and bend the edges into a special groove with a chisel.
Cardan cross device
KK is a hinge that ensures the alignment of all rotating elements, and consists of:
- cups;
- needle bearings;
- retaining rings;
- sealing cuffs.
Each CC has four cups, which are the protruding elements of the assembly. All of them must be periodically checked for rotation, which should be smooth and even. The cups can be easily removed to check for lubrication.
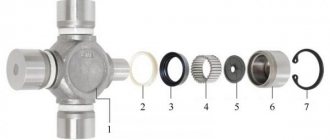
The cardan cross has a fairly simple structure: 1 - cross; 2 — plastic seal; 3 — rubber seal; 4 — needle bearing; 5 — clamp; 6 - cup; 7 - retaining ring
Bearings are designed to move the cross in different planes. The needle elements located in the cups are secured with retaining rings and prevent the bearings from moving during rotation. The size of the rings depends on the diameter of the axial clearance. They are selected using a four-leaf feeler gauge, which is used to measure the distance from the cup to the edge of the groove - this will be the diameter of the restrictive ring. Depending on the size of the crosspieces, rings with a thickness of 1.50, 1.52, 1.56, 1.59 or 1.62 mm are installed on the VAZ 2107.
Balancing the driveshaft
After disassembling and replacing any element, the driveshaft must be balanced. This is done on a special stand, so for balancing it is easier to contact the nearest car service center. The balancing itself consists of measuring and eliminating the imbalance on the three shaft supports. Its permissible value at a shaft rotation speed of 5500 rpm should not be more than 1.62 N*mm. The imbalance is eliminated by welding small weights (metal plates) onto the surface of the front driveshaft.
Read this, it might come in handy: Why do brakes squeak?
If vibration appears after repairing the driveshaft, you can try to balance it yourself. Naturally, there can be no talk of any accuracy here, and the balancing itself will be only temporary. This is done as follows.
- Drive the car onto a viewing hole or overpass.
- Inspect the driveshaft.
- Conventionally divide the front universal joint into four sectors (if you imagine it in cross-section).
- Find a small weight weighing 30-50g and attach it to the front of the shaft using tape or tape.
- Drive on a flat section of road, paying attention to vibrations.
- If the vibration does not disappear or increases, move the weight to another sector and repeat the checking process.
When the load is in its place, the vibration should stop, unless, of course, it is caused by an imbalance of the shaft.
Procedure for bleeding the clutch
To bleed the clutch hydraulic drive you will need:
- A rubber or plastic hose (tube) with a diameter suitable for tightly fitting the hose onto the drain fitting.
Wrench (usually 8 by 10).
A transparent vessel or reservoir for 200 ml of fresh liquid, for placing the second end of the hose into it.
Fresh fluid for topping up the clutch expansion tank.
Important! Old contaminated fluid drained from the clutch hydraulic system cannot be poured back into the system. On some car brands, the drain fitting is located at the bottom, so you may need an inspection hole to get to it.
To find out exactly where and how the clutch slave cylinder drain fitting is located in your car, read the “Operator's Manual”, in the “Clutch” section.
On some car brands, the drain fitting is located at the bottom, so you may need an inspection hole to get to it. To find out exactly where and how the clutch slave cylinder drain fitting is located in your car, study the “Operator's Manual”, in the “Clutch” section.
It is advisable to wear rubber gloves, since brake fluid is considered poisonous.
Important! DOT 3, 4 and 5.1 glycol-based fluids must not be mixed with DOT 5 and DOT 5.1/ABS. In the traditional version, clutch bleeding is carried out with an assistant, who only needs to press the pedal
In an emergency, the clutch can be pumped alone, using a brick or any other suitable object as an “assistant” to fix the clutch pedal in the fully pressed position
In the traditional version, clutch bleeding is carried out with an assistant, who only needs to press the pedal. In an emergency, you can bleed the clutch alone, using a brick or any other suitable object as an “assistant” to fix the clutch pedal in the fully pressed position.
Of course, the single option will take longer and be more labor-intensive, since one person will have to press the pedal in the cabin and unscrew/tighten the fitting in the hood or from below in the inspection hole.
Important! If bleeding the clutch hydraulic drive is carried out after repairing the clutch, then you must first ensure that the master cylinder piston pusher is correctly adjusted. If the pusher does not have sufficient free play, then it will not be possible to bleed the system
The pumping procedure is as follows:
- The first step is to check the fluid level in the clutch expansion tank. The tank must be filled completely, up to the neck. When inspecting the tank and adding fluid (if necessary), maintain cleanliness and prevent debris from entering the tank.
Release the head of the working cylinder drain fitting from the protective cap and place a hose (tube) on it. The opposite end of the hose should be lowered into a container with fresh brake fluid. When air comes out of the hose into the liquid, air bubbles will be clearly visible.
Important! During pumping, you cannot remove the second end of the hose from the liquid. Pump up pressure in the system using the clutch pedal
An assistant in the cabin must press the clutch pedal sharply and all the way 3-4 times. In this case, it is necessary that the pedal not only goes down to the stop, but also returns back to the stop. If the pedal “falls to the floor” and does not return to its original position on its own, you will have to return it with your hand or toe. The key here is to build up the pressure using maximum pedal travel. The interval between pedal presses should be approximately 2 seconds.
Pump up pressure in the system using the clutch pedal. An assistant in the cabin must press the clutch pedal sharply and all the way 3-4 times. In this case, it is necessary that the pedal not only goes down to the stop, but also returns back to the stop. If the pedal “falls to the floor” and does not return to its original position on its own, you will have to return it with your hand or toe
The key here is to build up the pressure using maximum pedal travel. The interval between pedal presses should be approximately 2 seconds.
Having pressed the pedal for the last time (the third or fourth), it must be left and held in the pressed position until it stops.
While your partner holds the pedal all the way down, another person should unscrew the drain fitting of the working cylinder with the hose attached to it, about half a turn. After opening the drain fitting, old fluid from the working cylinder will begin to flow into the container with new brake fluid through the hose. With the old liquid leaving the cylinder, air will also come out, the presence of which can be judged by the air bubbles in the container with the new liquid.
As the old contaminated fluid exits the clutch hydraulic system, the pedal pressed all the way by the second partner will begin to be pressed and lowered. You need to wait until the pedal is pressed all the way to the floor, and then immediately screw in (close) the drain fitting. The pedal cannot be released until the drain fitting is closed.
Repeat the procedure of squeezing the pedal and opening/closing the fitting several more times until clean liquid without air begins to come out of the hose. If aired fluid continues to come out of the hose even after the system has been completely pumped and the fluid has been completely changed (approximately 1 liter), then you need to look for the reason why air is entering the clutch hydraulic system.
Important! During the pumping process, it is necessary to carefully monitor the liquid level in the expansion tank and not allow it to fall more than 35 mm from the edge of the neck. During the pumping process, the old fluid will drain into a container and leave the hydraulic system.
Accordingly, the level in the tank will decrease, and if during the pumping process the liquid completely leaves the tank, then air will again enter the hydraulic system. Then you will not only have to start all over again, but also additionally waste new liquid, since the new liquid that has already been poured will merge into the container and mix there with the old one, and it will no longer be possible to pour it back.
After pumping and obtaining the desired result, the fitting must be screwed in well, remove the hose and put a protective cap on the head of the fitting.
In the process of bleeding the clutch hydraulic drive, the power reserve of the master cylinder piston pusher may change. Therefore, after bleeding the clutch, it is recommended to check the pusher travel reserve, which must correspond to the distance indicated. If the power reserve differs from that specified in the Manual, it will need to be adjusted to the desired value.
Conclusion
As you can see, it is not difficult to bleed the clutch hydraulic drive, and many people can do it without service at a service station, which will save money and time. At the same time, we should not forget that it is necessary to pump the clutch not only after repairing the clutch, but also after any routine maintenance affecting the components of the clutch hydraulic drive.
Video about several ways to bleed the clutch:
How to change the cross
Before removing the driveshaft, mark its position relative to the rear gearbox and elastic coupling. To do this, simply place the risks on them and then, when installing the cardan in place, combine them.
- remove the exhaust pipe from the exhaust pipe to the main muffler (you don’t have to remove it);
- unscrew and remove the cardan;
Unscrew the cardan from the gearbox
Mark and remove the cardan from the soft connection - make marks on the forks of the cardan joints (during assembly, they must be aligned);
- remove the retaining rings;
Removing the retaining rings - Use a puller or drift to remove the crosspiece. You can remove the cups by squeezing them in one direction or in different directions (this is more convenient in my opinion).
Cross puller
Dismantling the cardan cross of a VAZ 2107
Dismantling the cardan crosspieces
You don’t have to go on ceremony with the crosspieces, but there’s no harm in catching the cardan forks.
We carry out the assembly more carefully.
- before installing the cross, add a little grease Fiol-2U or No. 158 (or at least lithol) so that the rollers do not crumble;
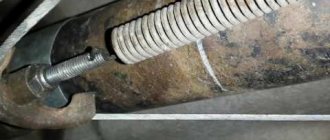
- we insert the cross into the fork, put a cup with rollers on its end and slowly hammer it into place until a seat for the locking ring appears;
Replacing the VAZ 2107 universal joint
Repair of the cardan shaft crosspiece - observing the marks, install the second fork on the crosspiece;
- install retaining rings;
Assembling the VAZ crosspiece If the rollers fell apart during assembly, the retaining rings will not fit into place; you need to disassemble again and install the rollers in place, after applying lubricant. - when rotating tightly in the crosspiece bearings, lightly tap the forks in different directions so that the cups move slightly apart, using a wooden spacer;
- Next, install the propeller shaft in place.
Before installing the shaft, clean and lubricate the splines.
Lubricate the soft joint splines
- Previous post
- Next entry
Outboard Bearing Size Chart 6-180605 (62305.2RS)
Characteristics Unit of measurement Value according to GOST (TU)
| Inner diameter, d | mm | 25 |
| Outer diameter, D | mm | 62 |
| Nominal height, B | mm | 24 |
| Radius of mounting chamfers, r | mm (min) | 2,0 |
| Dynamic load capacity | kH | 22,5 |
| Static load capacity | kH | 11,4 |
| Nominal speed | rpm | 7500 |
| Radial clearance | mm | 0,01-0,024 |
| Steel type | – | SHH-15 |
| Lubricant type | – | S17 (Litol-24) |
| Hardness of steel and rollers | H.R.C. | 61-65 |
| Contact angle | hail | – |
| Torque | kN*M | – |
| Ring roughness | Ra | 0.32 |
| Number of balls | PC. | 7 |
| Ball diameter | mm | 11,509 |
| Weight | G. | 325 |
Sources
- https://7vaz.ru/remont/kardannyj-val.html
- https://bumper.guru/klassicheskie-modeli-vaz/zadnij-most/zamena-podvesnogo-podshipnika-na-vaz-2107.html
- https://mashinaa.ru/avtovaz/vaz-2107/8628-podvesnoj-podshipnik-na-vaz-2107-ego-zamena-i-remont.html
- https://zamena-podshipnikov.ru/zamena-podvesnogo-podshipnika-na-vaz-2107.html
- https://semerkavaz.ru/transmissiya/zamena-podvesnogo-podshipnika-na-vaz-2107/
- https://AvtoKart.ru/diagnostika-i-remont/zamena-podvesnogo-podshipnika-2107.html
- https://znatokvaz.ru/transmissiya/zamena-krestovinyi-vaz-2107
[collapse]
Principle of operation
It is very, very simple. All work of the shaft to transmit torque is performed using articulated joints. Thus, rotational energy can be transferred from the gearbox shaft to the axles if the shafts are in different planes. The hinges are crosspieces. It is thanks to them that rotation occurs at variable angles. This part often fails and requires repair. Replacing the cardan crosspieces is necessary if the angle of rotation is more than 20 degrees. The part is subjected to enormous loads and wears out very quickly. As a result, the shaft loses its balance, knocks and vibrates.
The replacement operation is quite simple, and the shaft itself is one of the most repairable mechanisms in a car. Removing this structure is very simple. Repair consists of installing new components.
Replacing the crosspiece of a UAZ loaf
Also put marks so as not to confuse the position of the flange. Knock out the bearings carefully so as not to bend the forks. Ideally, balance after repair.
It's not entirely clear about the labels. I’ll install a new crosspiece.
The crosspiece is a consumable, the cardan itself is balanced. But. There is a strong opinion that new cardans are now NOT BALANCED from the factory. And further. The crosspiece, if you like, should be aligned with the axis of the cardan. To do this, there are locking rings of different thicknesses. To put out the glasses. In real life, no one is doing this, except perhaps Hassan.