It is better to place the bottle as far away from the engine as the length of the hose allows.
We start the engine and let it run for 15-20 minutes, then turn it off and wait the same 15 minutes for the fluid to start working. We start the engine again for 15-20 minutes. We do this until all the liquid has been used up.
Complete kit for cleaning injectors on a Granta engine
After washing the injectors, we assemble the standard power system and install the fuse in place. Turn on the ignition without starting the engine. We wait until the pressure rises in the system. Turn off the ignition again for a few seconds, start the engine and warm it up to operating temperature. We unscrew the flush plugs and admire their condition.
Spark plug after flushing the injector. The difference is visible to the naked eye
Now you can change the oil, filter and install the working spark plugs in place.
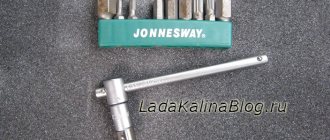
Tools and materials for cleaning injectors
The operation of cleaning the injector without special equipment (ultrasonic baths and fuel stands) will go quickly and efficiently if you have a few necessary tools and a simple homemade device on hand. The device is a simulator of the operation of an injector in combat conditions, that is, the injector removed from the engine will be visually diagnosed, washed and fully prepared for further use. For washing it is useful:
- Five cc disposable syringe.
- Aerosol for carburetor cleaning from any manufacturer.
- Two meter wires of any section.
- 12 volt lamp.
- Single position switch or push button.
Procedure for removing oil injectors
Before you begin removing injectors from any car of the tenth VAZ family, you will need to relieve the pressure in the fuel system. Removing any element that is under pressure in any way can result in personal injury.
How to get rid of excess fuel
To relieve the existing fuel pressure, you need to turn off the fuel pump and exhaust the remaining gasoline:
- Fold down the cushion from the back row of seats.
- Below it is the fuel tank hatch.
- Unscrew the screws securing the hatch.
- Disconnect the wiring harness from the pump housing (the wires supply power).
After this, start the engine and wait until it stalls. It is recommended to turn the ignition on several times to ensure that there is no gasoline left in the system.
Next, you can begin to remove the injectors. It is recommended to prepare the necessary tools in advance:
- open-end wrench 17;
- a flat screwdriver with a narrow blade;
- Phillips screwdriver;
- hex key 6;
- rags.
All elements of the repair kit are usually at hand for any driver
How to remove parts from the engine
- Remove the air filter box (it will interfere with free access to the engine).
- Remove the wiring harnesses from the injectors.
- Then you will need to disconnect the wires from the idle speed control and from the throttle sensor.
- Next, remove the vacuum seal from the pressure regulator (it has a white braid).
- Using a 17 key, unscrew the bolts that secure the fuel frame to the body. To make it more convenient, you can remove the gas cable.
- It is better to unscrew the fasteners of the plate with which the ramp is pressed using a hexagon.
- The fuel rail must be removed very carefully, with the nozzles facing up.
- On a 16-valve engine, dismantling will take longer, since the ramp has a more complex structure and several types of fasteners.
- Next, you can remove the injectors themselves - to do this, disconnect the fastening brackets of the electrical connector with your finger, and then the injector bracket. During removal, gasoline may leak; it is recommended to place a cloth under the ramp.
To install a new injector, the socket is first thoroughly cleaned of dirt and fuel, and only then can the product be screwed in. It is better to drop a few drops of gasoline onto the rubber ring before installation - this will make the nozzle fit into the mounting hole more easily. All work is then carried out in reverse order.
How to clean the injectors of a VAZ 2107
Methods for cleaning sprayers may vary; the use of one method or another depends on the level of contamination of the holes and the nature of the deposits. If you carry out preventive cleaning or remove light contamination, you can use special chemicals, the use of which does not involve removing the injectors.
If the injectors are in a neglected state and cleaning with additives does not make sense, then you will have to dismantle the injector and replace the VAZ 2107 injectors.
Cleaning injectors with additives
Additives can not only remove deposits from fuel nozzles, but also clean the fuel system as a whole. This method is effective only with the systematic use of cleaning chemicals. Additives need to be used every 17-20 thousand kilometers. To clean, the standard fuel pump is turned off, and the fuel injection line is connected to a container through which the cleaning liquid is supplied under pressure. The engine is started and idles for a quarter of an hour, after which it is turned off for the same amount of time. During this time, the deposits become soft. The engine is then started again, but this time the speed is gradually increased to maximum to remove sludge fragments. In this mode, the internal combustion engine should operate for about half an hour.
Manual cleaning
For manual cleaning you will need:
- A jar of injector cleaner;
- A set of spanners or open-end wrenches;
- Screwdriver Set;
- Syringe 5-7 ml;
- Clean rags.
Follow the following sequence of actions for the success of the event:
- We dismantle the air pipe fixing clamps using the key set to “7” and remove the pipe;
- We dismantle the throttle cable clamp with a “flat” screwdriver;
- Remove the accelerator cable and its bracket;
- We dismantle the fuel lines and pipe fastenings;
- Dismantle the VUT hose;
- We dismantle the fuel pipe brackets and the intake manifold;
- Remove the fuel rail mounting bolts;
- Loosen the injector mounting harness;
- We remove the injectors with the fuel rail.
We clean the sprayers in accordance with the instructions given on the packaging of the chemical. We perform assembly in reverse order.
Removing Kalina injectors
- Slide the injector lock.
- Remove the clamp.
- Remove the injector from the fuel rail.
- Remove the O-ring from the sprayer.
Before installing the injectors, it is necessary to replace the O-rings. Then apply a thin layer of engine oil to the O-rings. Assembling and installing the fuel rail with injectors is performed in the reverse order.
Ultrasound or chemicals for cleaning the injector?
So, it was decided that the injectors and injector needed to be cleaned. Which method should I choose? Common methods are washing the injector without removing the injectors or cleaning the injector on an ultrasonic bench. The cleaning efficiency of the second method is several orders of magnitude higher, but in this case, except for the nozzles, nothing else is cleaned. For VAZ cars, sometimes cleaning is not the right solution. It is much easier and cheaper to simply replace the injectors.
Today, simple single-circuit installations are used for washing and cleaning. These are containers in which the solvent is located. The unit is placed next to the machine. A hose is connected to the inlet of the fuel rail to inject the product into the system. The cleaner, which acts as both a cleaning agent and a fuel, is supplied to the system by a compressor.
But there is a drawback: this method does not allow the cleaning fluid to pass through the pressure regulator and shut-off valve. This is ineffective and does not flush out the fuel system. Double-circuit stands are much more efficient, since the cleaning liquid passes through all fuel systems. As for ultrasound, it began to be used back in 1985. A bath for such cleaning is a container with a cleaner. An ultrasonic emitter is installed at the bottom of this bath.
The disadvantage is that you only need to clean the injector nozzle. And modern sprayers cannot be cleaned using ultrasound. And this process is quite labor-intensive.
It is preferable to use imported solvents as a cleaner for injectors and injectors. They are of high quality. These are, for example, injector cleaning products such as the German Liqui Moly, the Belgian Winns or the American Hi-Gear. Domestic products were also tested, but neither “Toilet duckling” nor “Moidodyr” were suitable for these purposes.
Cleaning the injectors
Before replacing the injectors, if they are thoroughly clogged, you can try to revive them. To do this, it is necessary to flush the injectors. The service manual for components and assemblies of the VAZ 2112 car does not indicate how to flush the injectors. But, even for a novice car enthusiast, this procedure is not very difficult. To do this you need:
- Soak the nozzle in white spirit for 3-4 hours.
- Clean the nozzle with a thin soft wire.
- Flush the supply channel with high-pressure water.
- Blow out the channel with compressed air.
If necessary, the procedure must be repeated several times. In particular, on a VAZ 2112 car, washing the injectors does not take much time. And it’s not the price that worries us in this case. Much more important is the knowledge and experience that we acquire in the process of performing these works.
Attention: Do not clean the nozzle with a sewing needle. The tip of the needle may break and completely jam the washer fluid supply channel.
Replacement or flushing?
Some problems can be eliminated by cleaning and flushing. Others are “treated” only by replacement.
Table: problems with injectors
| Malfunction | Remedy |
| reduced performance | flushing, replacement if flushing fails |
| leakage | flushing, replacement if flushing fails |
| increased productivity | replacement |
| valve sticking | replacement |
| unstable valve sticking | flushing, replacement if flushing fails |
| overestimated or underestimated winding resistance | replacement |
In these cases, flushing is not a panacea. This method should be used taking into account the mileage and quality of service during operation.
During operation, the injector nozzles inevitably become coked and clogged with resinous deposits. The picture is aggravated by low-quality fuel, which can introduce additional pollutants.
For some time, fuel atomizers continue to operate without any visible changes, but sooner or later contaminants accumulate, changing the shape of the spray and reducing performance.
Injector life expectancy is limited even when using the cleanest fuel. Manufacturers recommend changing them every 100–120 thousand kilometers. Due to the fact that motorists use imperfect gasoline, and the one that can be bought at gas stations, the part has to be changed after 80-100 thousand km.
There is an opinion among motorists that “there is no need to interfere if everything works fine.” This opinion is justified, but only if the owner is ready to replace the nozzles with new ones approximately every 50 thousand kilometers.
The fact is that by getting rid of minor deposits as they accumulate, the owner extends the life of the consumable, since pollutants do not have time to cause irreparable damage.
Clogged injectors begin to interfere with normal operation after 30–50 thousand km.
Initially, negative processes manifest themselves only in increased fuel consumption. Owners do not always associate the increased “appetite” of the engine with injectors, since there are many reasons for this phenomenon.
In the range of 50–80 thousand km, pollution, having accumulated, can cause interruptions in engine operation, which is no longer undetectable. It becomes clear that “you have to get into the injectors,” but cleaning them at this stage may be useless. When a clogged part is used for a long time, the diameter of the nozzle often increases. Flushing will remove contaminants, but the original parameters will not be restored.
To extend the life of trouble-free operation and postpone replacement, you should regularly check the
pour injector cleaning fluid into the tank or use it in another way recommended by the manufacturer.
Motorists' opinions about the effectiveness and safety of injection chemicals are contradictory. Many people fear that flushing without removing it from the engine will clog the cylinders.
Indeed, if the car owner has not touched the injectors for a long time, it is impossible to do without removing the rack. The chemicals in the tank can cause harm instead of benefit. If you use cleaners regularly, without waiting for characteristic malfunctions to appear, there will be no harm to the engine from the chemicals.
Although injection chemistry has a beneficial effect on slightly dirty injectors, its use does not guarantee that the atomizers will comfortably “live” the entire period “allotted” to them by the manufacturer. You can unsuccessfully fill the tank with “left” gasoline at almost any gas station.
To minimize the accumulation of deposits, manufacturers recommend additional preventive flushing with special products every 30 thousand kilometers.
| Mileage (thousand km) | Flushing | Replacement |
| up to 30 | preventive flushing with fuel additives every 3–5 thousand km | individual replacement of faulty parts |
| 30–80 | preventive flushing with a special agent every 30 thousand km | individual replacement |
| 80–120 | preventive flushing with a special agent every 30 thousand km | complete replacement of all injectors if at least one faulty one is detected |
Replacing O-rings
To prevent fuel leakage, do not reuse the O-rings of the injector and injector body. They are replaced with new ones every time they are removed for any reason.
To remove the old ring, just pry it up with a screwdriver. When installing new ones, do not use hard tools; install the seals by hand. Before installing the injector, lubricate the rubber bands with engine oil.
An injection engine is not at all complicated, as owners of carburetor cars sometimes believe. Injectors are reliable parts that require only a little attention. Show it, and the engine will thank you.
Technical characteristics of the VAZ-21126-77 engine
| VAZ-21126-77 | |
| Installed on cars: | Lada Granta Sport and Lada Kalina Sport |
| Years of production, year | since 2013 |
| Cylinder block material | cast iron |
| Supply system | injector |
| Type | in-line |
| Number of cylinders | 4 |
| Valves per cylinder | 4 |
| Compression ratio | 11 |
| Engine volume, l | 1,6 |
| Power | 120hp/5900rpm |
| Torque | 154Nm/4740rpm |
| Fuel consumption (city/highway/mix), l | -/-/7.8 per 100 km |
| Oil consumption | 50g/1000km |
| Engine oil quantity | 3.5l |
| Engine life (according to the passport/actually) | 200/200 thousand km. |
Let us remind you that in another article we determine the best VAZ engine for a modern Lada car.
Keywords: Lada Granta engine | Lada Kalina engine
8
Found an error? Select it and press Ctrl+Enter..
Coronavirus has an impact on AvtoVAZ, new details
How to use the standard LADA telescopic jack
Review of carpet overlays for rear arches of Lada Largus
Instructions for changing engine oil Lada Largus (K7M and K4M)
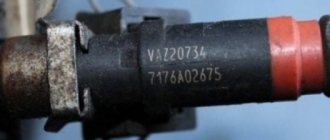
What injectors are installed on VAZ 2110–2112 cars
The main advantage of injectors for VAZ cars of the tenth family is that they are interchangeable. There are only two types of sprayers - produced by Bosch and Siemens. And each of them, regardless of marking and year of manufacture, can be replaced with another.
Bosch injectors are traditionally manufactured in black housing
When selecting, there is only one limitation - engine size. 1.5 injectors are not suitable for 1.6 liter engines.
The Siemens injector has a blue tip
Both Bosch and Siemens injectors of any marking can be installed on 8-valve and 16-valve engines.
Table: how to select injectors for VAZ 2110–2112 by marking
| Siemens | Bosch |
| Injector DEKA VAZ 6238 | 0 280 150 996 and 0 280 158 110 |
| Injector DEKA VAZ 6393 | 0 280 158 502 |
| Injector DEKA VAZ 20734 | 0 280 158 017 |
| Injector DEKA VAZ 20735 | 0 280 158 022 |
| Injector DEKA VAZ short 20734 | 280158017 |
| Injector DEKA VAZ short 20735 | 0 280 158 022 |
Removing the fuel rail and injectors, checking VAZ-2107-20 injectors
The fuel rail of the VAZ-2104 engine serves to supply fuel to the injectors and is mounted on the intake pipe. On the top of the ramp, next to the injector of the 3rd cylinder, there is a fitting for monitoring the fuel pressure.
The pressure regulator, attached to the rail, changes the fuel pressure in the rail from 2.8 to 3.2 bar (280-320 kPa) depending on the vacuum in the receiver, maintaining a constant pressure difference between them. This is necessary for accurate dosing of fuel by injectors.
The injectors are electromagnetic valves that allow fuel to pass through when power is applied and are closed by the action of a return spring when power is de-energized. At the end of the injector there is a nozzle through which fuel is injected into the intake pipe. The injectors are sealed in the ramp and in the intake pipe with rubber rings; it is recommended to replace them each time the injector is dismantled. The controller controls the injectors. If there is a break or short circuit in the winding, the injector should be replaced. If the injectors become clogged, they can be washed at a special service station without dismantling them.
We carry out the work on a cold engine. Relieve pressure in the fuel system.
Unfasten or cut the plastic clamp securing the injector wire block to the front panel.
To replace the injector o-rings, use a screwdriver with a thin blade and remove the o-rings and nozzle.
We dismantle the other injectors in the same way.
To check the injectors, we connect the block of their wiring harness to the block of the wiring harness of the engine management system, and connect the fuel hoses to the tubes of the ramp and pressure regulator.
We install the electric fuel pump fuse in the relay and fuse block of the engine control system.
The shapes of the spray patterns, as well as the amount of fuel injected by each injector over a certain period of time, should not differ noticeably.
We check each injector separately by placing a transparent bulb under it and disconnecting the wire block from it. We supply 12V voltage from the battery with two wires to the injector and turn on the ignition.
After turning off the power from the injector, check whether fuel is leaking through the nozzle holes.
If the injector's electrical resistance is not correct, the performance and spray pattern are very different from other injectors, or if the injector is leaking, it will need to be replaced.
Install the ramp in reverse order. We replace damaged rubber O-rings with new ones and apply engine oil to them during installation. The tightening torque of the ramp mounting screws is 9–13 Nm, and the fuel pipe fittings are 20–34 Nm.
https://youtube.com/watch?v=WvQqW1Nnhbs
Sources
- https://mylada.net/remont/chistka-forsunok-vaz-2114-svoimi-rukami.html
- https://www.iva-soft.ru/base/VAZ/Articles/1/
- https://autoruk.ru/2101-2107-klass/vaz-2107-20/proveriaem-i-zameniaem-forsunki
Lada Kalina hatchback Shrimp › Logbook › Cleaning injectors on Kalina
Good day to all! I continue to try to combat the high fuel consumption of my swallow. I've heard and read that cleaning the injectors can help. In principle, I won’t write anything new here, because there is a lot of information on this topic on the Internet, but maybe my report will still be useful to someone. So, first of all, these same injectors need to be removed. To do this we need two 17mm open-end wrenches and a hex screwdriver. I also needed a mount, but more on that later.
The first step is to reduce the pressure in the fuel rail so as not to fill everything with gasoline. To do this, remove the hatch in the center console under which the diagnostic connector is located.
To the right of the connector is the fuse box, the fuse in the center is responsible for the operation of the fuel pump. It needs to be taken out. Next, we start the car and wait until the fuel in the ramp runs out and the car stalls. For me this happened in 15-20 seconds. Turn off the ignition and open the hood. Before removing the injectors, I used a compressor to blow through the installation sites into the inlet manifold so that dirt would not get into the engine.
Next, remove the negative terminal and disconnect the injector power connector. For convenience, I also disconnected the connector from the phase sensor. We carry out further work ONLY ON A COLD engine. There may be gasoline residues in the ramp and fuel hose, which can happen if they come into contact with a hot manifold, I think there is no need to explain. Using two 17mm wrenches, we disconnect the fuel hose from the ramp (it’s good that the viburnum has a power system without return, otherwise there would be two hoses). I had a slight gas leak.
The ramp is held on by two bolts, to unscrew which we need a hex screwdriver. We unscrew them.
But then the dancing with the tambourine began. The fact is that it is quite difficult to get to the ramp from the right side (if you don’t disconnect anything). I managed to crawl up... I wobbled and rocked this ramp, damn it, and shook it, but I couldn’t get it out. I had to resort to using a mount. With much grief, I still managed to remove...the ramp...but without the injectors! The injectors remained in the manifold. An indicative point: two rubber seals from the injectors, when removed, remained in the ramp! Somehow, I pulled out the injectors, one at a time.
Having examined the injectors at home, I was a little upset, the problem was clearly not in them, they were quite clean. But since I’ve removed it, I need to continue the procedure!
Many people use a carb cleaner bottle and a five-cc syringe for cleaning, but I decided to go a different route - I decided to assemble a device for washing. We will need a plastic bottle (some kind of strong one, like Pepsi or Coca-Cola), two nipples from a tubeless tube, and a desire.
You need to unscrew the nipple from the nipple in the plug. We connect an ordinary car compressor to the nipple at the bottom of the bottle. First, to check the tightness, I pumped the empty device with air, pumped five glasses - I did not leak air anywhere. I bought some inexpensive carb cleaner as a cleaning liquid (unfortunately, I didn’t take a photo), but after opening the bottle, I decided to stop using it. The fact is that in terms of smell, color, and consistency it was ordinary gasoline. I read on the Internet that you can clean the injectors with solvent, I just had a bottle of 646, so I decided to use it. First of all, I removed the rubber bands from the nozzles (they turned out to be in good condition) and soaked the nozzles themselves in solvent for a day. After a day, I cleaned the injectors with an old toothbrush, but I could not completely remove the plaque from the bodies. Next is the cleaning process itself. We connect the nozzle to the hose of the device, pour solvent into the bottle, tighten the cap tightly, pump air into the bottle (I pumped 4 glasses) - that’s it, the device is ready for use. To open the injector, voltage must be applied to the contacts. I read on the Internet that 12 volts is too much, you need to apply voltage in series, through a 12V light bulb. That's what I did, but the nozzle did not open. Well, I think I screwed up the injector, just for luck, I applied 12 V directly - the injector opened (Simmens injectors). In general, we place the nozzle of the injector in some container (I used a glass jar), turn the inflated bottle over and, in short pulses (2-3 seconds each), apply voltage to the injector. I washed all the injectors several times in both directions. The torches turned out to be smooth and identical on all nozzles, the color of the solvent after repeated washings practically did not change.
Next we assemble the ramp. Lubricate the installation sites of the rubber rings and the rings themselves with engine oil. Since the corrugated hose on the wires had partially collapsed over time, I wrapped the wires with electrical tape.
Causes and symptoms of malfunctions of the seven injection nozzles
Injectors are one of the most important parts of the fuel injection system. If it fails, which happens extremely rarely, the operation of the engine is disrupted. Most often, fuel injectors become clogged, which occurs due to contact with aggressive media. An aggressive environment is not only the fuel, but also the burned fuel assemblies. Before cleaning the injectors on a VAZ 2107, you need to determine by the signs that diagnostics of these particular parts is required:
- At idle, unstable operation of the internal combustion engine is observed.
- When trying to move away, the engine stalls.
- Reduced power and agility.
- When moving, jerks and dips occur.
- Excessive amount of exhaust gases from the muffler.
- Increased fuel consumption.
- Extraneous sounds and noise are observed when the engine is running.
If these signs are detected, you will need to check the condition of the injectors. The reason for their clogging is low-quality gasoline, which causes deposits to form on the walls. If your car has a faulty or missing fuel filter, then the need to clean the fuel nozzles arises quite often.
After removal, you will need to check the devices, or rather their condition. How to check the injectors on the seven, we will figure it out in the next section. If diagnostics show that they are unsuitable for use, they will need to be replaced.
Device diagnostics
To make sure that the injectors need to be cleaned or replaced, you will need to first perform some diagnostic procedures:
Removing and cleaning VAZ 2110-2112 injectors
Cleaning the injectors of a VAZ 2110-2112 is a job that should be done only if necessary, because the ramp in which the injectors are located and the injectors themselves are practically the very heart of the engine.
That is why they need to be cleaned only if there are problems with the engine - increased fuel consumption, tripping, a significant decrease in power. Only when there is reason to believe that the injectors are clogged can they be cleaned.
Fuel additives are supplied to the market to clean the injector, which must be added to gasoline, but they do not always cope with their job and do it efficiently. And in some cases they can harm the engine, because all the dirt from the injector gets into it, or react with the components of the engine oil.
Removing the VAZ 2110-2112 ramp
Important! All work on removing the VAZ 2110-2112 ramp must be done cold. First of all, we disconnect the wires from the fuel pump, thereby de-energizing it. Then we start the engine and wait until it stalls.
We start it again and so on - we repeat the procedure until it stops starting. Thus, we remove pressure from the fuel supply system. After this, you can begin to remove the ramp.
The first step is to de-energize it by turning off the power - the general wiring is located on the interior side. Then we unscrew the fuel hoses and all the electrics that are connected to the fuel rail of the VAZ 2110-2112 - idle speed regulator, pressure regulator, throttle position sensor.
Next, unscrew the two hex bolts that hold the fuel rail in place. Essentially, we can now remove the fuel rail. It can be removed in the upward direction, but it will hardly be possible to do without improvised means. The fuel rail sits very tightly and must be removed strictly parallel to the ground, since any distortion will only complicate the task.
Cleaning injectors VAZ 2110-2112.
All work on cleaning VAZ 2110-2112 injectors must be done on a clean surface - for this it is advisable to spread a clean piece of cloth on the ground or work table. In addition, you will need to assemble a simple circuit from a 12 V light bulb, an injector, wires and a switch. We connect the light bulb, nozzle and switch in series, after which you can start cleaning the nozzle.
Troubleshooting
Despite their undeniable advantages over carburetor systems, injection engines are quite capricious, subject to the influence of many factors and have higher maintenance requirements.
Engine performance depends on the condition of the injectors. The main external signs of problems with injectors are:
- jerks and dips when accelerating the car;
- reduced engine speed;
- unstable operation at idle and low speeds;
- high content of toxic substances in the exhaust.
Checking with a stethoscope
You can carry out diagnostics yourself or contact a car service. The procedure for checking injectors with your own hands is as follows.
- Check the valve. If it does not move, then either the injector itself or the electrical circuit is faulty.
- If a characteristic sound is heard when the valve opens, it is working properly. If there is no sound, the valve is not working.
When diagnosing injectors, you can use a stethoscope.
- Using a stethoscope, listen to the injectors click when idling. Listen in such a way that the clicks are not transmitted along the fuel rail to the non-working injector from the working one.
- Make sure that the frequency of clicking sounds increases as engine speed increases. Otherwise the injector is faulty.
Video: checking injectors with a stethoscope
Checking with a multimeter
A multimeter is a special device for diagnosing electrical circuits.
- In the technical documentation, find the resistance value of the injectors installed on your car.
- Disconnect the wires from the injectors.
- Set the multimeter to resistance measurement mode.
- Connect the multimeter contacts to the injectors.
- Measure the injector resistance.
The normal impedance of injectors with low resistance should be 2–5 Ohms, with high ones – 12–17 Ohms. If the values do not match, the injector is replaced with a new one.
Testing at the stand
The stand can have a different design, it can be expensive or cheap. Simple stands can be found in private garages. They are used to check the pressure of the injectors. Professional stands allow you to most accurately diagnose and adjust injectors. Such equipment is usually available only in service centers.
Professional injector testing stand
As a simple stand for checking injectors, you can use the MTA-2 mechanical tester. With its help, you can easily check the condition of the injectors, pressure, fuel injection pump. There is no need to disassemble the engine.
The Bosch stand is more expensive and complex. Many experts call it the standard of quality for diagnosing injection pump. The stands “Delphi”, “Hartridge”, “Rabotti” and others also show good results.
Search
There are two ways to clean nozzles
at
home
There are two ways to clean the nozzles at home
. This will be discussed in this article.
It often happens that on your next trip, when you press the accelerator pedal, you suddenly feel a breakdown or, for example, the car begins to “slip”, and in bad weather it moves very poorly. Well, all this points to the need for a quick cleaning of the injectors. How to clean injectors using viburnum? | Lada. Of course, there are many service stations these days, so you can go straight there. There, specialists will carry out ultrasonic cleaning.
Using an industrial method, you can restore 90% efficiency. Improves dispersion. This means that the fuel droplet size decreases as you cut. Productivity also increases, and fuel begins to be consumed evenly by the nozzles . And, importantly, the sprayer has been restored. This improves engine efficiency, the "response" is noticeable at low speeds, and this has a positive effect on the increase in power.
You may also like
maintenance stations, a list of services will be offered immediately. I want to know how to check the engine on the injector using. They are ready to measure CO and CH, check the engine at idle, and disassemble the fuel rail. The nozzles will be checked for tightness and performance twice (at the end of the work they will be checked) and will be cleaned with ultrasound. Specialists will also replace the fuel filter and rubber seals. nozzles
. Once the engine is installed, station personnel will adjust the CO and CH as well as the engine at idle.
But there is one problem, all the work of the maintenance
It costs money, and sometimes quite a lot.
Often, motorists love not only to drive their car, but also to “lift it themselves.” On the one hand, this is even a plus, because the costs will be much lower.
How to clean injectors at home
at your discretion?
You may also like
OWN JOB: Clean the injectors yourself
An effective way to clean the nozzle
The cleaning time for any type of equipment depends on the degree of contamination.
Dismantling of attachments on Kalin.
Take off nozzles
with viburnum. I'll notice nothing complicated. All gums remain intact after disassembly.
2 ways to clean injectors
- First, we need an injector cleaner like Vince; carburetor cleaner (homemade spray is a good option). How to remove vibration injectors (fuel). photo report on how to replace VAZ 1117, 1118 and 1119 injectors. It's also best to prepare one ring for the injector (in case you don't have to rush to the car market while working).
Cleaning procedure
- First of all, remove the barrel with two attachments - IAK.
- Next, remove the bar from the nozzle wires by first removing the clips from the bottom. Loosen the four screws on the nozzle rod and carefully pull out the nozzle rod. How to check injectors without removing the engine. Symptoms of a faulty injector. Checking the winding resistance level on the pipes. The work should be carried out with care so as not to damage it due to negligence. Each nozzle must be removed in turn.
- Now you need to take a container and fill it with Vins cleaner. how to clean injectors. Demonstration of a faulty air flow sensor on a viburnum, a priori. The container should be convenient for washing the nozzles in it. While they are “juicing”, you need to use a MAC cleaning spray.
- Typically nozzles are coated with coke around the nozzle
.
Externally, coke looks like resin. The area is very difficult to leave, but it is quite possible to clean it. After removing the coke, be careful around the nozzle to clean the surface of the funnel. How to check the power of injectors. This check is performed if the injectors themselves are working normally, but any injector does not work when the ignition is on. You will need to use a spray from time to time to blow out any excess. After the nozzle
from the outside, it should be thoroughly washed from the inside. - To rinse the nozzle
inside you will need a 3-12V power source, a foot pump with a pressure gauge.
Set of rubber nozzle rings on a button How to clean nozzles? The end of the hose is removed from the pump and the cleaner is filled there. The hose is then placed over the nozzle. After pumping about 6 atmospheres, a voltage of 3 V should be applied to the nozzle. Sometimes it happens that for the first time it is necessary to apply a voltage of 6-9 volts. This is because the nozzles
cannot "click". Voltage must be supplied in “batches” during periodic pumping. Once each injector has been cleaned, they should be replaced in the reverse order.
How to clean injectors at home
The injector nozzle operates on the principle of a spray, dispensing the mixture into the working chamber of the engine. The duration of the injection cycle and the amount of fuel supplied are set in the program of the internal combustion engine control unit. For each of the injectors these parameters are the same. The fuel injector is located inside the intake manifold. The air flow passes through the manifold and carries the fuel particles ejected by the injector into the combustion chamber.
In order to wash the removed injectors, it is necessary to prepare a washing device. The injectors are flushed under pressure. To do this, we assemble the injector power supply circuit. The injector receives power from 9 to 12 V. The power source for opening the injector can be a crown battery or a car battery. We will use a rechargeable battery.
So, let's start assembling a device for washing injectors on a Lada car
For convenience, it is better to carry out the procedure together.
You need to prepare a syringe. Pull the piston out of it; the syringe cylinder should fit tightly onto the nozzle with the ring. You can also use a hose of a suitable diameter instead of a syringe and tighten it with a clamp. We will use a hose.
flushing with a syringe; flushing through a hose
Next, we twist the wires with the injector plug or with the “mother” terminals.
We connect the nozzle to the power source, observing the polarity. "+" and "-"
The injector should click, which means the injector is opening.
We hold the nozzle and spray carburetor cleaner into the hose and hold it, creating pressure in the hose between the nozzle and the cleaner bottle.
Then you need to open the injector by connecting the wires to the battery
The injector will spray carburetor cleaner and clear itself.
You can complete the procedure as soon as a uniform spray of fuel begins to emerge from the injector.
Next, you should do the same procedure with all the injectors.
Assembly should be carried out in the reverse order of disassembly.
Sources
- https://vse-dlyaavto.ru/kakie-luchshe-postavit-forsunki-na-vaz-2107/
- https://forexs-online.ru/remont/kak-snyat-forsunki-na-vaz-2107.html
- https://www.vazzz.ru/kak-samomu-pochistit-forsunku-inzhektor-vaz-2107/
- https://avtotop.info/kak-pomenjat-forsunki-na-vaz-2107-inzhektor/
- https://auto-park24.ru/remont/kak-snyat-forsunki-na-vaz-2107.html
- https://auto-park24.ru/obsluzhivanie/kak-pochistit-inzhektor-na-vaz-2107.html
- https://avtika.ru/kak-snyat-forsunki-dvigatelya-2107/
- https://enginehack.ru/promyvka-forsunok/
Removing the nozzle
In order to carry out high-quality maintenance, restore the functionality of the nozzle or replace it, first of all, it is necessary to disconnect the wind cover or, as it is popularly called, “jabot”. Or rather, its upper part. To do this, you will need a 10-mm head, a flathead and a Phillips screwdriver.
How to remove the upper part of the windshield
- Using a 10mm socket, unscrew the two nuts located along the edges of the cladding.
- Next, unscrew the four self-tapping screws that secure the cladding. The screws are located under the plugs.
- Then you need to disconnect the sound insulation, which is attached to the wind window trim with six self-tapping screws.
- Carefully remove the top part of the windshield.
Having thus gained access to the washer nozzles, we proceed directly to dismantling them.
To dismantle the injectors you must:
- Disconnect the washer tube from the tee.
- Unscrew the screws securing the injectors, as shown in the photo above.
- Remove the injectors.
Now you can perform all further operations with the injectors. Assembly is carried out in reverse order.
What are injectors?
An injector is a special mechanical sprayer located in the “head” of the engine, through which fuel is supplied to the cylinders under high pressure.
Injector malfunctions
Among the most common causes of injector failure may be the following:
- The injector nozzle is coked - in this case, increased fuel consumption may be observed, vehicle dynamics will decrease, and engine starting will be difficult at subzero ambient temperatures. Otherwise there are no differences.
- The injector valve does not close hermetically (“the injector is snotty” - note) - here there may be increased fuel consumption, “tripleting” and increased detonation (about checking the knock sensor here), unstable idling.
- Valve sticking - engine troubles. In order to diagnose it, with the engine running, turn off the power supply to each injector in turn. With a non-working injector, no changes in engine operation will be observed, but with a working injector, the speed will drop.
Step-by-step work order
- The most important thing is to remove the air filter housing, the mass air flow sensor (MAF – approx.) and the pipe.
- Then you need to relieve the pressure in the fuel system. If you set a goal not to suffer, and this work is easier to do, put a rag under the pipes and unscrew the connections. This will release the pressure quickly, and the remaining gasoline will flow out onto the rag.
When using two keys, unscrew the fuel line.
The power supply is disconnected.
How to remove injectors on a VAZ 2112 16 valves.
Place the loosened bolts in a safe place.
To remove the ramp, you will have to make an effort.
When the fuel rail is removed, we carry out work to dismantle a specific injector:
Checking Lada Priora injectors
As mentioned above, both the fuel system ECU and the injector itself can fail. To carry out a complete diagnosis of the ECU, special software is required, which the average motorist simply does not have. Therefore, the only option is to diagnose the machine at a service center. The program, connected to special equipment, will quickly detect ECU errors and correct them.
A full check of Priora injectors is possible only on a special stand
And if problems arise in the mechanical part of the injector, then the diagnostic program will be useless. The maximum that it can do is indicate which cylinder is not working correctly. After this, the car owner can only replace the failed injector on the specified cylinder, since these devices cannot be repaired.
Adjusting the nozzles
If you managed to flush the injectors on your VAZ 2112 car yourself, then you can confidently handle the task of adjusting them. To do this, you need to understand a little about the design features of this device. On a VAZ 2112 car, two types of washer nozzles are used - jet and fan. In turn, jet nozzles can be: single-jet, two-jet and four-jet. This terminology is defined by the method of spraying washer fluid onto the windshield. In the jet nozzles, at the outlet of the washer fluid, a hinged bell is installed. This is a small ball with a through hole. Fan nozzles are equipped with a narrow slot-shaped bell. Now let’s start adjusting the injectors with our own hands:
- The direction of the jet in the jet nozzles is adjusted by turning the hinged bell.
- We insert a thin wire into the hole of the ball and turn the bell in the desired direction.
- Adjustment of fan nozzles according to their design is carried out only in a vertical position; the bell rises or falls to the desired direction. But this is not important; turning them left or right is also possible.
And, in general, no instruction can prohibit you from implementing any technical solution that helps improve the performance of vehicle components.
How to remove injectors?
First of all, you need to remove the injectors. To do this, first remove the terminals from the battery. We disconnect the wiring from the injectors; by the way, don’t forget to write down which wire comes from where. Next, you need to relieve the pressure in the fuel rail; for these purposes, there is a special bolt on it: place a rag under it and unscrew it slightly, when the fuel stops oozing, tighten the bolt in place so that you don’t forget about it later. After this, unscrew the screws that secure the fuel rail with injectors to the intake manifold and carefully remove the entire structure. We take out the injectors from the ramp. Try not to damage the sealing elements; be doubly careful if you did not purchase them to replace them.
An example of dismantling a fuel rail on a VAZ 2110.
Inspect the injectors: on one side there will be a supply channel, and on the other side there will be a spray nozzle, which may be covered with a brown oil coating. There will also be connection contacts on the side. Some injector models will still have a mesh filter on the supply channel, which must be removed along with the rubber seals before cleaning.
Let's move on to assembling the system for cleaning. To do this, we need to securely connect the spray tube of the cleaning can and the supply channel of the nozzle. In some models of nozzles, to do this, simply wrap electrical tape around the end of the tube that comes with the cleaner and then insert it tightly into the feed hole in the nozzle. If this is not possible, you will have to select a hose of the required diameter and use labor, electrical tape and “dancing with a tambourine” to make an adapter. Although, to be honest, it is not difficult at all.
Here are photos with examples:
Next, you should assemble the electrical circuit to open the injectors. To do this, one wire will connect the plus “+” on the battery, the light bulb and the designated plus on the injector terminal (the designation may be implicit, so it’s better to check the instructions). We connect the second wire from “–” to the button from the doorbell and to the second terminal of the injector.
We attach the hose from the cleaner to the nozzle, create pressure by pressing the valve on the can, and press the button for a couple of seconds, opening the nozzle (you should see a fine fuel torch escaping from the nozzle nozzle). We continue cleaning until the torch becomes uniform. We carry out this procedure with the remaining nozzles.
Now we install the injectors and reassemble the disassembled one in the reverse order. As experts and repair manuals advise, it is better to replace all rubber seals, but honestly, if they are in good condition, not stretched or “stiff,” you can leave the old ones. Do not forget, of course, to lubricate all seals with machine oil before installation.
After assembly, turn on the ignition to increase the pressure in the fuel system, and check all elements for fuel leaks, tighten the connections if necessary; if this does not help, then most likely the recommendation from the instructions for replacing the seals with new ones was just for you.
For those who have successfully tested the leak test and the engine starts and runs smoothly, I congratulate you, you have correctly flushed the fuel injectors with your own hands.
How to clean injectors yourself
Method 1: fuel additive
The simplest and relatively gentle cleaning method is using special additives. More suitable for preventing the formation of deposits inside all elements of the fuel system - from the gas tank to the injectors.
The disadvantage of such additives is that on cars with high mileage they lift all the dirt from the gas tank and pipelines. As a result, the filters and the injectors themselves become clogged, which leads to even more disastrous consequences.
You will need
- Fuel additive-injector cleaner.
How to do
- Pour the product into the tank immediately before refueling according to the proportions in the attached instructions.
- Operate the vehicle as normal.
- For the best cleaning effect, it is advisable not to stand in city traffic jams, but to drive along the highway.
Method 2: flushing the injectors on the engine
This cleaning method is more difficult, but also more effective. It not only cleans the injectors, but also additionally decarbonizes the piston rings and also increases compression. Flushing is carried out with the engine running, which runs on detergent instead of gasoline.
The main disadvantage is that the quality of washing cannot be controlled. Other disadvantages include the entry of aggressive substances into the exhaust tract and potential damage to the catalyst. After using some products, spark plugs may need to be replaced.
You will need
- Injector cleaner;
- fuel filter;
- two-liter plastic bottle;
- wire;
- 1 m of fuel hose with a diameter of 10–12 mm;
- 3 clamps with a diameter of 9–14 mm;
- 2 nipples from a tubeless tire;
- bolt M12;
- screwdriver or drill;
- drill with a diameter of 12½ mm;
- tire compressor;
- spark plugs (if their replacement is recommended in the flushing instructions).
How to do
- Drill one hole each in the cap and bottom of the bottle. Install the nipple with the valve turned out into the cover. The nipple will supply liquid to the ramp.
- Insert the second nipple assembly into the hole in the bottom. You will need it to pump in air later to create pressure.
- Place one end of the hose onto the nipple in the cover, and install the other on the fuel filter, according to the arrow on the body. Tighten the ends of the hose with clamps. Wrap the bottle with wire so you can hang it.
- Warm up the engine to operating temperature and turn it off. Disable the fuel pump by removing the corresponding fuse.
- Start the engine. Let it run to relieve pressure in the rail. Wait until the engine stops.
- Disconnect the fuel supply hose from the line and connect it to the filter of an improvised flushing receiver. Pour the wash into the bottle, close the cap and hang it on the hood.
- If the car has a return fuel line, plug it using a bolt of suitable diameter and clamp it with a clamp.
- Use a compressor to pump air into the bottle until the pressure reaches 2–2½ bar.
- Start the engine and let it idle for 15 minutes, maintaining the pressure in the bottle at the same level.
- Turn off the engine and wait about 15 minutes for all deposits to soak off.
- Start the engine again and use up any remaining flushing fluid while maintaining the RPM between 1,000 and 1,500.
- Remove the bottle, the return plug and connect everything as normal. Don't forget the fuse.
- If the flush is aggressive and affects the spark plugs, replace them.
Method 3: washing and removing the injectors
The most difficult method, which involves removing the fuel rail and injectors. At the same time, it is the most effective and targeted - there is no harm to other elements of the system. For flushing, the operation of an injector is simulated, and a carburetor cleaner is used instead of gasoline.
The only disadvantages of this method are the difficulty of dismantling the ramp and injectors, as well as the need to replace microfilters and o-rings.
You will need
- Aerosol cleaner for carburetors;
- syringe 5 mm³;
- 9-volt Krona battery;
- 1–2 m of wires;
- doorbell button or other without fixation;
- 4 alligator clips;
- screw with a diameter of 4 mm;
- pliers;
- repair kit for injectors (only rubber rings and a filter are allowed).
How to do
- Remove the throttle assembly and fuel rail. Disconnect the injector wires and remove them.
- Pour some cleaning liquid directly into the bottle cap and place the nozzles there for 15-20 minutes to dissolve the carbon deposits. You can use the same cleaner to wash the throttle assembly while it is removed.
- Connect the battery contacts and the injector with wires and clamps, observing the polarity. Cut one of the wires and install a bell button in the gap.
- Make an adapter from the body of the syringe by placing the thin end on the aerosol tube.
- Remove the microfilter from the first injector: screw a screw into the fuel channel and pull it out with pliers.
- Place the syringe on the nozzle side of the sprayer. Press down on the valve of the cleaner bottle and at the same time press the bell button several times.
- Place the syringe on the nozzle from the reverse side. Press the valve and press the bell button intermittently until the liquid begins to spray out in an even pattern.
- Repeat steps 5–7 for each injector.
- Replace filters and rubber seals by lightly tapping them.
- Reinstall the injectors and ramp, reassemble all parts in reverse order.
Source: lifehacker.ru
Replacing injectors
The difficulty in identifying problems in the operation of injectors is that the fuel system is quite branched and it is necessary to diagnose the functionality of all its parts. For example, a malfunction such as a decrease in engine power can have two reasons - failure of the injectors or exhaustion of the pump's life.
Clogged injectors can result in sudden jerking of the engine while driving or unstable idle speed. In addition, an increase in fuel consumption can be considered a sign of injector failure.
You can check the functionality of each injector even without removing them. Simply start the engine and remove the wires from the connector of each injector one by one. If immediately after removal the engine starts to twitch or stalls, then the injector is fine. If the stability of the engine does not change with removal of the wire, then the injector needs to be thoroughly cleaned or even replaced.
Defective injectors
First of all, the car must be installed on a site convenient for work. Defects of the nozzle are carried out by simply turning it on. Using the steering column switch lever, you need to turn on the VAZ windshield wiper and observe the operation of the nozzle.
List of problems with washer nozzles
- Washer fluid does not flow through the nozzle nozzle at all.
- The washer fluid pressure is very weak.
- The jet of liquid supplied is directed to the side and does not provide complete cleaning of the windshield.
- The pump supplying washer fluid or its motor has failed.
- The washer fluid supply tube is damaged.
- The injector has mechanical damage.
- The injector nozzle is clogged with foreign material.
- The nozzle adjustment is incorrect.
Causes of problems
Attention: In order to quickly determine the area where the defect is located, it is recommended to disconnect the washer fluid supply tube from the nozzle and turn on the washer. If the fluid supply pressure is normal, then the problem is in the injector.
Symptoms of a problem
If you clean and maintain the injector assembly in a timely manner, they can last quite a long time. But when to clean the elements is difficult to determine, so there are a number of signs of malfunction.
- Starting the engine with difficulties or not the first time.
- Loss of power and traction.
- Troubling is a clear sign of uneven fuel supply.
- Increased consumption.
- Jerking of the vehicle in the winter season.
If the above symptoms occur, it is necessary to urgently clean the injectors. After the procedure, the performance of the car engine should return to normal. If this does not happen, then you should look for reasons in another place, such as the fuel pump, fuel filter or cylinders.
Signs of a clogged injector
To understand when to clean fuel injectors, you need to understand what the distinctive signs and indicators of a clogged injector are.
As a rule, experts recommend cleaning at least once every 30 thousand kilometers. But it is worth understanding that the condition of each car is individual, and each car owner has a different attitude towards servicing the power unit. Therefore, it is not always worth adhering to certain regulations, since cleaning the injector nozzles may be necessary much earlier. Among the main signs indicating the need to clean the injectors are the following:
Such signs indicate clogged injectors. But the symptoms cannot definitely indicate a faulty injector. Sometimes this indicates problems in other components and assemblies. To make a “verdict”, it is recommended to go for car diagnostics or conduct a visual inspection of the element that causes suspicion. As a rule, the listed symptoms do not appear immediately, but after some time. Especially if the car’s mileage is close to 100 thousand km or has exceeded this mark.
Troubleshooting
To quickly check the injectors without removing them, you will need an indicator screwdriver. It consists of a metal rod and handle on which a switch and a contact are located to create a conductive circuit, clamped by one of the fingers. When moving the switch forward towards the rod, the device becomes less sensitive; when moving to the upper position, its sensitivity increases. In the first case, the red indicator lamp will light up or flicker, in the second case, the green lamp will light up.
Before carrying out the test, the screwdriver switch must be moved forward, towards the working part (rod) until it stops, and your finger must be pressed against the open contact located on the handle of the indicator screwdriver. The hand must remain in this position during the entire test, closing the electrical circuit, otherwise there will be no indication.
The working rod of the screwdriver must be positioned so that it touches the metal bracket on the block holding the nozzle. There is an opinion that it is enough to simply bring the rod to the block for an indication to occur, but this is not so. The metal clamp catches the electromagnetic pulse generated during the operation of the injectors; a potential difference and alternating currents arise in it, which the device records.
This test checks the injector while the engine is running, so it must be started and left at idle. When the rod of the indicator screwdriver comes into contact with the metal bracket on the screwdriver, the red indicator should light up. This checks performance on all cylinders. If the injector of one of the cylinders is not working, the indicator will not light or blink.
Using the indicator does not necessarily indicate that the injector is faulty, it signals that it is not working. The problem may be there, or in the voltage supply system, poor contact, failure in the electronic control unit, etc.
Some models do not have metal pad clamps in which currents are generated; in this case, is it possible to determine the faulty injector without removing it from the engine? Yes, this can be done using the same indicator screwdriver. To do this, you need to set the switch in the uppermost position (this is the highest level of sensitivity of the device) and perform additional manipulations.
After starting the engine, the screwdriver rod is brought to the injector block, and no indication will appear, even if it is working. Therefore, you need to attach a metal bracket to the screwdriver shaft, which will serve as an antenna where electromagnetic oscillations will occur. A paper clip carefully pressed around the rod with pliers is suitable for this.
During the fuel injector test, the switch remains in the highest sensitivity up position. With the engine running at idle speed, you need to bring the bracket as close to the block as possible, it should cover it. A blinking indication should appear on the device due to currents excited by the electromagnetic field that occurs during operation of the nozzle. If there is a non-working injector under the column, there will be no indication. This technique is also suitable for pads equipped with a metal bracket.
Conclusion
Testing with an indicator screwdriver will help you quickly find a problem when the engine is misfiring due to an injector, or other problems from the list above arise. If you have this tool, you can carry out diagnostics in your garage, and having identified a malfunction, fix it, if possible. The proposed test only reveals the fact that the injector is not working, and this can be done without disassembling the engine.
To identify the reasons why the fuel does not ignite in the cylinder, more detailed diagnostics and subsequent repairs will be required. However, it is not always necessary to replace the nozzle; there are other reasons why it does not function or is unstable. Sometimes you just need to seal the pad contact and the problem of stable engine operation is immediately solved; in more complex cases, for example, to clean the injectors, you will need to contact specialists.
Source
Repair of injectors VAZ 2110–2112
Repairing injectors means cleaning the product and replacing the O-rings. Simple measures to restore the functionality of the injectors can significantly increase the car’s power and make cold starts easier. Injector repair is possible in the following cases:
- there are no visible deformations on the body;
- the nozzle has not yet exhausted its service life;
- the car owner wants to optimize the operation of the power unit.
In all other cases (cracks and deformations, long service life), it is recommended to replace the nozzles with new ones.
How to blow out and clean oil molds
On cars of the tenth family, injector cleaning may be necessary after 40–50 thousand kilometers. In this case, it is best to carry out the procedure yourself, since you can always observe for yourself the true condition of the motor and its elements, and also save a significant amount on service station services.
Many drivers prefer to use the simplest method of cleaning injectors - fuel additives. Special liquids, along with gasoline, are poured into the tank and pass through all elements of the fuel system, cleaning them. This measure is justified for new cars in which the degree of pollution is at a minimum level. But additives will not be able to properly clean injectors and other elements of the system.