02/28/2022 3,370 Electrical package
Author: Ivan Baranov
Every modern car is equipped with a washer system designed to clean the windshield and, depending on the car body, the rear window. This system includes various elements, including windshield wiper blades and a washer fluid reservoir (WHC) into which cleaning fluid is filled. Read more about what malfunctions the expansion tank is susceptible to and how to repair it.
[Hide]
How it works and where it is located
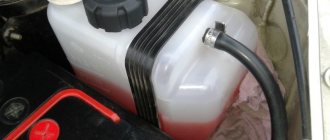
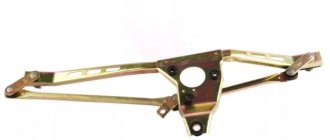
The tank is a plastic container.
The price for this container can range from 100 to 400 rubles. This different price is determined by the configuration. It can be equipped with a special motor that pumps liquid.
The VAZ washer reservoir is only part of a larger system. In addition to this reservoir, the design includes a pump that supplies liquid, a hose, a tee, windshield washer nozzles, a liquid level sensor, and fasteners.
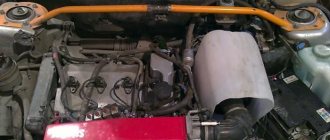
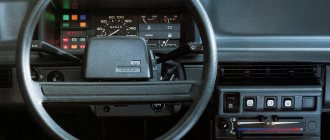
The container is located under the hood, on the left. You can immediately see a large white plastic canister - that’s it.
To fill the container with water, you need to open the hood, unscrew the tank, and pour liquid to the required level. The standard tank capacity is about 5 liters.
Typical problems that can happen
Often, during the change of seasons, car enthusiasts manage to do everything to prepare their cars for the winter cold.
So, the oil is changed, the tires are changed. And many people forget to empty the washer reservoir. Then frosts come, the water in it freezes, the system depressurizes, and the pump may fail due to ice. But this is just a theory. Most often, a crack appears on the body of this very tank, which in winter can turn into a large crack. There are many more different reasons why these plastic containers fail.
Replacing the windshield washer reservoir
If suddenly for some reason there is a need to replace the tank, it is very easy to do it yourself. No special skills or tools are required here. All work can be done with almost bare hands.
Before removing the windshield washer reservoir, be sure to disconnect the hose and power cables from the motor and level sensor. Then use a 10mm socket to remove the bolts that secure the reservoir to the slots. Now this part will come off easily if you pull it up.
Don't forget to remove the electric pumps from the tank. The sealing sleeve can be easily pryed with a screwdriver and removed from its seat. If this part is no longer flexible or has any damage, it should be replaced.
After this, you need to remove the level sensor from the tank. To do this, you must unscrew the plug and remove the sensor. Now all work is completely finished.
How and what to fill in the washer reservoir?
Above we looked at how to remove the washer reservoir, check the system sensor and change the container (if it is damaged). But there are situations when the container body is intact, and the only thing that needs to be done is to add liquid.
In such a situation, proceed as follows:
- Pull the hood handle located in the cabin.
- Open and secure the hood.
- Unscrew the cap that is installed on the tank. In this case, unscrew only the cover that does not have wires.
- Add liquid (water or anti-freeze). If the container is empty, it holds about five liters.
An equally important question is what to put in the tank. It is important to consider the time of year here. So, in winter it is recommended to pour non-freezing liquid, which will protect the system from freezing.
Washer reservoirs: repair
If your tank suddenly develops a crack for unknown or known reasons, you have several options. Either it’s a repair or buying a new container, since its price is low. If you are on the highway, then definitely a repair.
If temporary measures are needed, then prepare several food bags and place the washer reservoir in them. This will stop the water leakage for a while. It is advisable that these bags are approximately the same size as your container.
You can also perform simple repairs using a soldering iron. For such repairs you will need an ordinary soldering iron. It needs to be cleaned, but there is no need to tin it. Use a plastic food bag as solder. Twist it to make a rope with a diameter of 5 mm. Solder one end of it below the crack, and then slowly solder the entire crack and even a little higher.
Be careful not to overheat the soldering iron. Then heat the tourniquet until it becomes transparent, but heat it carefully so as not to damage the tank body. After cooling, you will get a reliable seam.
Instructions for replacing and repairing the tank
Replacing the washer reservoir is usually done as a result of its failure, which cannot be repaired. In particular, if the CP is cracked and it is no longer possible to restore its integrity.
Using the example of a VAZ 2114 car, let’s look at how to remove the washer reservoir:
- First open the hood. Before removing the BO, it is necessary to drain all remaining liquid from the container. If the liquid level in the container is high, then unscrew the cap of the washer reservoir, this will reduce the pressure in the system.
- Then the BO is removed from the grooves; to do this, it can be pulled up, and placed in such a way that you can easily dismantle the electric motors.
- You need to disconnect the contacts from the motors, as well as the water supply pipes.
- Next, the electric motors are removed from the container body - for this you can use a regular screwdriver to pry them off (the author of the video is the menstimecom channel).
As you can see, there is nothing complicated in removing BO. It is much more difficult to repair the washer reservoir. If the container is cracked, it is not a fact that it can be repaired, since everything depends on the size of the crack and its location.
If you don’t know how to seal the washer reservoir, then you have several options:
- For gluing, you can use special glue or cold welding. Before applying material to a crack, the BO must be thoroughly washed, and the area to be patched must also be degreased. Glue or cold welding is applied to the crack, while it is necessary to grab a few more millimeters from each edge of the crack. Depending on the type of glue and cold weld, the waiting time for the material to dry can range from 30 minutes to several hours.
- If the crack or hole is small, you can try to treat it with regular sealant. In this case, the repair procedure looks similar - the surface is first washed and then degreased. A certain amount of sealant is applied to the hole, which should completely fill the crack and the space around it.
- Another option that is best suited for larger cracks is the use of special plaster tape. It is also installed on a degreased surface, but before installation the tape should be coated with epoxy, and the material should be applied in several layers until all the cracks are closed.
- If all these options do not help you, then you can use a soldering iron or wood burning machine. With the help of these devices, the structure of the container is softened, which makes it possible to restore its integrity if the damage is minor. Additionally, after treatment with a soldering iron, the damaged area of the BO can be covered with cold welding.
Lada Priora washer reservoir
These cars have very fragile tanks.
There are many different offers in the stores. So, you can use a model for two pumps. This way you can ensure the glass is clean both front and back. This container has a slightly larger volume when compared with that installed by the manufacturer.
When replacing, you need to take into account that on the Lada Priora in hatchback and station wagon bodies, you buy containers for two pumps. If you have a sedan, then this option will not suit you.
Seal up a burst washer reservoir on a car step by step
Let's take a closer look at two methods of repairing a burst washer reservoir - glue and glueless (soldering).
Method one - using two-component Hosch glue:
- Preparation. Both surfaces to be bonded should be cleaned of dirt using acetone.
- Applying glue. The liquid cyanoacrylate component is applied in a thin layer to the crack or hole. Welding granules from the second bottle are added on top and again covered with a small amount of glue for impregnation.
- Gluing. The glue sets almost instantly, so within a few minutes after applying the composition, the tank can be returned to its place and filled with windshield washer fluid.
Note! When a liquid adhesive component interacts with welding granules, an exothermic reaction occurs with the release of heat and steam, so care should be taken to ensure safety.
Do not inhale the vapors generated during the reaction process.
VIDEO REVIEW
Method two - soldering:
- The surfaces to be joined must be degreased with acetone.
- Heat the soldering iron to maximum temperature.
- We apply the mesh to the seam so that the edges of the mesh extend to each side by at least 2-3 centimeters.
- We gradually heat the metal mesh, fusing it into the plastic.
- Smooth out the top layer of polyethylene so that the layer becomes monolithic.
- We check the tank for leaks and install it on the car.
When performing work, safety precautions should also be observed. Soldering may only be carried out in a well-ventilated area.
How to heat it in winter
This is necessary so that the containers do not crack and do not have to be replaced.
So. In order to make heating with your own hands, you will need about 1 meter of copper pipe with a diameter of 8 mm, 2 meters of the same braided hose, tank cuffs and clamps.
The technology does not require special skills and is extremely simple.
For the next technology you will need the same tube. Using a gas torch or a soldering iron, bend the pipe so that you get a coil. They fasten it unconventionally. The coil is soldered to a textolite plate. Then all this is installed in the container, but in such a way as not to interfere with the operation of the level sensor.
Holes for the heating device can be made using a soldering iron.
The third scheme is a ready-made system - “Geyser”. As coolant passes through the coil, its temperature rises. The temperature of the fluid in the reservoir will also increase.
Do not forget to monitor the condition of your car, and then it will work for you for a long time and reliably. Keep an eye on your washer fluid levels and you won't have to change reservoirs too often in the winter.
Where is the washer fluid container located?
Novice car owners often do not know where the washer reservoir is located. They often confuse it with a coolant or brake fluid container. In fact, finding the tank you are interested in is not difficult.
Let’s say in VAZ cars it is located under the hood, on the left or right side of the engine, depending on the model, and there may also be two of them, on the rear and front windows. And on foreign cars it can be located under the front bumper.
If the level of water or antifreeze in the tank is insufficient, it is enough to top up. But what to do when the windshield washer reservoir bursts? In such a situation, the only salvation is to replace the failed device.
How to replace the washer reservoir:
Lift the hood and find the sensor that monitors the washer fluid level (not found on all cars). Disconnect the connector that fits this device. Also, disconnect the connectors from the wires from the electric pump that pumps up the washer fluid. At the same time, remove the wires from both pumps - for the windshield and for the rear.
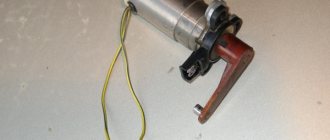
Then remove the washer reservoir from its mounting and remove the tubes from the fittings of both pumps. Remove electric pumps from the container. To do this job, you will have to overcome a certain force created by the sealing bushings.
Carefully pry the said sleeve (you can use a flat head screwdriver or something similar) and then remove it from the hole in the container. Assess the condition of the bushing for elasticity. If it is damaged, replace it.
Unscrew the cap and remove from the container the sensor that controls the level of windshield washer fluid (if, of course, your car has one). Check the functionality of the sensor. To perform this task, connect a test lamp to its connectors, then power the device with 12 Volts.
If the float is at the bottom (that is, it signals the absence of liquid), the light should light. Now lift the float up and control the behavior of the light bulb - there should be no glow. If the algorithm is not the same as described above, the sensor needs to be replaced.
Washer fluid level sensor
This completes the removal of the washer reservoir. Next, you need to decide whether you will change the device or try to make a repair, that is, seal it. The first option is more preferable. And the cost of the product is not so high as to save.
Now replace the container and follow the reverse order. If problems arise with the installation of electric motors, and they are difficult to fit through the seals, use soap to lubricate the edges.
Once the tank and motors are mounted, return the nozzle pipes to their place. To simplify the process of installing the tube on an electric motor, heat the tip of the tube with a lighter, after which they can be easily put on. During installation, ensure that the motor is securely fixed.
Removal instructions
The washer reservoir can become damaged for various reasons. If frost sets in and you forgot to fill in the frost-resistant liquid, in the morning there is a chance to see a burst container under the hood that will have to be replaced. The quality of the washer fluid is also not the best, which can lead to the same result. Regardless of the reasons, the burst reservoir must be removed from under the hood. This job has its own procedure, which differs depending on the make of the car. The fastenings can be either different or similar, and for work most often you need a flat-head screwdriver, as well as 10 and 13 keys.
Repairing an old tank is possible, however, the money and time spent on it are not always worth it. To put it more clearly, even a repaired tank will not perform all the functions assigned to it, it will look less aesthetically pleasing, and the service life after repair will still be reduced, because the wear of the plastic can be great. If possible, you should not neglect repairs. For older cars, repairs are acceptable; everything will work fine until it wears out completely. If you do not want to give preference to repairing this part in your car, it is best to go to the store.
There is a good chance you will find a tank that will fit your car according to its characteristics, and will be even larger in size. If the product is not the original model, it will be even cheaper, and in terms of characteristics – no less productive. There are tanks with a sensor for washer fluid and they are not difficult to buy. If the fasteners match, then the new system can be installed, even if its shape is slightly different from the original system previously installed in the car. If you want to maintain the make and equipment of your car, look for a tank that looks the same as yours.
How to remove the washer reservoir on a Lada Kalina?
What will be needed to replace the washer reservoir? To work, take a flat-blade screwdriver and a 10mm wrench.
- The first stage is unscrewing one nut and mounting bolt. The pumps can be removed with a screwdriver or simply by pulling them by hand. Next comes the clamp, which serves as a hose fastening. If it cannot be removed, then you can cut it and then install a new one - such hoses do not cost much. Note: before starting work, water or other liquid must be removed, as it may spill during the removal process.
- Once you have unscrewed the nut and bolt fastening, you can remove the container itself. During the procedure, you can replace worn-out pumps, hoses and wires by installing new ones.
Removing and installing a tank for Lada Priora
- First the battery is removed. You can remove the terminal; to do this you will need a 10 mm wrench.
- The upper fastener is removed; for this you need a 13 key.
- The mounting post is removed using a 13mm wrench. This should be done carefully so as not to drop the nut.
- The block with wires is disconnected from the washer pump. A block with a pink-blue wire is connected to the “plus”, and a black wire is connected to the “minus”.
- When removing the pumps, liquid may spill. Therefore, you should prepare rags to collect it.
- Everything is attached to the rack with two nuts, which are located in the headlight area.
- The old tank is removed from the niche and a new one is installed in its place. To do this, it is raised and removed from the pin. It is very important to secure it well.
- To prevent water from spilling, close the hole with your finger, after which it is drained into a clean container.
- The pump installation locations can be lubricated with sealant. Thus, the rubber seals will fit more tightly, eliminating the possibility of water leakage. Also, the connection points with the hoses can be washed if necessary.
- Installation proceeds in the opposite sequence to removal.
Characteristics of the element of the windshield washer system - tank
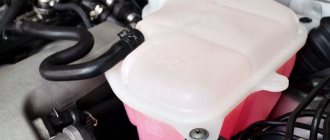
Before we tell you how to remove the washer reservoir and repair it, we suggest you understand the main characteristics of this element of the system. It is a container, usually white, designed to hold cleaning liquid.
Design Features
In addition to the container itself, the BO includes in its design the following components:
- nozzles through which liquid is supplied to the glass;
- an electric motor used to supply consumables to the glass;
- small-diameter hoses located between the nozzles and the electric motor, through which liquid is supplied;
- depending on the car, the system can be supplemented with a sensor designed to measure the volume of consumables in the container and warn the driver about a critical level;
- washer reservoir cap and retainer;
- tee for connecting pipes.
Location
Location of the container in a Renault car
Where is the washer reservoir located? Inexperienced motorists often confuse BO with expansion tanks for antifreeze or brake fluid. But in fact, finding this element is easier than ever. For example, in most domestically produced cars this component is located in the engine compartment, to the right or left of the engine. There can also be two of them - for the front and rear glass.
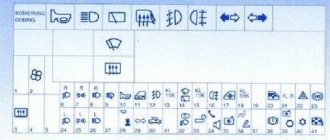
In foreign-made cars, the BO is usually located under the front bumper or under the windshield. As a rule, a special symbol in the form of a watering can is applied to the lid of the container - this is how BOs are marked.
Design features
The car window cleaning and washing system must always be in good working order; traffic safety largely depends on it. Its main component is a special tank; the efficiency of the entire system will depend on its serviceability. The volume, size and shape of the vessel will depend on the make and model of the vehicle. On average, the product can hold from 2.5 to 4 liters of water. The volume may be increased if other components, such as the rear window or optical elements, are to be serviced.
The design characteristics of the container may depend on its type. Most units can be divided into two main categories: universal types and designs used for a specific make and model of vehicle.
The product usually has a rectangular shape, one or more electric motors can be located on one side, and there must also be a hole for a sensor to control the water level in the tank. The vessel is made of white plastic, thanks to which the car owner is able to independently determine the amount of anti-freeze remaining.
Where is the structure located?
The windshield wiper container is located in the engine compartment, but the car owner has access to its neck and cap, so the windshield washer can be filled at any time.
It is not possible to visually inspect the integrity of the system. To do this, you need to go to a car service center or independently disassemble the structure located under the bumper or from the bottom of the engine compartment. In some cases it may be necessary to remove the wheel. The exact location of the product will depend on the internal layout of the power unit components.
What is a glass washer tank?
The tank is a special container, most often white. It contains liquid for cleaning glass in case of contamination. Barrel components:
- Storage tank;
- Nozzles, with their help the washer gets onto the glass itself;
- Electric motor supplying liquid;
- Hoses between the electric motor and the nozzles, through which the washer is supplied;
- The sensor measures the volume of liquid consumed in the tank and warns when this amount is critical and needs to be added;
- Fixing element and tank cover;
- A tee with which the pipes are connected.
Frequent unit malfunctions
The container for antifreeze liquid does not require maintenance during vehicle operation, but malfunctions may occur that require repair or complete replacement of the product. It is necessary to contact car service specialists in the following situations:
- If cracks have formed in the tank body.
- The seal of the product was broken and leaks began to form.
- The threaded connection is not tight enough, which can also lead to leaks.
- If the water freezes, the unit in this case becomes completely inoperable.
- Electric motor failure. Such a malfunction leads to a decrease in pressure, and the product will reach the nozzles in insufficient quantities or will not flow at all.
Add antifreeze to the windshield washer reservoir
In case of accidents, vibrations or mechanical stress, the structure may completely collapse. If the washer reservoir has burst, it may need to be completely replaced. All types of faults are divided into two main categories: mechanical and electrical defects. The former are much more common, and, as practice shows, the car owners themselves are most often to blame. It is important to always monitor the fluid level and switch to a winter product in time.
Important advice! It is not recommended to use ordinary tap water; it contains a large amount of impurities that can lead to contamination of the washer nozzles.
Electrical causes are less common; the most common are fuse failure and electrical pump failure.
The nuances of operating the device “by season”
What you need to know about operation:
- In the warm season, it is allowed to use a washing solution or water with the addition of a special additive.
- In winter, you need to fill in a special anti-freeze liquid, since the water can freeze and ruin the container itself. You can find the appropriate fluids in domestic auto stores.
- Use heated washer fluid reservoir. As practice shows, most cases of cracks in tanks are due to consumables freezing in them. To prevent this, you can use a heated washer reservoir, which is installed on cars as standard or as additional equipment.