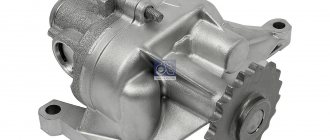
The VAZ 2107 oil pump is designed to create pressure in the lubrication channels of an internal combustion engine. Thanks to it, oil flows to all moving parts of the engine: crankshaft, camshaft and other parts. If the pump malfunctions, the lubrication of the sliding bearings and internal combustion engine parts will stop and they will quickly fail. Therefore, if there are any signs of malfunction, the oil pump should be replaced or repaired immediately.
Replacing the pump on a VAZ 2101–2107 (injector and carburetor)
So, the pump is faulty and a decision has been made to replace it. By the way, this procedure can be directly related to the renewal of the coolant.
Location
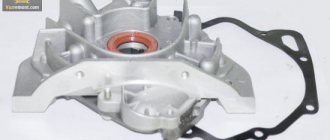
The pump sits on the BC. It is bolted to the block body (indicated by arrows in the photo).
Location of the pump on the block of a VAZ car (nuts are indicated by arrows)
Subtleties of choice
Choosing a pump is a responsible matter. If you don’t give it proper attention, you can end up with a bad deal - spend money on a “left-handed” or refurbished, but used product.
You especially need to check the seal. It is advisable that it be a new model, not an old one. New samples come with springs, old ones - without them.
There should be no backlash. It is recommended to open the package directly in the store, on the spot. Check the product for the presence of transverse bearing play; if it is observed, return or replace it.
The body of a real VAZ pump should have the TZA logo, which means it was manufactured by casting. If there is no sign, it is a handicraft work.
Purchasing an original VAZ pump is a guarantee of reliability and durability. Only as a last resort, if there is no suitable option, can you listen to the recommendations of a seller or professional who advises you to select the most optimal pump.
Tools and materials for replacement
You will need the following tools:
- mount;
- set of keys;
- empty container for draining coolant.
In addition to tools, you will also need materials:
- the pump itself, new and factory;
- new coolant to replace old fluid;
- pad;
- silicone based sealant;
- new set of nuts and washers (recommended).
Replacement algorithm
Let's start.
- Open the drain hole and carefully drain the liquid. How much antifreeze comes out, that much will need to be added (if there was no leak before). If there was a leak, then it is advisable to completely empty the system of coolant and fill it with 9.8 liters according to the instructions.
- Disconnect the battery. Disconnect the electric fan connector.
- Remove the fan protective cover.
Access to various elements of the cylinder block is now open.
- Loosen the generator belt tension nut (M17) and remove the belt.
- Unscrew the bracket fixed to the pump and move it to the side.
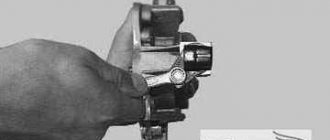
- Holding the pump pulley, unscrew the three mounting bolts.
- Then unscrew the four nuts securing the pump to the engine.
- Dismantle the pump and clean the seat with sandpaper.
- Install a new pump, first lubricating the seat with sealant.
The rest of the assembly process is carried out in reverse order.
Troubleshooting and repair of a removed element
Let's look at how to test a removed oil pump. The check consists of visual inspection, measurements and comparison of the measurement result with the nominal dimensions.
Unscrew the oil receiver cap together with the pressure reducing valve. It is worth making an effort so that the spring thrust washer does not get lost. Next, note that some bolts will be smaller than others. This bolt should then snap back into place.
Use a caliper to measure the spring. At rest, it should be at least 38 millimeters in length. Then remove the cover, which will have marks from the wear of the gears. If the scoring is deep, then the oil pump has a lot of wear. The cover can be repaired - its plane should be leveled.
Next, remove the drive gear and visually check the condition of its teeth. If there are abrasions and burrs on the teeth, this indicates a lot of wear. The driven gear should also be checked. The main thing about it is the hole in which the fixation axis is located.
Then check the walls of the device housing and the axis of the driven gear. Potholes, grooves, and various defects indicate that debris has entered the working area inside the pump.
Choosing oil for VAZ 2107
Repair and replacement of the VAZ 2110 oil pump
Taking into account all of the above, it becomes clear: the choice of lubricant for the VAZ 2107 engine primarily depends on the climatic conditions in which the car is operated. If a car owner operates a car in a region with a positive average annual temperature, then he should use a simple and cheap mineral oil, such as LUKOIL TM-5.
If the car owner lives in a region with a temperate climate (which predominates in central Russia), then it would be more advisable to fill in semi-synthetic oil. For example, Mannol Classic 10W40.
And finally, residents of the Far North and regions close to it will have to use exclusively high-quality synthetic oils. A good option is MOBIL Super 3000.
Bottom line
Self-repair of a car is allowed only after studying the mechanism. Having learned how to check the oil pump, you can independently determine the cause of the pressure drop inside the system. However, it is better to entrust complete repairs and troubleshooting of the device to a qualified specialist.
Sources
- https://autoexpert174.ru/vidy-ustrojstvo-masljanogo-nasosa-dvigatelja-diagnostika/
- https://FB.ru/article/402092/kak-proverit-maslyanyiy-nasos-sposobyi-proverki-remont-sovetyi-spetsialistov
- https://masladvig.ru/kak-proverit-maslyanyy-nasos-diagnostika-i-sovety/
- https://carnovato.ru/zamena-maslyanogo-nasosa/
- https://autolirika.ru/soveti/kak-proverit-maslyanyj-nasos.html
[collapse]
How to change the oil pump of a VAZ 2107
Replacing the oil pump
If the problem is not a clogged pressure relief valve or oil intake screen, the pump must be repaired or replaced with a new one. Replacing the VAZ 2107 oil pump is performed as follows:
- install the machine on the inspection hole;
- clean the lower part of the engine, sump and crankcase protection from dirt;
- unscrew the bolts securing the crankcase protection (mud guard) and dismantle the part;
- place an oil container under the oil drain plug;
- unscrew the plug and drain the oil;
- unscrew the nuts holding the lower fastenings of the front engine mounts;
- placing the spacer, lift the engine using a jack;
- remove the studs from the crossmember supports;
- hang the engine on a winch or on a wooden block placed on the front wings of the “seven”;
- Using a 10mm socket wrench, unscrew the pallet mounting bolts (19 pieces);
- remove the pan and gasket;
- Use a knife to clean the pan and the adjacent surface of the engine from any gasket or sealant residues;
- Using a 13mm wrench, unscrew a pair of bolts securing the oil pump;
- remove the oil pump along with the gasket;
- install a new oil pump along with a new sealing gasket;
- tighten the oil pump mounting bolts;
- install the pan cover along with a new gasket;
- evenly tighten the 19 bolts holding the pan cover;
- lower the engine and install the engine mounts in place;
- tighten the support nuts;
- install the crankcase protection and tighten the fastening bolts;
- add new oil.
This completes the replacement of the VAZ 2107 oil pump. All that remains is to start the engine and check the operating oil pressure in the system.
Oil pump - thanks to this part, the most important units in engines are lubricated with oil, these include: Crankshaft, camshaft and other parts. If you remove this part from the car, then these parts listed above will not be lubricated with oil at all, which will lead to very rapid engine failure, so the oil pump must always be kept in good condition and, if it malfunctions, be repaired or replaced with a new one.
Replacement
1. Place the car on an inspection hole or overpass.
2. Remove the engine oil pan.
3. Using a 13 mm socket wrench, unscrew the two oil pump mounting bolts. The VAZ 2107 oil pump mounting bolts have different lengths.
4. Remove the oil pump and sealing gasket.
Installing an oil pump on a VAZ 2107 engine
1. Before installing a new oil pump, replace the sealing gasket.
2. Installation of all removed parts on the VAZ 2107 is carried out in the reverse order.
3. Fill the VAZ 2107 engine with oil.
Where is
It is located inside the engine, so just looking at the engine you will not see it, and in order to look at it, you will first have to remove the crankcase protection, then you will need to remove the pan and only after that you will see the oil pump with your own eyes.
Pressure reducing valve
To avoid such problems, a pressure reducing valve was provided. At first glance, this is a simple unit, but without it, normal engine operation would be impossible.
The purpose of the oil pump pressure reducing valve is to control the oil pressure, weaken or increase it.
This is realized through two actions - opening the passage (to reduce pressure or prevent serious damage) or closing it (to ensure normal operation of the system).
The most common failures of the pressure reducing valve
As operating experience shows, a malfunction of the pressure reducing valve can manifest itself in the following:
1. Inability to maintain normal blood pressure. As a rule, this is caused by mechanical failures of the unit. The weakest element of the system is the spring.
During operation, it can stretch and open the valve even with a slight increase in pressure. As a result, oil does not reach many engine components, they wear out and fail.
The reasons for a spring malfunction are its wear due to long-term operation, installation of the wrong spring during a major overhaul (defective or excessively soft), and installation errors.
2. Problems with opening the valve when peak pressure is reached. During operation, the valve lumen may become clogged. As a result, the RKMN jams and does not open even at high pressure.
The result is the destruction of many important engine components and the need for major repairs. The main cause of the malfunction is untimely oil change.
It's easy to explain. Dirt particles are deposited on the surface and constantly increase the size of the growth. Poor flushing quality leads to the accumulation of various debris and chips in the channels.
Engine lubrication
To ensure the required oil pressure in the line and compensate for its consumption during engine wear, the oil pump has increased performance.
- The gear driven oil pump is mounted inside the oil pan. The pump is attached to the cylinder block using two bolts of different lengths. The drive gear of the product is fixedly fixed on the roller, on an axis fixedly installed in the pump body, the gear wheel rotates freely.
- Having passed through the filter mesh along the oil intake pipe, in the housing of which a pressure reducing valve is built-in, the oil is directed to the pump. The pressure reducing valve allows excess oil to pass into the oil receiver and prevents its pressure from increasing above the permissible level. An elastic spring ensures that the valve operates when the pressure increases.
- When the oil pressure drops below the permissible level, a warning light on the dashboard lights up.
- To clean the oil entering the engine, a non-separable, full-flow oil filter is installed, which must be replaced when changing the oil to ensure effective filtration.
When using a car, parts of any device gradually wear out. If it is noticed that the pump has begun to perform its functions incorrectly, the pressure differs from the nominal one: either increased or decreased at idle speed, it is necessary to replace the oil pump on the VAZ 2107.
Removing the oil pump
Advice: It is better when replacing the oil pump on a VAZ 2107 is done on an inspection pit or a lift.
- Replacing the oil pump on a VAZ 2107 begins with disconnecting the wire from the battery.
- Oil is drained from the engine crankcase.
Tip: To improve oil drainage, the engine must be warmed up well to operating temperature.
- The engine splash guard is removed.
- The nuts securing the engine front suspension cushions to the cross member are unscrewed. In order for the pillow pins to easily come out of the holes, the engine must be slightly raised using a jack or hoist.
- The engine crankcase of a VAZ 2107 is removed.
- The oil pump is removed.
Causes of malfunction of VAZ 2108/2109 oil pumps
Replacing the oil pump VAZ 2112 16 valves
Before deciding to repair or replace the oil pump, it is worth understanding the reasons that may indicate problems. By the way, problems are possible not only with the mechanism itself, but also with other elements of the lubrication system:
- decrease in pressure in the crankcase;
- problems with pressure sensors;
- use of low quality motor oil;
- using oil that is not suitable for this vehicle;
- problems with the lubrication or safety valve;
- oil filter clogged;
- contamination of the oil receiver or pump housing.
Contamination of the oil receiver leads to a decrease in pressure in the system and the light comes on.
The blockage may occur due to contamination of the engine crankcase itself. The problem is solved by removing and cleaning the pan. The operation of the oil pump can be disrupted by other problems that are identified during the diagnostic process. These include:
- gasket damage;
- unreliable filter fastening;
- high wear of mechanism parts;
- reduction valve failure.
The oil pump is a fairly reliable component with a long service life. Breakdowns usually occur due to improper repairs or poor quality lubricants.
Purpose and types of automobile oil pumps
The purpose of the oil pump is to create the necessary pressure in the engine lubrication system. Under high pressure, oil flows through special channels to all rubbing parts of the engine, intensively reducing their friction against each other, thereby preventing premature wear.
Oil pump for VAZ car, adjustable, with pressure reducing valve
Advantages of adjustable rotary oil pumps
Almost all modern VAZ cars (starting from VAZ 2114 and higher) are equipped with adjustable rotary-type oil pumps.
Main design elements of the VAZ adjustable rotary oil pump
Here are the main advantages of these devices:
- When using an adjustable oil pump, engine power increases by 30%. This occurs due to a decrease in the power factor taken from the motor by third-party devices;
- with an adjustable oil pump, the oil has to be changed less frequently, since the crankshaft speed decreases, which means the number of revolutions decreases;
- The adjustable oil pump practically does not foam the oil. The problem that is relevant for unregulated gear pumps has been successfully solved in rotary pumps.
Signs of a faulty water pump on a classic
The pump on a VAZ is a very important detail. It largely depends on it whether the car will heat up or not. Needless to say, element failure is an unpleasant thing, but it also has its advantage. Thus, a failing part always gives a sign to an experienced driver, who must be able to recognize the main signs of an impending breakdown.
First of all, let's look at the signs of deteriorating pump bearings. Albeit insignificant, but excessive play of the drive pulley is already a reason to think about it. Also, rustling, howling, roaring and other characteristic sounds of worn-out bearings should alert the driver.
Experienced motorists make an interesting comment on the sounds. The engine, they say, does not creak, but knocks or makes noise. On the contrary, everything that squeaks or creaks are characteristic signs of a generator, rollers or pump. A howl indicates that the timing belt or alternator belt is overtightened.
If you don’t pay attention to these signs, then after several tens of kilometers the car’s run, coolant may begin to leak, although this is not an axiom, because there are so many examples when there was no leakage when the pump completely collapsed. It is better to focus on noise: the grinding noise of bearings will only intensify over time, and it will be impossible not to notice it
As for leakage, it depends more on the quality of the seal. It is located in the pump and is designed to ensure tightness. Liquid can come out of the drain hole if it is provided on the pump (depending on the pump model - there are ones with or without holes). Over time, the leak will only get worse if replacement measures are not taken.
You can check the bearing visually:
- stick your hand in and grab the pump pulley;
- move it back and forth;
- if even a slight play is observed, this means that some wear of the bearings is present.
However, if there is no whistle and the play is very insignificant, then the pump will continue to run for some time. You can remove the alternator belt and check the pulley like this. This will allow you to better feel the free play.
Thus, as long as there is no specific grinding noise, and there is no critical release of antifreeze to the outside, you can drive. From the first sign of rustling or faint whistling to complete failure, it is possible to travel another 1000–6000 kilometers. Here, depending on your luck, there are no magic tips.
On the other hand, and this must be taken into account, the pump can fail much earlier, before reaching the grinding stage. Everything can happen quickly and unnoticed by the car owner, and you should not wait until the noise level increases to replace the pump.
It is important to understand that there is such a breakdown of the water pump that there will be no loss of antifreeze or noise at all. And the engine will boil
For example, this happens when a plastic impeller moves away from the shaft. In fact, the shaft is spinning as before, but the impeller is inactive and just dangles. At the same time, the stove will stop heating.
There is another option for the motor to overheat. The pump is in good condition, new. However, in hot weather or in difficult off-road driving conditions, in traffic jams at traffic lights, the fan often turns on and the engine begins to heat up. This happens due to a mismatch in the design features of the pump: for example, if an impeller of a smaller size than necessary is installed inside (on older models of the pump, the impeller is equipped with small blades that may not be able to cope with the cooling of a more powerful engine).
If the owner has a choice when purchasing a new pump, then it is better to give preference to models with a larger impeller.
Pump impellers: small (left) and large
A large gap between the impeller and the pump body can also cause insufficient antifreeze flow through the cooling system. The gap should be no more than 1.5 mm. This deficiency is especially pronounced at idle speed, in traffic jams.
The gap between the impeller and the pump housing should not exceed 1.5 mm
Original methods for diagnosing the operation of a pump were found in one automobile magazine.
- You need to take several clean sheets of white paper and lay them out under the car in the evening. In the morning, check the paper; if it is wet, with traces of greenish liquid, it means the pump is leaking.
- Turn on the interior heater at full power. If the arrows of the water temperature indicator shoot up sharply, stop the machine. Check by touch the condition of the cooling radiator after stopping the engine and the condition of the pump drive belt. If the elements are too hot, there is something wrong with the pump.
- Open the hood of the car. If there is a clear smell of coolant, this indicates a pump malfunction.
- The engine switches to idle mode. Then you need to pinch the upper pipe of the pump with your finger. If the pump is working, a slight push of liquid is felt.
Why do you need oil at all?
I often hear that oil is the lifeblood of the engine. This is not entirely true, of course, the comparison is very rough, but still, the engine will not function without oil (or it will, but not for a very long time).
Modern motor oils lubricate and protect all rubbing parts, and these are pistons (with their rings), shafts, bearings, etc. Let's just say that good oil extends the life of the engine by many thousands of kilometers.
BUT oil must flow through the system, just like blood itself through human vessels, if the oil is simply poured in a pan and does not go to the rubbing parts - IT IS USELESS!
This is interesting: How to unscrew the crankshaft pulley bolt - not a complicated procedure at all
Oil pump structure
The operation of the engine oil pump is ensured by a rotating shaft.
The shaft itself, through a gear transmission, can be connected to one of the main shafts of the engine - the crankshaft, the camshaft of the gas distribution mechanism, or the additional drive shaft used recently. In many ways, technical improvements in oil pumps today are limited to changing the shape and number of gear teeth, but the principle inherent in the gear pump remains virtually unchanged. This approach is generally justified due to its low cost and ease of production of such equipment. Conveyor assembly of motors using robotics makes it possible to continue using this pump design option.
Despite its small dimensions, the oil pump is still one of the main consumers of engine energy; it is estimated that when operating during starting and the first minutes of warming up the engine, it consumes up to 8% of the engine power, which is why it is important to warm up the engine before driving. The pump located at the bottom of the engine housing does not have a separate housing in most car models.
The drive shaft, the shaft on which the driven gear is mounted, and the working gears themselves are located in one of the chambers located in the cylinder block body itself. The rationality of this placement is due to the need to minimize the size of the engine and the possibility of operating the pump directly in the oil bath of the engine sump
The pump located at the bottom of the engine housing does not have a separate housing in most car models. The drive shaft, the shaft on which the driven gear is mounted, and the working gears themselves are located in one of the chambers located in the cylinder block body itself. The rationality of this placement is due to the need to minimize the size of the engine and the possibility of operating the pump directly in the oil bath of the engine sump.
Running the engine at high speeds provides more oil pressure to the system by increasing gear speeds. On a cold engine, until the oil has warmed up to operating temperature, the process of pumping oil is somewhat difficult, which is why the power of the engine itself in the first moments after starting is somewhat lower than that during operation of a warmed-up unit. The performance of the pump is also affected by the quality of the oil. With fresh lubricant after replacement, the pump performance is higher than with oil that has served even half its service life. This is due to the fact that the pump pumps lubricant that has not been cleaned by the filter, which contains a large amount of sediment in the form of fuel combustion products and the oil itself when lubricating the surface of the cylinder and piston.
In the design of oil pumps of modern internal combustion engines, an additional pressure reducing valve is installed to prevent premature failure. And although it is not installed directly into the chamber with gears, when there is an uncontrolled increase in pressure in the system, it operates as a safety valve, bleeding the oil back into the sump. Along with these two gear pumps, other models of equipment for increasing oil pressure are used in internal combustion engines:
- Rotor type models with a leading and driven rotor;
- Pumps with pendulum spool valves;
- Vane types of pumps.
On a hot engine
As the oil temperature drops, its viscosity rises. This is good for efficient pump operation. To obtain adequate measurement results, it is best to measure pressure on a warm engine. Since the oil heats up much more slowly than the coolant, the engine is allowed to run a little longer after reaching operating temperatures.
In the lubrication system of a working engine with a working pump, the pressure should be in the range of 3.5-4.5 kgf per square centimeter at a crankshaft speed of 5600. If the measurement values differ from the nominal value, then the engine will experience a lack of lubrication in some modes.
Symptoms of a faulty oil pump
The main signs of problems in the lubrication system are sounds uncharacteristic of engine operation and the oil pressure light coming on. In this situation, you should stop, turn off the car and after a while check the oil level in the engine with a dipstick (you need to wait a little until the oil drains into the sump). If the level is below the minimum, add oil and check the level again (it should be between the min and max marks). If the light goes out when starting the engine, the reason it came on was precisely the low oil level.
A burning oil pressure light indicates a problem with the lubrication system.
If, after adding oil, the extraneous sounds do not disappear and the light continues to light, you should not continue driving. Most likely, there is a problem with the oil pump and will require replacement or repair. You can get to the garage or car service using a tow truck or tow. However, the light may also be on due to a failure of the oil pressure sensor. Therefore, until an accurate diagnosis is made, you should not rush to repair the oil pump and start disassembling the engine.
Causes of a drop in oil pressure - how to eliminate them
- Oil pump malfunction. It manifests itself as a mechanical component, such as jamming or breakage of individual elements or its clogging. The fact is that such a pump has very thin tubes for oil circulation, which can easily become clogged due to small foreign particles.
- Violation of the tightness of the system is the most “capricious” malfunction, which is quite difficult to identify, but possible. First of all, this concerns the oil seal, which suddenly began to leak and leak a certain amount of oil out. As the oil level drops, the pressure created inside also decreases. The most visible malfunction associated with low pressure is a broken engine sump, which happens when driving carelessly on “bad” roads.
Be that as it may, the problem needs to be solved. Therefore, depending on the reason, we will try to tell you what to do if the pressure is low.
So, you saw a red light on the instrument panel. First of all, you need to check the oil level. To do this, open the hood and pull out the oil dipstick. If the level is normal, then measure the oil pressure using the methods mentioned above. If the pressure is normal, then the fault lies in the sensor, which simply shorted. Replace the sensor and check everything again. In most cases, the malfunction disappears. However, if the pressure is reduced, then it is time to remove the oil pump, clean it or repair it.
If the oil level has dropped, check the engine for leaks. If the pan is broken, it needs to be replaced. Change the gasket along with it. However, under no circumstances should the engine be started in this condition until the work is completed.
Leaks can also come from the seals
For example, it is worth paying attention to the condition of the crankshaft oil seals. If they are worn, you will see corresponding traces of oil in place from the installation
Just change the seals and pour new oil into the engine.
The last reason is oil consumption. This happens when the cylinders and oil rings are faulty. In this case, you will find an engine repair that is not the most pleasant, but worth it. As a temporary measure, move the breather down and constantly monitor the oil level.
That's all that can be done for the engine if the oil pressure suddenly drops. As you can see, the problem is not that complicated.
What value should it be?
To begin with, it is worth noting that pressure is measured in bars (BAR), because we are measuring liquid. It’s unlikely that anyone will tell you the exact values now, because the structures of the engines are different, but there is a certain normal interval.
AT idle speed it is 2 BAR (or 0.2 MPa), for most cars
At 4000 - 5000 rpm - this is 4.5 - 6.5 BAR (0.45 - 0.65 MPa), also for most brands
If we take our VAZ 2112 16 valve version, then the pressure at idle is slightly higher, about 1.5 - 2.5 BAR. But at 4000 - 5000 rpm 0.4 - 0.6 BAR.
Actually, I’ll end here, I think the information was useful, read our AUTOBLOG.
(4 votes, average: 2.75 out of 5)
Similar news
Why do you close the radiator in winter? Let's say with cardboard, the necessary knowledge
Mileage 100,000-150,000 km. Is it a lot or a little, what needs to be changed? Ra.
OTTO cycle. ATKINSON. MILLER. What is it, what are the differences in ra.
Comments
Good day everyone, I decided to write my review of the 2010 Toyota Avensis. Just want…
TOP articles for the month
I have many different articles and videos on various gearboxes, for example here...
I already have an article on the website about choosing memory cards (you can see it here), it’s very...
In the article - is it possible to open windows when the air conditioner is running (you can read it here), I was asked...
Cold engine measurements
In order to measure the pressure, before starting the engine, you need to make sure that the oil temperature is equal to the ambient temperature. The emergency sensor in the VAZ is configured to trigger at a pressure of 0.33 kgf per square centimeter. If the measurement result turns out to be like this, then it is necessary to dismantle the pump and troubleshoot it. With a gradual increase in the crankshaft speed, the pressure should increase to 4.5 kgf per square centimeter. The pressure relief valve should work, so the pressure will not increase further.
Oil pump
On VAZ 2106 cars, a gear pump is installed, on the cover of which there is already an oil receiver and a pressure-reducing valve mechanism. The housing design is a cylinder with gears installed on it. One of them is leading (main), the other moves due to inertial forces and is called driven.
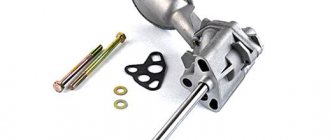
The design of the pump itself is a series connection of a number of units:
- metal case;
- oil receiver (the part through which oil enters the pump);
- two gears (driver and driven);
- pressure reducing valve;
- stuffing box;
- various gaskets.
The design of the oil pump allows it to be considered one of the most reliable and durable mechanisms in a car.
The only function of the oil pump is to supply oil to all engine components. We can say that both the functioning of the motor and its service life depend on the performance of the pump.
Therefore, it is important to monitor what kind of oil is poured into the engine and in what mode the oil pump operates
Principle of operation
On the “six” the oil pump is started using a chain drive. This is a rather complex starting system, and therefore repairing and replacing the pump can cause some difficulties.
The operating principle is based on the following stages of pump startup:
- After turning on the ignition, the first gear of the pump starts.
- From its rotation, the second (driven) gear begins to rotate.
- As the gear blades rotate, they begin to draw oil through the pressure reducing valve into the pump housing.
- By inertia, the oil leaves the pump and enters the engine through the lines under the required pressure.
One gear pushes the other, causing oil to circulate through the lubrication system.
Thus, oil circulation is carried out through two rotating gears
In this case, it is very important that the entire pump device is completely sealed, since the slightest oil leak can significantly reduce the operating pressure in the system and deteriorate the quality of engine lubrication
Bypass (reducing) valve
The drive and driven gears rarely break because they have a simple design. In addition to oil seals and gaskets, there is another component in the pump design that can fail, which will have disastrous consequences for the engine.
The pressure reduction (bypass) valve on the VAZ 2106 is responsible for controlling the oil pressure in the system. If necessary, it is this valve that can reduce or increase the pressure so that it corresponds to the norm.
Increasing or reducing the existing pressure is carried out by simple actions: either the valve closes or opens. Closing or opening of the valve is possible due to the bolt, which presses on the spring, which, in turn, closes the valve or opens it (if there is no pressure from the bolt).
The bypass valve mechanism consists of four parts:
- small body;
- a valve in the form of a ball (this ball closes the passage for oil supply, if necessary);
- spring;
- stop bolt.
On the VAZ 2106, the bypass valve is mounted directly on the oil pump housing.
The pressure reducing valve mechanism controls the required level of pressure in the system
How to measure correctly?
How to check the engine oil pump? The technology is the same for all motors. But, if you lack some equipment for the service station, then it is better to buy it in advance. There is a slight difference only in the values of the threshold pressure level - it is different for different engines. You can find out about the minimum permissible pressure and its level for the valve to operate in the instructions for the car.
Using a classic VAZ as an example, we will look at how to check whether the oil pump is working. Measurements should be made in two modes - on a cold and hot engine.
How to remove and install the oil pump on a VAZ 2113, 2114, 2115
To perform work on removing the oil pump you will need: calipers, micrometer, metal ruler.
Removing the oil pump
- First of all, remove the crankshaft timing belt.
- We remove the oil intake.
- Using a 10mm socket wrench, unscrew the 6 bolts securing the oil pump to the cylinder block.
- Remove the oil pump.
Disassembling the oil pump
- Using a 5mm hex wrench, unscrew the oil pump cover.
- Remove the pump cover.
- We take the drive gear out of the cover.
- We take the driven gear out of the housing.
- We wash all the parts of the oil pump clean with diesel fuel or kerosene. We wipe the parts and lubricate them with engine oil.
Checking the oil pump
- We carefully inspect all the parts of the oil pump. They should not have cracks, chips, metal envelopment or severe wear.
- Using a caliper, check the diameter of the driven gear seat in the pump housing. We check the thickness of the partition between the drive and driven gears. In this case, the diameter of the seat should not exceed 75.1 mm. And the thickness of the partition should not be less than 3.4 mm.
- Then use a micrometer to measure the thickness of the drive and driven gears. The thickness of the driven gear must be at least 7.35mm, and the thickness of the drive gear - 7.41mm. If the thickness is less, then the gears must be replaced.
- We place the drive gear in the pump housing. We apply a bench ruler with its edge to the mating surface of the oil pump and use a set of flat feeler gauges to check the thickness of the gap. We measure the driven gear in the same way. If the gap between the ruler and the drive gear is more than 0.12mm (for the driven gear it is more than 0.15mm), then the gears must be replaced.
Oil pump installation
- We assemble the pump in reverse order. When assembling, you need to install the driven gear with the side with the chamfers and the mark facing the pump housing. We also install the drive gear with a mark and chamfers on the teeth towards the pump housing.
- Reinstall the pump in reverse order. During installation, you need to replace the gasket between the pump and the cylinder block.
Purpose of valve stem seals and their replacement
To prevent engine oil from entering the combustion chamber through the valve holes of the engine head, the design includes valve stem seals consisting of rubber and a spring.
Like all rubber products, over time they lose their physical qualities and become hard. They need to be changed. In addition, many owners of the “six” replace the rubber valve stem seals with imported ones made of rubber. Replacing valve stem seals on a VAZ 2106 will not cause much trouble for car owners who own plumbing tools. If you are the owner of a “six” and are repairing it, then you should have:
- flat screwdriver;
- a tool used to compress a spring;
- mandrel for installing caps.
- pliers.
- soft metal wire.
Having prepared the tools and new seal kits, you can begin the process of replacing old parts with new ones.
- Remove the cover from the block head by unscrewing the nuts.
- Rotate the crankshaft until the marks on the camshaft drive sprocket and the cover align.
- Remove the camshaft bearing housing and be sure to secure the sprocket and chain.
- Remove the pastel of the camshaft bearings, fix the sprocket and chain so that they do not fall down, otherwise it will be very difficult to get them out.
- Unscrew the spark plug, remove the spring, move the lever to the side.
- The adjusting bolt fastener must be loosened and a puller installed to work on compressing the spring.
- Insert a tin rod into the spark plug hole to hold the valve.
- Using a tool to compress the spring, bring it to a position where the crimp elements are released.
- Remove the springs, disc elements, washers.
Next, to install new parts, proceed in this order.
| Stages of work | Actions |
| Reinstall the first oil seal. | To do this, place the clamp on the valve and remove the old oil seal, tapping lightly with a plumber's hammer. |
| Lubricate the new cap with engine oil. | Install it in place using a mandrel. |
| Replace the seals on the remaining valves. | This is done in the same way: by scrolling the crankshaft to bring out the second and third cylinders. |
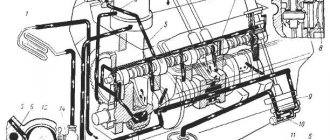
The VAZ 2106 engine lubrication system has a combined structure. Under pressure, the camshaft supports and cams, roller bearings, oil pump drive gear and ignition distributor, and bearings are lubricated. The oil flowing from the gaps lubricates the cylinder walls, piston-type elements, camshaft drive chain, valve stems in their guide bushings, and valve drive lever supports.
DIY oil pump repair
The oil pump is considered a mechanism that can be repaired even by an inexperienced driver. It's all about the simplicity of the design and the minimum number of components. To repair the pump you will need:
- open-end wrenches "10" - 2 pcs.;
- ruler - 1 pc.;
- probes - set;
- vice.
To repair the oil pump, you need to remove it from the car and disassemble it. It is best to disassemble the part in order:
- Disconnect the oil supply pipe from the pump housing.
- Remove the three mounting bolts.
- Disconnect the pressure reducing valve.
- Remove the spring from the valve.
- Remove the cover from the pump.
- Remove the main gear and shaft from the housing.
- Next, remove the second gear.
Photo: main stages of repair work
At this point, disassembling the oil pump is considered complete. All seized parts must be washed in gasoline (kerosene or ordinary solvent), dried and inspected. If a part has a crack or signs of wear, it must be replaced.
The next stage of repair work is to adjust the gaps:
- between the axle and the second gear the gap should be no more than 0.1 mm (measure with a ruler), if the gap is larger, then the second gear must be replaced;
- between the teeth of two gears there should be no more than 0.25 mm;
- the gap between the top of the gears and the cover is no more than 0.2 mm;
- the gap between the pump casing and the outer part of any gear is no more than 0.25 mm.
After checking the parameters, you can proceed to the final stage of repair - checking the spring on the valve. You need to measure the length of the spring in the free position - it should be no more than 3.8 cm in length. If the spring is very worn, it is recommended to replace it.
Video: how to measure gaps correctly
After replacing all worn elements, the oil pump must be reassembled in the reverse order.
Location of the oil pump in VAZ cars
The oil pump in VAZ cars is part of the engine, so you won’t be able to see it just by opening the hood. To get to the oil pump, you need to place the car on an inspection hole, remove the crankcase protection from it, and then remove the pan.
To get to the oil pump, you will have to remove the pan and crankcase from the VAZ car
Overhaul of VAZ 2107
In some cases, major repairs of the VAZ 2107 power unit can be partially carried out without dismantling it. Before starting work, thoroughly rinse the engine and engine compartment with running water and dry. Without removing the motor you can replace:
- crankcase seal;
- cuffs of both collectors;
- crankshaft oil seals;
- pump;
- generator;
- gasoline pump;
- carburetor.
The cylinder head is also easily removed from the engine without dismantling.
A major overhaul involves the restoration of engine elements, as a result of which the technical parameters will correspond to the parameters of the new engine. For this:
- the entire piston group is changed;
- cylinders are bored;
- the crankshaft is ground;
- liners are changed.
I remember how I got into the first major engine overhaul due to my own stupidity. I went out onto the field. There was a ravine ahead, so I drove in my “seven”. I couldn’t go further up the hill, and I couldn’t go back either. Basically, the car is stuck and skidding. Then an acquaintance came up, he was collecting something there - flowers or plants of some kind. He says: “You’re doing it wrong, you need to give it back, and then sharply forward. Let me sit down, and you push me when he moves forward.” Well, I agreed like a fool. The car skidded for about half an hour, no use. I called a tractor, which I wanted to do before. They pulled out the car. I sat down and drove back home. A few meters later the check flashed. It turns out, as I later found out, all the oil leaked while the car was slipping. It’s good that the tractor didn’t go far. I had to take the car for a major overhaul, replacing the piston and boring the shaft.
The need for major repairs is determined by the condition of the cylinder block and piston group. If most of the elements are well preserved, you can limit yourself to replacing individual parts. If even slight block wear is detected, cylinder honing will be required.
Sometimes VAZ 2107 owners buy a repair kit, which includes a reground crankshaft and a piston set. It is also recommended to purchase an incomplete cylinder block for major repairs. Since in this case the gaps are not misaligned, replacing the block will be quite simple. However, most often you have to buy a complete cylinder block, including an oil pump, pan, cylinder head, etc.
It is recommended to disassemble the internal combustion engine on a professional stand, after first removing the flywheel and clutch assembly. If there is no such stand, the dismantled engine is firmly fixed and only then its repair begins.
Typically, a major overhaul of a VAZ-2107 engine involves:
- disassembling the cylinder head, followed by cleaning and checking;
- inspection of rocker arms and valves;
- valve repair or grinding;
- dismantling pistons and connecting rods;
- dismantling the crankshaft;
- checking the condition of the cylinder block and cleaning it;
- checking the camshaft;
- inspection of bearings and checking them for play;
- removal and installation of rings;
- checking clearances;
- inspection of seals and their replacement.
Thus, almost any repair of the VAZ-2107 can be carried out independently. To do this, you need to have certain skills and a set of repair tools, as well as follow step-by-step instructions from specialists.
Checking pressure with a pressure gauge
Screwing in a mechanical pressure gauge instead of the oil pressure sensor is the only reliable way to check the oil pump without removing it from the engine. You can buy a ready-made kit for measuring pressure in the oil system or assemble the device yourself. For this you will need:
- liquid mechanical pressure gauge. The device can be easily found in almost every auto parts store for domestic equipment and tractors. Any industrial pressure gauge with an adequate measuring scale will also work;
- an adapter that will be screwed in instead of the standard oil pressure sensor. The mating part must have a fitting for a hose or a thread with a landing cone for screwing in a flexible tube. Any turner can turn such an adapter. You will need to measure the diameter of the mounting hole, the thread pitch and make a sketch of the adapter. An alternative option is to bring a standard oil pressure sensor to a turner so that he can make an adapter in its likeness. Some drivers, in order to check the oil pump, drill out the insides of the old oil pressure sensor and use improvised means to make an adapter from it. It is much easier in this regard for owners of VAZ cars, for which ready-made tees are available for sale. You can simultaneously screw in both a standard pressure sensor and a mechanical pressure gauge;
- a piece of hose that will connect the pressure gauge and adapter.
Measuring technique
The method for checking oil pressure will be identical for all cars. The only difference is the threshold minimum value, upon reaching which the low oil pressure warning lamp lights up on the dashboard. Information about the response threshold of the pressure relief valve and the minimum operating pressure in the engine lubrication system can be found in the repair and maintenance manual for your vehicle. The data below is relevant for VAZ classic models (2101, 2102, 2103, 2104, 2105, 2106, 2107).
- Cold pressure. Before starting, the engine and oil in the sump must cool to ambient temperature. The response threshold of the emergency oil pressure sensor is 0.33 kgf/cm2. With this value, the engine must be turned off and disassembled to troubleshoot the oil pump. When the speed increases, the pressure gauge needle should rise to 4.5 kgf/cm2. At this pressure, a serviceable pressure relief valve is activated, so no further increase should occur.
- Measurements on a warm engine. As the oil temperature decreases, its viscosity increases, which has a positive effect on the performance of the oil pump. Therefore, it is best to check the oil pump when it is hot. Since the oil warms up more slowly than antifreeze, let the engine run for another 5 minutes after the coolant temperature gauge shows 90°C.
You should not rely on the standard pressure indicators of VAZ and UAZ cars. In 90 out of 100 cases they show anything but the actual oil pressure in the engine.
Alarm indication
Of course, now in almost all cars there is an emergency indication for a complete lack of pressure, this is known to us all - a “burning oil can”. If it doesn’t go out for some time after starting, for example 10 – 20 seconds is one thing, it’s almost always the oil filter’s fault . But if the lamp is constantly on, then this is already an alarm bell. Perhaps the oil pressure sensor has simply failed, or perhaps the oil pump has failed.
In any case, the emergency indication is very important, and I do not advise you to joke with it; nevertheless, this is fraught with a major engine overhaul .
Remember this rule, if the lamp comes on, then turn off the car and preferably immediately to a service station, either a tow truck, or in tow.
Troubleshooting
Direct connection of the pump to the crankshaft avoids damage associated with its drive. This, however, does not exclude the possibility of other malfunctions.
Pump malfunctions and their symptoms
The main malfunctions of the VAZ 2110–12 oil pump include:
- clogging of the oil receiver mesh;
- damage to the device body;
- wear of gear seats in the housing and cover;
- wear of the drive or driven gear;
- damage to the pressure reducing valve;
- deformation or damage to the valve spring.
A constantly burning warning light in the form of an oil can indicates a drop in pressure in the lubrication system to a critical level
Signs of oil pump failure may include:
- critical oil pressure warning light on the dashboard;
- engine overheating;
- high-frequency knocking (clattering) at the pump location.
The design of the VAZ 2110–12 engine does not provide for the installation of an oil pressure sensor. Like most modern cars, representatives of the tenth family are equipped only with an emergency (critically low) pressure sensor. When the pressure in the system drops, a warning light in the form of a red oil can lights up on the instrument panel. However, this lamp can also light up in the event of other malfunctions (failure of the sensor, break in its electrical circuit, oil leak, etc.).
Engine overheating also cannot be attributed only to symptoms of a faulty oil pump. It usually occurs due to problems in the cooling system.
As for the knocking coming from the oil pump, not everything is clear here either. Sometimes, when gears or housing elements wear out, the device may produce a high-frequency knocking sound. As a rule, it is associated with the formation of play between the gears and the housing (cover) and is most clearly audible at idle. However, similar sounds can also be produced by worn bearings (tension or guide rollers, pumps, crankshafts).
Methods for eliminating the reasons that caused the pressure control light to turn on
If the control light comes on, do not panic. You need to stop the car and perform diagnostic measures:
- Check the amount of engine oil using a special oil dipstick.
- If necessary, add lubricant to the required level.
- Start the engine.
- When the red light turns off, continue driving.
- If the light continues to glow, you must ensure that no fuel or lubricant gets into the engine sump.
This problem occurs when cracks occur in the pan, increased clearance in the cylinder walls, or piston wear. The problem can only be resolved after complete disassembly of the engine and major overhaul.
If the sensor breaks down and there is no pressure measuring device, then you can check the oil pressure in the following way:
- remove the terminals from the sensor;
- unscrew and dismantle the sensor;
- pull out the wire from the ignition;
- ask an assistant to turn on the starter so that the crankshaft starts working;
- if oil begins to flow out of the hole where the sensor was located, the pressure is normal;
The pressure is normal, but the light blinks, which means the sensor itself is broken. In a clogged oil filter, the bypass valve opens, causing the indicator light to light up. To eliminate the problem, it is enough to change the engine oil.
If a decrease in oil pressure is caused by a malfunction in the oil pump or as a result of the oil receiver screen being dirty and clogged, do the following:
- Clean and adjust the pressure relief valve.
- Remove the oil pan.
- Wash the contaminated oil receiver screen.
A major overhaul of the power unit, grinding the crankshaft, and installing special bearings are necessary when the main bearings are worn out. With such defects, the indicator light also lights up, and the lubrication system has pressure equal to zero.
Experienced car enthusiasts are advised to look at the instrument panel while moving the vehicle and monitor the indicators and lights that come on. This is the only way to protect your car from expensive major repairs and protect your health.
The serviceability of the oil pump directly determines how long the car will run before the next engine overhaul. To protect the engine from complete destruction, it is important to understand the main signs of a malfunction, as well as know how to check the oil pump and what pressure should be in the lubrication system.
Malfunctions in the operation of the pressure reducing valve
The structure of the pressure reducing valve is quite simple, which ensures its reliability and reduces the likelihood of breakdown. However, sometimes this still happens. Most often this is due to wear and tear of the mechanism, so do not forget to regularly diagnose all components of the car, as well as promptly replace outdated parts.
There are two main types of mechanism failure.
- The valve creates insufficient pressure. Usually the cause of this problem lies in the spring. With prolonged use, it becomes less elastic and stretches. As a result, the valve remains slightly open all the time. Due to this, the pressure decreases, and the oil does not reach some engine components. Sometimes it happens that unprofessional craftsmen install a spring with insufficient elasticity during repairs. This has the same effect.
- Excessive pressure builds up in the valve. As a rule, the cause of this breakdown is the entry of debris into the mechanism or the use of old viscous oil.